
Popular categories
Looking for a yarn?


Comments / Questions (23)
![]() Kimberley wrote:
Kimberley wrote:
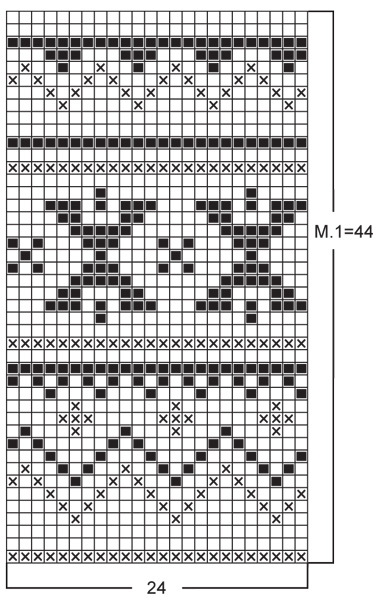
Er staat "alle naalden van het patroon zijn weergegeven op de goede kant en het patroon wordt helemaal in tricotsteek gebreid", betekend dit dat de averechte naalden niet in het telpatroon staan? Moeten de averechte naalden gebreid worden met de kleur die er op dat moment op de naald staat? Of moet ik het nog anders interpreteren?
04.11.2025 - 16:08DROPS Design answered:
Dag Kimberley,
In de telpatronen zijn alle naalden weergegeven, dus zowel de naalden aan de goede kant als aan de verkeerde kant. Aan de goede kant lees je het telpatroon van rechts naar links en je begint onderaan. De volgende naald aan de verkeerde kant lees je het telpatroon van links naar rechts, enzovoort.
10.12.2025 - 19:39
![]() Lyndsay wrote:
Lyndsay wrote:
Thanks so much for your help - maybe the button band purpose didn't translate over to the English version? I don't see it there, but now I get it - thanks.
13.10.2025 - 20:43
![]() Lyndsay wrote:
Lyndsay wrote:
“Pick up 300-400 sts with natural Alpaca on smaller needles on outer edge of button band. Knit 4 rows stockinette st, bind off. Sew bound-off edge to button band, inside 1 st.” What is this for? Is it backing for the button band? Again, the number of picked up stitches is not specified. How many for XXL? Please can you direct me to relevant photos/video of the finished button band? There are no visible details in the pattern.
08.10.2025 - 02:17DROPS Design answered:
Dear Lyndsay, as explained in the pattern, the lining is: To cover the pick-up edge on inside of band. You pick up the number of stitches that better fits for your row gauge, on the outer edge of the button band. You knit 4 rows in stocking stitch and bind off. Fasten lining neatly inside 1 st on body. Happy knitting!
12.10.2025 - 21:42
![]() Lyndsau wrote:
Lyndsau wrote:
The finishing instructions are super-confusing. “Button band: Pick up 209-319 sts (divisible by 5 + 4)” Why is this not specified? How many stitches to pick up for XXL? “When edge measures 6-7-7-7-7 cm, inc (as seen from the wrong side) all P 3 to P 4 over the center 38 sts (back neck)” What does this mean? Increase each 3 purls to 4 purls? If so what method of increase and into the 1st, 2nd or 3rd stitch?
08.10.2025 - 02:16DROPS Design answered:
Dear Lyndsau, the number of stitches should be divisible by 5+4, but we leave the number open so that each can choose the number of stitches that better fits according to your row gauge, which may differ from that of the pattern. The larger the size worked, the closer the number should be to 319 sts (in fact, you can use 319 sts if you wish). As for your second question, you will work the rib (k3, p3). So now you will increase on purl sections of the rib (for example, knit 3, make 1 yarn over, purl 3) so that the rib becomes [knit 3, purl 4] in the next row. It doesn't matter in which of the purl stitches you work the increase, as long as it's in the purl stitches. Happy knitting!
12.10.2025 - 21:31
![]() Lyndsay wrote:
Lyndsay wrote:
How many stitches should be on the needle when all of the deceases for the top of the sleeve are complete (= bound of stitches)?
08.10.2025 - 00:41DROPS Design answered:
Hi Lyndsay, Depending on the size you are working, there should be (21) 24-26-26-28 shoulder-stitches left when you bind off. Regards, Drops Team.
08.10.2025 - 06:40
![]() Adri wrote:
Adri wrote:
I want to knit the button band seperately in 2 pieces. How many stitches should I have for each side in XXL. Thank you
05.07.2025 - 03:02DROPS Design answered:
Dear Adri, you should have approx. half, but maybe not exactly; pick up stitches along the first front piece up to exactly the mid-back and then pick up the same amount on the other side. Happy knitting!
06.07.2025 - 22:54
![]() Loelia wrote:
Loelia wrote:
Good morning, would it be possible to know how much yarn is needed for just the shawl collar as I would like to make this in a contrasting colour. By collar I mean the rib all the way from the bottom front up and round the neck and back down the other side (not just the rib at the neckline). Many thanks.
09.07.2024 - 10:46DROPS Design answered:
Dear Loelia, please understand that a) this pattern was designed many years ago, b) we have thousands of patterns available on our site, thus we are sorry, but we cannot modify them to each individual request, like redesigning and recalculating the collar). Happy Knitting!
09.07.2024 - 14:32
![]() Amanda Karlsson wrote:
Amanda Karlsson wrote:
Does the pattern continue after I have separated the fronts from the back?
18.01.2023 - 11:35DROPS Design answered:
Dear Mrs Karlsson, yes, if the diagram M.1 is not done when you divide piece, continue the pattern on each front pieces/back piece - making sure to line it up over the first part before dividing. Happy knitting!
18.01.2023 - 16:59
![]() Joan Høst wrote:
Joan Høst wrote:
Hvad er en ærmepind. Skal/kan man strikke ærmerne på rundpind?
03.01.2023 - 14:09DROPS Design answered:
Hej Joan, det er samme som strømpepinde, du kan vælge at strikke på strømpepinde eller lille rundpind :)
05.01.2023 - 10:35
![]() Joan Høst wrote:
Joan Høst wrote:
Man skal på ryg og forstykke starte med at tage ud når arbejdet måler 6 cm (str. XL) Når I skriver arbejdet er det så hele arbejdet eller er det efter ribben? Når jeg har strikket ribben og 2 p retstrik måler arbejdet allerede 7 cm
10.11.2022 - 19:41DROPS Design answered:
Hej Joan, det er hele arbejdet (incl ribben), se også måleskitsen nederst i opskriften :)
11.11.2022 - 14:58
|
||||||||||
Winter Lodge |
||||||||||
 |
 |
|||||||||
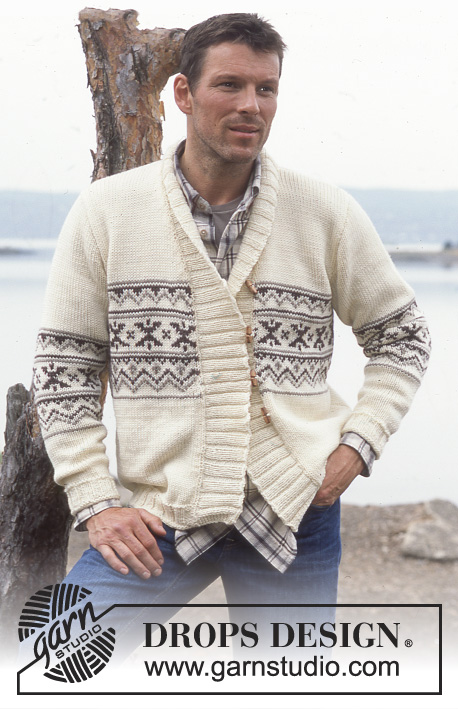
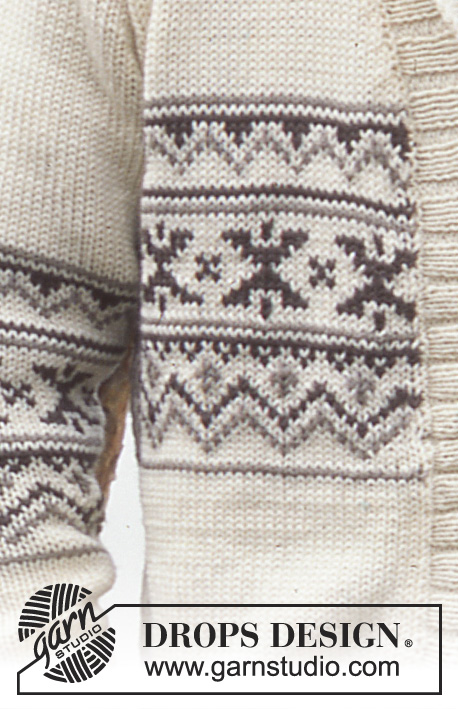
Knitted jacket for men, with shawl collar and Nordic pattern in DROPS Alaska
DROPS 85-15 |
||||||||||
|
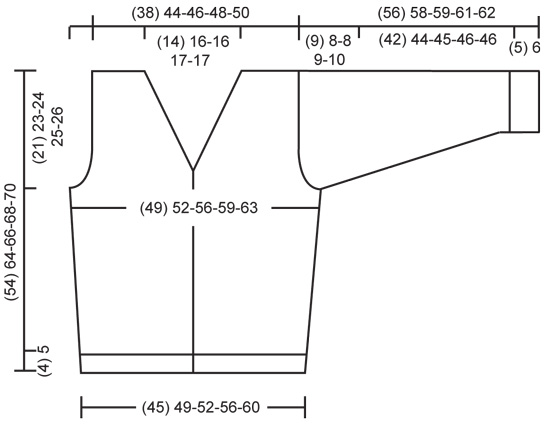
Gauge: 17 sts x 22 rows on larger needles in stockinette st = 10 x 10 cm. Rib: *K 3, P 2*, repeat from *-*. Pattern: See the chart. The pattern is seen from the right side and is knit entirely in stockinette st. Body: Cast on 155-170-180-190-210 sts on mid-size circular needles with natural Alaska. Knit 2 rows garter st, then knit rib as follows (seen from the right side): K 1 (edge st knit in garter st), *K 3, P 2*, repeat *-*, finish with K 3 and K 1 (edge st knit in garter st). When the rib measures 4-5-5-5-5 cm change to larger circular needles and knit 2 rows garter st, adjusting (dec/inc) to 155-167-179-191-207 sts on the 1st row. Then knit stockinette st, keeping 1 edge st at each side (center front) in garter st. Put markers in work 39-42-45-48-52 sts in from each side = 77-83-89-95-103 sts between markers for back. When the piece measures 5-6-6-6-10 cm inc 1 st each side of markers at each side every 3.5-7-7-8-10 cm a total of 3-3-3-3-2 times = 167-179-191-203-215 sts. When the piece measures 13-21-22-23-24 cm knit Pattern 1, keeping 1 edge st at each side (center front) in garter st. When the piece measures 33-41-42-43-44 cm knit the next row as follows (right side row): 39-42-45-48-51 sts (= right front), bind off 6 sts for armhole, 77-83-89-95-101 sts (= back), bind off 6 sts for armhole, 39-42-45-48-51 sts (= left front). Knit each piece separately. Left front: = 39-42-45-48-51 sts. Bind off for armhole at the side every other row: 2 sts 1-1-1-2-2 times and 1 st 4-2-3-3-4 times. At the same time when the piece measures 36-43-44-45-47 cm dec 1 st for the neck every other row: 12-14-14-15-15 times = 21-24-26-26-28 sts remain on shoulder. Bind off the remaining sts when the piece measures 54-64-66-68-70 cm. Right front: = 39-42-45-48-51 sts. Knit the same as left front, reversing all shaping. Back: = 77-83-89-95-101 sts. Bind off for armhole at side as on front = 65-75-79-81-85 sts remain on needles. When the piece measures 52-62-64-66-68 cm bind off the center 19-23-23-25-25 sts for the neck. Dec 1 st at each neck edge every other row 2 times = 21-24-26-26-28 sts remain on each shoulder. Bind off the remaining sts when the piece measures 54-64-66-68-70 cm. Sleeve: Cast on 40-40-45-45-45 sts on mid-size double-pointed needles with natural Alaska; join and place a marker at the join. Knit 2 rows garter st, then knit rib until the piece measures 5-6-6-6-6 cm. Change to larger double-pointed needles and knit 2 rows garter st, adjusting (inc/dec) to 38-40-43-43-43 sts on 1st row. Then knit stockinette st. When the piece measures 10-8-8-12-11 cm inc 1 st each side of marker every 2.5-2.5-2.5-2-2 cm a total of 14-17-17-18-20 times = 66-74-77-79-83 sts. At the same time, when the piece measures 17-18-18-19-19 cm, knit Pattern 1 (knit the increased sts in the pattern as you go along). When the piece measures 47-50-50-51-51 cm bind off 3 sts each side of marker. Then bind off for sleeve cap at each side every other row: 3 sts 2 times, 2 sts 2-2-2-3-4 times, 1 st 2-1-1-1-1 times, then 2 sts at each side until the piece measures 55-57-58-60-61 cm, and then bind off 3 sts at each side 1 time. Bind off remaining sts, the piece measures approx. 56-58-59-61-62 cm. Assembly: Sew shoulder seams. Buttonband: Pick up 209-319 sts (divisible by 5 + 4) along right front, back of the neck and then along left front on mid-size circular needles with natural Alaska. K 1 row from wrong side and K 1 row from right side. Then knit rib, keeping 3 sts in garter st at each side and begin rib with K 3 (as seen from the right side). When edge measures 6-7-7-7-7 cm, inc (as seen from the wrong side) all P 3 to P 4 over the center 38 sts (back neck). When edge measures 8-9-9-9-9 cm bind off in rib. Pick up 300-400 sts with natural Alpaca on smaller needles on outer edge of buttonband. Knit 4 rows stockinette st, bind off. Sew bound-off edge to buttonband, inside 1 st. Loops Crochet 4 buttonhole loops along right front with natural Alaska. 1 loop = 1 sc in outermost st on buttonband, ch 7, skip over 1 st, 1 sc. Start the top loop at beginning of neckband, then crochet loops down front with 5-6-6-6-6 cm between. Sew in sleeves. Sew on buttons. |
||||||||||
Diagram explanations |
||||||||||
|
||||||||||
 |
||||||||||
 |
||||||||||
Have you finished this pattern?Tag your pictures with #dropspattern or submit them to the #dropsfan gallery. Do you need help with this pattern?You'll find 26 tutorial videos, a Comments/Questions area and more by visiting the pattern on garnstudio.com. © 1982-2026 DROPS Design A/S. We reserve all rights. This document, including all its sub-sections, has copyrights. Read more about what you can do with our patterns at the bottom of each pattern on our site. |
||||||||||


With over 40 years in knitting and crochet design, DROPS Design offers one of the most extensive collections of free patterns on the internet - translated to 17 languages. As of today we count 324 catalogs and 12290 patterns - 12280 of which are translated into English (US/in).
We work hard to bring you the best knitting and crochet have to offer, inspiration and advice as well as great quality yarns at incredible prices! Would you like to use our patterns for other than personal use? You can read what you are allowed to do in the Copyright text at the bottom of all our patterns. Happy crafting!
Post a comment to pattern DROPS 85-15
We would love to hear what you have to say about this pattern!
If you want to leave a question, please make sure you select the correct category in the form below, to speed up the answering process. Required fields are marked *.