
Popular categories
Looking for a yarn?


Comments / Questions (49)
![]() Tatjana wrote:
Tatjana wrote:
Wie viel Garn benötige ich, wenn ich nur den Pulli stricken möchte?
30.12.2024 - 12:13DROPS Design answered:
Liebe Tatjana, Garnmenge finden Sie für jede Größe oben der Seite, unter Tab "Anleitung" und unter Pulli. Viel Spaß beim Stricken!
02.01.2025 - 14:44
![]() Corry wrote:
Corry wrote:
Vervolg vorige vraag. Ik kan het ws wel oplossen door bij de raglan niet iedere tweede pen maar iedere derde pen te minderen. Maar als jullie een betere oplossing hebben dan hoor ik het graag. Met vriendelijke groet Corry
09.04.2024 - 14:34
![]() Brigitte wrote:
Brigitte wrote:
Quand on tricote le bonnet en taille 12/18 mois, si l’on ajuste à 108 mailles pour tricoter M3, on n’obtient pas 22 mailles entre chacun des 5 marqueurs. Il faut ajuster à 110 mailles. Sur combien de rangs faut-il tricoter M3 ? Si on ne le tricote qu’une fois avant les diminutions, le bonnet ne ressemble pas à la photo et est très plat. Qu’elle doit être la hauteur du bonnet avant de commencer les diminutions ?
19.11.2022 - 00:37DROPS Design answered:
Bonjour Brigitte, il manquait effectivement une phrase ici, vous tricotez jusqu'à 16 cm à partir du rang de cassure et ajustez le nombre de mailles à 110, puis placez vos 5 marqueurs espacés de 22 m et tricotez en jersey. Bon tricot!
21.11.2022 - 08:44
![]() Hanna wrote:
Hanna wrote:
I mönstret för mössan står det att antalet maskor ska justeras till samma antal maskor som det ursprungligen var?
26.08.2022 - 13:04DROPS Design answered:
Hei Hanna. Man legger opp 96-104 (112-120) masker og når man har strikket glattstrikk i 6 cm, brettekanten, M.2 1 gang i høyden, 1 omgang rett og 1 omgang vrang, justeres maskeantallet til 96-102 (108-120) masker. Altså maskeantallet i den minste og største størrelsen er den sammen, mens i de 2 andre størrelsene justeres maskeantallet med 2 og 4 masker, slik at når diagram M.3 strikkes stemmer maskeantallen med hvor mange ganger diagrammet skal gjentas. mvh DROPS Design
29.08.2022 - 11:10
![]() Inger-Mari Vestlund wrote:
Inger-Mari Vestlund wrote:
Skal det økes til kile på buksen bare foran?? Mvh Inger-Mari Vestlund
24.08.2022 - 18:23DROPS Design answered:
Hei Inger Mari. Ja, i denne oppskriften er det bare i front. mvh DROPS Design
29.08.2022 - 09:30
![]() Kjersti Tveit Nergaard wrote:
Kjersti Tveit Nergaard wrote:
Skal hele buksen strikkes med dobbel tråd?
24.08.2022 - 12:14DROPS Design answered:
Hej Kjersti. Ja det stemmer, hele buksen strikkes med dobbel tråd. Mvh DROPS Design
24.08.2022 - 13:20
![]() Eva Olsson wrote:
Eva Olsson wrote:
När ärmen mäter ca 17-19-22 (25-29) cm avm 8 m mitt under ärmen Betyder det mitt på ärmen eller?
27.05.2021 - 23:11DROPS Design answered:
Hej Eva. När du maskar av till ärmhål så gör du det vid markören (4 maskor på varje sida av markören), alltså där du ökade maskor tidigare. Mvh DROPS Design
28.05.2021 - 09:19
![]() Eloïse Tranchand wrote:
Eloïse Tranchand wrote:
Bonjour, il me semble qu'il y a une petite faute dans les explications de la bordure du raglan. Le nombre de maille à récupérer doit être multiple de 6 et non de 4, puisque ce sont des côtes 3/3.
21.01.2021 - 17:10DROPS Design answered:
Bonjour Mme Tranchand, on tricote bien en côtes 3/3, mais avec 1 maille lisière au point mousse de chaque côté, il faut donc un nombre de mailles multiple de 6 + 2. Bon tricot!
22.01.2021 - 08:26
![]() Else Johansen wrote:
Else Johansen wrote:
Blir ikke vr.borden veldig bred med 48 m?
18.11.2020 - 15:34DROPS Design answered:
Hej Else, duhar 26 masker på 10 cm når du strikker glatstrik på pind 2,5, men husk at vrangborden trækker arbejdet sammen. God fornøjelse!
18.11.2020 - 15:45
![]() Brigitte wrote:
Brigitte wrote:
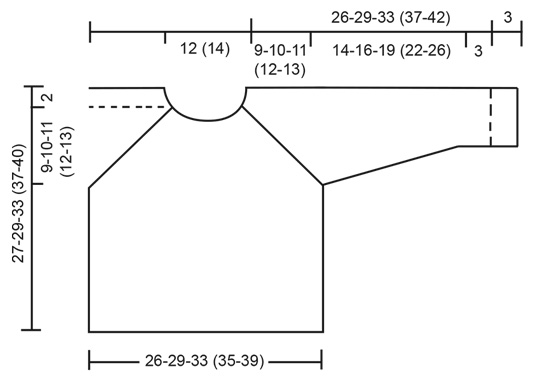
Abketten für das Armloch: in der Anleitung steht "wenn die Arb. ca. 16-17-20 (23-25) cm" misst. In der Skizze steht 27-29-33(37-40). Was ist korrekt? MfG Brigitte
19.06.2020 - 09:30DROPS Design answered:
Liebe Brigitte, die 27-29-33(37-40) cm in der Maßskizze sind die gesamte Höhe, von der Anschlagskante bis zur Schulter. Viel Spaß beim stsricken!
19.06.2020 - 16:17
|
|||||||||||||||||||||||||
Swab the Deck#swabthedeckset |
|||||||||||||||||||||||||
 |
 |
||||||||||||||||||||||||
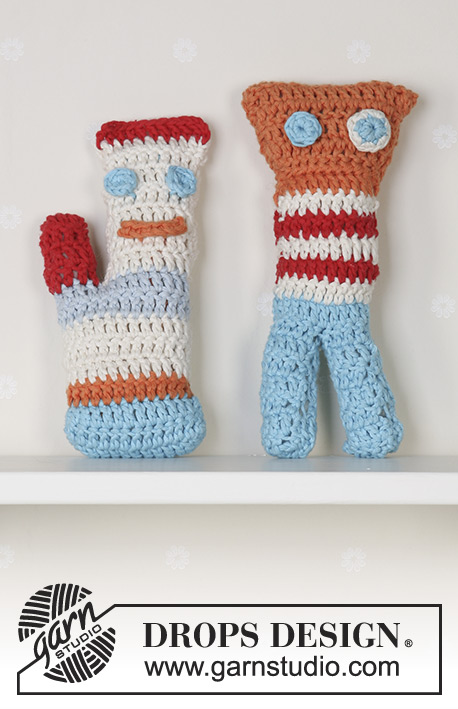
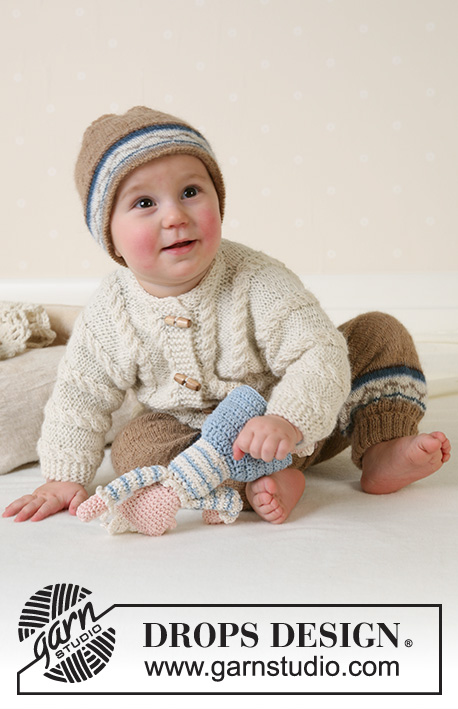
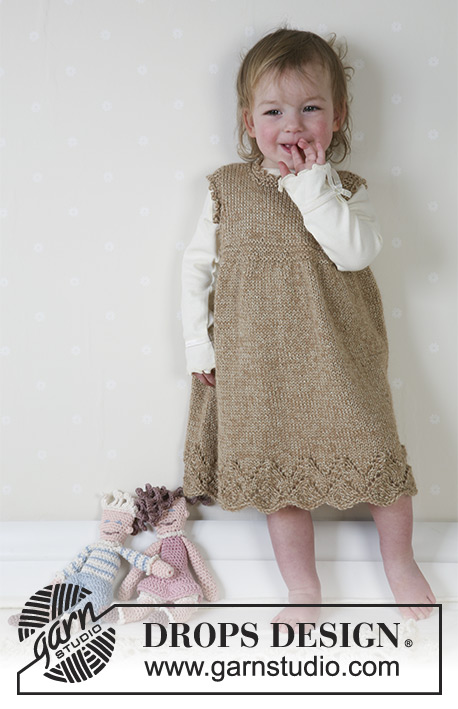
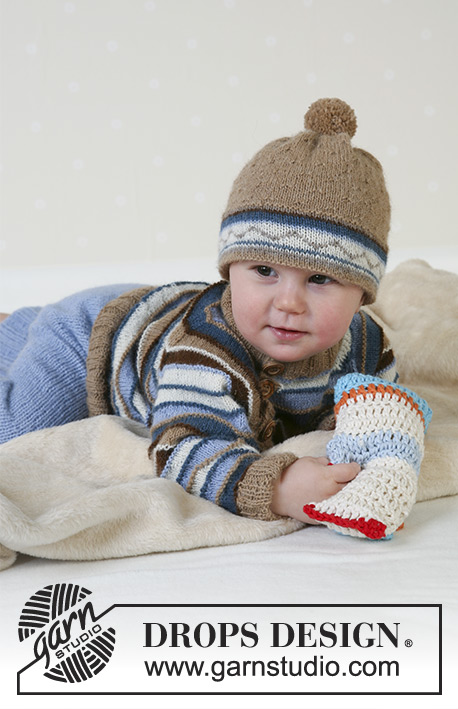
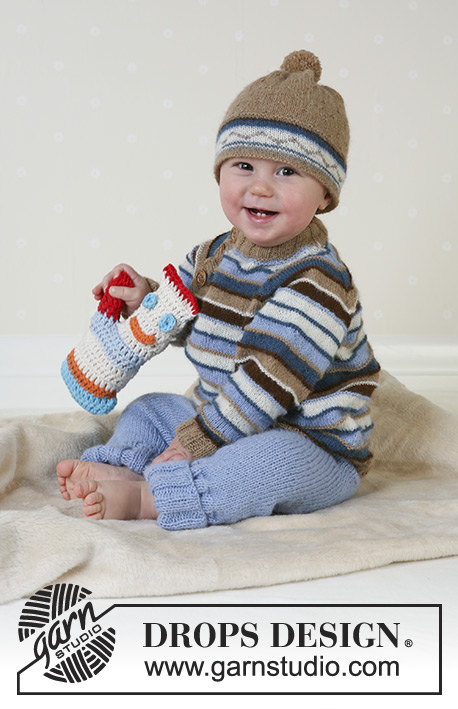
DROPS Jumper, pants, hat and soft toy in Alpaca
DROPS Baby 13-12 |
|||||||||||||||||||||||||
|
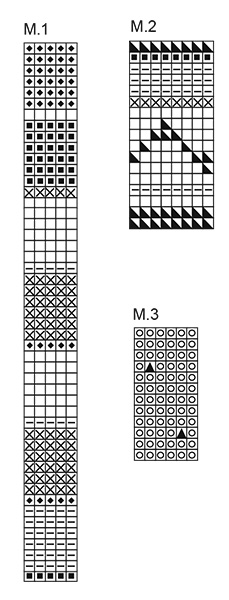
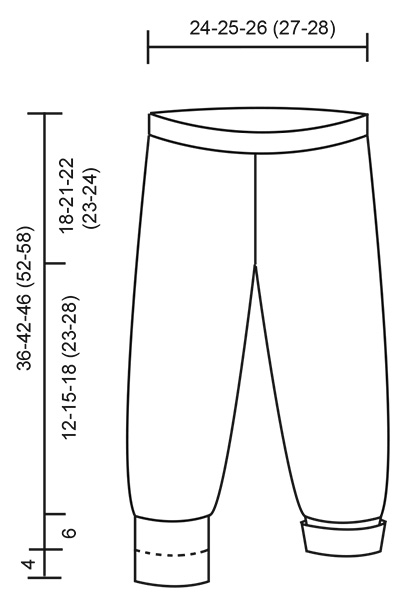
JUMPER: Knitting gauge: 24 sts x 32 rows on needle size 3 mm / US 2.5 in stockinette sts = 10 x 10 cm / 4" x 4" Rib: *K3, P3*, repeat from *-*. Pattern: See diagrams M.1. Repeat the diagram until finished measurements. Note! The pattern is knitted in stockinette sts but the "single" rows, i.e. rows 1, 8, 15 etc = 2 rounds of garter sts. I.e. knit 2 rounds garters sts as follows: knit 1 round, purl 1 round. Decreasing tips (applies to raglan): Dec as follows from the right side: Start and finish the row with K2 tog. By the 3 other markers dec as follows (start 3 sts before marker): K2 tog, K2, slip 1 st as if to knit, K1, psso. Dec as follows from the wrong side: Start and finish the row with P2 tog. By the 3 other markers dec as follows (start 3 sts before marker): P2 tog into back of st, P2, P2 tog. Front and back piece: Cast on 126-138-156 (168-186) sts on circular needle size 2.5 mm / US 1.5 with camel. Knit 3 cm / 1 ⅛" Rib. Change to needle size 3 mm / US 2.5 and knit 1 round with camel. Continue in stripes according to M.1 – see explanation above. When piece measures approx 16-17-20 (23-25) cm / 6¼"-6¾"-8" (9"-9¾") (adjust so that there is 1 round left of a whole stripe) knit next round as follows: bind off 8 sts for armhole, knit 55-61-70 (76-85) sts (= front piece), bind off 8 sts for armhole, knit 55-61-70 (76-85) sts (= back piece). Put the piece aside and knit the sleeves. Sleeve: Knit round on double pointed needles size 2.5 mm / US 1.5. Cast on 36-42-42 (48-48) sts with camel. Knit 3 cm / 1 ⅛" Rib (= turn-up). Insert a marker and measure piece from here from now on. Knit another 3 cm / 1 ⅛" Rib. Change to needle size 3 mm / US 2.5, knit 1 round with camel and continue in stripes according to M.1. At the same time, when sleeve measures 5 cm / 2" inc 2 sts mid under arm a total of 6-5-8 (7-9) times on every 2-3-2 (3-2.5) cm = 48-52-58 (62-66) sts. When sleeve measures 17-19-22 (25-29) bind off 8 sts mid under arm (adjust to last row in a stripe) = 40-44-50 (54-58) sts. Put the piece aside and knit the other sleeve. Yoke: Put sleeves in on the same needle as back and front pieces where you bind off for armholes = 190-210-240 (260-286) sts. Insert a marker in all transitions between body pieces and sleeves = 4 markers. Knit back and forth on needle, starting by the right raglan seam and start by dec 3 sts on each side of this marker. Continue in M.1 following on from the stripe pattern on front and back pieces. At the same time, dec for raglan – see Decreasing tip – on every other row: 14-16-18 (20-22) times. When all dec are complete there are 72-76-90 (94-104) sts left. Put sts on a holder and knit the raglan edge before the neck. Raglan edge: Pick up approx 32 to 41 sts (divisable by 4 + 2) along the raglan seam on the sleeve with double pointed needle size 2.5 mm / US 1.5 and camel. Knit Rib with 1 edge st each side in garter sts. When Rib measures 2 cm / ¾", bind off loosely. Repeat along raglan opening on front piece, but after 2 rows make 3 buttonholes evenly distributed (there will be a buttonhole on neckline as well). 1 buttonhole = bind off 2 sts and cast on 2 new sts on next row. Neck: Put sts from holder on neck back on double pointed needles size 2.5 mm / US 1.5 and pick up 7-8-7 (8-6) sts on each raglan edge with camel = 86-92-104 (110-116) sts. Knit back and forth on needle from the open raglan seam as follows: knit 1 row from wrong side, knit 1 row from right side. Next row from wrong side: 1 edge st in garter sts, *K3, P3*, repeat from *-* and finish with 1 edge st in garter sts. Continue in Rib with 1 edge st each side in garter sts. At the same time, after 1 row in Rib, make a buttonhole over the others and repeat when Rib measures 4-4-4 (5-5) cm. bind off loosely when Rib measures 5-5-5 (6-6) cm. Fold neckline towards wrong side and attach with neat sts. Assembly: Place raglan edges on top of each other with buttonholes at the top and join in lower edge. Sew the openings under the arms. Sew on buttons. Fold Rib at sleeve edges towards the wrong side and attach neatly. -------------------------------------------------------- PANTS: Knitting gauge: 19 sts x 25 rows with double thread Alpaca on needle size 4 mm / US 6 in stockinette sts = 10 x 10 cm / 4" x 4". Rib: *K3, P3*, repeat from *-* Start at the top and knit downwards. Cast on 92-96-98 (102-106) sts with 2 threads light blue (= double thread) and circular needle size 4 mm / US 6. Knit 2 cm / ¾" stockinette sts and insert a marker (= folding edge). Measure piece from marker. Insert a marker mid front and mid back (= 46-48-49 (51-53) sts between markers. Continue in stockinette sts until piece measures 12-14-15 (15-15) cm. Now inc 1 st on each side of the 4 middle sts mid front (inc by picking up st from previous row and knit this) on every other row a total of 8-9-9 (10-11) times = 108-114-116 (122-128) sts. On next row dec 6 sts mid front and mid back (i.e. 3 sts on each side of both markers) = 48-51-52 (55-58) sts for each leg. The piece measures approx 18-21-22 (23-24) cm = 7"-8¼"-8¾" (9"-9½") Legs: Put sts from one leg on a thread and sts from the other leg on double pointed needles size 4 mm / US 6. Insert a marker on inner side of leg and knit stockinette sts. When leg measures 2 cm / ¾" dec 1 st on both sides of marker on every 2-3-4 (5½-7) cm = ¾"-1⅛"-1½" (2⅛"-2¾") a total of 3 times = 40-43-44 (47-50) sts. When leg measures 12-15-18 (23-28) cm inc evenly on row to 48-48-54 (54-60) sts. Continue in Rib and bind off loosely when Rib measures 10 cm / 4". Knit the other leg in the same way. Assembly: Sew opening between legs. Fold the edge at top, sew to wrong side (leave a little opening for the elastic) and pull the elastic through. Fold the rib at bottom of legs. -------------------------------------------------------- HAT: Size: 1/3 – 6/9 months – (12/18 months – 2 years) To fit head circumference: 40/42 – 43/45 – (48/50 – 50/52) cm Knitting gauge: 26 sts x 35 rows on needle size 2.5 mm / US 1.5 in stockinette sts = 10 x 10 cm / 4" x 4" Pattern: see diagrams M.2 and M.3. Decreasing tips: Dec as follows before the marker: K2 tog Dec as follows after the marker: slip 1 st as if to knit, K1, psso. Knit round on double pointed needles size 2.5 mm / US 1.5. Cast on 96-104 (112-120) sts with camel. Knit 6 cm / 2 ⅜" stockinette sts, purl 1 round (= folding edge) and knit 1 round. Now knit 1 repeat of M.2. Change to camel, knit 1 round and purl 1 round. Now knit M.3, at the same time adjusting number of sts to 96-102 (108-120) on first row. When piece measures 13-15 (16-17) cm from folding edge adjust number of sts to 90-100 (110-120). Insert 5 markers in piece with 18-20 (22-24) sts in between each. Continue in stockinette sts, at the same time dec 1 st on each side of all markers on every row until there are 10 sts left – see Decreasing tips. Cut the thread, pull through remaining sts and attach. Fold lower edge towards the wrong side and attach with neat sts – make sure the seam doesn’t pull. Pompon: Make a pompon with a diameter of approx 4 cm / 1½" and attach to top of hat. |
|||||||||||||||||||||||||
Diagram explanations |
|||||||||||||||||||||||||
|
|||||||||||||||||||||||||
 |
|||||||||||||||||||||||||
 |
|||||||||||||||||||||||||
 |
|||||||||||||||||||||||||
Have you finished this pattern?Tag your pictures with #dropspattern #swabthedeckset or submit them to the #dropsfan gallery. Do you need help with this pattern?You'll find 28 tutorial videos, a Comments/Questions area and more by visiting the pattern on garnstudio.com. © 1982-2026 DROPS Design A/S. We reserve all rights. This document, including all its sub-sections, has copyrights. Read more about what you can do with our patterns at the bottom of each pattern on our site. |
|||||||||||||||||||||||||


With over 40 years in knitting and crochet design, DROPS Design offers one of the most extensive collections of free patterns on the internet - translated to 17 languages. As of today we count 324 catalogs and 12290 patterns - 12280 of which are translated into English (US/in).
We work hard to bring you the best knitting and crochet have to offer, inspiration and advice as well as great quality yarns at incredible prices! Would you like to use our patterns for other than personal use? You can read what you are allowed to do in the Copyright text at the bottom of all our patterns. Happy crafting!
Post a comment to pattern DROPS Baby 13-12
We would love to hear what you have to say about this pattern!
If you want to leave a question, please make sure you select the correct category in the form below, to speed up the answering process. Required fields are marked *.