
Popular categories
Looking for a yarn?


Comments / Questions (65)
Nina wrote:
Es fehlt keine Strickanleitung! Man strickt erst Perlmuster und danach Lochmuster.
19.04.2014 - 15:52
![]() Daniela Mudry wrote:
Daniela Mudry wrote:
Es fehlt die Strickanleitung für den Ärmel. Zudem muss nicht das Lochmuster erst Armloch gestrickt werden? Zuvor glatt rechts oder das Perlmuster?
19.04.2014 - 07:41DROPS Design answered:
Liebe Daniela, die Anleitung für die Ärmel steht direkt unter der Anleitung für das linke Vorderteil.
24.04.2014 - 08:01
![]() Jolande Orsel wrote:
Jolande Orsel wrote:
Klopt dit telpatroon en afbeelding wel?
17.10.2013 - 16:37
![]() Ingegerd wrote:
Ingegerd wrote:
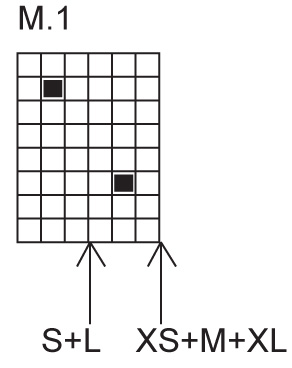
Ska man börja sticka mönstret på armen direkt eller är det mossstickning några varv innan????
11.10.2013 - 10:15DROPS Design answered:
På ärmen stickar du M.1 enligt beskrivningen direkt. Lycka till!
11.10.2013 - 12:00
![]() Bianca wrote:
Bianca wrote:
Wat ik niet snap is of je het inzetstuk nu dwars breit, dus langs de lange kant of langs de korte kant en hoe maak je het dan vast aan de andere dwarse of lange kant
23.04.2012 - 22:29DROPS Design answered:
Je neemt steken op langs de hals, dus in de lengte en je breit patroon M.2 overdwars. Uiteindelijk naai je de 12 cm die je in M.2 gebreid hebt aan de onderkant vast op het voorpand. Wij gaan binnenkort dit patroon doorkijken en zien of wij het wat beter en duidelijker kunnen vertalen.
24.04.2012 - 14:58
![]() A.De Winter wrote:
A.De Winter wrote:
Ik begrijp het patroon niet met het inzet stuk,het klopt niet ,weet iemand hoe het moet ?
11.04.2012 - 12:38DROPS Design answered:
Kijk anders goed naar de foto, dan ziet u ook dat het ajour deel recht boven het onderste deel van het voorpand komt.
11.04.2012 - 17:28
![]() A.De Winter wrote:
A.De Winter wrote:
Ik begrijp het ajour patroon niet in de hals het komt niet goed uit,ik heb 24 steken op genomen op de 24 steken die ik afgekant had en 34 langs de zijkant hals dat is samen 58 is dat goed ? dan 12 cm gebreid ,maar dan komt er een geen schuine hals uit maar een recht stuk ajourpatroon ik snap het ook niet met 2 recht samen breien over welke steken doe je dat dan ,ik vind het heel jammer ,maar ik begrijp de beschrijving niet,of het patroon klopt niet Weet iemand hoe het moet?
11.04.2012 - 12:34DROPS Design answered:
Het patroon is correct. Het wordt ook een recht stuk ajour boven de afgekante steken. Bij het afwerken neemt u ook steken op langs de lange kant voor de bies, daarin maakt u knoopsgaten. groeten Angelique
11.04.2012 - 17:27
![]() Drops Design wrote:
Drops Design wrote:
This pattern has been out for long, and has been very popular over the years. Everything should be ok, so there must be something you misunderstand. If you need assistance we kindly ask you to contact the store that sold you your yarn. When you buy original Garnstudio yarn in one of our stores, you will get all the help you may need.
14.11.2011 - 22:15
![]() Jodi Harrison wrote:
Jodi Harrison wrote:
I have worked all the pieces for this pattern and am currently trying to start the assembly with the right collar. No matter what I do, this just doesn't look right. Pattern #2 has a wavy edge and it just does not seem to look right when it is worked on the curve created on the neck edge. It definetly does not match the picture. Please help me and tell me what I am misunderstanding on the pattern. This is a beautiful pattern and I really want to finish the sweater! Thank you.
13.11.2011 - 16:51
![]() Jodi Harrison wrote:
Jodi Harrison wrote:
I have worked all the pieces for this pattern and am currently trying to start the assembly with the right collar. No matter what I do, this just doesn't look right. Pattern #2 has a wavy edge and it just does not seem to look right when it is worked on the curve created on the neck edge. It definetly does not match the picture. Please help me and tell me what I am misunderstanding on the pattern. This is a beautiful pattern and I really want to finish the sweater! Thank you.
13.11.2011 - 16:50
|
|||||||
Pauline |
|||||||
|
|
|||||||
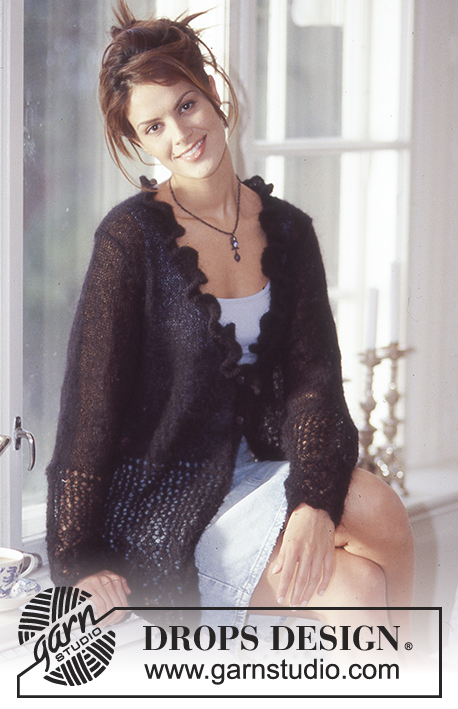
DROPS Cardigan in Muskat
DROPS 74-21 |
|||||||
|
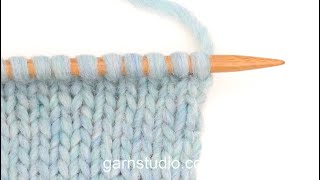
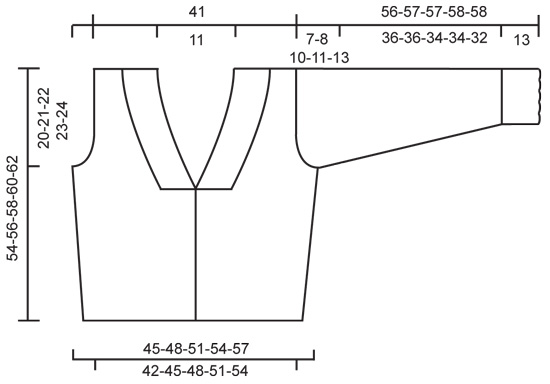
Gauge: 20 sts x 26 rows = 10 x 10 cm on larger needles in stockinette st. Seed Stitch (on an even number of sts): Row 1: * K 1, P 1 * Row 2: * P 1, K 1 * Repeat Rows 1-2. Pattern 1: See chart. The pattern is seen from the right side. Arrows indicate the starting point for different sizes for the right front only – the chart is the same for all sizes for the back and left front. Pattern 2: divisible by 8 + 2 sts (1 edge st each side) Row 1 (right side row): K 1 (edge st), * yo, K 1 through back of st, yo, sl 1, K 1, psso, K 5 *, repeat from * - *, K 1 (edge st). Row 2 (wrong side row): P 1 (edge st), * P 4, P 2 tog through back of sts, P 3 *, repeat from * - *, P 1 (edge st). Row 3: K 1, * yo, K 1 through back of st, yo, K 2, sl 1, K 1, psso, K 3 *, repeat from * - *, K 1. Row 4: P 1, * P 2, P 2 tog through back of sts, P 5*, repeat from * - *, P 1. Row 5: K 1, * K 1 through back of st, yo, K 4, sl 1, K 1, psso, K 1, yo *, repeat from * - *, K 1. Row 6: P 1, * P 1, P 2 tog through back of st, P 6 *, repeat from * - *, P 1. Row 7: K 1, * K 5, K 2 tog, yo, K 1 through back of st, yo *, repeat from * - *, K 1. Row 8: P 1, * P 3, P 2 tog, P 4 *, repeat from * - *, P 1. Row 9: K 1, * K 3, K 2 tog, K 2, yo, K 1 through back of st, yo *, repeat from * - *, K 1. Row 10: P 1, * P 5, P 2 tog, P 2 *, repeat from * - *, P 1. Row 11: K 1, * yo, K 1, K 2 tog, K 4, yo, K 1 through back of st *, repeat from * - *, K 1. Row 12: P 1, * P 6, P 2 tog, P 1 *, repeat from * - *, P 1. Repeat rows 1-12. ------------------------------------------------------------------ Back: Cast on 86-92-98-104-110 sts on smaller needles. Knit 5 rows seed st, change to larger needles and Pattern 1 - start pattern at lower right corner on chart for all sizes, but do not knit 1 edge st at each side in the pattern. When the piece measures 7 cm inc 1 st at each side every 8 cm a total of 3 times = 92-98-104-110-116 sts - the increased sts are knit in the pattern as you go along. When the piece measures 34-35-36-37-38 cm bind off for armhole at each side every other row: 3 sts 1 time, 2 sts 0-1-2-3-4 times and 1 st 2-3-4-5-6 times = 82 sts remain for all sizes. When the piece measures 52-54-56-58-60 cm bind off the center 20 sts for the neck. On the next row dec 1 st at each neck edge = 30 sts remain on each shoulder. Bind off when the piece measures 54-56-58-60-62 cm. Right front: Cast on 44-47-50-53-56 sts on smaller needles. Knit 5 rows seed st, change to larger needles and Pattern 1, starting from center front edge at appropriate arrow on the chart (1 edge st at each side is not knit in the pattern). When the piece measures 7 cm inc 1 st at the side edge every 8 cm a total of 3 times = 47-50-53-56-59 sts - the increased sts are knit in the pattern as you go along. Read the entire next section before knitting: Neckband: When the piece measures 30-32-34-36-38 cm bind off 24 sts at center front edge for neck. Then dec 1 st for the neck on alternately every 4th and 5th row a total of 13 times. Armhole: At the same time when the piece measures 34-35-36-37-38 cm bind off for armhole at the side as on back. After all armhole and neck shaping is complete 5 sts remain on each shoulder. Bind off when the piece measures 54-56-58-60-62 cm. Left front: Cast on and knit the same as the right - start Pattern 1 at lower right corner so that the pattern will be the same on each side at the center front – for armhole and neck reverse all shaping. Sleeve: Cast on 42-42-50-50-50 sts on smaller needles. Knit Pattern 2 for 13 cm. Change to larger needles and Pattern 1, increasing 8-8-6-6-6 sts evenly distributed on the 1st row = 50-50-56-56-56 sts. When the piece measures 16 cm inc 1 st at each side every 7-6-6-5-4 rows a total of 12-14-13-15-17 times = 74-78-82-86-90 sts - the increased sts are knit in the pattern as you go along. When sleeve measures 49-49-47-47-45 cm bind off for sleeve cap at each side every other row: 4 sts 1 time, 3 sts 1 time, 2 sts 3 times, 1 st 0-0-4-5-8 times, then bind off 2 sts at each side until the piece measures 55-56-56-57-57 cm and then bind off 3 sts 1 time. The piece measures approx. 56-57-57-58-58 cm, bind off the remaining sts. Assembly: Right collar: Pick up 58 sts on smaller needles along left neck edge and knit approx. 12 cm of Pattern 2 - see instructions above, put all sts on a st holder. Left collar: knit the same as the right collar. Sew shoulder seams. Right button band and neckband: Pick up on smaller circular needles approx. 62-76 sts along right button band, then put 58 sts from right collar back on needles and pick up approx. 12 sts to center back = 132 -146 sts. Knit 2 rows seed st. On the next row make 5 buttonholes evenly distributed along button bands - the bottom should be approx. 1 cm from bottom edge and the top should be just before the collar starts. 1 buttonhole = K 2 tog, yo. Knit 1 row seed st more, then bind off sts around back of the neck and along the collar in seed st. Continue with 3 rows seed st along button bands – K 2 tog the 2 sts at the top of button bands every row so that there will be a smooth transition from neckband. After these 3 rows bind off the remaining sts in seed st. Left button band and neckband: Knit the same as the right, reversing all shaping and without buttonholes. Sew in sleeves. Sew sleeve and side seams using edge sts as a seam allowance. Sew on buttons. |
|||||||
Diagram explanations |
|||||||
|
|||||||
 |
|||||||
 |
|||||||
Have you finished this pattern?Tag your pictures with #dropspattern or submit them to the #dropsfan gallery. Do you need help with this pattern?You'll find 21 tutorial videos, a Comments/Questions area and more by visiting the pattern on garnstudio.com. © 1982-2026 DROPS Design A/S. We reserve all rights. This document, including all its sub-sections, has copyrights. Read more about what you can do with our patterns at the bottom of each pattern on our site. |
|||||||


With over 40 years in knitting and crochet design, DROPS Design offers one of the most extensive collections of free patterns on the internet - translated to 17 languages. As of today we count 325 catalogs and 12298 patterns - 12288 of which are translated into English (US/in).
We work hard to bring you the best knitting and crochet have to offer, inspiration and advice as well as great quality yarns at incredible prices! Would you like to use our patterns for other than personal use? You can read what you are allowed to do in the Copyright text at the bottom of all our patterns. Happy crafting!
Post a comment to pattern DROPS 74-21
We would love to hear what you have to say about this pattern!
If you want to leave a question, please make sure you select the correct category in the form below, to speed up the answering process. Required fields are marked *.