
Popular categories
Looking for a yarn?


Comments / Questions (65)
![]() Ute Würtenberger wrote:
Ute Würtenberger wrote:
Hallo, was soll beim Rückenteil bedeuten: "Wenn die Arbeit 7 cm misst, 1M auf jeder Seite alle 8.cm total 3mal aufnehmen."?
16.05.2017 - 19:00DROPS Design answered:
Liebe Frau Würtenberg, nach 7 cm von der Anschlagskante nehmen Sie beidseitig 1 M. *Dann 8 cm stricken und noch beidseitig zunehmen*, von *-* insgesamt 2 mal wiederhohlen = 3 M wurden auf beide Seite zugenommen = es gibt jetzt 6 M mehr auf den Nadel. Viel Spaß beim stricken!
17.05.2017 - 08:36
![]() Josefina Pina wrote:
Josefina Pina wrote:
I want to start this cardigan with the drops muskat yarn. Do I have to make it slightly bigger to consider shrink after a wash or will stay the same?
02.05.2017 - 18:13DROPS Design answered:
Dear Mrs Pina, you can always wash your swatch (following care instructions on shademap + general care tips, but you should use normal size as shown in measurement chart. Happy knitting!
03.05.2017 - 08:43Damaris Nanjari wrote:
El patron no esta de acuerdo a la foto de la modelo, no es el mismo, agradeceria revisar por que me gustaria mucho poder realizarlo.
17.11.2016 - 21:40DROPS Design answered:
Hola Damaris. El patrón y la foto están correctos. La parte del patrón que se llama "cuello" se refiere a los calados del delantero.
19.11.2016 - 18:08
![]() DROPS Design wrote:
DROPS Design wrote:
Beste Lia. Ik heb antwoord van ons Design Team, en de maattekening is correct. Het is wel een ouderwetse tekening, maar de afmetingen komen overeen.
08.03.2016 - 13:04
![]() Karin Van Lemmeren wrote:
Karin Van Lemmeren wrote:
Goedemiddag,bij de schuine kant maken in het voorpand moet je 13 keer elke 4de en elke 5de naald 1steek afkanten,maar moet dat dan aan de goede kant en aan de verkeerde kant en zoja hoe,ik heb altijd geleerd dat je steken afkanten aan de goede kant van het werk doet,bij voorbaat dank voor de uitleg!
11.02.2016 - 12:49DROPS Design answered:
Hoi Karin. Ik zou na de 24 st afkanten, minderen na de kantst (dus niet afkanten) door 2 st samen te breien). Dan kan je minderen in elke 4e en 5e nld. Er staat afkanten in het patroon (ook het originele patroon), maar ik denk dat er minderen wordt bedoeld. Ik pas het in ieder geval zo aan in het Nederlandse patroon :-)
11.02.2016 - 14:40
![]() Lia Breddels wrote:
Lia Breddels wrote:
- Hoort de tekening van het model wel bij dit patroon. Op de tekening lijkt het een brede kraag. Dat zie ik niet terug op de foto. - In de beschrijving blijven er maar 5 steken over voor de schouder. Dat komt ook niet overeen met de foto. - In de beschrijving van het voorpand wordt niet over telpatroon M2 gesproken.
08.12.2015 - 22:30DROPS Design answered:
Hoi Lia. Het patroon zou correct moeten zijn, maar ik denk dat de maattekening/teltekeningen inderdaad hier niet bij passen. Ik heb het doorgegeven en wachten reactie en eventuele correctie af.
09.12.2015 - 12:43
![]() Inge Veetman wrote:
Inge Veetman wrote:
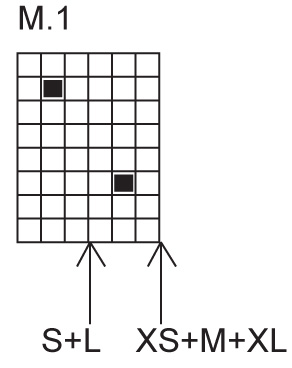
Hallo, zouden jullie misschien het telpatroon M1 kunnen uitleggen? Betekent het 2 nld recht breien en dan in de 3e nld stteds een averecht na 4 recht? Ik hoop dat jullie me kunnen helpen. Alvast bedankt voor het antwoord. Mvr groeten, Inge
02.05.2015 - 15:16DROPS Design answered:
Hoi Inge. Je breit heen en weer, dus rij 1 = 1e nld, goede kant lees je van rechts naar links: r breien. Rij 2 = 2e nld, verkeerde kant, lees je van links naar rechts. Nld 3 is de goede kant en 1 r, 1 av, 4 r (einde eerste herhaling), ga door met herhalen: 1 r, 1 av, 4 r over de st zoals vermeld. Rij 7 is (goede kant): 4 r, 1 av, 1 r per herhaling (dit geldt dan voor maat XS, M en XL. Voor maat S en L begin je bij het pijltje en herhaalt. Succes!
04.05.2015 - 16:19
![]() Martina wrote:
Martina wrote:
Ich vermisse in der Anleitung eine Angabe ab welcher Höhe ich bei dem Rückenteil bzw. den Vorderteilen jeweils von M1 zu M2 wechseln soll. Vielen Dank für Ihre Hilfe.
14.03.2015 - 21:15DROPS Design answered:
Liebe Martina, beim Rückenteil wird M.2 nicht gestrickt. Bei den Vorderteilen steht es unter "Zusammennähen: Rechter Kragen" - M.2 wird nachträglich quer angestrickt. Sie ketten ja an den Vorderteilen an einer Stelle 24 M ab - dies ist die "Aussparung" für das nachträglich angestrickte Muster M.2. Gutes Gelingen und viel Spaß beim Stricken!
15.03.2015 - 23:25
![]() Drops Design NL wrote:
Drops Design NL wrote:
Patroon M.1 staat onderaan als telpatroon, patroon M.2 wordt uitgelegd bovenaan in het patroon.
02.09.2014 - 20:34
![]() Yvonne wrote:
Yvonne wrote:
Het telpatroon staat niet op de site (M1 en M2)
02.09.2014 - 19:59
|
|||||||
Pauline |
|||||||
|
|
|||||||
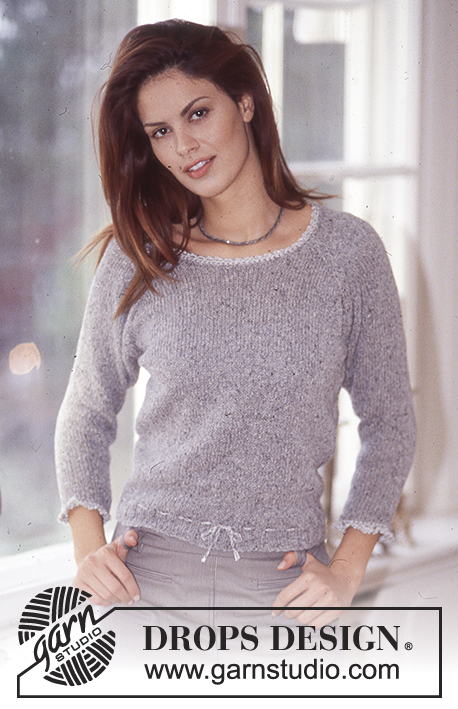
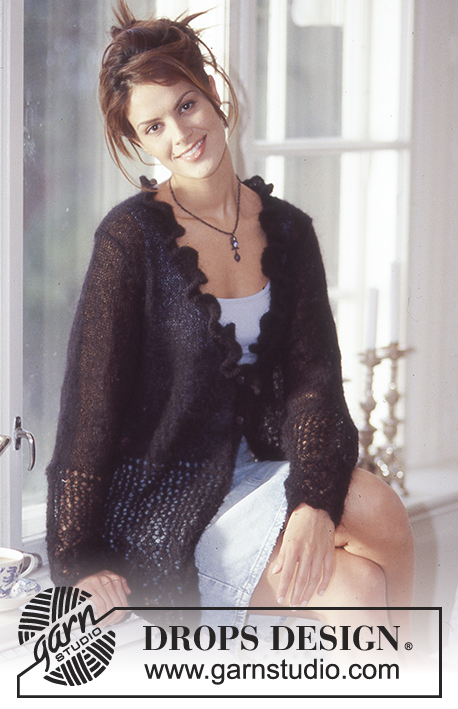
DROPS Cardigan in Muskat
DROPS 74-21 |
|||||||
|
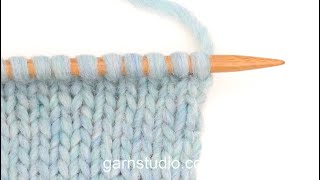
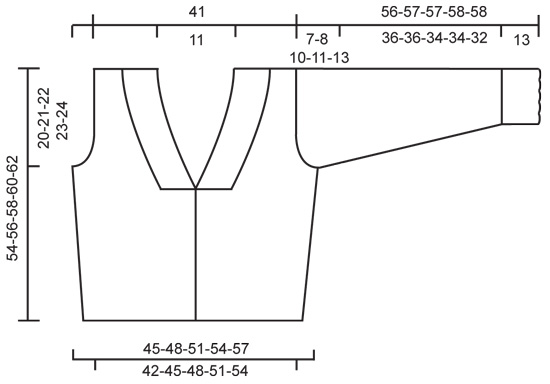
Gauge: 20 sts x 26 rows = 10 x 10 cm on larger needles in stockinette st. Seed Stitch (on an even number of sts): Row 1: * K 1, P 1 * Row 2: * P 1, K 1 * Repeat Rows 1-2. Pattern 1: See chart. The pattern is seen from the right side. Arrows indicate the starting point for different sizes for the right front only – the chart is the same for all sizes for the back and left front. Pattern 2: divisible by 8 + 2 sts (1 edge st each side) Row 1 (right side row): K 1 (edge st), * yo, K 1 through back of st, yo, sl 1, K 1, psso, K 5 *, repeat from * - *, K 1 (edge st). Row 2 (wrong side row): P 1 (edge st), * P 4, P 2 tog through back of sts, P 3 *, repeat from * - *, P 1 (edge st). Row 3: K 1, * yo, K 1 through back of st, yo, K 2, sl 1, K 1, psso, K 3 *, repeat from * - *, K 1. Row 4: P 1, * P 2, P 2 tog through back of sts, P 5*, repeat from * - *, P 1. Row 5: K 1, * K 1 through back of st, yo, K 4, sl 1, K 1, psso, K 1, yo *, repeat from * - *, K 1. Row 6: P 1, * P 1, P 2 tog through back of st, P 6 *, repeat from * - *, P 1. Row 7: K 1, * K 5, K 2 tog, yo, K 1 through back of st, yo *, repeat from * - *, K 1. Row 8: P 1, * P 3, P 2 tog, P 4 *, repeat from * - *, P 1. Row 9: K 1, * K 3, K 2 tog, K 2, yo, K 1 through back of st, yo *, repeat from * - *, K 1. Row 10: P 1, * P 5, P 2 tog, P 2 *, repeat from * - *, P 1. Row 11: K 1, * yo, K 1, K 2 tog, K 4, yo, K 1 through back of st *, repeat from * - *, K 1. Row 12: P 1, * P 6, P 2 tog, P 1 *, repeat from * - *, P 1. Repeat rows 1-12. ------------------------------------------------------------------ Back: Cast on 86-92-98-104-110 sts on smaller needles. Knit 5 rows seed st, change to larger needles and Pattern 1 - start pattern at lower right corner on chart for all sizes, but do not knit 1 edge st at each side in the pattern. When the piece measures 7 cm inc 1 st at each side every 8 cm a total of 3 times = 92-98-104-110-116 sts - the increased sts are knit in the pattern as you go along. When the piece measures 34-35-36-37-38 cm bind off for armhole at each side every other row: 3 sts 1 time, 2 sts 0-1-2-3-4 times and 1 st 2-3-4-5-6 times = 82 sts remain for all sizes. When the piece measures 52-54-56-58-60 cm bind off the center 20 sts for the neck. On the next row dec 1 st at each neck edge = 30 sts remain on each shoulder. Bind off when the piece measures 54-56-58-60-62 cm. Right front: Cast on 44-47-50-53-56 sts on smaller needles. Knit 5 rows seed st, change to larger needles and Pattern 1, starting from center front edge at appropriate arrow on the chart (1 edge st at each side is not knit in the pattern). When the piece measures 7 cm inc 1 st at the side edge every 8 cm a total of 3 times = 47-50-53-56-59 sts - the increased sts are knit in the pattern as you go along. Read the entire next section before knitting: Neckband: When the piece measures 30-32-34-36-38 cm bind off 24 sts at center front edge for neck. Then dec 1 st for the neck on alternately every 4th and 5th row a total of 13 times. Armhole: At the same time when the piece measures 34-35-36-37-38 cm bind off for armhole at the side as on back. After all armhole and neck shaping is complete 5 sts remain on each shoulder. Bind off when the piece measures 54-56-58-60-62 cm. Left front: Cast on and knit the same as the right - start Pattern 1 at lower right corner so that the pattern will be the same on each side at the center front – for armhole and neck reverse all shaping. Sleeve: Cast on 42-42-50-50-50 sts on smaller needles. Knit Pattern 2 for 13 cm. Change to larger needles and Pattern 1, increasing 8-8-6-6-6 sts evenly distributed on the 1st row = 50-50-56-56-56 sts. When the piece measures 16 cm inc 1 st at each side every 7-6-6-5-4 rows a total of 12-14-13-15-17 times = 74-78-82-86-90 sts - the increased sts are knit in the pattern as you go along. When sleeve measures 49-49-47-47-45 cm bind off for sleeve cap at each side every other row: 4 sts 1 time, 3 sts 1 time, 2 sts 3 times, 1 st 0-0-4-5-8 times, then bind off 2 sts at each side until the piece measures 55-56-56-57-57 cm and then bind off 3 sts 1 time. The piece measures approx. 56-57-57-58-58 cm, bind off the remaining sts. Assembly: Right collar: Pick up 58 sts on smaller needles along left neck edge and knit approx. 12 cm of Pattern 2 - see instructions above, put all sts on a st holder. Left collar: knit the same as the right collar. Sew shoulder seams. Right button band and neckband: Pick up on smaller circular needles approx. 62-76 sts along right button band, then put 58 sts from right collar back on needles and pick up approx. 12 sts to center back = 132 -146 sts. Knit 2 rows seed st. On the next row make 5 buttonholes evenly distributed along button bands - the bottom should be approx. 1 cm from bottom edge and the top should be just before the collar starts. 1 buttonhole = K 2 tog, yo. Knit 1 row seed st more, then bind off sts around back of the neck and along the collar in seed st. Continue with 3 rows seed st along button bands – K 2 tog the 2 sts at the top of button bands every row so that there will be a smooth transition from neckband. After these 3 rows bind off the remaining sts in seed st. Left button band and neckband: Knit the same as the right, reversing all shaping and without buttonholes. Sew in sleeves. Sew sleeve and side seams using edge sts as a seam allowance. Sew on buttons. |
|||||||
Diagram explanations |
|||||||
|
|||||||
 |
|||||||
 |
|||||||
Have you finished this pattern?Tag your pictures with #dropspattern or submit them to the #dropsfan gallery. Do you need help with this pattern?You'll find 21 tutorial videos, a Comments/Questions area and more by visiting the pattern on garnstudio.com. © 1982-2026 DROPS Design A/S. We reserve all rights. This document, including all its sub-sections, has copyrights. Read more about what you can do with our patterns at the bottom of each pattern on our site. |
|||||||


With over 40 years in knitting and crochet design, DROPS Design offers one of the most extensive collections of free patterns on the internet - translated to 17 languages. As of today we count 325 catalogs and 12298 patterns - 12288 of which are translated into English (US/in).
We work hard to bring you the best knitting and crochet have to offer, inspiration and advice as well as great quality yarns at incredible prices! Would you like to use our patterns for other than personal use? You can read what you are allowed to do in the Copyright text at the bottom of all our patterns. Happy crafting!
Post a comment to pattern DROPS 74-21
We would love to hear what you have to say about this pattern!
If you want to leave a question, please make sure you select the correct category in the form below, to speed up the answering process. Required fields are marked *.