
Popular categories
Looking for a yarn?


Comments / Questions (7)
![]() Vanessa Rawcliffe wrote:
Vanessa Rawcliffe wrote:
Can u translate comments please
12.02.2018 - 12:42DROPS Design answered:
Dear Mrs Rawcliffe, we are not able to translate every comment and every question/answer but you are welcome to use any online translator, even if it looks sometimes a bit weird, you can get the global sense of comment. Should you have any further question, you are welcome to ask here, or for any individual assistance, please contact your store. Happy knitting!
12.02.2018 - 14:23
![]() Marian Hoffensetz wrote:
Marian Hoffensetz wrote:
Jeg glemte at skrive at det er ind mod midten.
19.12.2016 - 07:45
![]() Marian Hoffensetz wrote:
Marian Hoffensetz wrote:
Jeg er I gang med indtagning på forstykket. Er det rigtigt forstået at det skal indtages også på vrang pinden? Med venlig hilsen
19.12.2016 - 06:22DROPS Design answered:
Hej Marian. Er det indtagning til halsen du mener eller er det aermegabet? :)
19.12.2016 - 16:00
![]() Donatella wrote:
Donatella wrote:
Ho un quesito generale da porre: le varie parti da unire risultano come "arrotolate" ai bordi. In altri modelli le ho stirate prima di unirle, ma poi le maglie sono diventate lucide e piatte: avete qualche consiglio da darmi a questo proposito? Grazie Buonasera
02.05.2016 - 20:21DROPS Design answered:
Buonasera Donatella, di solito non si stirano mai i lavori fatti a maglia o uncinetto, ma si bloccano ancora umidi: per cui deve unire le varie parti e lavare il capo finito come indicato nelle istruzioni del filato, poi lo asciughi in un asciugamano e lo blocchi con degli spilli su un tappeto o materasso. In questo caso servirà anche a distendere bene il bordo. Buon lavoro!
02.05.2016 - 20:46
![]() Donatella wrote:
Donatella wrote:
Non ho parole... grazie !! Oltre ad avere modelli per tutti i gusti, per tutte le taglie e filati bellissimi, trovo eccezionali le istruzioni che mettete a disposizione di tutti. Apprezzo molto la Vostra professionalità ed efficienza. Donatella
03.10.2015 - 10:07
![]() Donatella wrote:
Donatella wrote:
Buongiorno scrivo dall'Italia e vi seguo con passione: complimenti!!! Chiedo consiglio su alternativa a SILKE-TWEED: penso a uno dei filati con percentuale in seta simile a quello della foto e di conseguenza non so quale colore disponibile scegliere in modo che si abbini al rosa antico del bordo e della sciarpa. datemi istruzioni precise su COSA E COME ordinare (in questo modello manca il bottone "ordinare") vi ringrazio Donatella S.
15.09.2015 - 16:32DROPS Design answered:
Buongiorno Donatella. Potrebbe sostituire il filato Silke Alpaca con il Baby Alpaca Silk oppure con il Lace (quest’ultimo molto sottile). Il tasto ordinare manca in quanto il filato indicato nel modello non è più in produzione. Al seguente link trova l’elenco dei nostri fornitori. Consultando il loro sito può verificare la disponibilità del filato e del colore di suo interesse. Il rivenditore stesso può aiutarla nella scelta del colore. Buon lavoro!
16.09.2015 - 11:06
![]() Kirsten M. Pedersen wrote:
Kirsten M. Pedersen wrote:
Jeg er ved at strikke efter opskrift nr. 87-4, men har problemer med udtagningerne på forstykket. Jeg strikker størrelse M. Som jeg læser det, skal jeg efter 4 pinde tage 1 maske ud ved forkanten og efterfølgende på hver 4. pind, dette har jeg prøvet, men forstykket bliver ikke langt nok. På modellen er forstykket meget højere end ærmgabet. Hvordan skal udtagningerne strikkes, der må være flere pinde imellem. Venlig hilsen Kirsten Margrethe Pedersen Lotusvej 4, 1.th. 5250 Odense SV
01.12.2012 - 18:11DROPS Design answered:
Hej, Jo men sørg for at følge strikkefastheden i højden. Hvis du ikke har nok pinde i højden på 10 cm, og bliver for tidlig færdig, så må du strikke et par pinde mere imellem nogle af udtagningerne.
04.12.2012 - 10:02
|
|
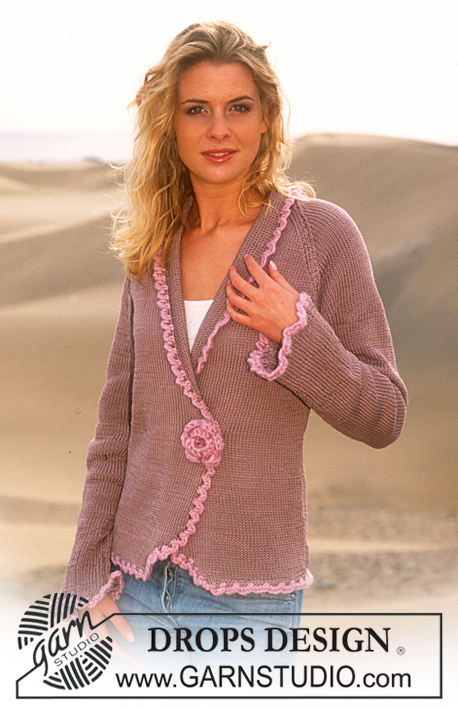
Paris Mood |
|
 |
 |
DROPS Cardigan in Silke-Tweed and Vivaldi and Scarf in Vivaldi
DROPS 87-4 |
|
|
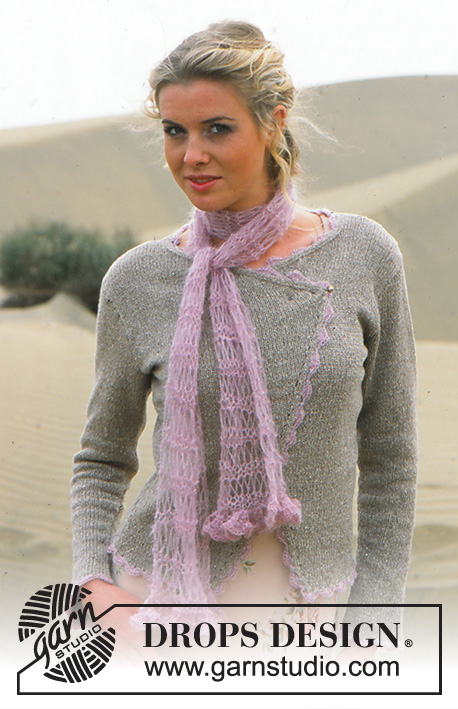
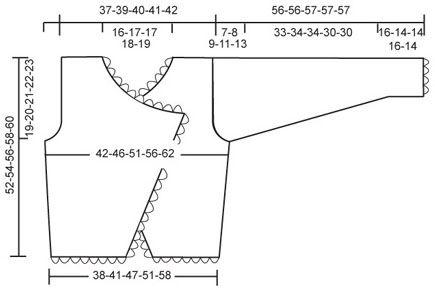
CARDIGAN: Gauge: 23 sts x 30 rows in stockinette st = 10x10 cm Increasing tips (for sloping button band): Inc inside 3 edge sts knit as follows from edge: 1 st garter st and 2 sts stockinette st. All incs are made on right side rows. Inc 1 st by making a yo but if you do not wish to make a hole, twist and P the yo on the next row. Knitting tips (for armhole and neck): Dec inside of 3 edge sts as follows: From right side: After 3 edge sts: Slip 1 st as if to knit, K 1, psso. Before 3 edge sts: K 2 tog. From wrong side: After 3 edge sts: P 2 tog. Before 3 edge sts: P 2, twisting each st. Back: Cast on 89-97-110-120-135 sts on smaller needles with Silke-Tweed. K 1 row (from wrong side), then continue with stockinette st. When the piece measures 10 cm inc 1 st at each side every 4.5 cm a total of 5 times = 99-107-120-130-145 sts. When the piece measures 33-34-35-36-37 cm dec 3-3-4-5-7 sts at each side for armhole. Continue to dec 1 st at armhole each side every other row – see knitting tip: 4-6-10-13-17 times = 85-89-92-94-97 sts. When the piece measures 50-52-54-56-58 cm bind off the center 33-35-36-38-39 sts for the neck. Then dec 1 st at each neck edge every other row 2 times = 24-25-26-26-27 sts remain on each shoulder. Bind off when the piece measures 52-54-56-58-60 cm. Left front: Cast on 35-39-46-51-58 sts on smaller needles with Silke-Tweed. K 1 row (wrong side), then knit stockinette st, but knit the outermost st at each center front edge in garter st to finished dimensions. Read the entire next section before knitting: Inc for sloping button band: After 1-4-7-10-13 rows inc 1 st at the center front edge every 4 rows 27 times – see Increasing tips above. Side inc: When the piece measures 10 cm inc at the side as on back. Armhole: When the piece measures 33-34-35-36-37 cm bind off for armhole at the side as on back. Neckband: When the piece measures 37-38-39-40-41 cm (the incs at the center front edge will be finished) continue as follows: * knit 2 rows back and forth over the outermost 3 sts (1 st in garter st and 2 sts stockinette st – do not knit the other sts on the row), then knit 2 rows as before over all sts *, repeat from * - * up along neckband (this is to prevent the neckband from being too tight). At the same time dec 1 st at the neck edge every row – see knitting tips above: 36-37-38-39-39 times. After last dec for the neck 24-25-26-26-27 sts remain on shoulder. Continue over all sts to finished dimensions. Bind off when the piece measures 52-54-56-58-60 cm. Right front: Cast on and knit the same as the left reversing all shaping. Sleeve: Cast on 53-55-57-59-62 sts on smaller needles with Silke-Tweed. K 1 row (from wrong side), then continue with stockinette st. When the piece measures 16-14-14-16-14 cm inc 1 st at each side every 2.5-2.5-2-1.5-1.5 cm a total of 13-14-17-18-19 times = 79-83-91-95-100 sts. When sleeve measures 49-48-48-46-44 cm bind off for sleeve cap at each side every other row: 4 sts 1 time, 3 sts 1 time, 2 sts 2-3-3-4-4 times and 1 st 2-3-4-6-8 times, then bind off 2 sts at each side until the piece measures 55-55-56-56-56 cm, then bind off 3 sts 1 time at each side. Bind off the remaining sts, the piece measures approx. 56-56-57-57-57 cm. Assembly: Sew shoulder seams. Sew in sleeves. Sew sleeve and side seams using edge sts as a seam allowance. Crocheted edge: Crochet an edge around the lower edge of sleeves and on the body up along fronts, around the neck, down the other front and around bottom edge with Vivaldi as follows: 1 sc in first st, * skip over approx. 2 cm, 7 dc in the next st, skip over approx. 2 cm, 1 sc in the next st *, repeat * - * and finish with 1 sl st in the first st at the start of row. Close the cardigan with a brooch or pin. SCARF: Measurements: approx. 18 x 150 cm [7" x 59"] Materials: Garnstudio VIVALDI 50 gr nr 08, light pink DROPS 5.5 mm [US 9] needles, or size needed to obtain correct gauge. DROPS 4 mm [US F] crochet hook, or size needed to obtain correct gauge. Gauge: 11 sts in Pattern = approx. 10 cm in width. Pattern: 1st row (= right side): * K 1, 2 yo *, repeat from * - * and finish with K 1. 2nd row (= wrong side): K the K sts, letting the yos drop (=long st). 3rd and 4th rows: Knit all sts. Repeat rows 1- 4. Measuring tips: On account of the pattern measure the piece when held up, rather than flat. Scarf: Loosely cast on 20 sts around 2 needles (so that the cast-on edge will be elastic), remove one needle and knit 4 rows garter st. Then knit Pattern – see instructions above – until scarf measures approx. 140 cm – read Measuring tips. Knit 4 rows garter st and bind off – so that the bind-off edge is not too tight, make a yo and bind it off after every st at the same time as binding off the K sts. The piece measures approx. 142 cm. Crocheted edge: Crochet with Vivaldi along both short sides as follows: 1st row: 1 sc in 1st st, ch 4, 2 tc in the same st, * ch 1, 3 tc in the next st *, repeat from * - *, turn the work. 2nd row: ch 5, 9 tc in first ch, ch 1, * 9 tc in the next ch, ch 1 *, repeat from * - * and finish with 1 tc in the ch 4 from previous row. |
|
 |
|
Have you finished this pattern?Tag your pictures with #dropspattern or submit them to the #dropsfan gallery. Do you need help with this pattern?You'll find 28 tutorial videos, a Comments/Questions area and more by visiting the pattern on garnstudio.com. © 1982-2026 DROPS Design A/S. We reserve all rights. This document, including all its sub-sections, has copyrights. Read more about what you can do with our patterns at the bottom of each pattern on our site. |
|


With over 40 years in knitting and crochet design, DROPS Design offers one of the most extensive collections of free patterns on the internet - translated to 17 languages. As of today we count 325 catalogs and 12298 patterns - 12288 of which are translated into English (US/in).
We work hard to bring you the best knitting and crochet have to offer, inspiration and advice as well as great quality yarns at incredible prices! Would you like to use our patterns for other than personal use? You can read what you are allowed to do in the Copyright text at the bottom of all our patterns. Happy crafting!
Post a comment to pattern DROPS 87-4
We would love to hear what you have to say about this pattern!
If you want to leave a question, please make sure you select the correct category in the form below, to speed up the answering process. Required fields are marked *.