
Popular categories
Looking for a yarn?


Comments / Questions (8)
![]() Birte Schulz wrote:
Birte Schulz wrote:
Hallo, Ich scheitere an dem Blattmuster, gibt es ein Diagramm oder ein Videotutorial? Ich habe versucht, mit anderer Wolle das Blattmuster auszuprobieren, aber ich bekomme das nicht hin! Ich scheitere bereits an Reihe 2.... Vielen Dank für Ihre Mühe und Geduld mit mir.
15.08.2023 - 20:20DROPS Design answered:
Liebe Frau Schultz, wir haben dafür nur die schriftliche Anleitung. Versuchen Sie mal mit Markierungen (je eine Markierung vor/nach den 14 Maschen bei der 1. Reihe einsetzen) und unbedingt am Anfang vom Blattmuster (nach den Zunahmen) und am Ende vom Blattmuster (von den Zunahmen), es kann Ihnen helfen; Die Maschenanzahl wird beim Blattmuster zuerst zunehmen dann abnehmen. Viel Spaß beim stricken!
16.08.2023 - 09:07
![]() Fouillade wrote:
Fouillade wrote:
J'en suis au Motif feuilles. R1 : pourquoi les mailles sont elle inversées après les 2 mailles centrales, 9 mailles env deviennent end et pareil pour les 5 mailes suivantes ? R2 : 5 m env avant les 5 premières m jersey : je ne comprends pas ce que cela veut dire. Merci de votre aide.
22.08.2019 - 15:59DROPS Design answered:
Bonjour Mme Fouillade, au 1er rang sur l'envers, le motif doit être symétrique, en fonction de votre nombre de mailles, vous tricotez à l'endroit (après les 5 m end) jusqu'aux 2 mailles centrales, et tricotez l'autre côté en sens inverse. Le rang 2 a été corrigé: on tricote à l'envers jusqu'à ce qu'il reste 5 m avant les 5 premières m jersey, puis on répète de *-*. Bon tricot!
23.08.2019 - 08:55
![]() Dorthe Nielsen wrote:
Dorthe Nielsen wrote:
Tak - ja det kan jeg se da jeg fortsatte med mønsteret. Men tak.
07.12.2008 - 17:46
![]() Lotta wrote:
Lotta wrote:
Hej Dorthe! Sjalen stickas från nacken (under hennes hår) och nedåt-utåt. Så även om du börjar men brombär kommer de att hamna överst som på bilden. Mvh, Lotta
06.12.2008 - 08:40
![]() Dorthe Nielsen wrote:
Dorthe Nielsen wrote:
Er lige begyndt på dette sjal men når jeg følger opskriften kommer brombær mønster til at være i bunden og blade i top - men sådan er den jo ikke på billedet. Jeg er helt forvirret.
05.12.2008 - 18:37
![]() Merethe Bering wrote:
Merethe Bering wrote:
Jeg har strikket 3 sjal med brombær og bladmønster. Jeg synes, det er synd at der kommer sådan en bule, der hvor man starter sjalet. Altså sådan et stykke, som man er nød til at bøje ned, når man har det på. Kan I udtænke en anden måde at starte på?
03.02.2008 - 13:30
![]() DROPS Design wrote:
DROPS Design wrote:
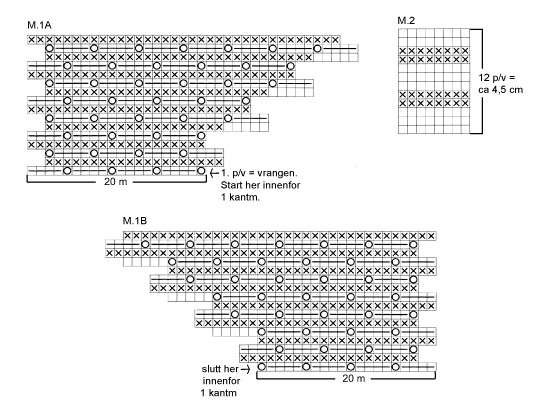
If you look immediately above the diagram, you will find lines starting with an = sign. These are the translations, and they are given in the same vertical order as the chart symbols within the diagram.
15.06.2007 - 16:25
![]() Elaine Bowman wrote:
Elaine Bowman wrote:
The diagram for this pattern is in Norwegian. How to I get it in English?
15.06.2007 - 16:13
|
||||||||||||||||
DROPS 93-37 |
||||||||||||||||
|
|
||||||||||||||||
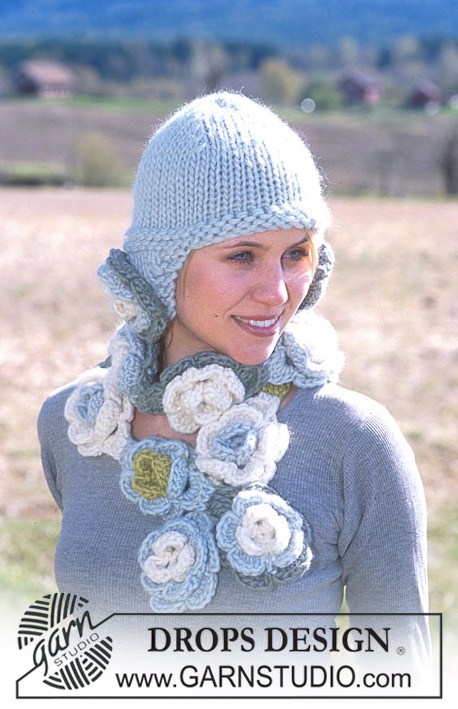
Blackberry Stitch and Leaf Pattern Shawl in Alpaca
DROPS 93-37 |
||||||||||||||||
|
Gauge: 20 sts x 26 rows in stockinette st = 10 x 10 cm Pattern: See diagram M.1 and M.2, the diagram shows the pattern from the right side. 1st row in M.1A and M.1B = 20 sts. Begin at arrow in bottom right hand corner after 1 edge st and finish at arrow in bottom left hand corner before 1 edge st. Shawl: The shawl is knit from the top edge down. Read the entire pattern before knitting: Note: the outermost st at each side is knit in garter st to finished measurements (= edge st) and the 2 center sts are knit in stockinette knit to finished measurements (as seen from the right side). Cast on 6 sts and K 1 row. Then knit as follows: Row 1 (= right side): K 1 (edge st), inc 1 st by pulling up a loop between sts, twist and knit this st, K 1, yo, K 2 (= center sts), yo, K 1, inc 1 st by pulling up a loop between sts, twist and knit this st, K 1 (edge st). Row 2 (= wrong side): K all sts, except the 2 center sts – P these sts for stockinette st as seen from the right side. Row 3: K 1 (edge st), inc 1 st as before, K to 2 center sts, yo, K 2, yo, K to edge st, inc 1 st as before and finish with K 1 (edge st). Row 4: K all sts, except the 2 center sts – P these sts for stockinette st as seen from the right side. Repeat rows 3 and 4 until there are 38 sts on needles. Note: after the last inc turn when there are 38 sts on needle and P back over all sts instead of K. Then P 1 row from right side, K 1 row from wrong side, and K 1 row from right side, keeping edge sts and center sts as before and inc at each side and in center as before = 46 sts. Now establish Blackberry stitch pattern as follows: Row 1 (= wrong side): K 1 (edge st), Pattern 1A (M.1A) over the following 20 sts, P 4, Pattern 1B (M.1B) over the following 20 sts, K 1 (edge st). Follow Pattern 1A and Pattern 1B, continuing to inc at each side of center sts every other row as before (do not inc at each side edge, you inc every 4 rows in the pattern – see chart). The increased sts at each side of the 2 center sts are knit in reverse stockinette st until there are enough sts to fit in the Blackberry st. Note: The charts for Patterns 1A and 1B have 16 rows. Once you have finished the chart, continue the pattern as established in the last 4 rows of the charts – that is, continue to cast on 5 sts every 4th row – do not go back to Row 1 of the chart. Continue the pattern until the piece measures approx. 48 cm at center back, or to desired length. Now knit Pattern 2 (M.2) one time (1st row = wrong side), keeping edge and center sts the same as before. Continue to inc at each side of center sts, and now inc 1 st inside of each edge st every other row (every right side row) by pulling up a loop between sts, then twist and knit this st. After Pattern 2 has been completed, start the Leaf pattern. Follow instructions below, keeping edge sts, center sts and incs the same as before. Row 1 (= wrong side): K 1 (edge st), * K 9 (background sts), P 5 (leaf sts) *, repeat * - * as long as the number of sts is divisible by 14 before the 2 center sts, then K the remaining sts up to the 2 center sts, P the 2 center sts, then K as many sts as you did before the 2 center sts, * P 5, K 9 * across row to last st, K 1 (edge st). Row 2 (= right side): K 1 (edge st), inc 1 st, P to 5 sts before the leaf sts, then * yo, K 1, yo, P 4, K 5, P 4 *, repeat * - * to center sts, but finish repeat with yo, K 1, yo after last P 4, then P to center sts, yo, K the 2 center sts, yo, then finish row in mirror image of first half. Row 3: K 1 (edge st), knit K over K and P over P (P the yos in Leaf) – so that the leaves are stockinette st and the remaining sts are reverse stockinette st as seen from the right side – to 2 center sts, P 2, knit K over K and P over P (P the yos in Leaf) to last st, K 1 (edge st). Row 4: K 1 (edge st), inc 1 st, P to the first leaf, then * K 1, yo, K 1, yo, K 1, P 4, sl 1, K 1, psso, K 1, K 2 tog, P 4 *, repeat * - * across row and finish with K 1, yo, K 1, yo, K 1, then P after last leaf to center sts, yo, K 2, yo, then knit 2nd half of row in mirror image. Row 5: Same as Row 3. Row 6: K 1 (edge st), inc 1 st, P to the first Leaf, then * K 2, yo, K 1, yo, K 2, P 4, Sl 1, K 2 tog, psso, P 4 *, repeat * - * and finish with K 2, yo, K 1, yo, K 2. Then P after last Leaf to center sts, yo, K 2, yo, then knit 2nd half of row in mirror image. Row 7: K 1 (edge st), K to the first Leaf, then * P 7, K 9 *, repeat * - * to center sts, P 2, then knit 2nd half of row in mirror image. Row 8: K 1 (edge st), inc 1 st, then knit K over K and P over P to center sts, yo, K 2, yo, then knit 2nd half of row in mirror image. Row 9: Same as Row 3. Row 10: K 1 (edge st), inc 1 st, P to 5 sts before the outermost Leaf, * yo, K 1, yo, P 4, sl 1, K 1, psso, K 3, K 2 tog, P 4 *, repeat * - *, and finish with yo, K 1 and yo. Then P to center sts, yo, K 2, yo, then knit 2nd half of row in mirror image. Row 11: Same as Row 3. Repeat Rows 4 through 11 three more times. Then knit Rows 4 through 9 one time. End Leaf pattern as follows (the next row is a right side row): Row 1: K 1 (edge st), inc 1 st, P to outermost Leaf, * sl 1, K 1, psso, K 3, K 2 tog, P 9 *, repeat * - *, then P after last Leaf to center sts, yo, K 2, yo, then knit 2nd half of row in mirror image. Row 2: K 1 (edge st), inc 1 st, knit K over K and P over P – but inc as follows in the K 9 between each Leaf: K 2, inc 1 st, K 5, inc 1 st, K 2 – to center sts, P 2, then knit 2nd half of row in mirror image. Row 3: K 1 (edge st), inc 1 st, knit over all sts – but dec at each side of Leaf as on Row 4 of the pattern – to center sts, yo, K 2, yo, then knit 2nd half of row in mirror image. Row 4: K 1 (edge st), inc 1 st, P the 3 sts of each Leaf, K all remaining sts and inc between each Leaf as follows: * K 2, inc 1 st, K 7, inc 1 st, K 2 * to center sts, P 2, then knit 2nd half of row in mirror image. Row 5: K 1 (edge st), inc 1 st, K all sts bind off the 3 sts of each Leaf as on Row 6 of the pattern to center sts, yo, K 2, yo, then knit 2nd half of row in mirror image. K 1 row (wrong side row) over all sts except P the center sts. Then K 1 row with incs at the side and in center as before and then K 1 row but P the center sts. Bind off loosely – so that the bound-off edge is not too tight make and bind off a yo approx. every 5 sts. |
||||||||||||||||
Diagram explanations |
||||||||||||||||
|
||||||||||||||||
 |
||||||||||||||||
Have you finished this pattern?Tag your pictures with #dropspattern or submit them to the #dropsfan gallery. Do you need help with this pattern?You'll find 16 tutorial videos, a Comments/Questions area and more by visiting the pattern on garnstudio.com. © 1982-2026 DROPS Design A/S. We reserve all rights. This document, including all its sub-sections, has copyrights. Read more about what you can do with our patterns at the bottom of each pattern on our site. |
||||||||||||||||


With over 40 years in knitting and crochet design, DROPS Design offers one of the most extensive collections of free patterns on the internet - translated to 17 languages. As of today we count 325 catalogs and 12298 patterns - 12288 of which are translated into English (US/in).
We work hard to bring you the best knitting and crochet have to offer, inspiration and advice as well as great quality yarns at incredible prices! Would you like to use our patterns for other than personal use? You can read what you are allowed to do in the Copyright text at the bottom of all our patterns. Happy crafting!
Post a comment to pattern DROPS 93-37
We would love to hear what you have to say about this pattern!
If you want to leave a question, please make sure you select the correct category in the form below, to speed up the answering process. Required fields are marked *.