
Popular categories
Looking for a yarn?


Comments / Questions (20)
![]() Alina wrote:
Alina wrote:
3 Ndl li stricken (1.Ndl = Rückreihe) Krausrippe = 2 Ndl. 1.Ndl: re, 2.Ndl: re. wie soll ich das bitte verstehen? Ndl ist doch Abkürzung für Nadeln. Jetzt bin ich ganz durcheinander. Vielen Dank für Ihre Hilfe
06.03.2026 - 13:25DROPS Design answered:
Liebe Alina, hier soll man Ndl als Reihe lesen. Viel Spaß beim Stricken!
06.03.2026 - 16:48
![]() Mymy wrote:
Mymy wrote:
Bonjour, j'ai un souci de compréhension. Pour l'empiècement je ne vois pas à quel moment on doit faire le diagramme. Merci de votre aide
12.05.2023 - 12:27DROPS Design answered:
Bonjour Mymy, vous diminuez d'abord pour un raglan 2 à 6 fois tous les 2-4 rangs (cf taille), vous ajustez ensuite le nombre de mailles à 316-331-361-376-391 mailles et tricotez ensuite le diagramme M.1 et ses diminutions entre les 8 mailles de bordure devant. Bon tricot!
12.05.2023 - 13:21
![]() Amy wrote:
Amy wrote:
Thank you for your quick response? I have another question: when the pattern says (on the body section): then work rib with 2 stitches garter stitch and 1 knitted stitch in each side (seen from the right side), what "sides" is being referred to? The two fronts where the button bands are or the sides of the sweater, beneath the armhole?
26.03.2020 - 15:30DROPS Design answered:
Dear Amy, these 2 stitches are here the first and last 2 stitches, in other words work from RS: K2, (K1, P2), repeeat from (to) until 3 sts remain, finish with K1 (rib), K2 (edge sts) (from WS: K2, P1 (K2, P1) until 2 sts remain, K2. Happy knitting!
26.03.2020 - 15:37
![]() AMY WALKO wrote:
AMY WALKO wrote:
What does M1=54 p/v=ca 18 cm mean???
26.03.2020 - 15:13DROPS Design answered:
Dear Mrs Walko, this means M.1 = diagram called M.1 at the bottom of the page is made of 54 rows and should measure approx. 18 cm. Happy knitting!
26.03.2020 - 15:15Kim wrote:
I’m new to fancy knitting and feeling so lucky to have found this site. Thank you very much for the tutorial accompanying the patterns. I’m confident that my projects will come out looking professional.
13.09.2018 - 18:17
![]() Lana wrote:
Lana wrote:
Vielen Dank für die Anleitung für den Pulli. Mir fehlt aber die Beschreibung von der Blende. Auf dem Foto sieht es nicht so aus, als ob die Blende in Krausrippe gestrickt wurde. Können Sie bitte erklären, wie das Strickmuster von der Blende ist? Vielen Dank vorab.
14.03.2014 - 23:21DROPS Design answered:
Liebe Lana, siehe Kommentar zur Frage von Bettina am 17.03.2012.
17.03.2014 - 12:35
![]() Jannie Baggerman wrote:
Jannie Baggerman wrote:
Goedemiddag Ik had eerder een mail gestuurd. Het patroon klopt helemaal, ik had zelf verkeerd geteld. Stom Het vorige berichtje kan dus vergeten worden. MvG Jannie
15.05.2013 - 12:44
![]() Jannie Baggerman wrote:
Jannie Baggerman wrote:
Goedemorgen Ik ben bezig met het vest maat L en bij bij het afkanten voor de raglan. Er staan 392 st op de naald, wanneer ik 3 x in elke 4e nld afkant dan houd ik 380 st over. In het patroon staat 368 st over. Zit er misschien ergens een telfout? Graag hoor ik van u. Met vriendelijke groet Jannie
15.05.2013 - 09:22DROPS Design answered:
Hoi Jannie. Goed om te horen dat je eruit bent. Veel breiplezier verder.
16.05.2013 - 10:16
![]() Bettina wrote:
Bettina wrote:
Hallo, wird denn die "Blende" von oben bis unten 2 M in Krausrippen, 1 re, 2 li, 1 re und 2 li gestrickt? Wenn ja waäre super wenn das schon oben erwähnt würde und nicht erst nach dem Bündchen. Vielen Dank, Bettina
17.03.2012 - 02:26DROPS Design answered:
Ja, das stimmt und steht so fast am Anfang der Anleitunge (Achtung: die 8 Blendemaschen auf jeder Seite gegen die Mitte vorne wie zuvor bis zum fertigen Mass stricken).
19.03.2012 - 09:26
![]() Asbjørg wrote:
Asbjørg wrote:
Har noen prøvd å strikke rundt i stedet for fram og tilbake? Det går mye fortere og jeg synes også det blir finere.
11.09.2010 - 23:37
|
|||||||||||||||||||
DROPS 88-17 |
|||||||||||||||||||
|
|
|||||||||||||||||||
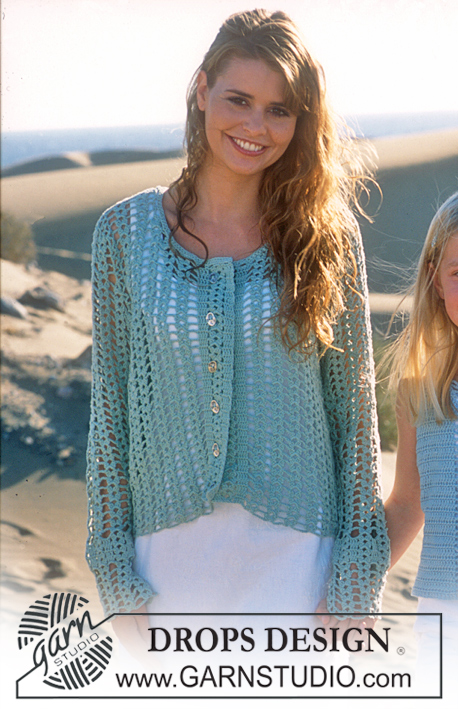
DROPS Cardigan in Alpaca
DROPS 88-17 |
|||||||||||||||||||
|
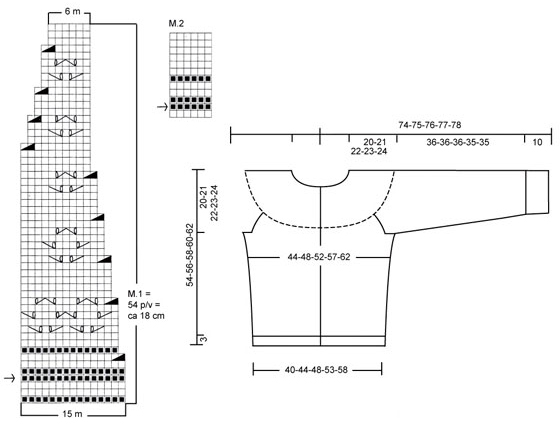
Gauge: 23 sts x 30 rows on larger needles in stockinette st = 10x10 cm Rib: * K 1, P 2 *, repeat * - *. Pattern: See chart. The pattern is seen from the right side. «M.1 = 54 p/v = ca 18 cm» means «Pattern 1 = 54 rows = approx. 18 cm». Arrows on the charts indicate starting points for crocheted edge. Buttonhole: Make buttonholes on right button band as follows (right side row): K 2 (edge sts knit in garter st), K 1, P 1, P 2 tog, yo, P 2. On the next row, P the yo. Make buttonholes when the piece measures: Size S: 2, 11, 19, 27, 36, 45 and 53 cm. Size M: 2, 11, 20, 29, 37, 46 and 55 cm. Size L: 2, 12, 21, 30, 39, 48 and 57 cm Size XL: 2, 11, 21, 30, 40, 49 and 59 cm. Size XXL: 2, 11, 21, 31, 41, 51 and 61 cm. Body: Cast on 200-218-236-260-284 sts on smaller circular needles. Knit 3 rows reverse stockinette st (1st row = wrong side), then knit rib, keeping 2 sts at each edge in garter st and begin rib with K 1 (as seen from the right side). Make buttonholes on right buttonband – see instructions above. When the piece measures 3 cm K 2 rows (first row is right side row), keeping the 8 edge sts at each side in rib/garter st as established to finished measurements. Change to larger circular needles and stockinette st (and buttonbands as before). Put 1 marker 54-58-63-69-75 sts in from each side = 92-102-110-122-134 sts between markers on back. When the piece measures 8 cm inc 1 st at each side of each marker every 5-5-5-7-7 cm a total of 5-5-5-4-4 times = 220-238-256-276-300 sts. When the piece measures 34-35-36-37-38 cm bind off 10-10-10-12-12 sts at each side for armhole (5-5-5-6-6 sts at each side of each marker) = 92-102-110-118-130 sts on back and 54-58-63-67-73 sts on each front. Lay piece aside and knit the sleeves. Sleeve: Cast on 60-60-60-66-66 sts on smaller double-pointed needles; join and place a marker at the join. K 1 row, P 1 row and K 1 row, then knit rib. When the piece measures 10 cm K 1 row and P 1 row. Change to larger double-pointed needles and stockinette st. When the piece measures 12 cm inc 1 st each side of marker a total of 9-11-14-13-15 times: Size S: every 12th row Size M: every 9th row Sizes L + XL: every 7th row Size XXL: every 6th row = 78-82-88-92-96 sts. When the piece measures 46-46-46-45-45 cm bind off 5-5-5-6-6 sts each side of marker = 68-72-78-80-84 sts. Put sts on a st holder and knit 2nd sleeve. Yoke: Put the sleeves in on the same circular needles as Body where you bound off for armholes = 336-362-392-412-444 sts. Knit 2-2-2-2-6 rows stockinette st (1st row is right side). Put 1 marker in each transition between front, back and sleeve = 4 markers. Then continue in stockinette st over all sts and shape raglan. Dec 1 st each side of each marker on right side rows as follows: Before markers: K 2 tog. After markers: slip 1 st as if to knit, K 1, psso. Make decs: Size S: every other row 2 times Size M: every other row 3 times Size L: every 4 rows 3 times Size XL: every 4 rows 4 times Size XXL: every other row 6 times = 320-338-368-380-396 sts. After last dec, P 1 wrong side row, decreasing evenly distributed to 316-331-361-376-391 sts (do not dec over buttonbands). Establish pattern on the next row as follows (right side): 8 edge sts as before, Pattern 1 over the following 300-315-345-360-375 sts and 8 edge sts as before. After last dec there are 136-142-154-160-166 sts on needles – finish Pattern 1. Then K 1 row (right side), decreasing evenly distributed to 94-98-102-106-110 sts. Neckband: Change to smaller double-pointed needles and knit Pattern 2 (including over buttonbands) – 1st row is the wrong side. Then bind off all sts loosely. Fold neckband in half to wrong side and sew in place – be sure it is not too tight. Assembly: Sew opening under the sleeve. Crocheted edge: Crochet 1 row of ch-loops around the neck (see the arrow in Pattern 2 for the row to crochet in), around lower edge of yoke (see the arrow in Pattern 1) and around lower edge of the sleeves (crochet in cast-on row). Crochet as follows: 1 sc in first st, * ch 5, skip over 2 sts, 1 sc in the next st *, repeat * - *. Do not crochet over buttonbands. |
|||||||||||||||||||
Diagram explanations |
|||||||||||||||||||
|
|||||||||||||||||||
 |
|||||||||||||||||||
Have you finished this pattern?Tag your pictures with #dropspattern or submit them to the #dropsfan gallery. Do you need help with this pattern?You'll find 27 tutorial videos, a Comments/Questions area and more by visiting the pattern on garnstudio.com. © 1982-2026 DROPS Design A/S. We reserve all rights. This document, including all its sub-sections, has copyrights. Read more about what you can do with our patterns at the bottom of each pattern on our site. |
|||||||||||||||||||


With over 40 years in knitting and crochet design, DROPS Design offers one of the most extensive collections of free patterns on the internet - translated to 17 languages. As of today we count 324 catalogs and 12291 patterns - 12281 of which are translated into English (US/in).
We work hard to bring you the best knitting and crochet have to offer, inspiration and advice as well as great quality yarns at incredible prices! Would you like to use our patterns for other than personal use? You can read what you are allowed to do in the Copyright text at the bottom of all our patterns. Happy crafting!
Post a comment to pattern DROPS 88-17
We would love to hear what you have to say about this pattern!
If you want to leave a question, please make sure you select the correct category in the form below, to speed up the answering process. Required fields are marked *.