
Popular categories
Looking for a yarn?


Comments / Questions (10)
![]() Mariola wrote:
Mariola wrote:
Dzień dobry. Jaka jest długość tyłu w rozmiarze M w momencie łączenia z przodem? Przód ma 31cm, a tył wyszedł mi 24cm. Czy nie jest za krótki? Pozdrawiam
25.02.2026 - 09:25DROPS Design answered:
Witaj Mariolo, wszystko jest w porządku. Zgodnie ze schematycznym rysunkiem miar, w rozmiarze M długość od najwyższego punktu przy dekolcie do dołu podkroju rękawa (mierząc w linii prostej) to 28 cm. 28x2=56 cm. U ciebie 31+24=55 cm, 55/2=27-28 cm. Pamiętaj, że część przodu będzie znajdować się na tyle swetra. Pozdrawiamy!
25.02.2026 - 15:23
![]() Maria Luisa wrote:
Maria Luisa wrote:
Vielen herzlichen Dank für Eure Hilfe mit den verkürzten Reihen! Jetzt hab ichs verstanden und auch schon gestrickt. Sieht ganz toll aus:-)
29.01.2026 - 22:36
![]() Christine wrote:
Christine wrote:
Pour le dos on augmente les emmanchures à 10 cm à partir du marqueur (M) et pour le devant à 28 cm. Cela fait un décalage je ne comprends pas. Merci de me renseigner
24.01.2026 - 11:34DROPS Design answered:
Bonjour Christine, c'est lié à la construction de ce type d'épaules, les épaules sont en biais dans le dos: le dos est plus court que le devant, retrouvez toutes les étapes de ce pull en vidéos et en photos en haut de page, à droite de l'onglet Explications. Bon tricot!
26.01.2026 - 08:09
![]() Christine wrote:
Christine wrote:
Bonjour Au début on doit tricoter avec 2 fils, mais selon le nombre de pelotes requises à quel moment doit-on tricoter avec 1 seul fil ? je ne vois pas dans les explications. J'ai déjà tricoter plusieurs de vos modèles et j'ai toujours compris les explications mais là cela me paraît très très compliqué. Merci de m'éclairer
23.01.2026 - 14:18DROPS Design answered:
Bonjour Christine, le pull se tricote entièrement avec 2 fils, raison pour laquelle l'échantillon est donné avec 1 fil de chaque qualité, autrement dit, vous allez tricoter tout du long avec 1 fil Air et 1 fil Kid-Silk. Bon tricot!
26.01.2026 - 07:43
![]() Maria Luisa wrote:
Maria Luisa wrote:
Zu den verkürzten Reihen am Beginn des Ärmels: laut Anleitung stricke ich über 14 Reihen nur 6 Maschen...? 3 links und 3 rechts vom Markierer an der Schulter... sehr komisch. Ich finde hier ist die Anleitung missverständlich. Vermutlich stricke ich jeweils die ganze Rückreihe.. ? Also ist die Reihe eher verlängert? Ich probiers jetzt mal so. Bitte um Aufklärung:-)
13.01.2026 - 20:09DROPS Design answered:
Liebe Maria Luisa, bei den verkürzten Reihen stricken Sie bei der 1. Reihe ab Beginn der Rund bis 3 M nach der Markierung, dann wenden und 3 M nach der Markierung stricken = Sie haben 6 Maschen gestrickt, wenden, und 2/3 (siehe Grösse) Maschen mehr stricken, wenden und 2/3 Maschen mehr stricken, so weiter stricken, dh immer 2/3 Maschen mehr am Ende jeder Reihe stricken bis Sie insgesamt 14/16 Reihen gestrickt haben. Könnte Ihnen dieses Video helfen?
15.01.2026 - 08:22
![]() Barbara wrote:
Barbara wrote:
Posso usare solo il filo drops air?
18.11.2025 - 16:26DROPS Design answered:
Buongiorno Barbara, se usa solo il filato DROPS Air il risultato sarà diverso dalla foto. Può provare a lavorare un campione e vedere se corrisponde a quello indicato. Buon lavoro!
25.11.2025 - 08:50
![]() Beate wrote:
Beate wrote:
Anleitung nach dem Zusammensetzen der Vorderteile. Stricken, bis die Arbeit eine Länge von 28 cm hat, um dann für die Armausschnitte zuzunehmen. A b w o g e m e s s e n ?
15.11.2025 - 16:34DROPS Design answered:
Liebe Beate, Sie messen ab dem Auffassen der Maschen für das Vorderteil. Viel Spaß beim Stricken!
17.11.2025 - 22:40
![]() Christina wrote:
Christina wrote:
Thank you so much for the answer! So I start measuring from the 14 (S) stitches I cast on to join the front pieces together? Sorry for asking again!! :)
07.11.2025 - 11:25DROPS Design answered:
Dear Christina, you have to measure the 27 cm from the stitches picked up for shoulder on right and left front pieces, not from the middle stitches cast on for neck, ie note in the pattern that sentence: All length-measurements on the front piece are taken from this knitted-up row., you will measure from here. Happy knitting!
18.11.2025 - 11:27
![]() Christina wrote:
Christina wrote:
After adding the two front pieces together the pattern says to knit until the piece measures 27 centimeters, but where do I start measuring? From the neck or the shoulder (where the back and front piece were joined)?
05.11.2025 - 20:29DROPS Design answered:
You measure from the knitted-up row for the front pieces. Happy knitting!
05.11.2025 - 20:47
![]() Liisa wrote:
Liisa wrote:
Kaunis pusero, mutta on kuvista ei näe, miltä eurooppalaisen olkapään tulisi näyttää ja miten hiha on istutettu. Mallin hiukset peittävät olkapään rakenteen. Onko teillä kuvia, joissa hiukset eivät ole tiellä?
22.10.2025 - 15:16
|
||||||||||
Cherry Hill Sweater#cherryhillsweater |
||||||||||
 |
 |
|||||||||
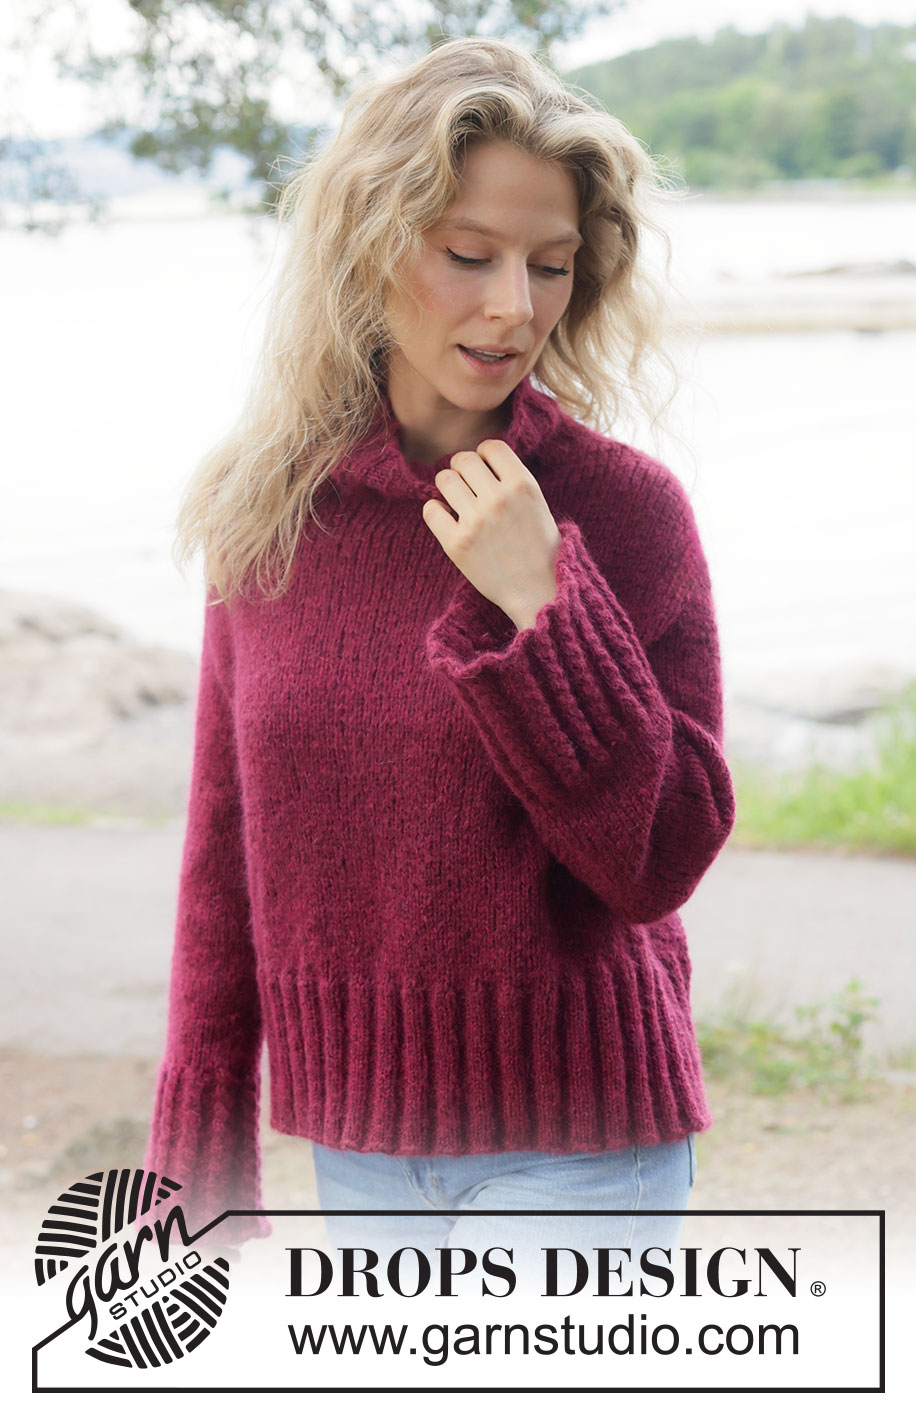
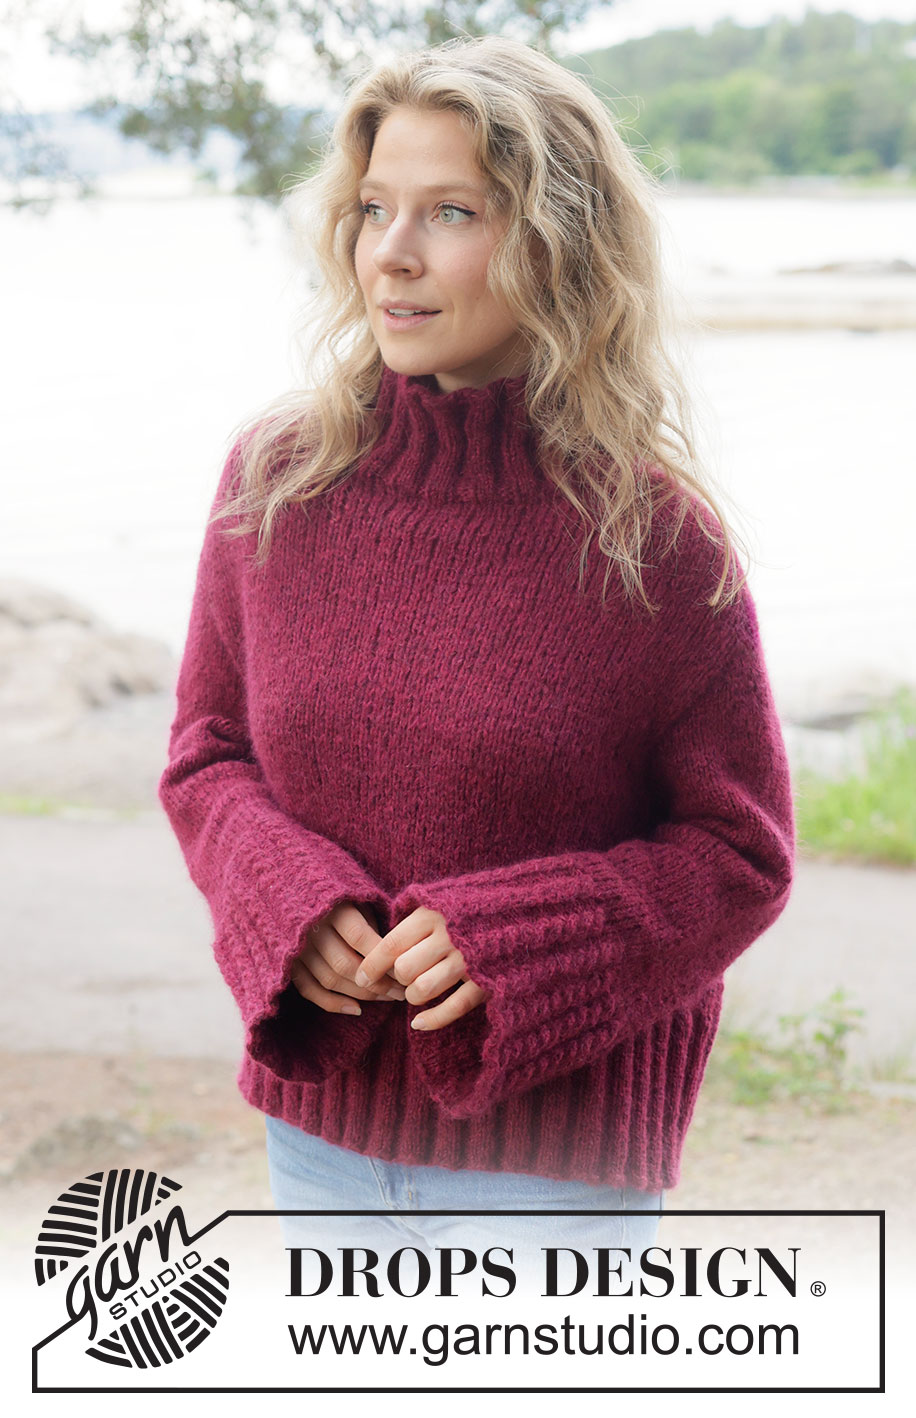
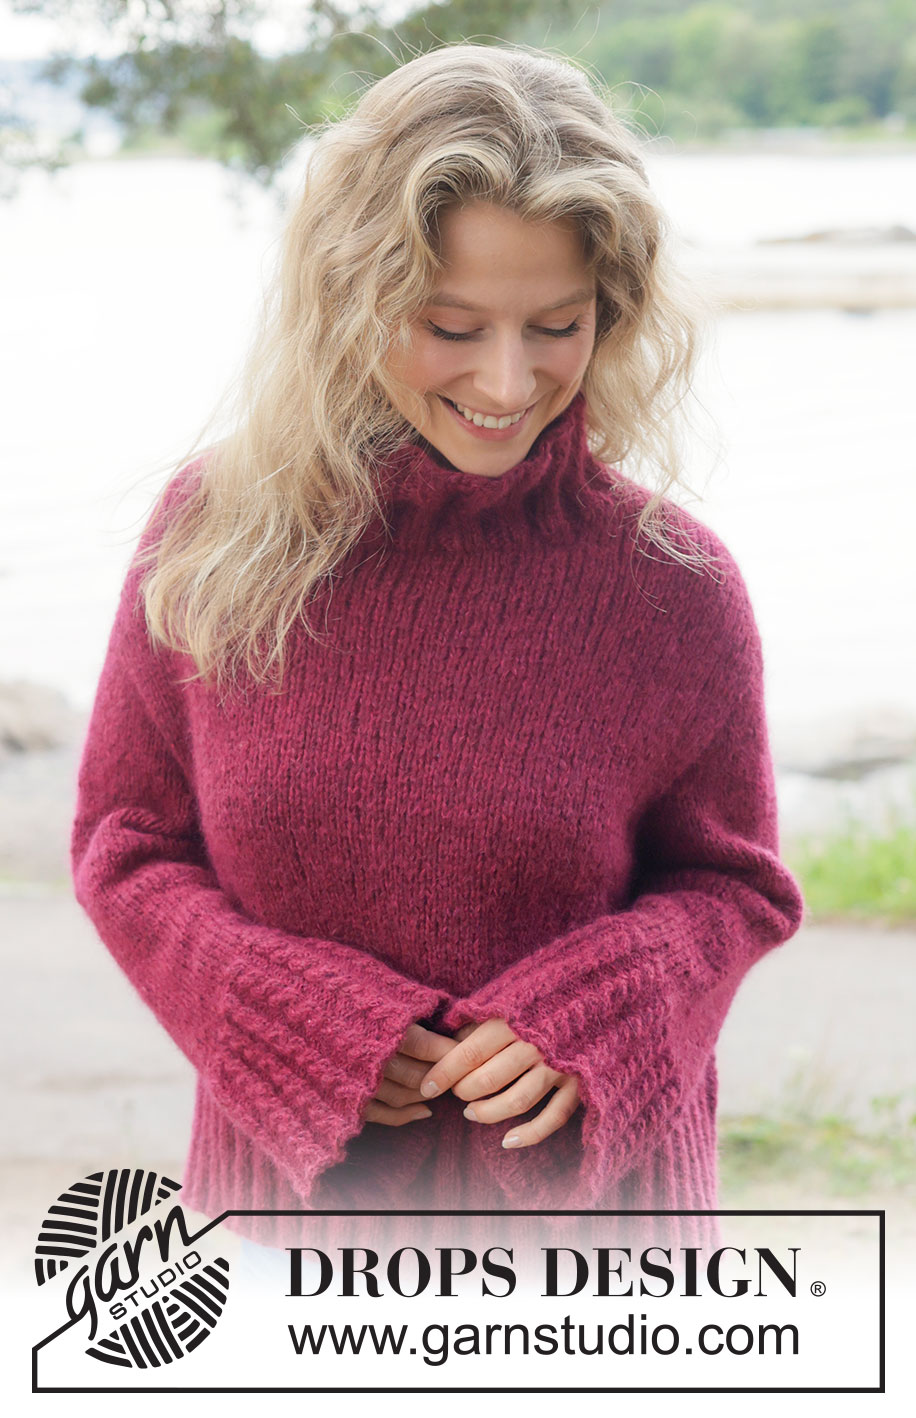
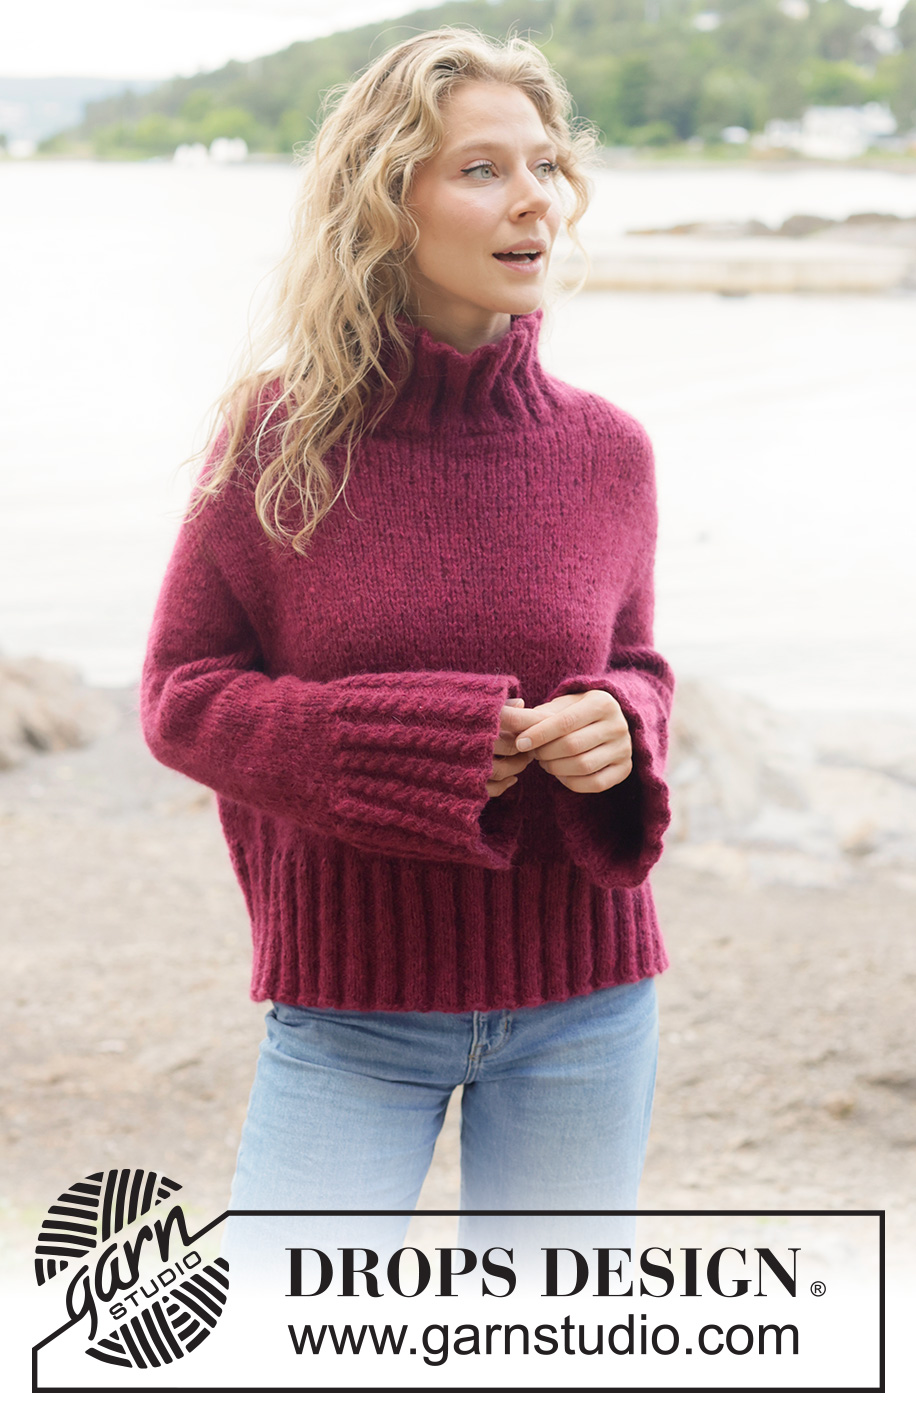
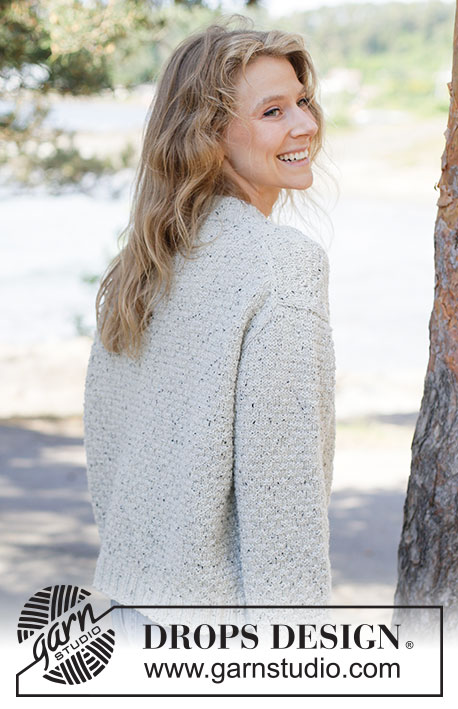
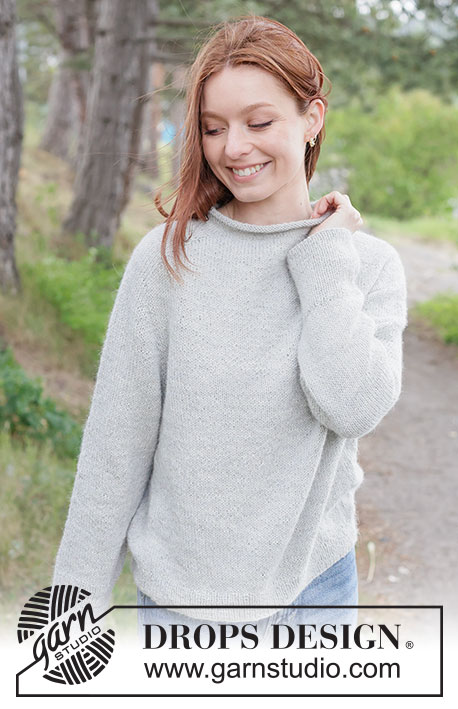
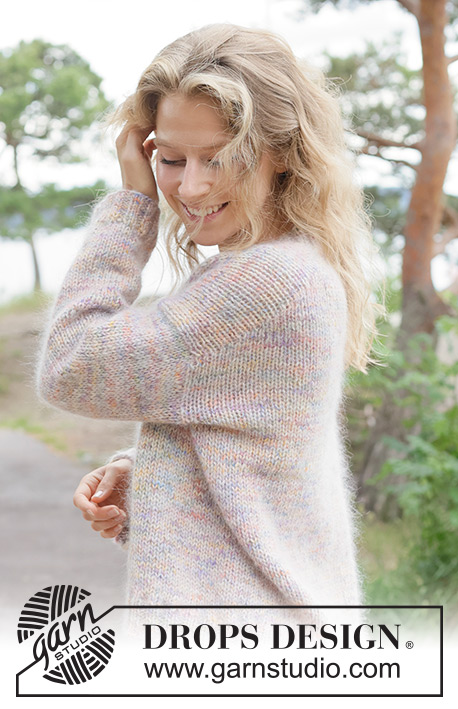
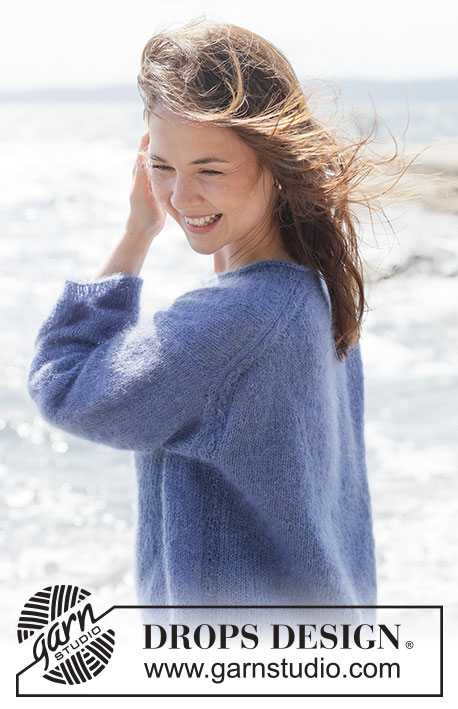
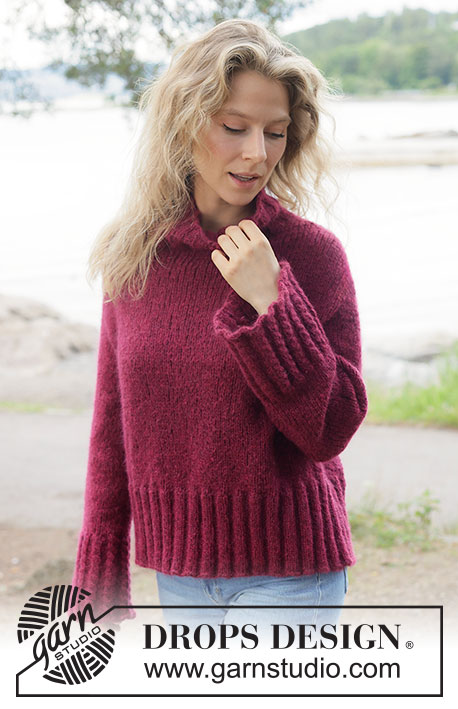
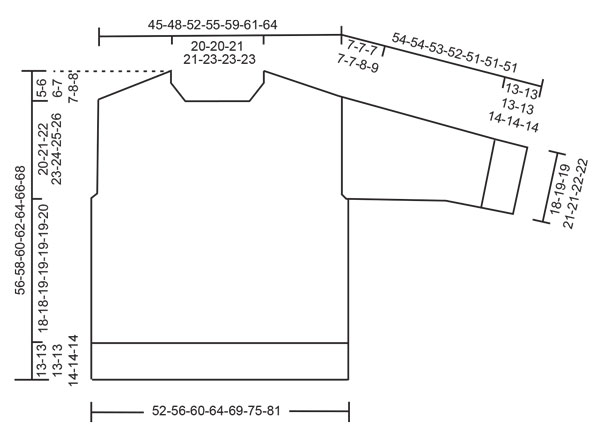
Knitted over-sized sweater in DROPS Air and DROPS Kid-Silk. The piece is worked top down with European/diagonal shoulders, high neck and cables. Sizes XS - XXXL.
DROPS 264-22 |
||||||||||
|
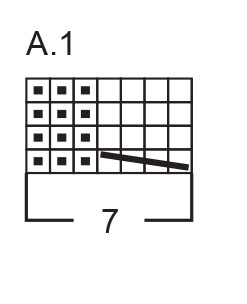
------------------------------------------------------- EXPLANATIONS FOR THE PATTERN: ------------------------------------------------------- INCREASE TIP-1: INCREASE 1 STITCH TOWARDS THE LEFT - from RIGHT SIDE: Use left needle to pick up yarn between 2 stitches from row below, pick up yarn from the front and knit in the stitch loop that is on the back of the needle. INCREASE 1 STITCH TOWARDS THE RIGHT - from RIGHT SIDE: Use left needle to pick up yarn between 2 stitches from row below, pick up yarn from the back and knit in the stitch loop that is on the front side of the needle. INCREASE TIP-2: INCREASE 1 STITCH TOWARDS THE RIGHT - from WRONG SIDE: Use left needle to pick up yarn between 2 stitches from row below, pick up yarn from the back and purl in the stitch loop that is on the front side of the needle. INCREASE 1 STITCH TOWARDS THE LEFT - from WRONG SIDE: Use left needle to pick up yarn between 2 stitches from row below, pick up yarn from the front and purl in the stitch loop that is on the back side of the needle. KNITTING TIP: When working short rows, there will be a small hole after each turn. This hole can be closed by tightening the strand or using the technique German Short Rows as follows: Slip the first stitch purl-wise, take the strand over the right needle and tighten well from the back (2 loops on the needle). These loops are worked together on the next row. DECREASE TIP: Decrease 1 stitch on each side of the marker thread as follows: Work until there are 3 stitches left before the marker thread, knit 2 together, knit 2 (marker thread sits between these 2 stitches) slip 1 stitch knit-wise, knit 1 and pass the slipped stitch over the knitted stitch (2 stitches decreased). PATTERN: See diagram A.1. ------------------------------------------------------- START THE PIECE HERE: ------------------------------------------------------- SWEATER – SHORT OVERVIEW OF THE PIECE: The pattern uses both long and short needles; start with the length which fits the number of stitches and change when necessary. The piece is started back and forth, casting on stitches at the back of the neck and working the back piece top down, while increasing stitches on each side for the shoulders, which become slightly diagonal. The back piece is worked as far as the armholes. The front piece is then worked in 2 sections, knitting up stitches along 1 back shoulder, working stockinette stitch and increasing for the neckline. This is repeated on the other shoulder. The 2 front sections are joined when the neckline is finished and worked as far as the armholes. The front and back pieces are joined on the same circular needle and the body worked in the round. Stitches are knitted up around the armholes for the sleeves, which are started back and forth with short rows for the sleeve cap, then finished in the round. Stitches are knitted up around the neckline and the neck is worked in the round to finish. If there is a «0» in your chosen size, skip the information and go straight to the next instruction. BACK PIECE: The piece is worked back and forth. cast on 32-32-34-34-36-36-36 stitches with circular needle size 5.5 MM = US 9, 1 strand DROPS Kid-Silk and 1 strand DROPS Air (2 strands). ROW 1 (wrong side): Purl. ROW 2 (right side): Read INCREASE TIP-1. Knit 3, increase 1 stitch towards the left, knit until there are 3 stitches left on the row, increase 1 stitch towards the right, knit 3. ROW 3 (wrong side): Read INCREASE TIP-2. Purl 3, increase 1 stitch towards the right, purl until there are 3 stitches left on the row, increase 1 stitch towards the left, purl 3. Work ROWS 2 and 3 a total of 9-10-11-12-13-14-15 times (18-20-22-24-26-28-30 rows worked) = 68-72-78-82-88-92-96 stitches. Insert 1 marker outermost on one side. The piece is now measured from here! Continue with stockinette stitch (remember to maintain the knitting gauge), until the piece measures 9-9-10-9-10-8-8 cm = 3½"-3½"-4"-3½"-4"-3⅛"-3⅛" from the marker measured along the armhole. Now increase for the armholes. INCREASE FOR ARMHOLES: ROW 1 (right side): Remember INCREASE TIP-1. Knit 3, increase 1 stitch towards the left, knit until there are 3 stitches left on the row, increase 1 stitch towards the right, knit 3. ROW 2 (wrong side): Purl. Work ROWS 1 and 2 a total of 3-3-3-4-4-6-7 times (6-6-6-8-8-12-14 rows worked) = 74-78-84-90-96-104-110 stitches. Continue working until the piece measures 12-12-13-13-14-14-15 cm = 4¾"-4¾"-5⅛"-5⅛"-5½"-5½"-6" from the marker measured along the armhole, finishing with a row from the wrong side. Cut the strand and place the stitches on a stitch holder/thread. Work the left front piece along the left back shoulder as follows. LEFT FRONT PIECE: Find the left back shoulder as follows: Lay the back piece flat, right side up, with the stitch holder/thread towards you; left side of piece = left shoulder. Start from the right side by the neck on the left back shoulder and knit up 1 stitch in each row worked, inside the outermost stitch as far as the armhole = 18-20-22-24-26-28-30 stitches. All length-measurements on the front piece are taken from this knitted-up row. Work stockinette stitch back and forth, with the first row from the wrong side until the piece measures 4-5-6-7-8-9-10 cm = 1½"-2"-2⅜"-2¾"-3⅛"-3½"-4". Increase for the neckline as follows: ROW 1 (right side): Knit. ROW 2 (wrong side): Purl, cast on 1 stitch at the end of the row. ROW 3 right side): Knit.. ROW 4 (wrong side): Purl, cast on 1 stitch at the end of the row. ROW 5 right side): Knit.. ROW 6 (wrong side): Purl, cast on 2 stitches at the end of the row. ROW 7 right side): Knit.. ROW 8 (wrong side): Purl, cast on 2 stitches at the end of the row. ROW 9 right side): Knit.. ROW 10 (wrong side): Purl, cast on 3 stitches at the end of the row = 27-29-31-33-35-37-39 stitches. Cut the strand and place the stitches on a stitch holder/thread. Work the right front piece along the right back shoulder as follows. RIGHT FRONT PIECE: Start from the right side by the armhole on the right back shoulder and knit up 1 stitch in each row worked, inside the outermost stitch as far as the neck = 18-20-22-24-26-28-30 stitches. All length-measurements on the front piece are taken from this knitted-up row. Work stockinette stitch back and forth, with the first row from the wrong side until the piece measures 4-5-6-7-8-9-10 cm = 1½"-2"-2⅜"-2¾"-3⅛"-3½"-4". Increase for the neckline as follows: ROW 1 (right side): Knit, cast on 1 stitch at the end of the row ROW 2 (wrong side): Purl. ROW 3 (right side): Knit, cast on 1 stitch at the end of the row ROW 4 (wrong side): Purl. ROW 5 (right side): Knit, cast on 2 stitches at the end of the row ROW 6 (wrong side): Purl. ROW 7 (right side): Knit, cast on 2 stitches at the end of the row ROW 8 (wrong side): Purl. ROW 9 (right side): Knit, cast on 3 stitches at the end of the row ROW 10 (wrong side): Purl = 27-29-31-33-35-37-39 stitches, with the next row from the right side. The 2 front pieces are now joined as follows. FRONT PIECE: Work as follows from the right side: Knit the 27-29-31-33-35-37-39 stitches on the right front piece, cast on 14-14-16-16-18-18-18 stitches, knit the 27-29-31-33-35-37-39 stitches on the left front piece = 68-72-78-82-88-92-96 stitches. Work stockinette stitch back and forth until the piece measures 25-27-28-29-30-30-30 cm = 9¾"-10⅝"-11"-11⅜"-11¾"-11¾"-11¾". Now increase for the armholes. INCREASE FOR ARMHOLES: ROW 1 (right side): Remember INCREASE TIP-1. Knit 3, increase 1 stitch towards the left, knit until there are 3 stitches left on the row, increase 1 stitch towards the right, knit 3. ROW 2 (wrong side): Purl. Work ROWS 1 and 2 a total of 3-3-3-4-4-6-7 times (6-6-6-8-8-12-14 rows worked) = 74-78-84-90-96-104-110 stitches. Continue working until the piece measures 28-30-31-33-34-36-37 cm = 11"-11¾"-12¼"-13"-13⅜"-14¼"-14½", finishing with a row from the wrong side. The front and back pieces are now joined for the body as follows. BODY: From the right side, knit the 74-78-84-90-96-104-110 stitches on the front piece, cast on 4-6-6-6-8-8-12 stitches (= mid-under the sleeve), knit the 74-78-84-90-96-104-110 stitches on the back piece, cast on 4-6-6-6-8-8-12 stitches (= mid-under the sleeve) = 156-168-180-192-208-224-244 stitches. The body is now measured from here! Continue working stockinette stitch in the round for a further 18-18-19-19-19-19-20 cm = 7"-7"-7½"-7½"-7½"-7½"-8". Change to circular needle size 4.5 MM = US 7. Work rib (knit 3, purl 3), AT THE SAME TIME increase 48-48-54-60-62-70-74 stitches evenly on the first round = 204-216-234-252-270-294-318 stitches. When the rib measures 13-13-13-13-14-14-14 cm = 5⅛"-5⅛"-5⅛"-5⅛"-5½"-5½"-5½", bind off with rib. The sweater measures approx. 56-58-60-62-64-66-68 cm = 22"-22¾"-23⅝"-24⅜"-25¼"-26"-26¾" measured from the neck. SLEEVES: The sleeve is worked top down. Lay the piece flat and insert 1 marker at the top of the armhole. (NOTE! This is not the same place as the knitted-up row on the front piece but approx. 8-11 cm = 3⅛"-4⅜" down the front piece). Use circular needle size 4.5 MM = US 7 and 1 strand of each quality. Start in the middle of the cast-on stitches under the sleeve and knit up 58-64-68-72-78-82-90 stitches around the armhole, with equal numbers of stitches on both sides of the marker. Change to circular needle size 5.5 MM = US 9. Work stockinette stitch back and forth with short rows for the sleeve cap (to give the sleeve a better fit), starting from mid-under the sleeve as follows: ROW 1 (right side): Knit to 3 masker stitches the marker on top of the sleeve, turn – read KNITTING TIP. ROW 2 (wrong side): Purl to 3 stitches past the marker, turn. ROW 3 (right side): Knit to 2-2-3-3-3-3-3 stitches past the previous turn, turn. ROW 4 (wrong side): Purl to 2-2-3-3-3-3-3 past the previous turn, turn. Repeat ROWS 3 and 4 until you have turned a total of 14-14-14-14-14-16-18 times (7-7-7-7-7-8-9 times each side, with the last row from the wrong side). AFTER THE LAST TURN: After the row 4 has been worked for the last time, turn and knit back to the beginning of the round (mid-under the sleeve). Insert 1 marker-thread here; this is used when decreasing under the sleeve. Allow it to follow your work onwards. Work stockinette stitch in the round. AT THE SAME TIME, when the sleeve measures 1 cm = ⅜" from the join, decrease 2 stitches mid-under the sleeve – read DECREASE TIP: Decrease every 2nd round 2-3-3-3-4-4-6 times, then decrease 2 stitches every 12-12-9-12-5½-5½-3½ cm = 4¾"-4¾"-3½"-4¾"-2⅛"-2⅛"-1¼" a total of 1-1-3-2-4-4-6 times = 52-56-56-62-62-66-66 stitches. Continue working until the sleeve measures 41-41-40-39-37-37-37 cm = 16⅛"-16⅛"-15¾"-15¼"-14½"-14½"-14½" from the shoulder. Change to double pointed needles size 4.5 MM = US 7. Work 1 round of rib (knit 4, purl 3), AT THE SAME TIME increase 32-35-35-36-36-39-39 stitches evenly on this round = 84-91-91-98-98-105-105 stitches. Continue with A.1 in the round (12-13-13-14-14-15-15 repeats). When the rib measures 13-13-13-13-14-14-14 cm = 5⅛"-5⅛"-5⅛"-5⅛"-5½"-5½"-5½", bind off slightly loosely with rib. The sleeve measures approx. 54-54-53-52-51-51-51 cm = 21¼"-21¼"-21"-20½"-20"-20"-20" from the shoulder. NECK: Use circular needle size 4.5 MM = US 7 and 1 strand of each quality (2 strands). Start from the right side on one shoulder-line and knit up 90-96-102-102-108-114-114 stitches inside 1 stitch – the stitch count must be divisible by 6. Work rib in the round (knit 3, purl 3) for 12-12-12-12-13-13-13 cm = 4¾"-4¾"-4¾"-4¾"-5⅛"-5⅛"-5⅛". Change to circular needle size 5.5 MM = US 9. Bind off slightly loosely with rib. |
||||||||||
Diagram explanations |
||||||||||
|
||||||||||
 |
||||||||||
 |
||||||||||
Have you finished this pattern?Tag your pictures with #dropspattern #cherryhillsweater or submit them to the #dropsfan gallery. Do you need help with this pattern?You'll find 34 tutorial videos, a Comments/Questions area and more by visiting the pattern on garnstudio.com. © 1982-2026 DROPS Design A/S. We reserve all rights. This document, including all its sub-sections, has copyrights. Read more about what you can do with our patterns at the bottom of each pattern on our site. |
||||||||||


With over 40 years in knitting and crochet design, DROPS Design offers one of the most extensive collections of free patterns on the internet - translated to 17 languages. As of today we count 325 catalogs and 12298 patterns - 12288 of which are translated into English (US/in).
We work hard to bring you the best knitting and crochet have to offer, inspiration and advice as well as great quality yarns at incredible prices! Would you like to use our patterns for other than personal use? You can read what you are allowed to do in the Copyright text at the bottom of all our patterns. Happy crafting!
Post a comment to pattern DROPS 264-22
We would love to hear what you have to say about this pattern!
If you want to leave a question, please make sure you select the correct category in the form below, to speed up the answering process. Required fields are marked *.