
Popular categories
Looking for a yarn?


Comments / Questions (24)
![]() Christiane wrote:
Christiane wrote:
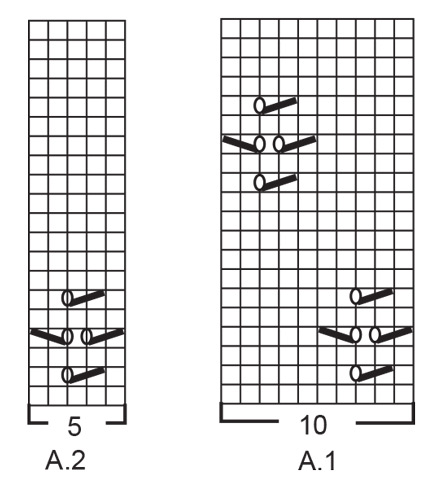
In A1 stellt die 0 einen Umschlag dar. In A2 hat die 0 einen I in der Mitte. Es fehlt die Erklärung zu diesem Symbol. Wird dieser Umschlag in der nächsten Reihe anders abgestrickt? Mit oder ohne Loch? Vielen Dank und liebe Grüße. C.
02.07.2024 - 18:31DROPS Design answered:
Liebe Christiane, das ist beide der gleiche Umschlag, der Loch für das Lochmuster bilden soll. Viel Spaß beim Stricken!
03.07.2024 - 08:11
![]() Jane D wrote:
Jane D wrote:
My little diamond shaped lace bits are not tidy, and I don't know why. Most often the right side of them (the second row of the lace pattern) turns out looking like there's no hole, at all. Is there a specific way to knit that one so it doesn't vanish? I've tried varying what I do, and nothing looks better. Thanks!
12.05.2024 - 16:33DROPS Design answered:
Dear Jane, see our answer below. Happy Knitting!
12.05.2024 - 22:02
![]() Jane D wrote:
Jane D wrote:
My little diamond shaped lace bits are not tidy, and I don't know why. Most often the right side of them (the second row of the lace pattern) turns out looking like there's no hole, at all. Is there a specific way to knit that one so it doesn't vanish? I've tried varying what I do, and nothing looks better. Thanks!
12.05.2024 - 16:32DROPS Design answered:
Dear Jane, have you tried blocking your lace? Blocking should open up the pattern, as well as make your knitting somewhat more uniform. Happy Knitting!
12.05.2024 - 21:59
![]() Betsy wrote:
Betsy wrote:
Hallo Ik snap niet hoe het lijf patroon precies gaat vanaf het * brei patroon met A1 en A2. Brei je 19 st recht en dan A1 over de 90 steken of A2? Staat een beetje verwarrend voor mij.
03.05.2024 - 11:04DROPS Design answered:
Dag Betsy,
Je breit eerst 19 steken recht en daarna A.1 over 90 steken (dat zijn dus 9 herhalingen van A.1 in de breedte omdat A.1 10 steken breed is), na die 90 steken brei je een maal A.2 in de breedte, enzovoort.
05.05.2024 - 11:36
![]() Jane D wrote:
Jane D wrote:
The pattern for XL size... If you cast on 308 stitches, knit the rib, decrease by 66, the resulting 242 is correct. But then when you proceed with the pattern in the description, A1 and A2, the total stitches assuming the 19 + 90 + 26 + 90 + 7 is only 232 stitches. 1. Am I correct that the 90- stitch sections are the front and back, and the 19+7 and 26 are under the arms? Does the pattern need to be corrected to decrease 76 instead of 66? Thank you
01.05.2024 - 01:24DROPS Design answered:
Dear Jane, the row after the ribbing and decrease (242 stitch) looks like this: 19 (knit) +90 (A.1)+5 (A.2)+26 (Knit)+90 (A.1)+5 (A.2) + 7 (knit) = 242 (You have not counted the 5 stitches of the A.2 pattern). I hope this helps. Happy Knitting!
01.05.2024 - 05:23
![]() Susanne Kierkegaard wrote:
Susanne Kierkegaard wrote:
Jeg har udfordring med ærmekuppel: efter de beskrevne indtagninger, måler ærmet 16 cm. I skriver, at der skal indtages 1 maske i hver side til det måler 15 cm og derefter 2 m - 3 m og 5 m. Skal/kan jeg bare springe indtagningen med 1 m over??
29.04.2024 - 11:42DROPS Design answered:
Hej Susanne, det er fordi dine pinde fylder lidt mere end hvad de gør i strikkefastheden i opskriften, så ja du hopper bare over den første indtagning :)
02.05.2024 - 12:25
![]() Nena wrote:
Nena wrote:
This design is very pretty but the description of how to shape the sleeve cap is hopeless. There are no no numbers to show how many stitches should be left as each batch of decreases are done so it\'s total guesswork. It\'s just lazy not to include these. Very disappointing as I\'ll have to try and find another pattern to use in order to finish the garment. Please review and clarify
23.04.2024 - 01:37DROPS Design answered:
Dear Nena, the number of remaining stitches is here less important than the height of the sleeve cap, so just cast off the number of stitches as explained for your size, you are welcome to tell us which size you are working on so that we can simplify for you. When you cast off 1 stitch on each side until sleeve cap measures 16, 15 or 16 cm (see size), just make sure you have cast off the same number of sts on each side so that the sleeve cap is symmetrical. Hope it will help. Happy knitting!
23.04.2024 - 08:18
![]() Maria Augusta wrote:
Maria Augusta wrote:
Model très sympa à tricoter. À refaire avec un autre motif.
15.04.2024 - 10:04
![]() Anne Ristimella wrote:
Anne Ristimella wrote:
Mitä eroa A.1 ja A.2 on? Esim neulotaan X määrällä silmukoita A.1 ja sitten A.2, sitten x määrällä silmukoita oikein.
12.04.2024 - 09:29DROPS Design answered:
Hei, kerroksella neulotaan mallineuletta näin: 9-14-13-19-19-28 silmukkaa oikein, neulo seuraavilla 70-70-80-80-90-90 silmukalla mallineuletta piirroksen A.1 mukaisesti, A.2, 12-20-18-26-26-40 silmukkaa oikein, neulo seuraavilla 70-70-80-80-90-90 silmukalla mallineuletta piirroksen A.1 mukaisesti, A.2, 3-6-5-7-7-12 silmukkaa oikein. Tällä tavoin mallineuleesta tulee siisti.
15.04.2024 - 18:05
![]() Jean Smith wrote:
Jean Smith wrote:
Is this pattern available in a 'pattern' as opposed to 'diagram' format? Or is there a way to create a 'pattern' so as to understand what one is meant to do? Diagrams just don't work for non-mathematical people. Thank you.
12.04.2024 - 00:58DROPS Design answered:
Dear Jean, we are sorry, but this pattern is not available in a different format. We are using diagrams, not only becaise our site is available in many languages, but also, because we believe, that with diagrams you can see not only the next step, the very next stitch, but also the "bigger picture", as how rows and stitches relate to each other. Please see our link text lesson on how to read knitting diagrams, and don't forget, that you can always ask for help either in person or over the phone from the store you bought your DROPS yarns from. Happy knitting!
12.04.2024 - 02:21
|
|||||||||||||
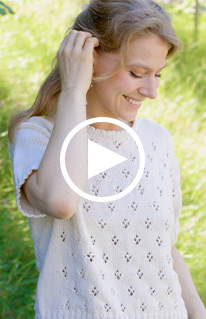
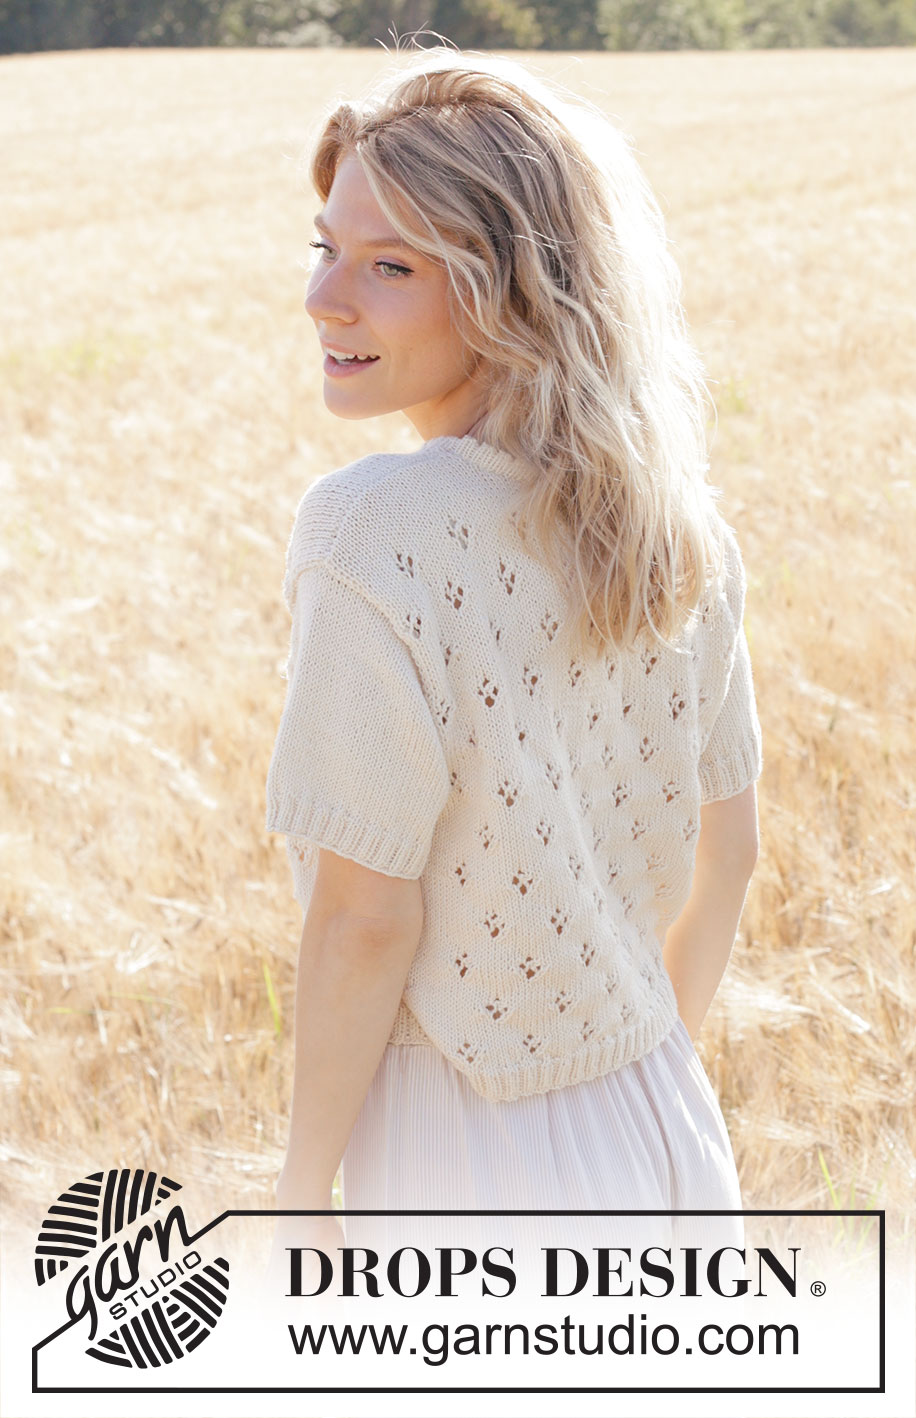
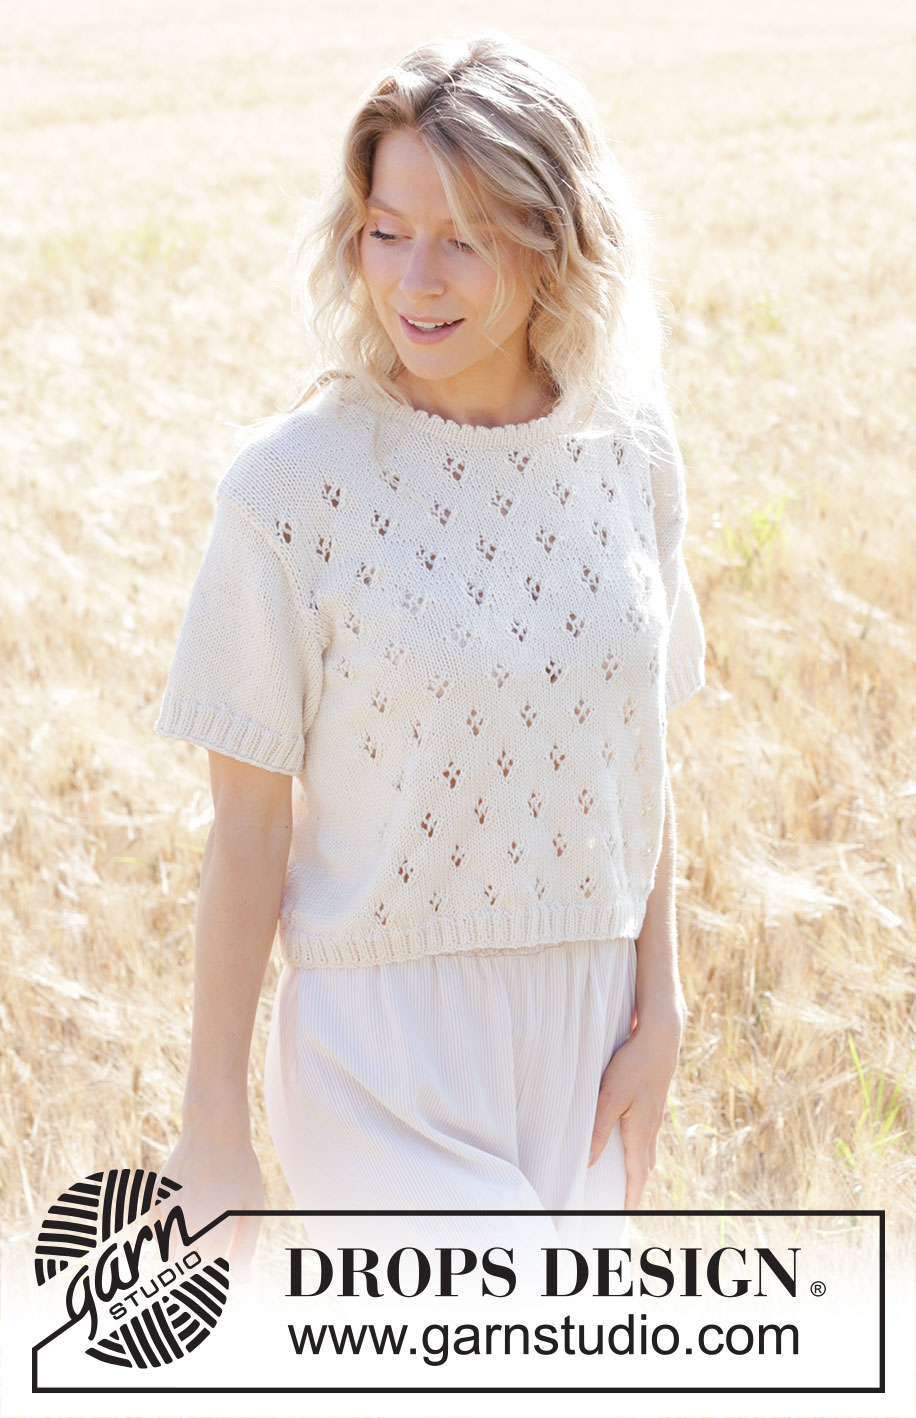
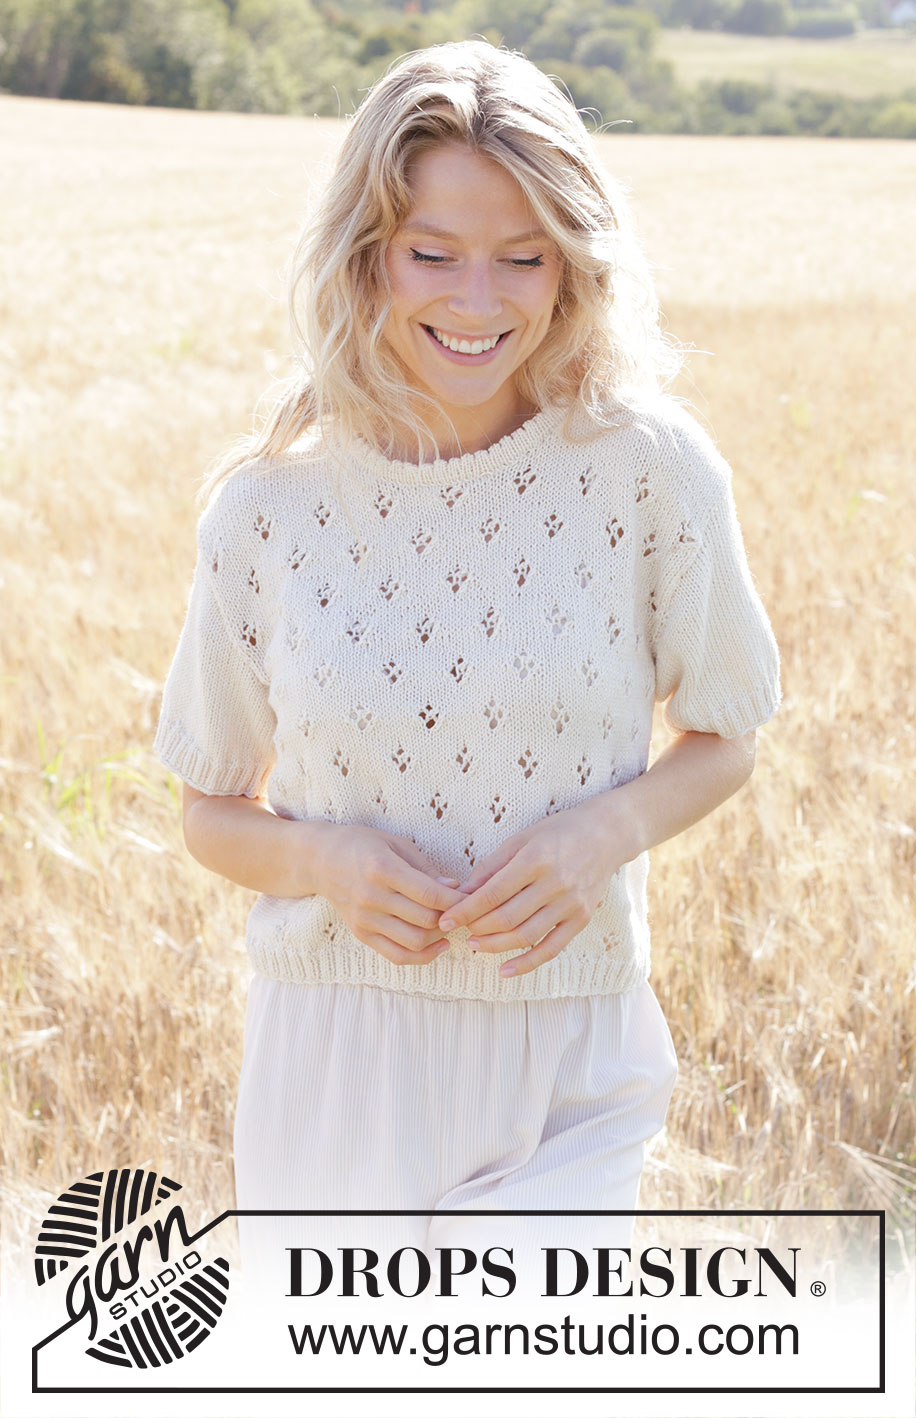
White Spring#whitespringtop |
|||||||||||||
 |
 |
||||||||||||
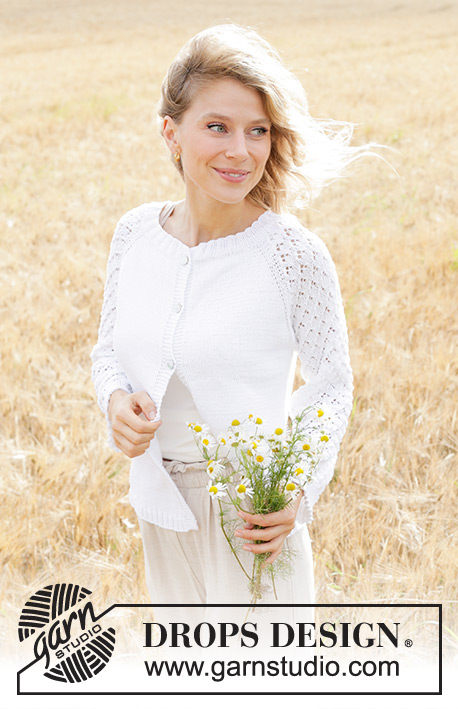
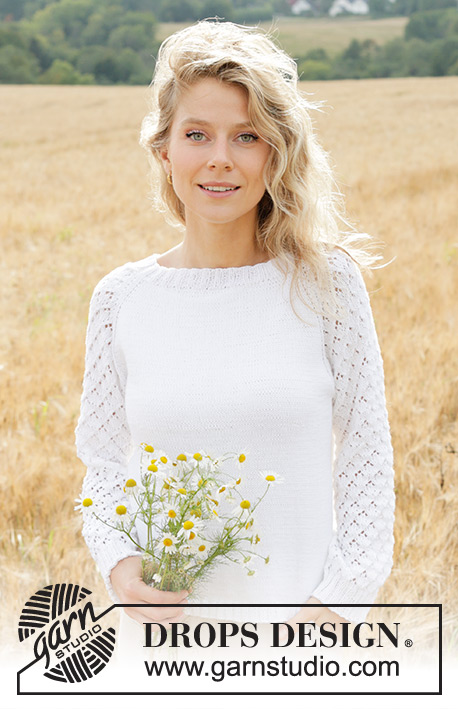
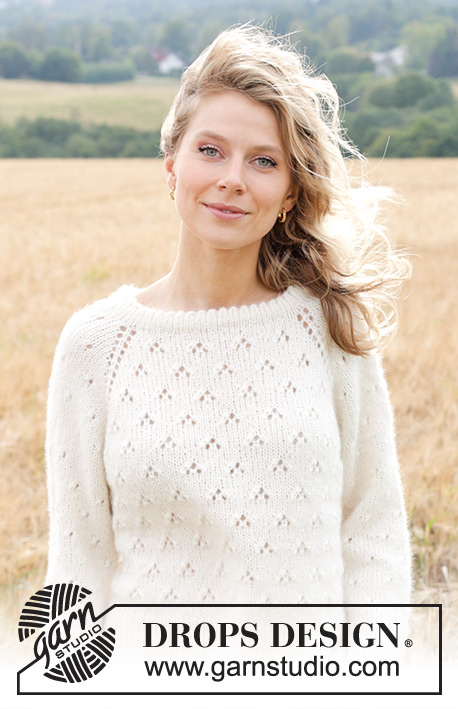
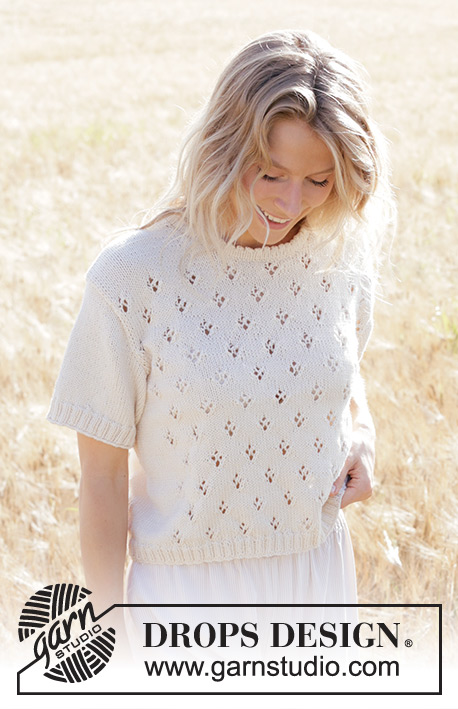
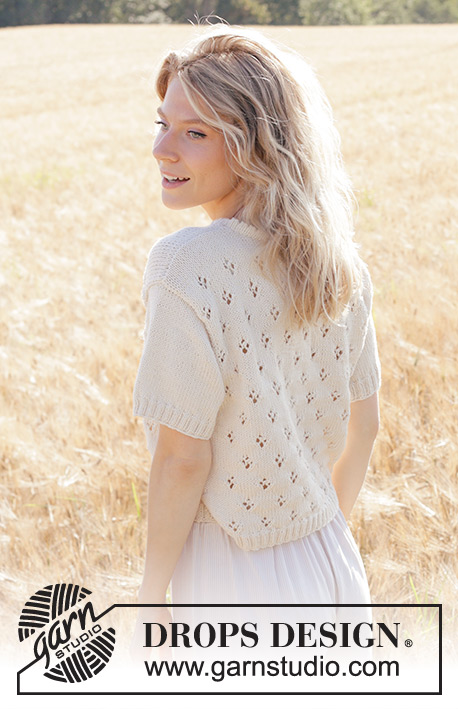
Knitted top in DROPS Cotton Merino. Piece is knitted bottom up with lace pattern and short sleeves. Size XS – XXL.
DROPS 250-7 |
|||||||||||||
|
---------------------------------------------------------- EXPLANATION FOR THE PATTERN: ---------------------------------------------------------- PATTERN: See diagrams A.1 and A.2. INCREASE TIP (applies to sleeves): Work until 1 stitch remains before marker thread, make 1 yarn over, knit 2 (marker thread is in the middle of these 2 stitches), make 1 yarn over. On next round knit yarns over twisted to avoid holes. Then work the new stitches in stockinette stitch. ---------------------------------------------------------- START THE PIECE HERE: ---------------------------------------------------------- SWEATER - SHORT OVERVIEW OF THE PIECE: In this pattern long and short needles have been used, begin with fitting length and switch as needed. Piece is worked in the round on circular needle, from the bottom and up to armholes. Then divide the piece for front piece and back piece, and finish each part separately back and forth. Work sleeves bottom up, and work in the round on needle until armhole, then work sleeve back and forth on row. Sew parts together. Finish by picking up stitches around the neck and work a neck edge in the round. BODY: Cast on 216-236-260-280-308-336 stitches on circular needle size 2.5 MM = US 1.5 with Cotton Merino. Knit 1 round. Then work rib (= knit 2/purl 2) in the round for 3 cm = 1⅛". Switch to circular needle size 4 MM = US 6. Knit next round while at the same time decreasing 42-46-54-58-66-66 stitches evenly = 174-190-206-222-242-270 stitches. Then work pattern from the beginning of round as follows: Knit 9-14-13-19-19-28, A.1 over the next 70-70-80-80-90-90 stitches, A.2, knit 12-20-18-26-26-40, A.1 over the next 70-70-80-80-90-90 stitches, A.2, knit 3-6-5-7-7-12. Continue the pattern like this. REMEMBER THE KNITTING GAUGE! Work until piece measures 26-28-29-30-31-32 cm = 10¼"-11"-11⅜"-11¾"-12¼"-12½". DIVIDING FOR ARMHOLES: On next round divide the piece for front piece and back piece, work round as follows: * Bind off 6-8-8-12-12-16 stitches, knit 3-6-5-7-7-12, work A.1 over the next 70-70-80-80-90-90 stitches, work A.2, knit 3-6-5-7-7-12 *, work from *-* 1 more time on round. Fasten off. Now work front piece and back piece back and forth on needle until finished measurements. BACK PIECE: = 81-87-95-99-109-119 stitches. Continue back and forth with pattern as before, in each side bind off stitches for armholes, bind off as follows on every other row: 2 stitches 0-0-0-0-0-3 times, then 1 stitch 1-4-3-5-5-4 times = 79-79-89-89-99-99 stitches. When piece measures 41-44-46-48-50-52 cm = 16⅛"-17¼"-18"-19"-19¾"-20½", work in stockinette stitch over all stitches, finish after a whole lace pattern. When piece measures 42-45-47-49-51-53, bind off the middle 13-13-15-15-17-17 stitches for neck and finish each shoulder separately. Then bind off for neck on every other row: Bind off 5 stitches 1 time, 3 stitches 1 time, then 1 stitch 1 time = 24-24-28-28-32-32 stitches for shoulder. Continue back and forth until piece measures 45-48-50-52-54-56 cm = 17¾"-19"-19¾"-20½"-21¼"-22" in total and bind off. Work the other shoulder the same way. FRONT PIECE: = 81-87-95-99-109-119 stitches. Continue back and forth with pattern as before, bind off for armholes the same way as on back piece = 79-79-89-89-99-99 stitches. When front piece measures 37-40-41-43-44-46 cm = 14½"-15¾"-16⅛"-17"-17¼"-18", work in stockinette stitch over all stitches, finish after a whole lace pattern. When piece measures 38-41-42-44-45-47 cm = 15"-16⅛"-16½"-17¼"-17¾"-18½", slip the middle 15-15-13-13-15-15 stitches on a thread for neck, and finish each shoulder separately. Then bind off for neck on every other row: Bind off 2 stitches 2-2-2-2-1-1 times, then 1 stitch 4-4-6-6-8-8 times = 24-24-28-28-32-32 stitches for shoulder. Continue back and forth until piece measures 45-48-50-52-54-56 cm = 17¾"-19"-19¾"-20½"-21¼"-22" in total and bind off. Work the other shoulder the same way. SLEEVES: Cast on 80-84-96-104-116-128 stitches on double pointed needles / short circular needle size 2.5 MM = US 1.5. Knit 1 round. Then work rib (= knit 2/purl 2) in the round for 3 cm = 1⅛". Switch to double pointed needles/short circular needle size 4 MM = US 6. Knit next round while AT THE SAME TIME decreasing 16-16-20-20-24-28 stitches evenly = 64-68-76-84-92-100 stitches. Insert a marker thread at beginning of round = mid under sleeve. Work in stockinette stitch. When piece measures 4-4-4-5-6-6 cm = 1½"-1½"-1½"-2"-2⅜"-2⅜", increase 1 stitch on each side of marker thread - read INCREASE TIP. Increase like this every 1-1-1-2-3-0 cm = ⅜"-⅜"-⅜"-¾"-1⅛"-0" 6-6-4-3-1-1 times in total = 76-80-84-90-94-102 stitches. Work until piece measures 12-12-12-12-10-8 cm = 4¾"-4¾"-4¾"-4¾"-4"-3⅛". SLEEVE CAP: On next round bind off 4-4-5-5-5-6 stitches on each side of marker thread (= 8-8-10-10-10-12 stitches bind off mid under sleeve). Then finish the piece back and forth on needle while at the same time binding off for sleeve cap in each side, bind off on every other row as follows: Bind off 3 stitches 2-2-3-3-4-2 times in each side, 2 stitches 2-1-1-2-1-1 times in each side. Then bind off 1 stitch in each side until piece measures 14-16-15-16-14-15 cm = 5½"-6¼"-6"-6¼"-5½"-6". Then bind off as follows in all sizes: Bind off 2 stitches 1 time in each side, 3 stitches 1 time in each side and 5 stitches 1 time in each side. Bind off the remaining stitches. Sleeve measures approx. 17-19-18-19-17-18 cm = 6¾"-7½"-7"-7½"-6¾"-7". ASSEMBLY: Sew the shoulder seams. Sew sleeves in body. NECK EDGE: Use circular needle / double pointed needles size 2.5 MM = US 1.5, pick up stitches around the neck from right side as follows: Begin at one shoulder seam and pick up 92 to 104 stitches (including stitches from thread mid front) – number of stitches must be divisible by 2. Work stockinette stitch in the round for 2 cm = ¾". Then work an eyelet row as follows: * Knit 2 together, 1 yarn over *, work from *-* the entire round. Work in stockinette stitch until neck edge measures 3½ cm = 1¼". Loosely bind off. Fold the neck edge in eyelet row down on the inside of garment. Fasten neck edge to get a double neck edge. To avoid a tight neck edge that sticks out it is important to keep the seam elastic. |
|||||||||||||
Diagram explanations |
|||||||||||||
|
|||||||||||||
 |
|||||||||||||
 |
|||||||||||||
Have you finished this pattern?Tag your pictures with #dropspattern #whitespringtop or submit them to the #dropsfan gallery. Do you need help with this pattern?You'll find 29 tutorial videos, a Comments/Questions area and more by visiting the pattern on garnstudio.com. © 1982-2026 DROPS Design A/S. We reserve all rights. This document, including all its sub-sections, has copyrights. Read more about what you can do with our patterns at the bottom of each pattern on our site. |
|||||||||||||


With over 40 years in knitting and crochet design, DROPS Design offers one of the most extensive collections of free patterns on the internet - translated to 17 languages. As of today we count 324 catalogs and 12290 patterns - 12280 of which are translated into English (US/in).
We work hard to bring you the best knitting and crochet have to offer, inspiration and advice as well as great quality yarns at incredible prices! Would you like to use our patterns for other than personal use? You can read what you are allowed to do in the Copyright text at the bottom of all our patterns. Happy crafting!
Post a comment to pattern DROPS 250-7
We would love to hear what you have to say about this pattern!
If you want to leave a question, please make sure you select the correct category in the form below, to speed up the answering process. Required fields are marked *.