
Popular categories
Looking for a yarn?


Comments / Questions (6)
![]() Sandra Clements wrote:
Sandra Clements wrote:
Hi, are the front dec worked in the stockingstich sections of each front? Thank you
10.03.2025 - 03:13DROPS Design answered:
Dear Mrs Clements, yes, you will decrease the stocking stitch section keeping the first 13 sts (1 edge stitch + M.2) as before. Happy knitting!
10.03.2025 - 10:11
![]() Sandra Clements wrote:
Sandra Clements wrote:
Hi, I am knitting the right front, Do I dec at the beginning of the 13 sts or after the 13 sts. Thank you
10.03.2025 - 01:48DROPS Design answered:
Dear Mrs Clements, the decrease towards mid front will be worked after the first 13 stitches from right side on right front piece. Happy knitting!
10.03.2025 - 10:04
![]() Strickerin wrote:
Strickerin wrote:
Guten Tag, Bei den Abnahmen am Vorderteil komme ich nicht mit dem Sticktipp klar. Ich würe einfach zum Abnehmen vor bzw. nach M2 2M. Re. zusamenstricken. Wenn ich ein überzogenes abnehmen mache, dann verschiebt sich das Muster. Oder wie ist das zu verstehen? Im weiteren müssen beim Gürtel 9M. aufgenommen werden, oder? Besten Dank fúr die Hilfe
03.12.2012 - 07:03DROPS Design answered:
Liebe Strickerin, wir haben die Anleitung jetzt besser formuliert: es wird vor bzw. nach dem Muster M2 abgenommen, damit sich dieses nicht verschiebt. Damit es eine schöne Abnahmelinie gibt wird einmal zusammengestrickt und am anderen Teil überzogen abgenommen. Beim Gürtel war ein Fehler in der Übersetzung – wir entschuldigen uns dafür: es sind 11 M , nicht 1 M. Die Anleitung ist korrigiert. Danke für die Hinweise und Fragen.
03.12.2012 - 10:04
![]() Babsi wrote:
Babsi wrote:
Zum Rückenteil: Es sollen 53M. angeschlagen und in M1 gestrickt werden, inkl. Randmaschen. M1 ist aber durch 6 bzw. 8M. teilbar und inkl. 2 Randmaschen komme ich nicht auf 53M. Wie habe ich die Anleitung zu verstehen? Danke für die Rückmeldung.
08.03.2012 - 07:49DROPS Design answered:
Das stimmt, das Muster geht am Schluss nicht auf.
08.03.2012 - 08:52
![]() DROPS Design wrote:
DROPS Design wrote:
Continue on that side where you have the yarn. When that side is finished, you break the yarn, start on the other side and continue exactly as first side.
11.02.2008 - 23:10
![]() Chris Sullivan wrote:
Chris Sullivan wrote:
When finishing the back I cast off the center sts. then wasn't sure what order and which side to do the rest. I think I was suppose to break the yarn ?
11.02.2008 - 22:43
|
||||||||||||||||
DROPS 83-18 |
||||||||||||||||
|
|
||||||||||||||||
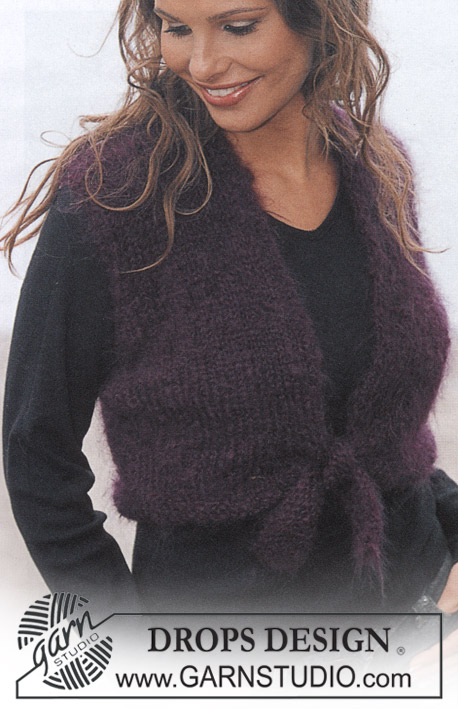
Knitted Wrap Cardigan in DROPS Karisma and Vivaldi or Brushed Alpaca Silk
DROPS 83-18 |
||||||||||||||||
|
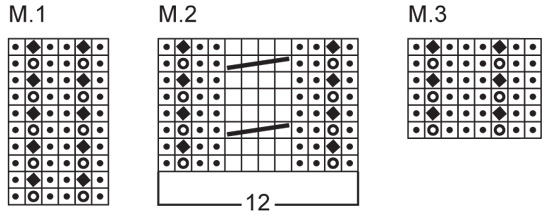
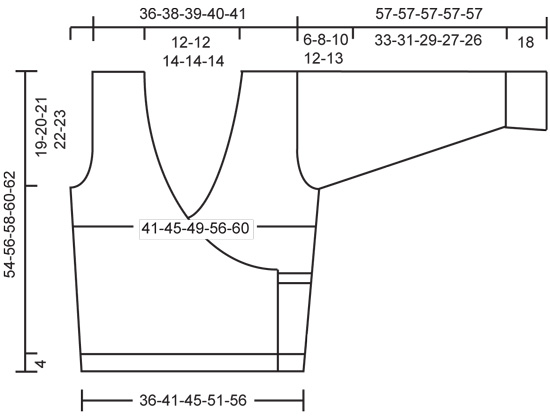
Gauge: 14 sts x 17 rows with 1 strand of each yarn: Karisma and Brushed Alpaca Silk (2 strands) on larger needles in stockinette st = 10 x 10 cm = 4" x 4". Pattern: See charts. The pattern is seen from the right side. Decreasing tips (for wrap front): All decs are made on right side rows. Dec 1 st inside 13 edge sts at the center front (= 1 slipped st and Pattern 2) as follows: Before 13 sts: Sl 1 as if to knit, K 1, psso. After 13 sts: K 2 tog. Back: Cast on 53-59-65-74-80 sts on smaller needles with 1 strand Karisma Superwash + 1 strand Vivaldi/Brushe Alpaca Silk. Knit Pattern 1, keeping 1 edge st at each side in garter st (1st row = right side). When the piece measures 4 cm change to larger needles and stockinette st. When the piece measures 10 cm inc 1 st at both sides every 9 cm a total of 3 times = 59-65-71-80-86 sts. When the piece measures 35-36-37-38-39 cm bind off for armhole at both sides every other row: 3 sts 1 time, 2 sts 0-0-1-2-3 times and 1 st 1-3-3-5-5 times = 51-53-55-56-58 sts. When the piece measures 52-54-56-58-60 cm bind off the center 15-15-17-18-18 sts for the neck. On the next row dec 1 st at each neck edge = 17-18-18-18-19 sts remain on each shoulder. Bind off when the piece measures 54-56-58-60-62 cm. Right front: Cast on 41-44-50-56-62 sts on smaller needles with 1 strand Karisma Superwash + 1 strand Vivaldi/Brushe Alpaca Silk. Knit as follows from center front (1st row = right side): sl 1, Pattern 1 over the following 39-42-48-54-60 sts and end with K 1 (edge st knit in garter st). Slip the first st at the beginning of every row that begins at center front edge and P the last st at the end of every row that ends at center front edge, so that the edge will be neat. When the piece measures 4 cm change to larger needles and continue as follows from right side/center front edge: sl 1, Pattern 2 (= 12 sts), 27-30-36-42-48 sts stockinette st and K 1 (edge st). Read the entire next section before knitting: Side inc: When the piece measures 10 cm inc at the side as on back. Center front edge: When the piece measures 10 cm dec 1 st at the center front – see decreasing tips above: every 8 rows: 8-8-6-3-2 times and every 4 rows: 2-2-8-13-17 times. Armhole: When the piece measures 35-36-37-38-39 cm bind off for armhole at the side as on back. After all shaping is complete 30-31-31-31-32 sts remain on shoulder (= 17-18-18-18-19 shoulder-sts + 13 neckband sts). When the piece measures 54-56-58-60-62 cm bind off the 17-18-18-18-19 shoulder-sts and put the remaining 13 sts on a st holder. Left front: Cast on as for right front and knit as follows from side edge (1st row = right side): K 1 (edge st knit in garter st), Pattern 1 over the following 39-42-48-54-60 sts and finish with P 1 – sl 1st st at the center front at start of row, P the last st at end of row. When the piece measures 4 cm change to larger needles and continue as follows from right side: K 1 (edge st), 27-30-36-42-48 sts stockinette st, Pattern 2 (= 12 sts) and P 1. Continue as on right front, reversing all shaping. Sleeve: Cast on 100-100-116-116-116 sts on smaller needles with 1 strand Karisma Superwash + 1 strand Vivaldi/Brushe Alpaca Silk and knit 3 rows stockinette st (1st row = wrong side), on the last row P 2 tog across row = 50-50-58-58-58 sts. Add 1 strand Karisma Superwash (= 1 strand of each yarn) and knit Pattern 3, keeping 1 edge st at each side in garter st (1st row = right side). When the piece measures 3 cm dec all P 3 to P 2 = 38-38-44-44-44 sts (at the start of the row dec the first P 2 to P 1 and at the end of the row do not dec). Then knit Pattern 1, keeping 1 edge st at each side in garter st. When the piece measures 18 cm change to larger needles and stockinette st. When the piece measures 18 cm inc 1 st at each side every 6-4.5-6.5-4-3 cm a total of 6-7-5-7-9 times = 50-52-54-58-62 sts. When sleeve measures 51-49-47-45-44 cm bind off for sleeve cap at each side every other row: 4 sts 1 time, 3 sts 1 time, 2 sts 0-1-2-2-2 times and 1 st 1-1-1-3-4 times, then 2 sts at each side until the piece measures 56 cm, then bind off 3 sts 1 time at each side. Bind off the remaining sts, the piece measures approx. 57 cm. Assembly: Sew shoulder seams. Neckband: Put the 13 sts from st holder at one side on smaller needles and continue Pattern 2 as established. When neckband measures approx. 6-7 cm put sts on a st holder. Repeat on the other side. Weave the 2 ends together and sew neckband to back neck. Sew in sleeves. Sew sleeve and side seams in one, using edge sts as seam allowance and leaving an opening of approx. 2 cm on the right side for belt – start opening approx. 7 cm from lower edge. Belt: Pick up 11 sts on smaller needles with 1 strand Karisma Superwash + 1 strand Vivaldi/Brushe Alpaca Silk on left front edge – start where shaping begins and pick up sts for approx. 4 cm toward lower edge. Knit rib (K 1/ P 1), keeping 1 st in garter st at each side. When belt measures 3 and 6 cm dec 1 st at each side inside the edge sts = 7 sts. When belt measures approx. 75 cm and then bind off in rib. Knit a second belt on right front edge. |
||||||||||||||||
Diagram explanations |
||||||||||||||||
|
||||||||||||||||
 |
||||||||||||||||
 |
||||||||||||||||
Have you finished this pattern?Tag your pictures with #dropspattern or submit them to the #dropsfan gallery. Do you need help with this pattern?You'll find 25 tutorial videos, a Comments/Questions area and more by visiting the pattern on garnstudio.com. © 1982-2026 DROPS Design A/S. We reserve all rights. This document, including all its sub-sections, has copyrights. Read more about what you can do with our patterns at the bottom of each pattern on our site. |
||||||||||||||||


With over 40 years in knitting and crochet design, DROPS Design offers one of the most extensive collections of free patterns on the internet - translated to 17 languages. As of today we count 325 catalogs and 12298 patterns - 12288 of which are translated into English (US/in).
We work hard to bring you the best knitting and crochet have to offer, inspiration and advice as well as great quality yarns at incredible prices! Would you like to use our patterns for other than personal use? You can read what you are allowed to do in the Copyright text at the bottom of all our patterns. Happy crafting!
Post a comment to pattern DROPS 83-18
We would love to hear what you have to say about this pattern!
If you want to leave a question, please make sure you select the correct category in the form below, to speed up the answering process. Required fields are marked *.