
Popular categories
Looking for a yarn?


Comments / Questions (11)
![]() Louise wrote:
Louise wrote:
Bonjour, Dans la description, devant gauche, « continuer ainsi… », je ne comprends pas : les 12 aug/dim correspondent à l’explication de la technique décalage encolure du début ? Et les 4 aug de la note en plus, sur quels rangs doivent-elles être faites ? Merci beaucoup pour votre aide
19.10.2025 - 16:12DROPS Design answered:
Bonjour Louise, tout à fait, les augmentations/diminutions pour le décalage du devant gauche sont à tricoter comme indiqué au début des explications: vous tricotez /répétez les 12 rangs en augmentant/diminuant aux rangs 1, 5 et 9 et en augmentant (sans diminuer) au rang 11. Bon tricot!
28.10.2025 - 18:40
![]() Wendy wrote:
Wendy wrote:
Just wanted to let you know that the listing of this pattern on Ravelry has the wrong catalog numbering. It says this pattern is 244-29 intead of 244-28. ;-) Thanks so much to all of you for all that you do! Garnstudio is the best!! :-)
16.04.2024 - 05:01DROPS Design answered:
Dear Wendy, thanks for noticing, pattern number has now been edited on Ravelry. Happy knitting!
16.04.2024 - 08:26
![]() Catherine wrote:
Catherine wrote:
Dear Editor, for the “Right Front” 1st paragraph under “cast on 4 stitches”……….. until before “from the wrong side”, is the description correct?I seems somehow some stitches missing. Thank you very much.
12.04.2024 - 06:39DROPS Design answered:
Dear Catherine, your feedback has been forwarded to our design team, thanks for noticing.
12.04.2024 - 08:32
![]() Catherine wrote:
Catherine wrote:
Please help me 1. Right front pc—after cast on 4 stitches + 48 stitches should be 52 stitches but it reads 51 stitches in the description, 2. On wrong side (continue next row), “until 13stitches left”, after work knit, purl , 7 band etc altogether only 12 stitches?., 3. Increase/decrease issue— sometimes increase every 4th row = every2nd row ?.? 4. Increase sometimes is after every 3rd increase.?? Thank you so much.
11.04.2024 - 12:20DROPS Design answered:
Dear Catherine, 2: after "13 stitches are left" - knit 1, marker, purl 1, knit 3, purl 1, 7 band stitches. You have 13 stitches. 3: increase every 4th row means that you knit 3 rows and increase in the fourth. If you start in a row from the right side, then you increase on every 2nd/alternate row from the right side: right side - increase row, wrong side - normal row 1, right side - normal row 2, wrong side - normal row 3, right side - new increase row. 4: "Every 3rd increase" is only for the neck displacements; it means after every 3rd increase row. In that case, you work an extra, only increase (with no decreases) row in row 11 of the displacements, as shown. Happy knitting!
14.04.2024 - 18:18
![]() Catherine wrote:
Catherine wrote:
Please help me to understand the neck displacement Row 1 — increase/decrease Row 2-4– work as before? etc Does it mean row 2 to row 4 no increase/decrease?
11.04.2024 - 11:57DROPS Design answered:
Dear Catherine, in row 1 you increase and decrease as the instructions in the explanations (at the beginning of the pattern) tells you. In row 2-4 you work stitches as before (as the pattern shows), but no increase or decrease. Happy Knitting!
11.04.2024 - 13:30
![]() Catherine wrote:
Catherine wrote:
Continue my confusion about neck displacement: 4. Some paragraphs said the increase is after every 3rd increase? Please help me. Thank you very much
11.04.2024 - 11:40DROPS Design answered:
Dear Catherine, when doing the dsisplacement, for every increase there is a decrease, so even though the stitches slant, the number of stitches stay the same. However, in order to avoid the rib to become too thight, you leave out this decrease, so there will be more stitches at the end. I hope this helps. Happy Knitting!
11.04.2024 - 13:34
![]() Albertha wrote:
Albertha wrote:
Om te voorkomen dat de boord te strak wordt, is een instructie te lezen. In één naald meerder en minder je, maar na iedere 3e keer minder je niet. Je krijgt hierdoor dus meer steken toch? Wordt je boordsteek dan 1 recht, 3 averecht? Op de foto is daar niets van te zien dus klopt dat wel?
07.11.2023 - 10:34DROPS Design answered:
Dag Albertha,
Ja, dat klopt. Er komen daardoor meer steken bij in totaal, maar dit zie je niet terug in de boordsteek, deze blijft in tact. Normaal meerder je en minder je steeds om de halslijn te laten verschuiven, maar op iedere 3e keer dat je dit doet, minder je niet, maar maak je alleen de meerdering. Je houdt wel de boordsteek in tact. De hals wordt hierdoor wat ruimer.
08.11.2023 - 20:44
![]() Lígia Rodrigues wrote:
Lígia Rodrigues wrote:
Autumn Sky
07.08.2023 - 10:17
![]() Patricia Scott wrote:
Patricia Scott wrote:
Promenade en forêt
05.08.2023 - 21:59
![]() Johanna wrote:
Johanna wrote:
Herbststrand
04.08.2023 - 17:56
|
||||||||||
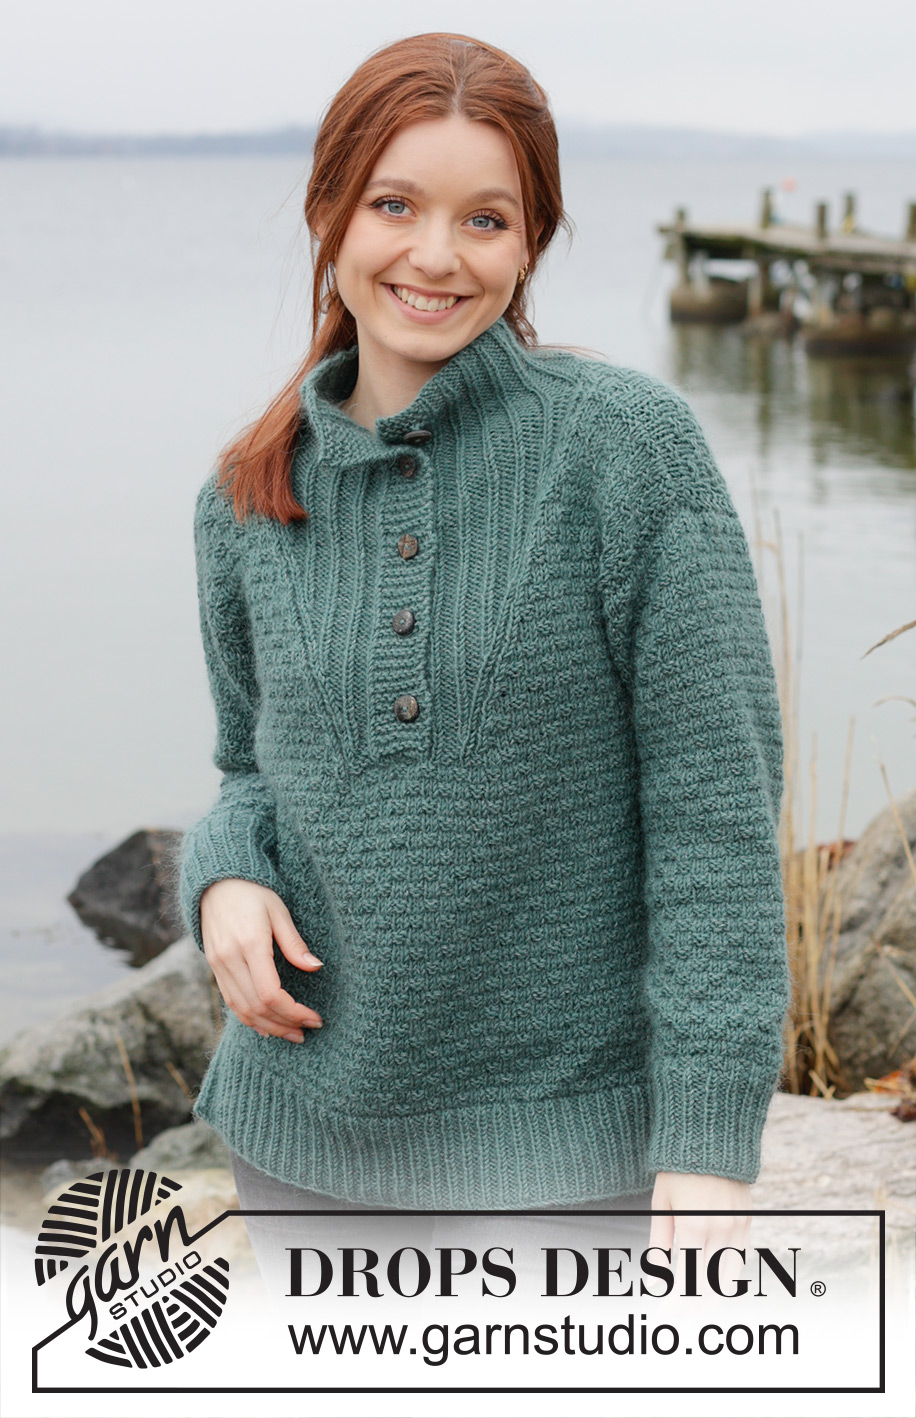
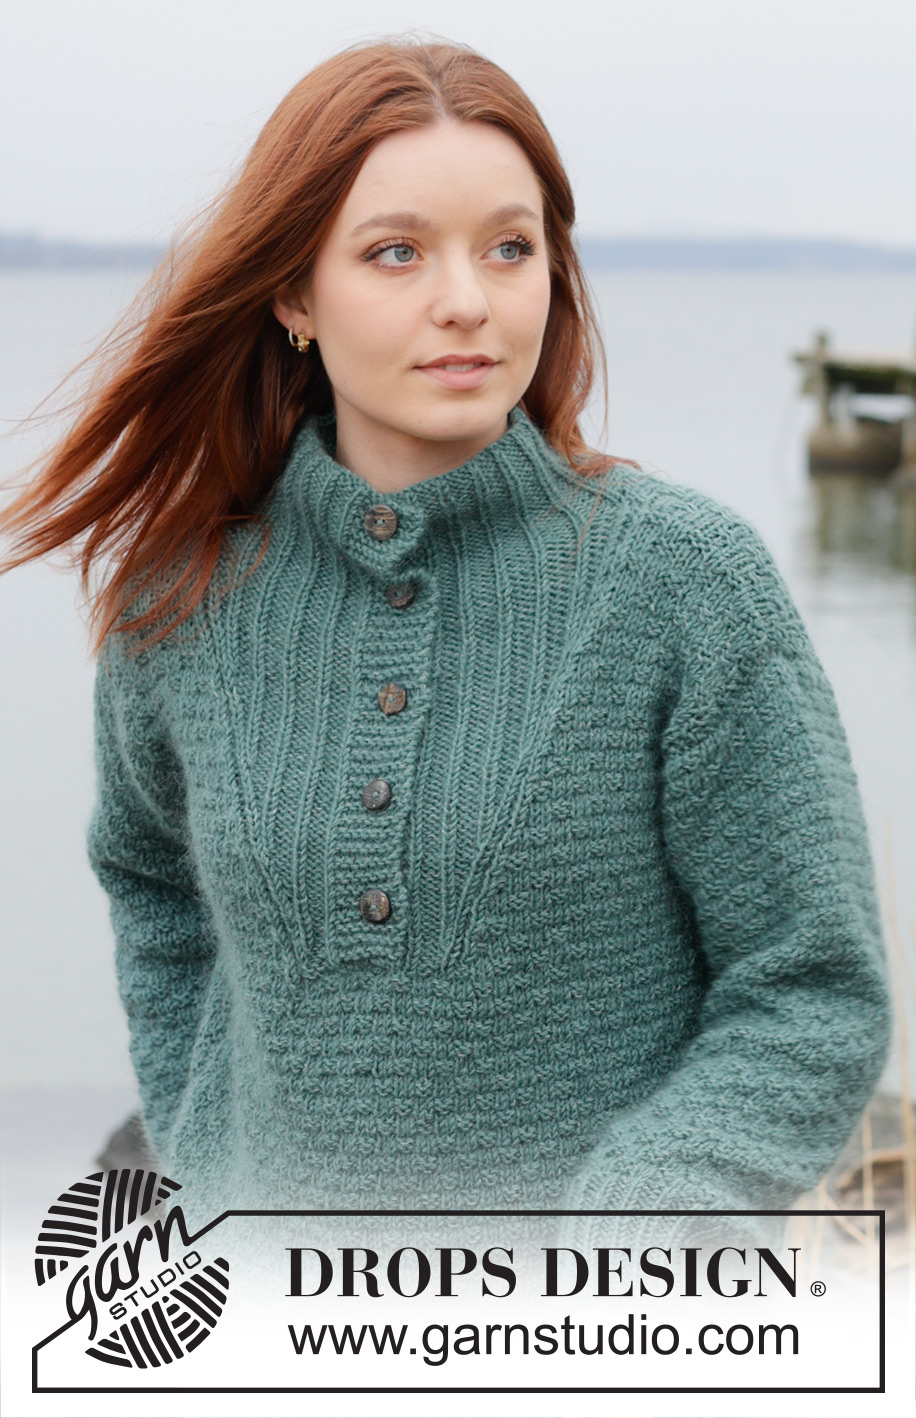
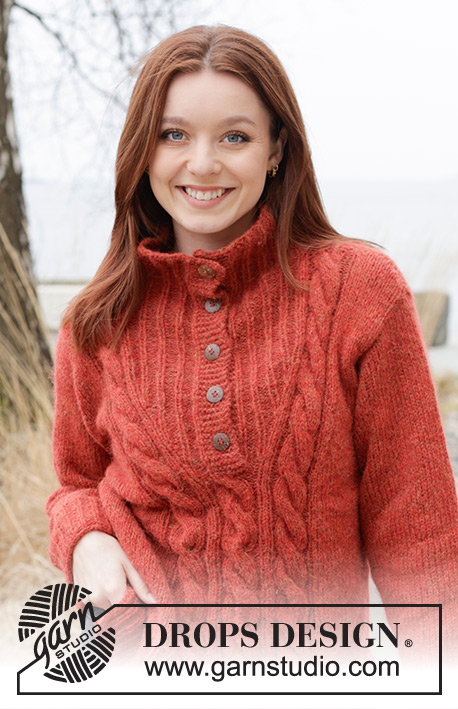
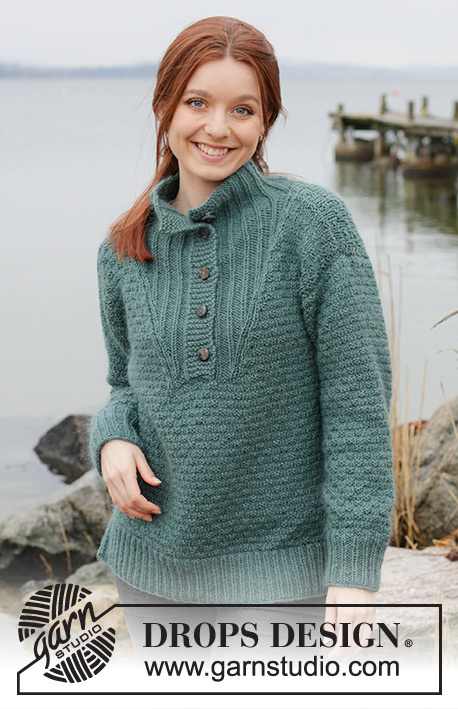
Pine Hill#pinehillsweater |
||||||||||
 |
 |
|||||||||
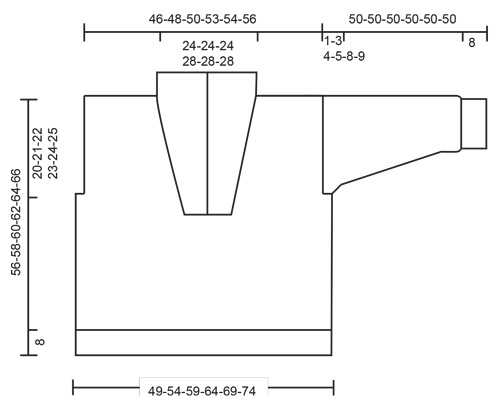
Knitted sweater in DROPS Merino Extra Fine and DROPS Kid-Silk. The piece is worked bottom up with high neck and relief-pattern. Sizes S - XXXL.
DROPS 244-28 |
||||||||||
|
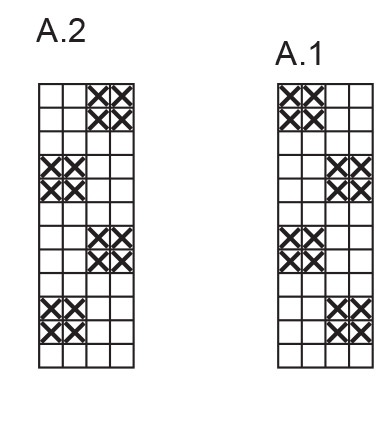
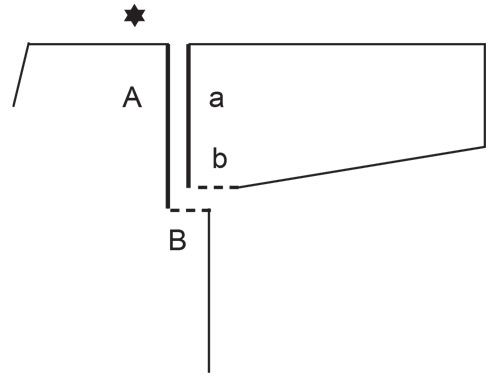
------------------------------------------------------- EXPLANATIONS FOR THE PATTERN: ------------------------------------------------------- GARTER STITCH (worked back and forth): Knit all rows. 1 ridge = knit 2 rows. PATTERN: See diagrams A.1 and A.2. The diagrams show all rows in the pattern from the right side. NECK-DISPLACEMENTS: LEFT FRONT PIECE: Decrease 1 stitch before the marker-thread and increase 1 stitch after the marker-thread as follows: Work until there are 3 stitches left before the marker-thread, knit 2 together, purl 1, knit 1 (marker-thread sits between these 2 stitches), make 1 yarn over, work to end of row. To avoid the rib becoming tight, increase 1 stitch without decreasing after every 3rd increase/decrease. The yarn overs are worked twisted on the next row, then worked into the rib (knit 1, purl 3 from the right side). Work the increases/decreases as follows: ROW 1: Increase and decrease ROWS 2.-4: Work as before ROW 5: Increase and decrease ROWS 6.-8: Work as before ROW 9: Increase and decrease ROW 10: Work as before ROW 11: Increase ROW 12: Work as before Repeat these 12 rows onwards. RIGHT FRONT PIECE: Increase 1 stitch before the marker-thread and decrease 1 stitch after the marker-thread as follows: Work until there is 1 stitch left before the marker-thread, make 1 yarn over, knit 1, purl 1 (marker-thread sits between these 2 stitches), slip 1 stitch, knit 1 and pass the slipped stitch over the knitted stitch, work to end of row. Increase and decrease in the same way as on the left front piece. BUTTONHOLES: Work the buttonholes on the right band. 1 BUTTONHOLE = knit together the 3rd and 4th stitch from the edge and make 1 yarn over. On the next row knit the yarn over to leave a hole. Work the buttonholes when the piece measures: S: 34, 41, 48 and 55 cm = 13⅜", 16⅛", 19" and 21⅝" M: 36, 43, 50 and 57 cm = 14¼", 17", 19¾" and 22½" L: 38, 45, 52 and 59 cm = 15", 17¾", 20½" and 23¼" XL: 39, 47, 54 and 61 cm = 15¼", 18½", 21¼" and 24" XXL: 41, 49, 56 and 63 cm = 16⅛", 19¼", 22" and 24¾" XXXL: 43, 51, 58 and 65 cm = 17", 20", 22¾" and 25½" The last buttonhole is worked when the neck measures 6 cm = 2⅜". INCREASE TIP (for sleeves): Start 1 stitch before the marker-thread, 1 yarn over, knit 2 (marker-thread sits between these 2 stitches), 1 yarn over. On the next round knit the yarn overs twisted to avoid holes. Then work the new stitches into A.2. ------------------------------------------------------- START THE PIECE HERE: ------------------------------------------------------- SWEATER – SHORT OVERVIEW OF THE PIECE: The piece is worked back and forth in sections, then sewn together. The neckline is worked by displacing stitches, giving more and more ribbed stitches towards mid-front and fewer stitches in A.2 towards the side. The neck is worked to finish. BACK PIECE: Cast on 102-111-117-126-135-144 stitches with circular needle size 4 MM = US 6 and 1 strand of each quality. Purl 1 row from the wrong side. Then work rib as follows: 1 edge stitch in GARTER STITCH – read description above, * knit 1, purl 2 *, work from *-* until there are 2 stitches left, knit 1 and 1 edge stitch in garter stitch. Continue this rib back and forth for 8 cm = 3⅛". Knit 1 row from the right side and decrease 22-23-21-22-23-24 stitches evenly spaced = 80-88-96-104-112-120 stitches. Change to circular needle size 5 MM = US 8. Work A.1 with 1 garter stitch on each side. REMEMBER THE KNITTING GAUGE! When the piece measures 36-37-38-39-40-41 cm = 14¼"-14½"-15"-15¼"-15¾"-16⅛", bind off 3-6-8-10-13-15 stitches for the armholes at the beginning of the next 2 rows = 74-76-80-84-86-90 stitches. Continue A.1 with 1 garter stitch on each side, making sure the pattern is continued as before. When the piece measures 54-56-58-60-62-64 cm = 21¼"-22"-22¾"-23⅝"-24⅜"-25¼", bind off the middle 36-36-36-42-42-42 stitches for the neckline. Finish each shoulder separately. Bind off 1 stitch on the next row from the neck = 18-19-21-20-21-23 stitches. Continue with A.1 and 1 garter stitch on each side until the piece measures 56-58-60-62-64-66 cm = 22"-22¾"-23⅝"-24⅜"-25¼"-26". Bind off. Work the other shoulder in the same way. FRONT PIECE: Cast on and work in the same way as the back piece until the front measures 33-35-37-38-40-42 cm = 13"-13¾"-14½"-15"-15¾"-16½" but working A.2 instead of A.1 = 80-88-96-104-112-120 stitches. Now divide the piece mid-front and displace stitches for the neckline. Place the last 40-44-48-52-56-60 stitches on a thread, work the first 40-44-48-52-56-60 stitches as follows: LEFT FRONT PIECE: Read the next section before continuing! Work the first row from the right side as follows: 1 edge stitch in garter stitch, work A.2 over the next 30-34-38-42-46-50 stitches, purl 1, knit 1, purl 3, knit 1, 3 garter stitches, cast on 4 stitches = 44-48-52-56-60-64 stitches. Work as follows from the wrong side: 7 garter stitches, purl 1, knit 3, purl 1, insert 1 marker-thread here, knit 1, work as before to the end of the row. Continue this pattern and work NECKLINE DISPLACEMENTS – read description (remember to bind off for the armhole – see below). Increase/decrease 1 stitch every 4th row (= every 2nd row from the right side) 12-12-12-15-15-15 times. NOTE! In addition, increase 1 extra stitch 4-4-4-5-5-5 times. There will be more and more ribbed stitches towards mid-front and fewer stitches in A.2 towards the side. Decrease and increase on each side of 2 stitches in rib (marker-thread sits between these 2 stitches), which form a diagonal line up the shoulder. AT THE SAME TIME when the piece measures 36-37-38-39-40-41 cm = 14¼"-14½"-15"-15¼"-15¾"-16⅛", bind off the first 3-6-8-10-13-15 stitches from the side for the armhole, making sure the pattern is continued as before. When the displacements are finished, there are 45-46-48-51-52-54 stitches. Continue working until the piece measures 56-58-60-62-64-66 cm = 22"-22¾"-23⅝"-24⅜"-25¼"-26". Bind off the first 18-19-21-20-21-23 stitches from the side = 27-27-27-31-31-31 stitches. Lay the piece to one side and work the right front piece. RIGHT FRONT PIECE: Read the next section before continuing! Cast on 4 stitches, work the 40-44-48-52-56-60 stitches from the right side as follows: 3 garter stitches, knit 1, purl 1, knit 1, purl 1, work A.2 until there is 1 stitch left, 1 edge stitch in garter stitch = 44-48-52-56-60-64 stitches. From the wrong side: 1 edge stitch in garter stitch, work A.2 until there are 13 stitches left, knit 1, insert 1 marker-thread here, knit 3, purl 1, 7 band stitches in garter stitch. Continue this pattern and work NECKLINE DISPLACEMENTS - (remember to bind off for the armhole – see below). Increase/decrease 1 stitch every 4th row (= every 2nd row from the right side) 12-12-12-15-15-15 times. NOTE! In addition, increase 1 extra stitch 4-4-4-5-5-5 times. There will be more and more ribbed stitches towards mid-front and fewer stitches in A.2 towards the side. Decrease and increase on each side of 2 stitches in rib (marker-thread sits between these 2 stitches), which form a diagonal line up the shoulder. Work the BUTTONHOLES – read description above. AT THE SAME TIME when the piece measures 36-37-38-39-40-41 cm = 14¼"-14½"-15"-15¼"-15¾"-16⅛", bind off the first 3-6-8-10-13-15 stitches from the side for the armhole, making sure the pattern is continued as before. When the displacements are finished, there are 45-46-48-51-52-54 stitches. Continue working until the piece measures 56-58-60-62-64-66 cm = 22"-22¾"-23⅝"-24⅜"-25¼"-26". Bind off the first 18-19-21-20-21-23 stitches from the side = 27-27-27-31-31-31 stitches. Lay the piece to one side. SLEEVES: Sleeves are worked bottom up in the round with double pointed needles/short circular needle. Cast on 48-48-51-51-57-60 stitches with double pointed needles size 4 MM = US 6. Knit 1 round, then work rib in the round (knit 1, purl 2) for 8 cm = 3⅛". Change to double pointed needles size 5 MM = US 8. Knit 1 round and decrease 4-4-3-3-5-4 stitches evenly spaced = 44-44-48-48-52-56 stitches. Insert a marker-thread at the beginning of the round = mid-under sleeve. Work A.1, AT THE SAME TIME when the sleeve measures 11-12-11-12-11-13 cm = 4⅜"-4¾"-4⅜"-4¾"-4⅜"-5⅛", increase 1 stitch on each side of the marker-thread – read INCREASE TIP. Increase like this every 4-3-3-2½-2½-1½ cm = 1½"-1⅛"-1⅛"-1"-1"-½" a total of 10-12-12-13-13-13 times (change to short circular needle when you have enough stitches) = 64-68-72-74-78-82 stitches. When the sleeve measures 49-47-46-45-42-41 cm = 19¼"-18½"-18"-17¾"-16½"-16⅛", work the sleeve cap back and forth (from mid-under sleeve) until the sleeve measures 50 cm = 19¾" in all sizes (a split of 1-3-4-5-8-9 cm = ⅜"-1⅛"-1½"-2"-3⅛"-3½" at the top of the sleeve). Work the other sleeve in the same way. ASSEMBLY: Sew the shoulder seams. Sew the sleeve cap to the armhole and the split to the bottom of the armhole – see sketch. Sew the side seams leaving an 8 cm = 3⅛" split at the bottom. NECK: Place the 27-27-27-31-31-31 stitches from each front piece on circular needle size 4 MM = US 6 and knit up 37-37-37-45-45-45 stitches along the back neckline = 91-91-91-107-107-107 stitches. Work as follows from the wrong side: 7 band stitches in garter stitch, * purl 1, knit 3 *, work from *-* until there are 8 stitches left, purl 1 and 7 band stitches in garter stitch. Work this rib for 8 cm = 3⅛" – remember the last buttonhole. Bind off with knit over knit and purl over purl. Lay the right band over the left band and sew together at the bottom. Sew the buttons onto the left band. |
||||||||||
Diagram explanations |
||||||||||
|
||||||||||
 |
||||||||||
 |
||||||||||
 |
||||||||||
Have you finished this pattern?Tag your pictures with #dropspattern #pinehillsweater or submit them to the #dropsfan gallery. Do you need help with this pattern?You'll find 35 tutorial videos, a Comments/Questions area and more by visiting the pattern on garnstudio.com. © 1982-2026 DROPS Design A/S. We reserve all rights. This document, including all its sub-sections, has copyrights. Read more about what you can do with our patterns at the bottom of each pattern on our site. |
||||||||||


With over 40 years in knitting and crochet design, DROPS Design offers one of the most extensive collections of free patterns on the internet - translated to 17 languages. As of today we count 324 catalogs and 12290 patterns - 12280 of which are translated into English (US/in).
We work hard to bring you the best knitting and crochet have to offer, inspiration and advice as well as great quality yarns at incredible prices! Would you like to use our patterns for other than personal use? You can read what you are allowed to do in the Copyright text at the bottom of all our patterns. Happy crafting!
Post a comment to pattern DROPS 244-28
We would love to hear what you have to say about this pattern!
If you want to leave a question, please make sure you select the correct category in the form below, to speed up the answering process. Required fields are marked *.