
Popular categories
Looking for a yarn?


Comments / Questions (23)
![]() Cornelia wrote:
Cornelia wrote:
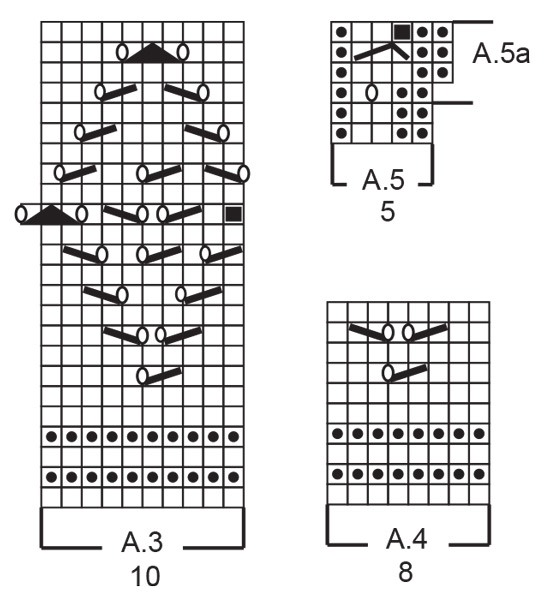
Wird im Rumpfteil A.5 und A.5a immer wieder nacheinander wiederholt, oder wird nur A.5a wiederholt ?
21.10.2023 - 22:11DROPS Design answered:
Liebe Cornelia, zuerst stricken Sie die 6 Reihen A.5 dann wiederholen Sie nur die 4 Reihen A.5a (- die 4 letzten Reihen im Diagram). Viel Spaß beim stricken!
23.10.2023 - 09:53
![]() Annemiek wrote:
Annemiek wrote:
Is het mogelijk om een geschreven patroon toe te voegen? Telpatronen lezen is niet echt mijn hobby, mede door wat neurologische problematiek. Ik zou de trui graag breien, vind het zo een gezellig model..
19.10.2023 - 13:37DROPS Design answered:
Dag Annemiek,
Dat is erg jammer. We hebben helaas alleen telpatronen hiervoor en we kunnen helaas de patronen niet aanpassen naar persoonlijke wensen. Je zou misschien hulp kunnen zoeken bij een breiwinkel of breiclub in de buurt...?
19.10.2023 - 19:50
![]() Bonnie wrote:
Bonnie wrote:
Patroon nr 241- 9 bij teltekening a3 15de naald is eerste steek zogezegd geen steek hoe begin ok dan met deze naald grtjs
26.06.2023 - 17:13DROPS Design answered:
Dag Bonnie,
Je begint gelijk met de volgende steek. Als je het telpatroon uit zou knippen, dan zou je dat hokje er ook uit knippen. De eerste steek is dus 1 recht, dan 2 samen breien en 1 omslag, enz.
26.06.2023 - 21:16
![]() Edyta wrote:
Edyta wrote:
Jak zszyć ramiona? Próbowałam kilka razy i za każdym razem szew brzydko wygląda.
24.06.2023 - 21:52DROPS Design answered:
Witaj Edyto, w tym przypadku masz do zszycia 2 brzegi ramienia wykonane techniką I-cord. Szew ramienia może być zbyt wypukły. Jeśli chcesz tego uniknąć, nie zamykaj ramienia I-cordem, tylko zostaw oczka tyłu i przodu na drutach i zakończ/połącz ramiona metodą 3 needle bind offPATRZ TUTAJ. Pozdrawiamy!
26.06.2023 - 08:15
![]() Mieke Baras wrote:
Mieke Baras wrote:
Mouwen: als A1 en A2 klaar zijn in de hoogte, herhaal A1a en A2a in de hoogte tot A2a in totaal 2 x is gebreid (A1a = 4 keer). Brei ik dan eerst A1, daarna A1a, vervolgens A2 en dan A2a? Hoe kan je dan A1a 4 keer gebreid hebben? In welke volgorde brei ik dus de patronen? Dank bij voorbaat! Prachtige trui!
01.04.2023 - 11:54DROPS Design answered:
Dag Mieke,
In de breedte brei je A.1 en A.2, Dus je herhaalt in de rondte steeds A.1, A.2, A.1, A.2 enzovoort. Als A.1 en A.2 op deze manier in de hoogte hebt gebreid, doe je dit op dezelfde manier voor A.1a en A.2a en deze herhaal je vervolgens ook steeds in de hoogte.
01.04.2023 - 19:09
![]() Corina Van Der Velden wrote:
Corina Van Der Velden wrote:
Bij A2 en A2a mis ik de “2 recht” van de boordsteek. Als ik A2 volgens het telpatroon brei krijg ik 2 averecht 2 recht 2 averecht en herhaal, dus komen er 4 averecht naast elkaar? En hoe zit het dan met de overgang naar A2a?
07.03.2023 - 16:36DROPS Design answered:
Dag Corina,
Het klopt dat er 4 averecht naast elkaar komen, dus je kunt gewoon het telpatroon volgen.
08.03.2023 - 12:08
![]() Laines wrote:
Laines wrote:
J'aime la lavande
22.01.2023 - 23:51
![]() Anette Brandt Schmidt wrote:
Anette Brandt Schmidt wrote:
Lavender summerdream
22.01.2023 - 11:55
![]() María Del Carmen wrote:
María Del Carmen wrote:
Romántico dia
20.01.2023 - 16:12
![]() Lavendel Summernight wrote:
Lavendel Summernight wrote:
Lavender summernight
19.01.2023 - 09:42
|
|||||||||||||||||||||||||||||||||||||
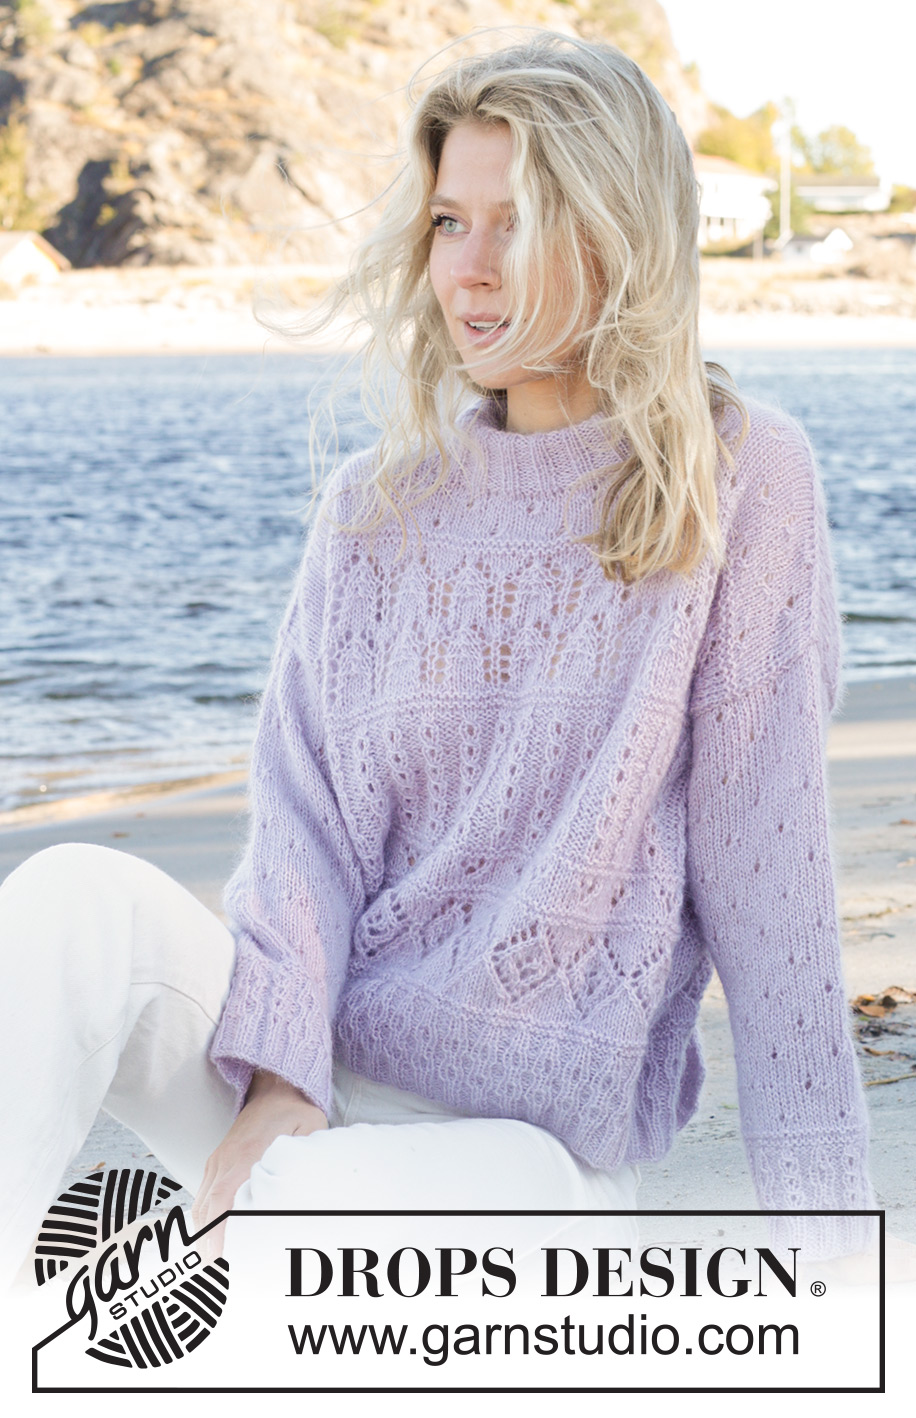
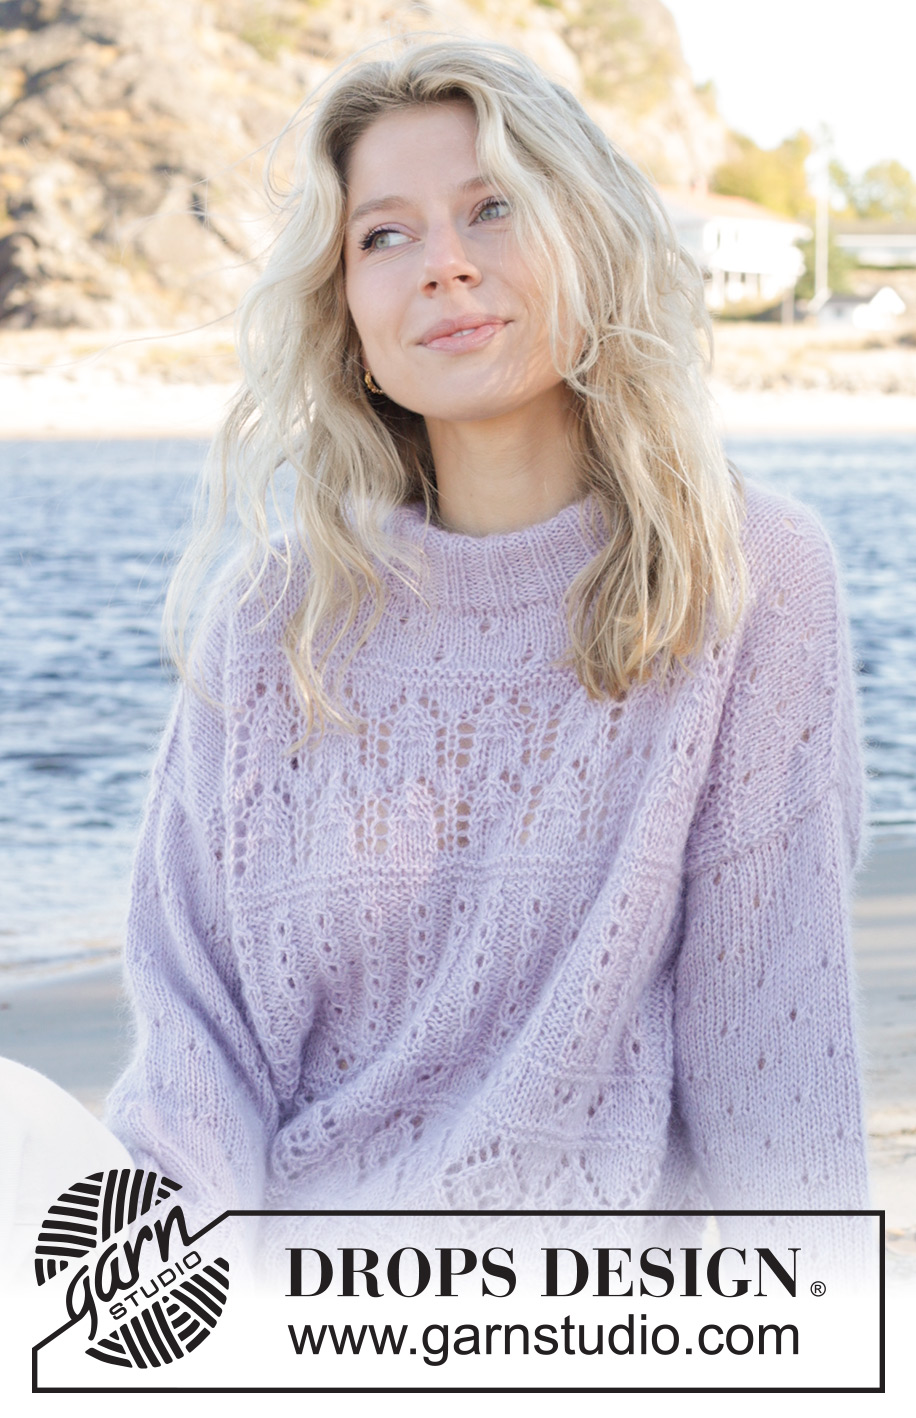
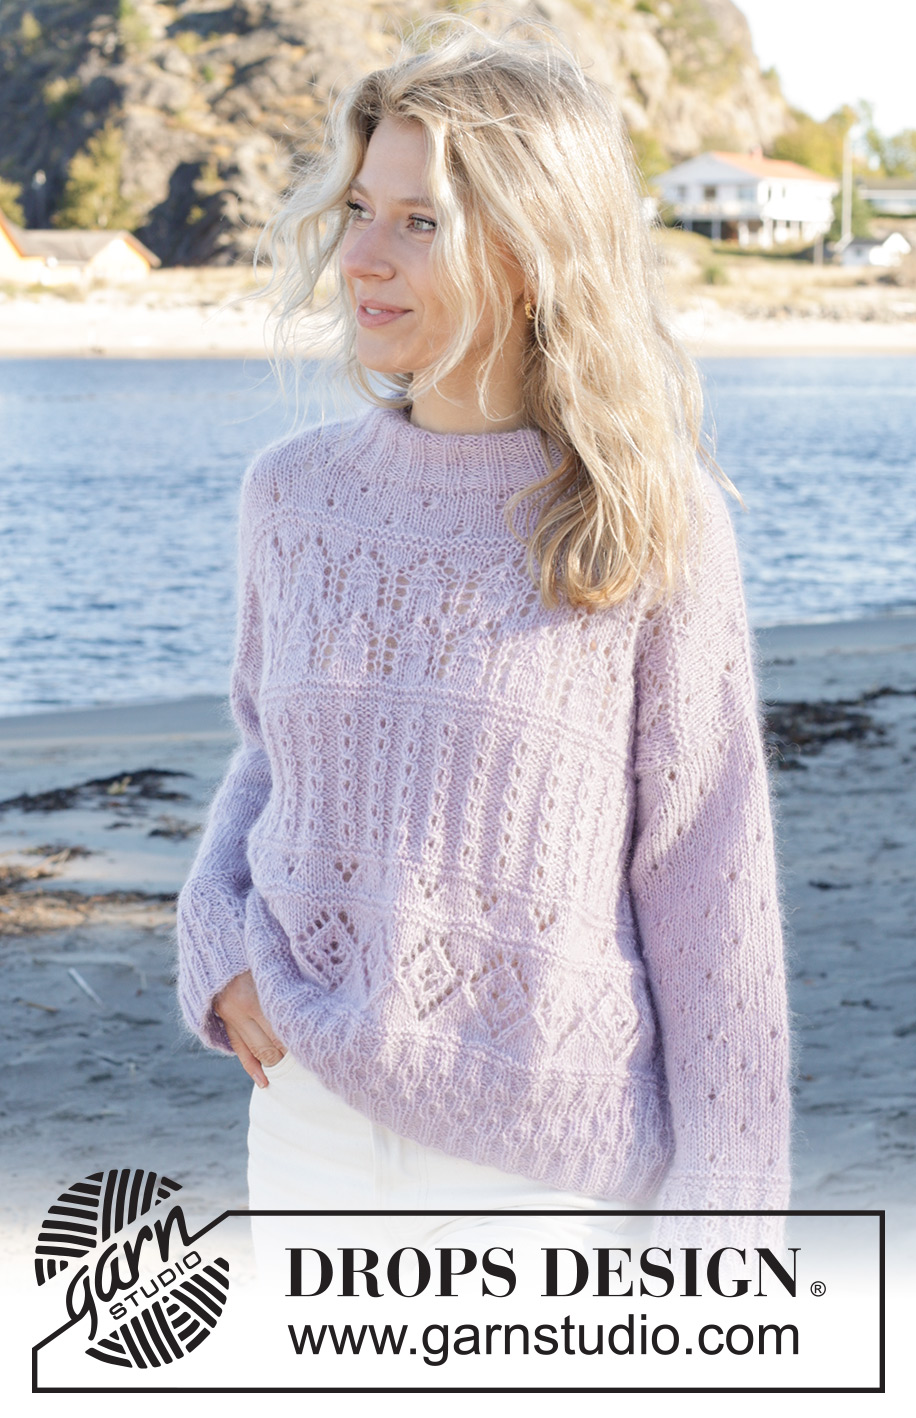
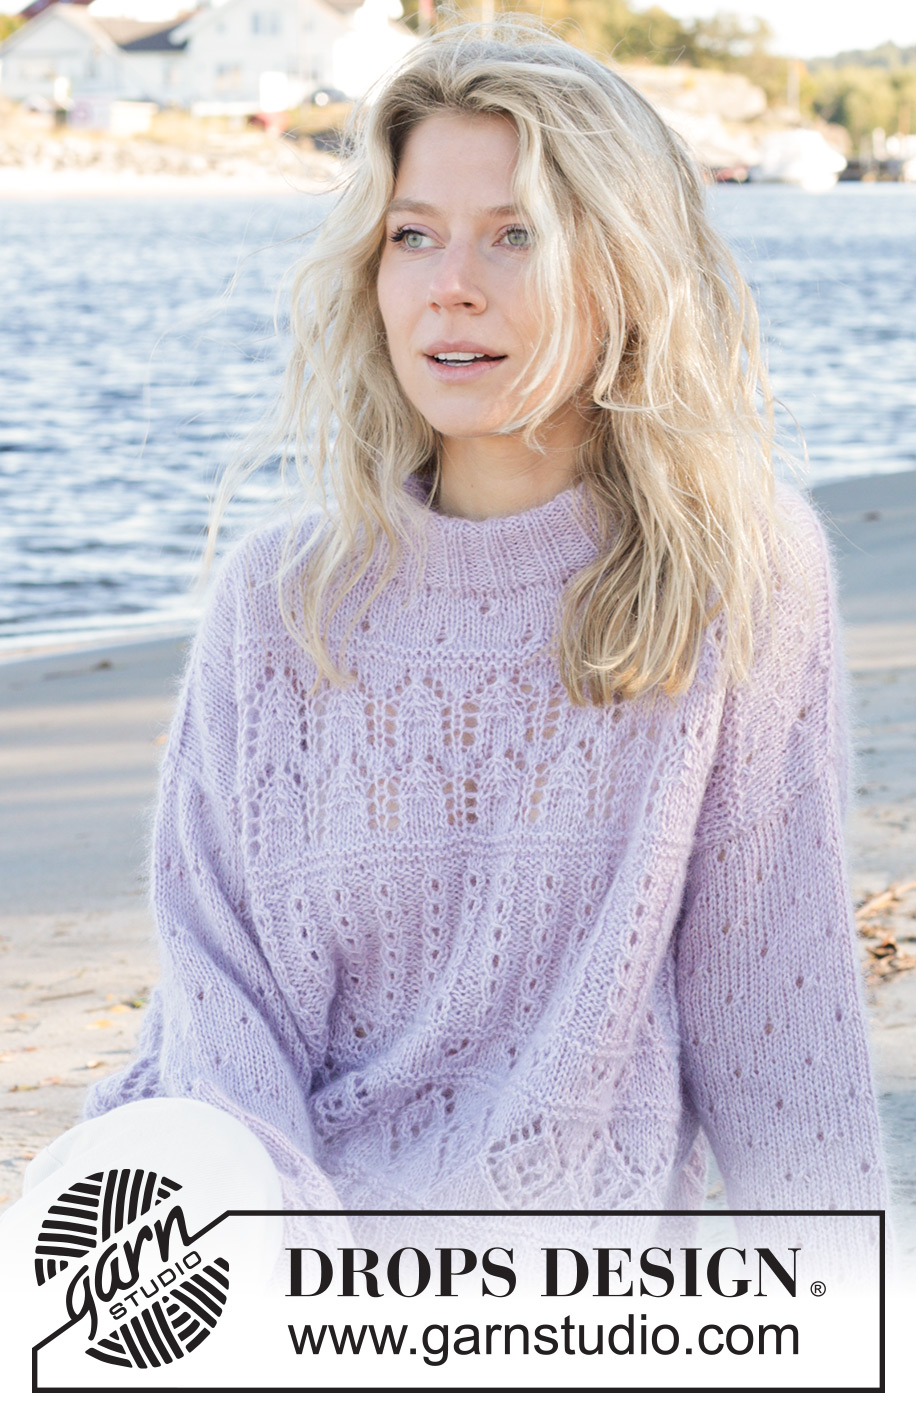
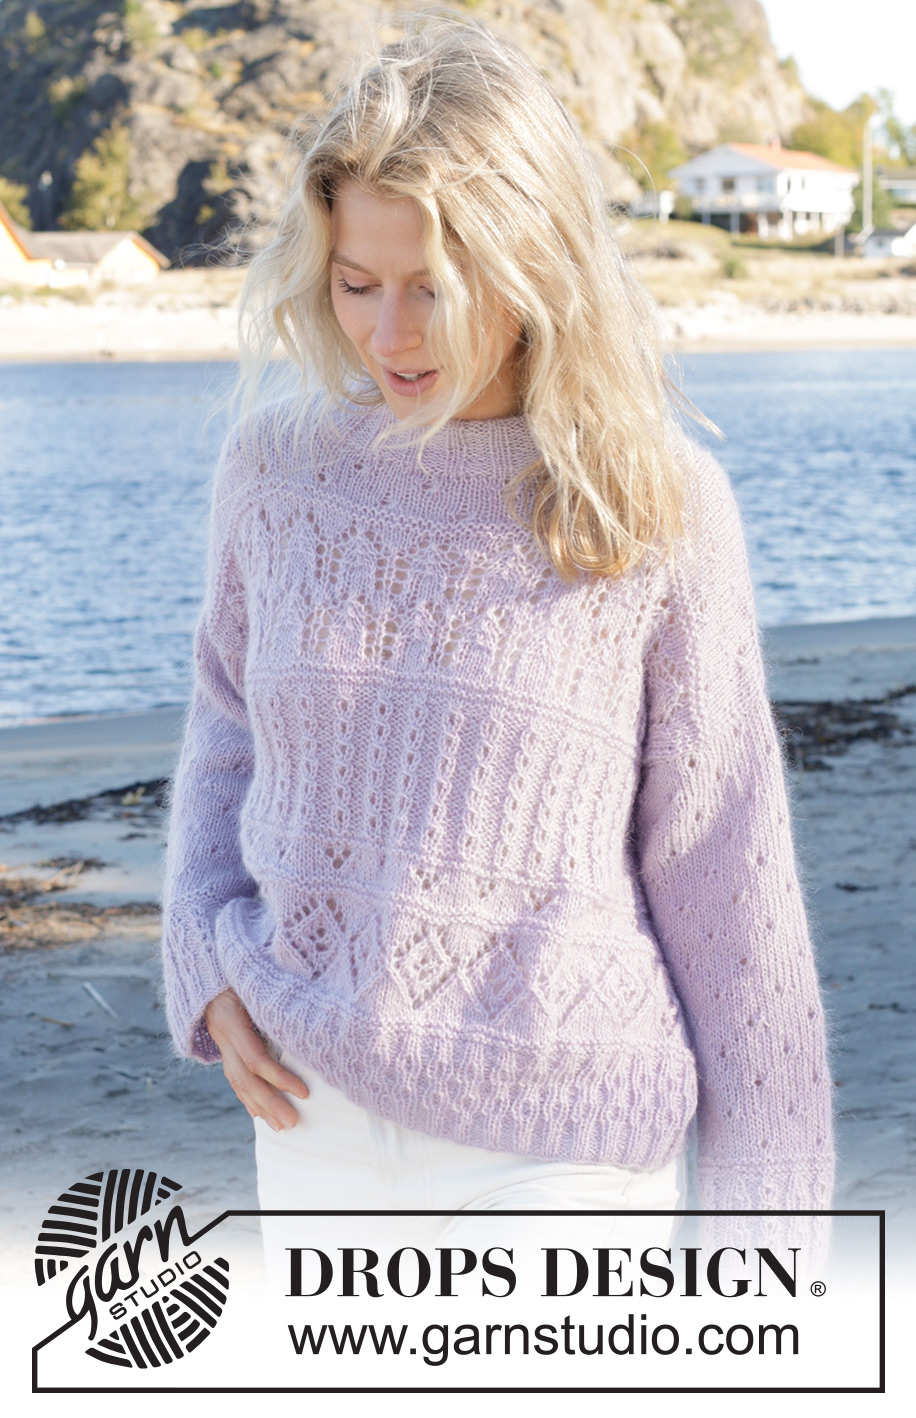
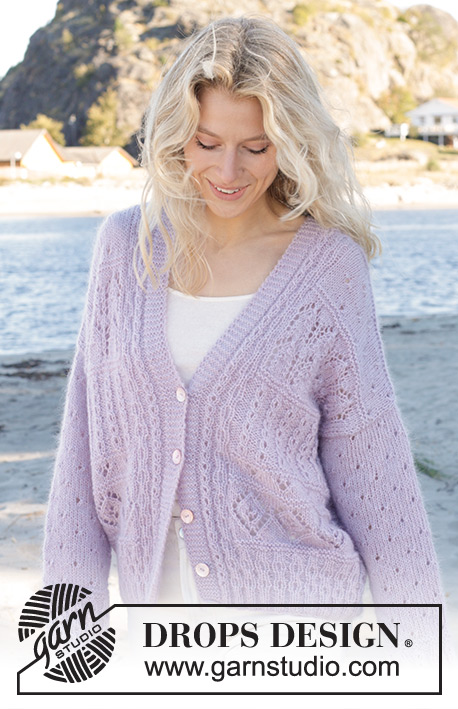
Fabled Harbour Sweater#fabledharboursweater |
|||||||||||||||||||||||||||||||||||||
 |
 |
||||||||||||||||||||||||||||||||||||
Knitted sweater in DROPS Alpaca and DROPS Kid-Silk. The piece is worked bottom up with lace pattern. Sizes S - XXXL.
DROPS 241-9 |
|||||||||||||||||||||||||||||||||||||
|
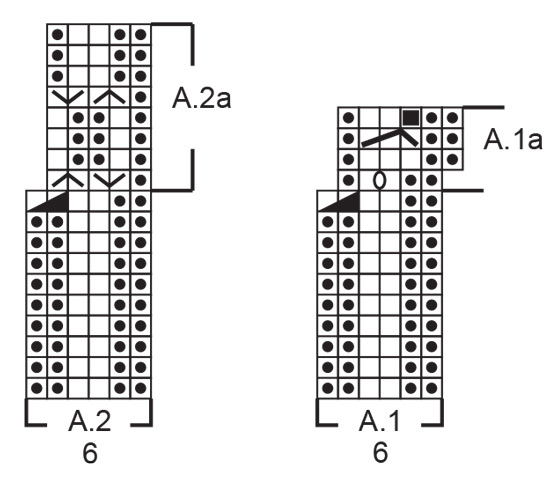
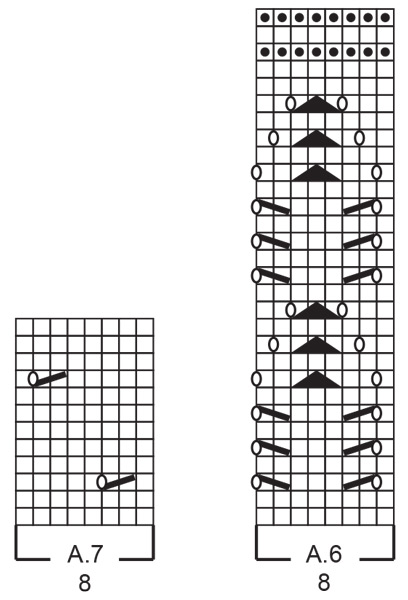
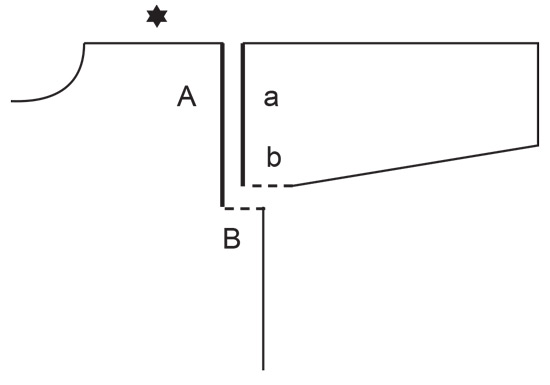
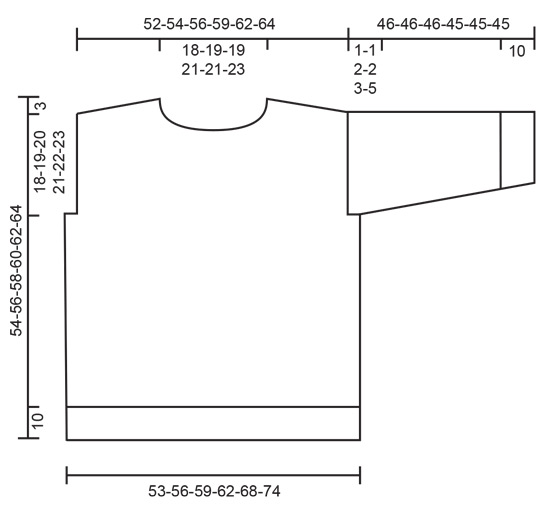
------------------------------------------------------- EXPLANATIONS FOR THE PATTERN ------------------------------------------------------- RIDGE/GARTER STITCH (worked in the round): 1 ridge in height = 2 rounds; Knit 1 round and purl 1 round. RIDGE/GARTER STITCH (worked back and forth): Knit all rows. 1 ridge = knit 2 rows. PATTERN: See diagrams A.1 to A.7. The diagrams show all rows in the pattern from the right side. When following a stitch-count, A.1a and A.5a are always 5 stitches, even though they are 6 stitches on some rows (due to decreases/increases in the pattern). WORKING TOGETHER: FROM RIGHT SIDE: Slip 1 stitch as if to knit, knit 1 and pass the slipped stitch over the knitted stitch. FROM WRONG SIDE: Purl 2 together. STOCKINETTE STITCH: Purl from the wrong side, knit from the right side. INCREASE TIP (for sleeves): Start 1 stitch before the marker thread, 1 yarn over, knit 2 (marker thread sits between these 2 stitches), 1 yarn over. On the next round knit the yarn overs twisted to avoid holes (2 stitches increased). ------------------------------------------------------- START THE PIECE HERE: ------------------------------------------------------- SWEATER – SHORT OVERVIEW OF THE PIECE: The body is worked in the round with circular needle, bottom up as far as the armholes, then it is divided and the front and back pieces finished separately, back and forth. The sleeves are worked in the round with double pointed needles/short circular needle as far as the sleeve cap and finished back and forth. The piece is sewn together and the neck worked to finish. BODY: Cast on 264-276-300-312-336-360 stitches with circular needle size 4 MM = US 6 and 1 strand of each quality (2 strands). Insert 1 marker-thread at the beginning of the round; allow it to follow your work onwards. Knit 1 round. Work rib according to A.2 over all stitches. When A.2 is finished in height there are 220-230-250-260-280-300 stitches. Work A.2a over all stitches, 2 times in height. Change to circular needle size 5 MM = US 8. Work A.3 over all stitches, decreasing AT THE SAME TIME 40-40-50-50-50-50 stitches evenly spaced on the first round = 180-190-200-210-230-250 stitches. REMEMBER THE KNITTING GAUGE! When A.3 is finished in height, the piece measures approx. 21 cm = 8¼". Work A.4 and increase 4-2-0-6-2-6 stitches evenly spaced on the first round = 184-192-200-216-232-256 stitches. When A.4 is finished in height, the piece measures approx. 25 cm = 9¾". Work 2 ridges - read GARTER STITCH and decrease 4-2-0-6-2-6 stitches evenly on the first round = 180-190-200-210-230-250 stitches. Work A.5. Now work A.5a over A.5. When the piece measures 33-34-35-36-37-38 cm = 13"-13⅜"-13¾"-14¼"-14½"-15", bind off for the armholes as follows (making sure the next round has 5 stitches in A.5a): Start 1-2-3-2-5-8 stitches before the marker-thread, bind off 1-4-5-4-10-16 stitches for the armhole, work 89-91-95-101-105-109 stitches as before, bind off 1-4-5-4-10-16 stitches for the armhole, work the remaining 89-91-95-101-105-109 stitches as before. Back and front pieces are finished separately. BACK PIECE: = 89-91-95-101-105-109 stitches. Work the first row from the wrong side. Knit 3 rows. Continue as follows from the right side: 1 garter stitch, 3-0-2-1-3-1 stockinette stitches, work A.6 until there are 5-2-4-3-5-3 stitches left, 4-1-3-2-4-2 stockinette stitches, 1 garter stitch. When A.6 is finished in height, the piece measures approx. 46-47-48-49-50-51 cm = 18"-18½"-19"-19¼"-19¾"-20". Work the following pattern, starting from the right side: 1 garter stitch, 3-0-2-1-3-1 stockinette stitches, work A.7 until there are 5-2-4-3-5-3 stitches left, 4-1-3-2-4-2 stockinette stitches, 1 garter stitch. Continue this pattern to finished length. When the piece measures 50-52-54-56-58-60 cm = 19¾"-20½"-21¼"-22"-22¾"-23⅝", bind off the middle 29-31-31-33-33-37 stitches for the neck and finish each shoulder separately (30-30-32-34-36-36 stitches on each shoulder). Continue the pattern; the stitches which do not fit into the pattern are worked in stockinette stitch. On the next row from the neck bind off 1 stitch at the beginning of the row = 29-29-31-33-35-35 stitches. When the piece measures 51-53-55-57-59-61 cm = 20"-21"-21⅝"-22½"-23¼"-24", work diagonal shoulders, starting from the neck as follows: * Work pattern until there are 7-7-8-8-9-9 stitches left, turn and work back *, work from *-* 2 more times (i.e. working 7-7-8-8-9-9 fewer stitches on each row from the neck). On the last row towards the neck cast on 2 stitches at the end of the row = 31-31-33-35-37-37 stitches. Now work and decrease with an edge over the shoulder stitches. The cast-on stitches are worked together with the shoulder stitches as follows: Work * 1 stitch in STOCKINETTE STITCH – read explanation above, work the next stitch together with the first/next stitch from the shoulder – read WORKING TOGETHER, place the 2 stitches back on the left needle, with the strand loosely on the back side of piece*, work from *-* until all the shoulder stitches are worked together with the 2 cast-on stitches. Bind off the 2 stitches. Work the other shoulder in the same way. FRONT PIECE: = 89-91-95-101-105-109 stitches. Starting from the wrong side work pattern in the same way as the back piece. When the piece measures 47-48-49-51-52-54 cm = 18½"-19"-19¼"-20"-20½"-21¼", slip the 25-27-27-29-29-33 middle stitches for the neck on a thread and finish each shoulder separately (32-32-34-36-38-38) stitches on each shoulder). Continue the pattern; the stitches which do not fit into the pattern are worked in stockinette stitch. On the next row from the neck bind off 2 stitches 1 time and 1 stitch 1 time at the beginning of the row = 29-29-31-33-35-35 stitches. When the piece measures 51-53-55-57-59-61 cm = 20"-21"-21⅝"-22½"-23¼"-24", work diagonal shoulders, starting from the neck as follows: * Work pattern until there are 7-7-8-8-9-9 stitches left, turn and work back *, work from *-* 2 more times (i.e. working 7-7-8-8-9-9 fewer stitches on each row from the neck). On the last row towards the neck cast on 2 stitches at the end of the row = 31-31-33-35-37-37 stitches. Now work and decrease with an edge over the shoulder stitches. The cast-on stitches are worked together with the shoulder stitches as follows: Work * 1 stitch in stockinette stitch, work the next stitch together with the first/next stitch from the shoulder, place the 2 stitches back on the left needle, with the strand loosely on the back side of piece*, work from *-* until all the shoulder stitches are worked together with the 2 cast-on stitches. Bind off the 2 stitches. Work the other shoulder in the same way. SLEEVES: Cast on 60-60-60-72-72-72 stitches with double pointed needles size 4 MM = US 6 and 1 strand of each quality. Knit 1 round. Insert 1 marker at the beginning of the round. Work * A.1 then A.2 *, work from *-* over all stitches. When A.1 and A.2 are finished in height there are 50-50-50-60-60-60 stitches. Repeat A.1a and A.2a in height until A.2a has been worked a total of 2 times (A.1a = 4 times). Knit 1 round and decrease 2-2-2-4-4-4 stitches evenly spaced = 48-48-48-56-56-56 stitches. Change to double pointed needles size 5 MM = US 8. Purl 1 round. Work 1 ridge. Work A.7 over all stitches. Repeat A.7 in height to finished length. When the sleeve measures 14-14-13-13-13-12 cm = 5½"-5½"-5⅛"-5⅛"-5⅛"-4¾", increase 1 stitch on each side of the marker – read INCREASE TIP. Increase like this every 4½-3½-3-3½-2½-2 cm = 1⅝"-1¼"-1⅛"-1¼"-1"-¾" a total of 6-8-10-7-9-11 times = 60-64-68-70-74-78 stitches. The increased stitches are worked into the pattern. When the sleeve measures 45-45-44-43-42-40 cm = 17¾"-17¾"-17¼"-17"-16½"-15¾", work back and forth from the marker for the sleeve cap. Bind off when the sleeve measures 46-46-46-45-45-45 cm = 18"-18"-18"-17¾"-17¾"-17¾" (a split of 1-1-2-2-3-5 cm = ⅜"-⅜"-¾"-¾"-1⅛"-2" at the top of the sleeve). Work the other sleeve in the same way. ASSEMBLY: Sew the shoulder seams inside 1 stitch on the I-cord edge. Sew the sleeve cap to the armhole - see sketch. DOUBLE NECK: Start at one shoulder seam and knit up from the right side 80 to 105 stitches around the neck (including the stitches from the thread) using short circular needle size 4 MM = US 6 and 1 strand of each quality. The stitch number should be divisible by 5. Work rib (purl 3, knit 2) for 10 cm = 4". Bind off with knit over knit and purl over purl, using needle size 5 MM = US 8 (to avoid the bind-off edge being tight). Fold the neck double to the inside and sew down. To avoid the neck being tight and rolling outwards, it is important that the seam is elastic. |
|||||||||||||||||||||||||||||||||||||
Diagram explanations |
|||||||||||||||||||||||||||||||||||||
|
|||||||||||||||||||||||||||||||||||||
 |
|||||||||||||||||||||||||||||||||||||
 |
|||||||||||||||||||||||||||||||||||||
 |
|||||||||||||||||||||||||||||||||||||
 |
|||||||||||||||||||||||||||||||||||||
 |
|||||||||||||||||||||||||||||||||||||
Have you finished this pattern?Tag your pictures with #dropspattern #fabledharboursweater or submit them to the #dropsfan gallery. Do you need help with this pattern?You'll find 43 tutorial videos, a Comments/Questions area and more by visiting the pattern on garnstudio.com. © 1982-2026 DROPS Design A/S. We reserve all rights. This document, including all its sub-sections, has copyrights. Read more about what you can do with our patterns at the bottom of each pattern on our site. |
|||||||||||||||||||||||||||||||||||||


With over 40 years in knitting and crochet design, DROPS Design offers one of the most extensive collections of free patterns on the internet - translated to 17 languages. As of today we count 324 catalogs and 12290 patterns - 12280 of which are translated into English (US/in).
We work hard to bring you the best knitting and crochet have to offer, inspiration and advice as well as great quality yarns at incredible prices! Would you like to use our patterns for other than personal use? You can read what you are allowed to do in the Copyright text at the bottom of all our patterns. Happy crafting!
Post a comment to pattern DROPS 241-9
We would love to hear what you have to say about this pattern!
If you want to leave a question, please make sure you select the correct category in the form below, to speed up the answering process. Required fields are marked *.