
Popular categories
Looking for a yarn?


Comments / Questions (47)
![]() Jo Lamb wrote:
Jo Lamb wrote:
What level of difficulty is this pattern? I have done a lot of crocheting and one knitted item… thank you!
26.03.2026 - 16:28DROPS Design answered:
Dear Mrs Lamb, read thoroughly the pattern, look at the videos / lessons under tabs next to "Pattern" and if you have question, feel free to use this section so that we can try to help. Happy knitting!
27.03.2026 - 07:06
![]() Kinou wrote:
Kinou wrote:
Bonjour, je suis à la fin de ce superbe gilet. Il est magnifique et je vous remercie de nous le proposer free. Je fais les bordures et j’ai un souci avec les explications des boutonnières. Vous dites de tricoter 3 rangs au total et que le dernier est tricoté sur l’envers, alors qu’on doit commencer par les 6 premières mailles. Je ne vois pas comment ça peut être possible :) pouvez-vous me préciser ces explications ?? Merci beaucoup
17.02.2026 - 17:20DROPS Design answered:
Bonjour Kinou, oops le 1er rang sur les 6 premières mailles doit bien être tricoté sur l'endroit (et non sur l'envers, la correction n'était pas correcte, elle est juste maintenant, merci). Merci pour l'info. Retrouvez ici, en vidéo (sur 16 m mais la technique est la même) comment tricoter une boutonnière avec ce type de bordure devant. Bon tricot!
18.02.2026 - 10:21
![]() Ingalill wrote:
Ingalill wrote:
När mönstret uppdateras. Har då uppdateringen gjorts i beskrivningen? Så jag kan följa det nyligen nerladdade mönstret?
09.01.2026 - 15:38DROPS Design answered:
Hei Ingalill. Når det blir gjort en oppdatering av oppskriften, vil det bli lagt til en tekst med rød skrift - Detta mönster har uppdaterats. Klicka här för att se uppdatering. Klikk på linken og les hva som er blitt oppdatert. Selve oppskriften er da også oppdatert. mvh DROPS Design
12.01.2026 - 12:42
![]() Tina wrote:
Tina wrote:
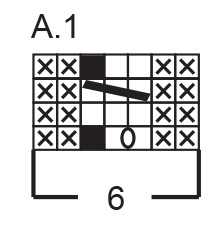
Mønster A1 viser at det er 7 masker, men der står i opskriften at det er 6 masker. Så hvordan skal det strikkes ?
04.11.2025 - 20:37DROPS Design answered:
Hei Tina. Nei, diagram A.1 har bare 6 masker. Husk å lese diagramteksten (den sorte firkanten = denne ruten er ingen maske, gå direkte videre til neste symbol i diagrammet(. mvh DROPS Design
17.11.2025 - 11:51
![]() Angele wrote:
Angele wrote:
Peut on faire ce modèle sans couture en adaptant les parties devant et dos en 1 seule aiguille depuis les 17 cm fait depuis le bas?
29.10.2025 - 13:15DROPS Design answered:
Bonjour Angèle, probablement, tricotez les deux devants et le dos séparément puis réunissez-les après les 17 cm de fente (notez que vous n'aurez pas besoin des mailles lisières sur les côtés devants/dos). Bon tricot!
30.10.2025 - 18:38
![]() Patricia wrote:
Patricia wrote:
Did i read this pattern right, you knit with 2 balls at the same time? I will probably knit with Fabel. And how much yarn do I need for a xxlarge?
07.06.2025 - 17:57DROPS Design answered:
Dear Patricia, yes, you work with two threads, one of DROPS Nepal, which is the main body of the yarn, and one of DROPS Kid-silk, which will give some hairy effect to the garment. If you want to use DROPS Fabel you will need to use 3 threads of DROPS Fabel to work this piece. You would need 21 balls of DROPS Fabel to work this piece with 3 threads of Fabel. And the texture of the garment will be quite different. Happy knitting!
08.06.2025 - 15:22
![]() THOMAS Bernadette wrote:
THOMAS Bernadette wrote:
Bonjour.Je voudrais faire un manteau court EN LE FEUTRANT sur la base de ce modèle (poches et col en plus) Qu’en pensez vous? Pourquoi n’y a-t-il que des «petits »modèles ( gants,chaussons…) Est-ce trop compliqué ? Si c’est le cas, je pensais aussi au principe de différents carrés ou rectangles assemblés façon patchwork. Quoi faire? Je le visualise bien et je sais que cela est probablement faisable mais je ne voudrais pas faire d’erreurs. Merci pour votre réponse.
21.02.2025 - 17:33DROPS Design answered:
Bonjour Mme Thomas, nous n'avons effectivement que des modèles de chaussons feutrés (en plus des modèles pour l'intérieur), pas de vêtements à proprement parler. Pour réaliser un vêtement feutré, vous pourrez probablement vous aider d'un modèle déjà existant des les mesures que vous souhaitez, il vous faudra également compter avec le rétrécissement dû au feutrage, il vous faudra faire un échantillon avant/après feutrage pour avoir vos bonnes mesures, et tout bien recalculer pour augmenter vos chances d'arriver au bon résultat. Bon tricot!
24.02.2025 - 07:36
![]() Fahima wrote:
Fahima wrote:
J\'aurais aimé avoir les explications et le chemat sur une feuille et merci d\'avance
10.01.2025 - 06:20
![]() Pascale wrote:
Pascale wrote:
Bonjour, sur les photos je vois une tresse de chaque côté. Mais pas dans les explications. L’unique diagramme A1 permet de faire un trou. Merci de votre retour
04.01.2025 - 20:34DROPS Design answered:
Bonjour Pascale, on a bien une petite torsade de chaque côté, torsade réalisée sans aiguilles à torsades avec un petit trou; dans cette vidéo, nous montrons comment réaliser ce type de torsades (une autre technique mais même résultat). Bon tricot!
06.01.2025 - 09:23
![]() Basma wrote:
Basma wrote:
Pour quoi on diminue pour encolure sur le devant droit en passant une maille glissante alors que sur le devant on diminue en tricotant deux mailles ensemble ? Faut-il pas diminuer de la même manière pour les deux devants ?
30.11.2024 - 23:27DROPS Design answered:
Bonjour Mme Basma, les diminutions sont faites en effet miroir, ainsi elles sont symétriques et elles vont suivre la ligne d'encolure. Bon tricot!
02.12.2024 - 09:22
|
|||||||||||||||||||
Conversation Starter#conversationstartercardigan |
|||||||||||||||||||
 |
 |
||||||||||||||||||
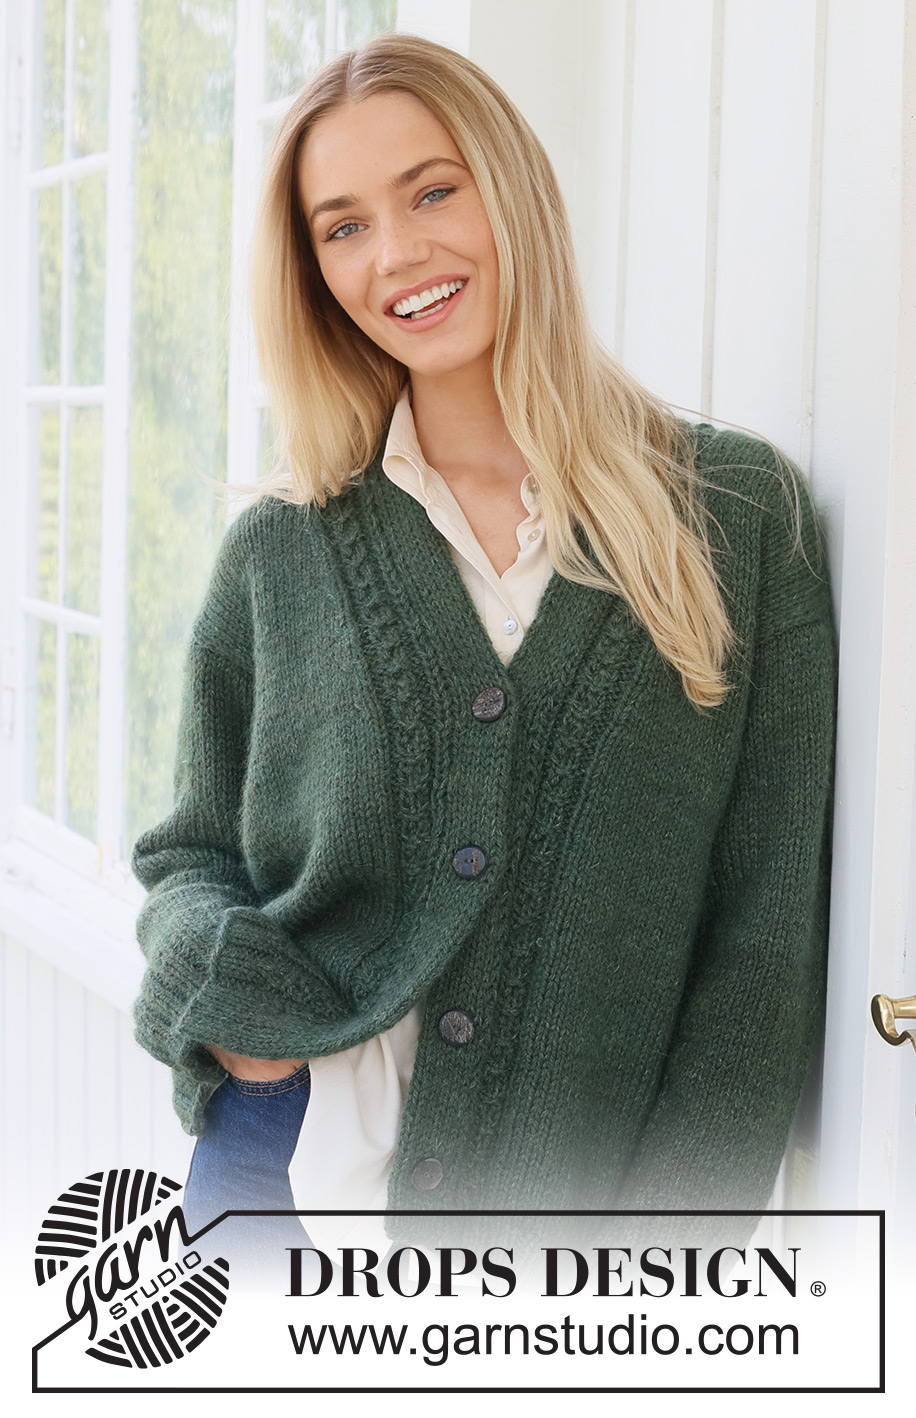
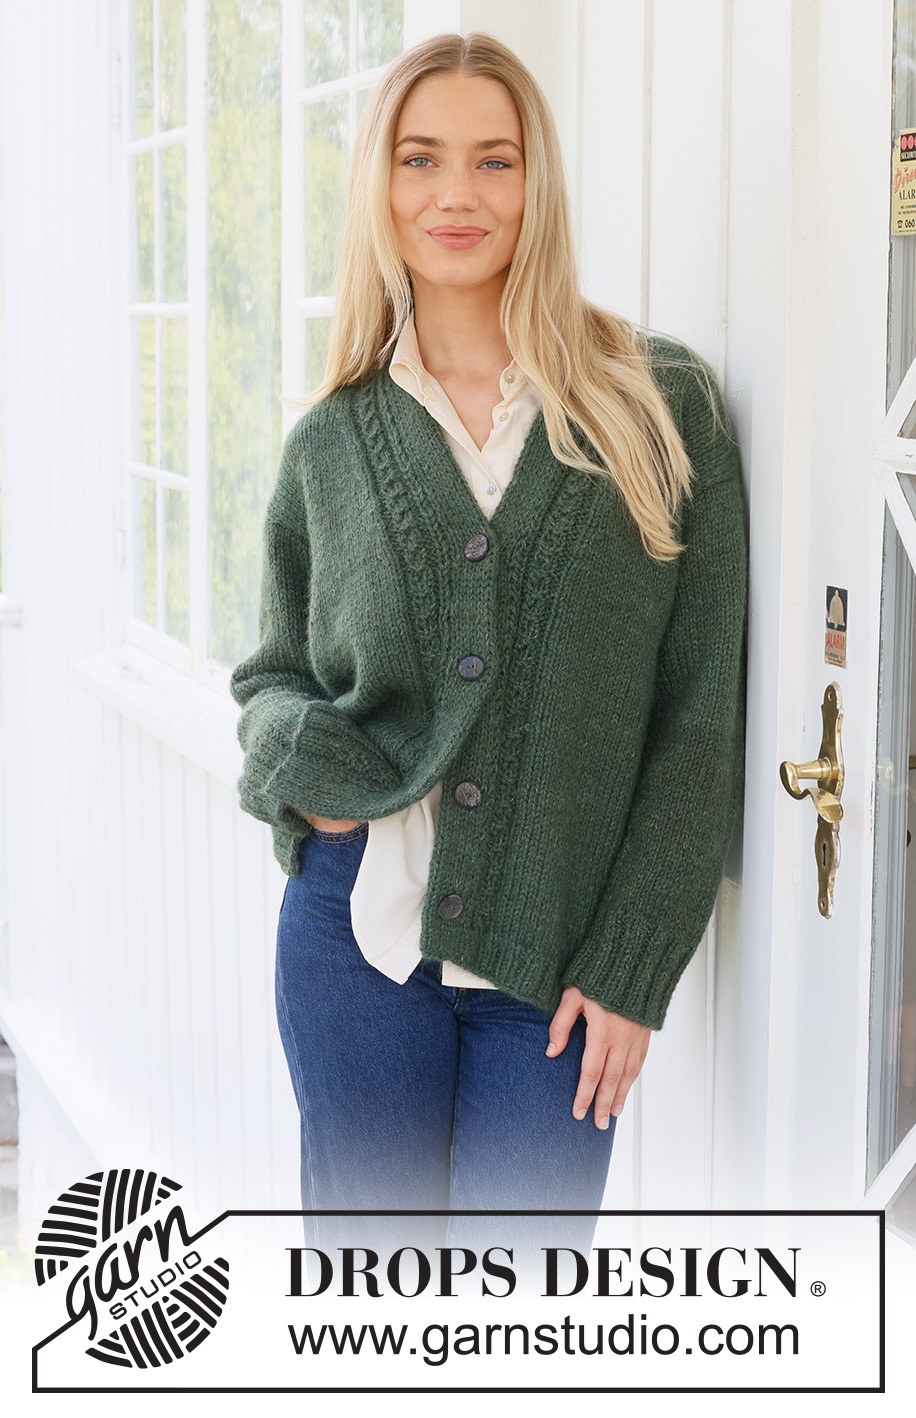
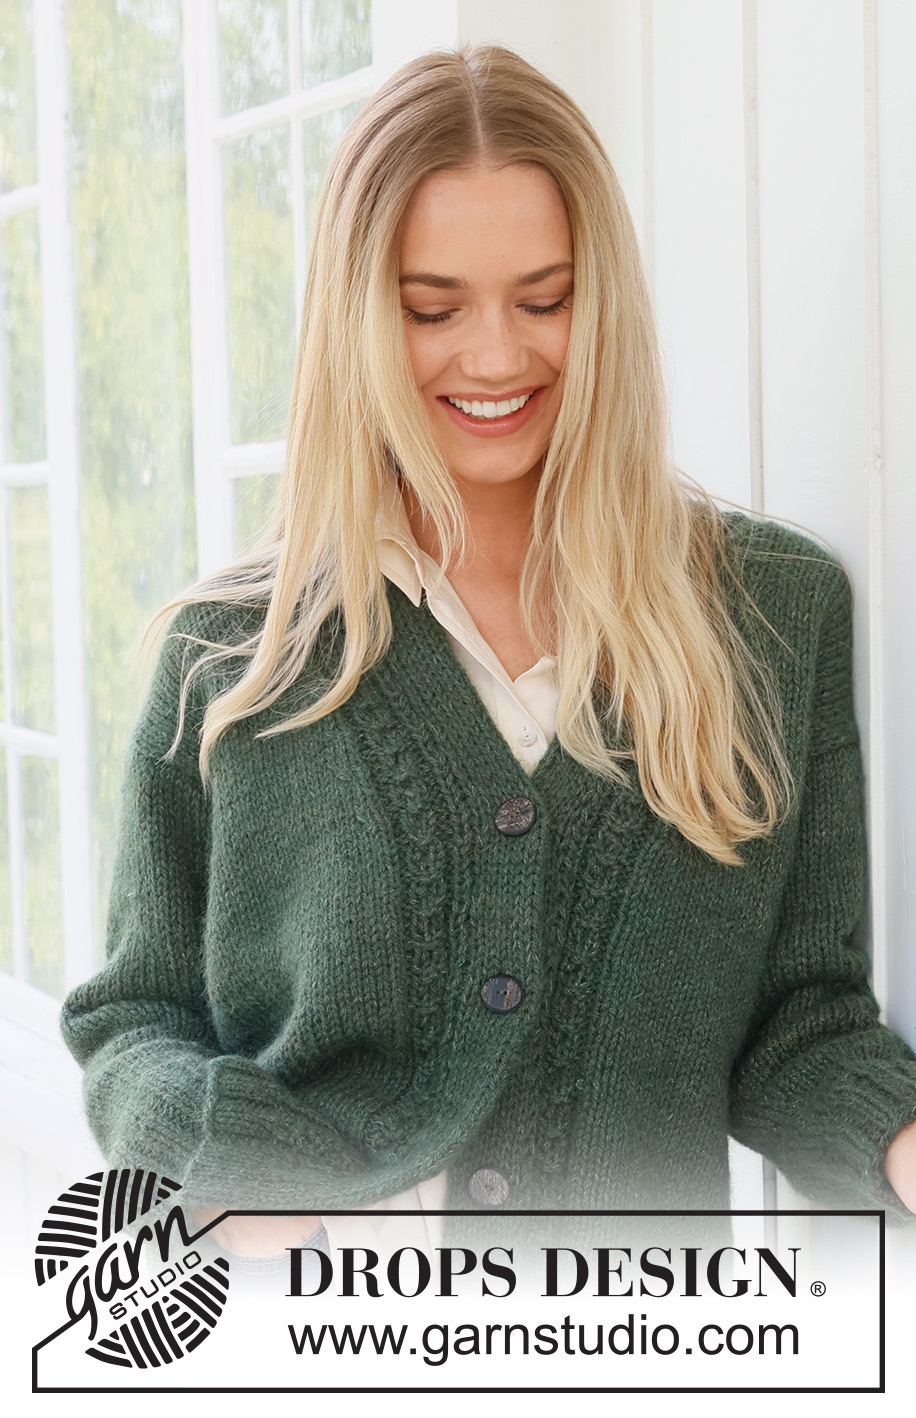
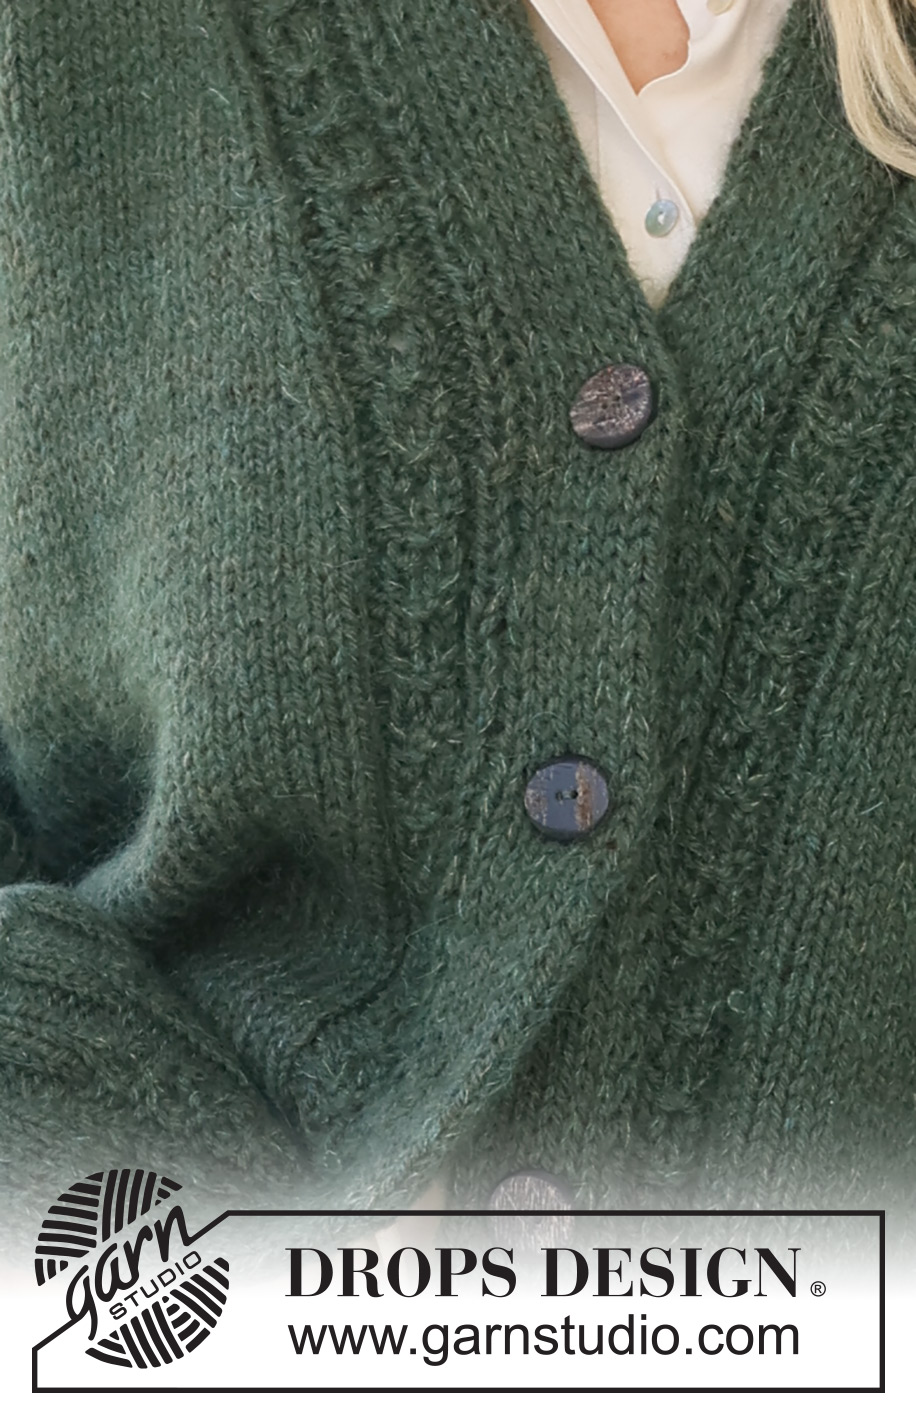
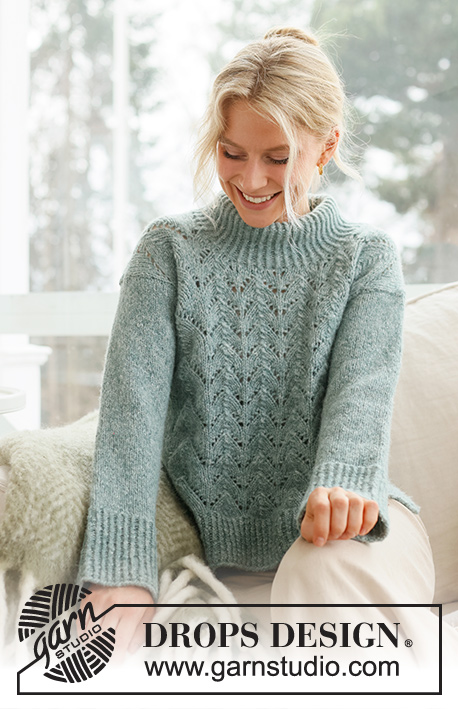
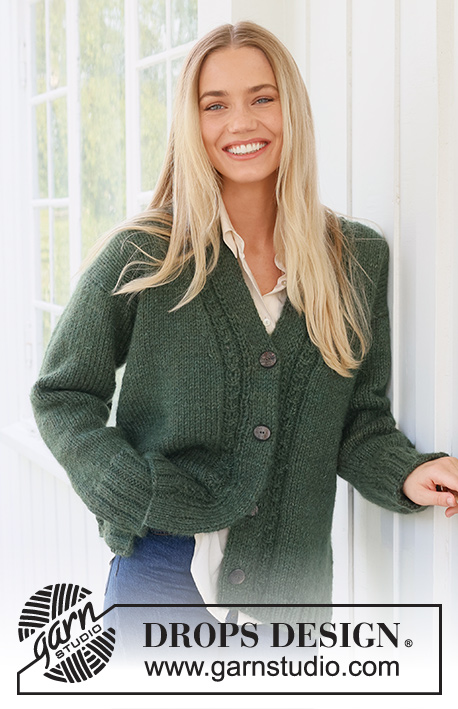
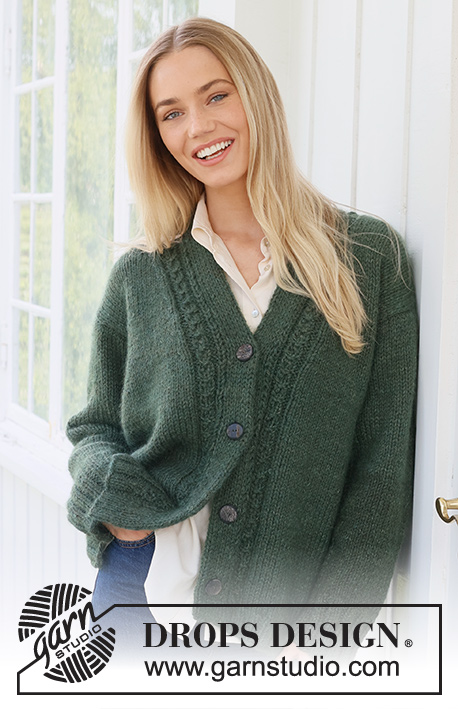
Knitted jacket in DROPS Nepal and DROPS Kid-Silk. Piece is knitted bottom up in stockinette stitch, lace pattern and double knitted band. Size: S - XXXL
DROPS 237-4 |
|||||||||||||||||||
|
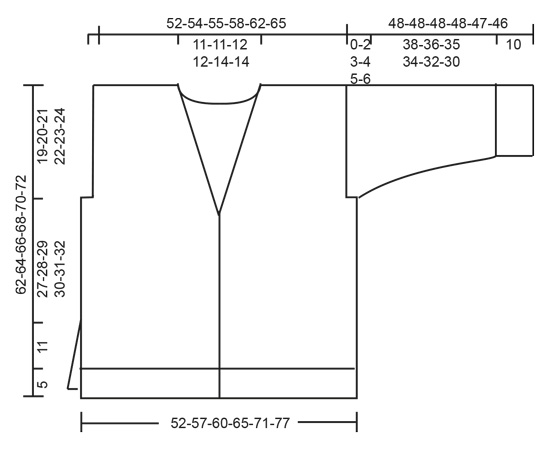
---------------------------------------------------------- EXPLANATION FOR THE PATTERN: ---------------------------------------------------------- GARTER STITCH (back and forth): Knit all rows. 1 ridge vertically = knit 2 rows. PATTERN: See diagram A.1. When number of stitches if given in pattern, A.1 is always counted as 6 stitches. BUTTONHOLES: Work buttonholes on right band as follows: Work over the first 6 stitches as before, turn and work back over the 6 stitches as before, work a total of 3 rows over the 6 stitches (last row is worked from the right side). Cut the yarn. Work a total of 4 rows as before over the remaining 6 band stitches (work first row from right side) and work last stitch from right side together with next stitch along edge of jacket as before. On last row from wrong side work as before over all band stitches and continue as before over all band stitches. Work buttonholes when band measures: S: 6, 16, 26 and 36 cm = 2⅜", 6¼", 10¼" and 14¼" M: 8, 18, 28 and 38 cm = 3⅛", 7", 11" and 15" L: 8, 18, 28 and 38 cm = 3⅛", 7", 11" and 15" XL: 4, 13, 22, 31 and 40 cm = 1½", 5⅛", 8¾", 12¼" and 15¾" XXL: 4, 13, 22, 31 and 40 cm = 1½", 5⅛", 8¾", 12¼" and 15¾" XXXL: 6, 15, 24, 33 and 41 cm = 2⅜", 6", 9½", 13" and 16⅛" INCREASE TIP (applies to sleeves): All increases are done from the right side. Work 1 edge stitch in garter stitch, knit 1, make 1 yarn over (= 1 stitch increased), knit until 2 stitches remain, make 1 yarn over (= 1 stitch increased), knit 1 and 1 edge stitch in garter stitch. On next row purl yarns over twisted. Then work the new stitches in stockinette stitch. ---------------------------------------------------------- START THE PIECE HERE: ---------------------------------------------------------- JACKET - SHORT OVERVIEW OF THE PIECE: Piece is worked back and forth in parts bottom up and sewn together when finished. Pick up a band along each of the front pieces. BACK PIECE: Cast on 84-92-96-104-112-120 stitches on circular needle size 6 MM = US 10 with 1 strand of each quality (= 2 strands). Purl 1 row from wrong side. Work rib, begin from right side as follows: 3 edge stitches in GARTER STITCH - read explanation above - * knit 2, purl 2 *, work from *-* until 5 stitches remain, knit 2 and 3 edge stitches in garter stitch. When rib measures 5 cm = 2", switch to circular needle size 7 MM = US 10.75. Knit 1 row from right side and decrease 14-16-16-18-18-18 stitches evenly = 70-76-80-86-94-102 stitches. Work in stockinette stitch with 3 edge stitches in garter stitch in each side. When piece measures 17 cm = 6¾", work in stockinette stitch with 1 edge stitch in garter stitch in each side. When piece measures 43-44-45-46-47-48 cm = 17"-17¼"-17¾"-18"-18½"-19", bind off 1-3-4-5-7-9 stitches for armholes at the beginning of the next 2 rows = 68-70-72-76-80-84 stitches. Continue with stockinette stitch and 1 edge stitch in garter stitch in each side. REMEMBER THE KNITTING GAUGE! When piece measures 58-60-62-64-66-68 cm = 22¾"-23⅝"-24⅜"-25¼"-26"-26¾", bind off the middle 12-12-14-14-16-16 stitches for neck and finish each shoulder separately (= 28-29-29-31-32-34 stitches remain on each shoulder). On next row from neck bind off 1 stitch for neck = 27-28-28-30-31-33 stitches. Bind off when piece measures 62-64-66-68-70-72 cm = 24⅜"-25¼"-26"-26¾"-27½"-28⅜". Work the other shoulder the same way. RIGHT FRONT PIECE: Cast on 40-44-48-52-56-60 stitches on circular needle size 6 MM = US 10 with 1 strand of each quality (= 2 strands). Purl 1 row from wrong side. Work rib, begin from right side as follows: 1 edge stitch in garter stitch, * purl 2, knit 2 *, repeat from **-* until 3 stitches remain and 3 edge stitches in garter stitch. When rib measures 5 cm = 2", switch to circular needle size 7 MM = US 10.75. Work next row as follows from right side: 1 edge stitch in garter stitch, A.1, work stockinette stitch until 3 stitches remains and decrease 4-5-7-8-8-8 stitches evenly and 3 edge stitches in garter stitch = 36-39-41-44-48-52 stitches. Repeat A.1 vertically. When piece measures 17 cm = 6¾", work in stockinette stitch and A.1 as before, 1 edge stitch in garter stitch in each side. When piece measures 37-39-39-41-41-42 cm = 14½"-15¼"-15¼"-16⅛"-16⅛"-16½", begin decrease for neck on next row from right side as follows: 1 edge stitch in garter stitch, A.1 as before, knit 1, slip 1 stitch knitwise, knit 1, pass slipped stitch over stitch worked, knit until 1 stitch remains and 1 edge stitch in garter stitch. Decrease like this every 6th row 4 times in total, then every 4th row 4-4-5-5-6-6 times in total. AT THE SAME TIME when piece measures 43-44-45-46-47-48 cm = 17"-17¼"-17¾"-18"-18½"-19", bind off the first 1-3-4-5-7-9 stitches for armhole on next row from wrong side. When neck decrease is done, 27-28-28-30-31-33 stitches remain on row. Bind off when piece measures 62-64-66-68-70-72 cm = 24⅜"-25¼"-26"-26¾"-27½"-28⅜". LEFT FRONT PIECE: Cast on 40-44-48-52-56-60 stitches on circular needle size 6 MM = US 10 with 1 strand of each quality (2 strands). Purl 1 row from wrong side. Work rib, begin from right side as follows: 3 edge stitches in garter stitch, * knit 2, purl 2 *, work from*-* until 1 stitch remains, 1 edge stitch in garter stitch. When rib measures 5 cm = 2", switch to circular needle size 7 MM = US 10.75. Work next row as follows from right side: 3 edge stitches in garter stitch, A.1, work stockinette stitch until 7 stitches remain and decrease 4-5-7-8-8-8 stitches evenly, work A.1 and 1 edge stitch in garter stitch = 36-39-41-44-48-52 stitches. Repeat A.1 vertically. When piece measures 17 cm = 6¾", work in stockinette stitch and A.1 as before, 1 edge stitch in garter stitch in each side. When piece measures 37-39-39-41-41-42 cm = 14½"-15¼"-15¼"-16⅛"-16⅛"-16½", begin decrease for neck on next row from right side as follows: 1 edge stitch in garter stitch, work stockinette stitch until 3 stitches remain before A.1, knit 2 stitches together, knit 1, A.1 as before and 1 edge stitch in garter stitch. Decrease like this every 6th row 4 times in total, then every 4th row 4-4-5-5-6-6 times in total. AT THE SAME TIME when piece measures 43-44-45-46-47-48 cm = 17"-17¼"-17¾"-18"-18½"-19", bind off the first 1-3-4-5-7-9 stitches for armhole on next row from right side. When neck decrease is done, 27-28-28-30-31-33 stitches remain on row. Bind off when piece measures 62-64-66-68-70-72 cm = 24⅜"-25¼"-26"-26¾"-27½"-28⅜". SLEEVE: Cast on 50-50-54-54-58-58 stitches on circular needle size 6 MM = US 10 with 1 strand of each quality (2 strands). Purl 1 row from wrong side. Then work as follows from right side: Work 1 edge stitch in garter stitch, * knit 2, purl 2 *, work from*-* until 1 stitch remains, 1 edge stitch in garter stitch. When rib measures 10 cm = 4", switch to circular needle size 7 MM = US 10,75. Work in stockinette stitch with 1 edge stitch in garter stitch in each side. On next row from right side decrease 7-7-9-9-11-11 stitches evenly = 43-43-45-45-47-47 stitches. When piece measures 14 cm = 5½", increase 1 stitch in each side - read INCREASE TIP! Increase like this every 6-4-4-3½-2½-2 cm = 2⅜"-1½"-1½"-1¼"-1"-¾" 6-8-8-9-10-11 times in total = 55-59-61-63-67-69 stitches. SIZE S: Work until piece measures 48 cm = 19". Bind off. Knit another sleeve the same way. SIZE M-L-XL-XXL-XXXL: Continue to work until sleeve measures 46-45-44-42-40 cm = 18"-17¾"-17¼"-16½"-15¾". Insert 1 marker in each side of sleeve - markers mark where bottom of armhole starts. Work until sleeve measures 48-48-48-47-46 cm = 19"-19"-19"-18½"-18" (i.e. approx. 2-3-4-5-6 cm = ¾"-1⅛"-1½"-2"-2⅜" from marker). Bind off. Knit another sleeve the same way. ASSEMBLY: Sew shoulder seams inside bind-off edge. Sew in sleeves in size M-L-XL-XXL-XXXL: Sew bottom of armhole - markers inserted on sleeves should fit sides of body. Sew sleeve and side seams in one inside 1 edge stitch down until approx. 16 cm = 6¼" remain (= vent). RIGHT BAND: Work band bottom up towards the neck. Pick up stitches along right front piece, skip 1½ - 2 meters in on thread and use yarn end to pick up stitches with (that way you can continue to work with the ball without cutting the yarn afterwards) as follows: Begin pick up at the bottom of front piece and pick up 1 stitch in every knitted row along the entire front piece inside 1 edge stitch, use circular needle size 6 MM = US 10 and 1 strand of each quality. Now continue piece at the end of row where ball is = at the bottom of front piece. Cast on 12 stitches for band as an exgauge of the stitches pick up at the bottom of front piece (cast on stitches from wrong side). Work band over the 12 stitches at the same time as band is knitted together with stitches picked up along the front piece as follows: ROW 1 (= right side): Slip first stitch on to right needle purlwise with strand in front of piece, * knit 1, slip 1 stitch on to right needle purlwise with strand in front of piece *, work from *-* until 1 stitch remains of the 12 band stitches, slip last stitch on to right needle knitwise, with strand behind piece, knit next stitch, pass slipped stitch over stitch worked, turn. ROW 2 (= wrong side): * Slip first/next stitch on to right needle purlwise with strand in front of piece, knit 1 *, work from *-* over all the 12 band stitches, turn. Repeat rows 1 and 2. NB! If the band becomes too long for the front piece, the band stitches can be worked together with 1 extra stitch from the front piece. Then work every 10th row as follows from the right side: Work until 1 stitch remains of the 12 band stitches, slip the last stitch onto the right needle as if to knit, with the yarn behind the work, knit the next 2 stitches together, pass the slipped stitch over the stitches knitted together, turn. Work BUTTONHOLES - read explanation above. When all stitches from front piece have been worked together with band, work neck edge at the back. BACK NECK EDGE: Now work over the 12 band stitches as follows: ROW 1: * Slip first/next stitch on to right needle purlwise, with strand in front of piece, knit 1 *, work from *-* over the 12 stitches. Repeat row 1 both from right side and wrong side for 7½-7½-8-8-9-9 cm = 2⅞"-2⅞"-3⅛"-3⅛"-3½"-3½". On last row from right side knit all stitches together 2 by 2 and then bind off. LEFT BAND: Work band bottom up. Pick up stitches at the top by shoulder on front piece, pick up 1 stitch in every knitted row down along the entire front piece inside 1 edge stitch, use circular needle size 6 MM = US 10 and 1 strand of each quality. After the pick up cast on 12 stitches for band (= at the bottom of front piece). Work band over the 12 stitches at the same time as band is knitted together with stitches picked up along the front piece as follows: ROW 1 (= wrong side): Knit 1, * slip 1 stitch on to right needle purlwise with strand in front of piece, knit 1 *, work from *-* until 1 stitch remains of the 12 band stitches, slip the next 2 stitches on to right needle purlwise with strand in front of piece, turn. ROW 2 (= right side): Knit 2 together, *, slip 1 stitch on to right needle purlwise with strand in front of piece, knit 1 *, work from *-* until 1 stitch remains, slip last stitch on to right needle purlwise with strand in front of piece, turn. Repeat rows 1 and 2.NB! If the band becomes too long for the front piece, the band stitches can be worked together with 1 extra stitch from the front piece on every 9th and 10th row as follows: slip 3 stitches onto the right needle at the end of the row from the wrong side and knit 3 together from the right side. When all stitches from front piece have been worked together with band work neck edge at the back. BACK NECK EDGE: Now work over the 12 band stitches as follows: ROW 1: * Knit 1, slip next stitch on to right needle purlwise with strand in front of piece *, work from *-* over the 12 stitches. Repeat row 1 both from right side and wrong side for 7½-7½-8-8-9-9 cm = 2⅞"-2⅞"-3⅛"-3⅛"-3½"-3½". On last row from right side work all stitches together as follows: Slip 1 stitch on to right needle knitwise, knit 1, pass slipped stitch over stitch worked. Then bind off the stitches. ASSEMBLY: Sew the band together mid back and sew it to the neck edge on back piece. Sew the buttons on to left band. |
|||||||||||||||||||
Diagram explanations |
|||||||||||||||||||
|
|||||||||||||||||||
 |
|||||||||||||||||||
 |
|||||||||||||||||||
 |
|||||||||||||||||||
Have you finished this pattern?Tag your pictures with #dropspattern #conversationstartercardigan or submit them to the #dropsfan gallery. Do you need help with this pattern?You'll find 26 tutorial videos, a Comments/Questions area and more by visiting the pattern on garnstudio.com. © 1982-2026 DROPS Design A/S. We reserve all rights. This document, including all its sub-sections, has copyrights. Read more about what you can do with our patterns at the bottom of each pattern on our site. |
|||||||||||||||||||


With over 40 years in knitting and crochet design, DROPS Design offers one of the most extensive collections of free patterns on the internet - translated to 17 languages. As of today we count 324 catalogs and 12290 patterns - 12280 of which are translated into English (US/in).
We work hard to bring you the best knitting and crochet have to offer, inspiration and advice as well as great quality yarns at incredible prices! Would you like to use our patterns for other than personal use? You can read what you are allowed to do in the Copyright text at the bottom of all our patterns. Happy crafting!
Post a comment to pattern DROPS 237-4
We would love to hear what you have to say about this pattern!
If you want to leave a question, please make sure you select the correct category in the form below, to speed up the answering process. Required fields are marked *.