
Popular categories
Looking for a yarn?


|
|||||||||||||||||||
Conversation Starter |
|||||||||||||||||||
 |
 |
||||||||||||||||||
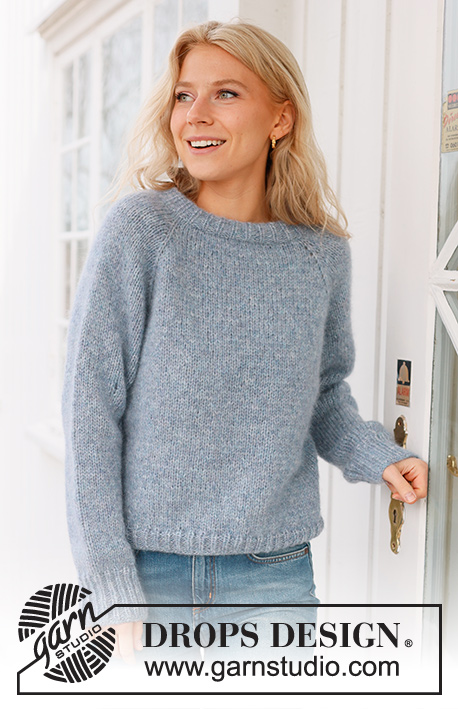
Knitted jacket in DROPS Nepal and DROPS Kid-Silk. Piece is knitted bottom up in stocking stitch, lace pattern and double knitted band. Size: S - XXXL
DROPS 237-4 |
|||||||||||||||||||
|
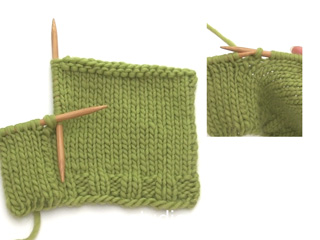
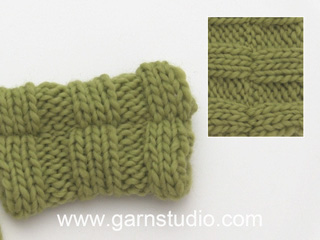
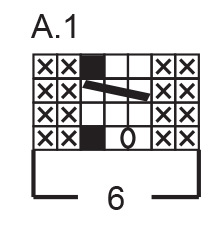
---------------------------------------------------------- EXPLANATION FOR THE PATTERN: ---------------------------------------------------------- GARTER STITCH (back and forth): Knit all rows. 1 ridge vertically = knit 2 rows. PATTERN: See diagram A.1. When number of stitches if given in pattern, A.1 is always counted as 6 stitches. BUTTONHOLES: Work buttonholes on right band as follows: Work over the first 6 stitches as before, turn and work back over the 6 stitches as before, work a total of 3 rows over the 6 stitches (last row is worked from the right side). Cut the yarn. Work a total of 4 rows as before over the remaining 6 band stitches (work first row from right side) and work last stitch from right side together with next stitch along edge of jacket as before. On last row from wrong side work as before over all band stitches and continue as before over all band stitches. Work buttonholes when band measures: S: 6, 16, 26 and 36 cm M: 8, 18, 28 and 38 cm L: 8, 18, 28 and 38 cm XL: 4, 13, 22, 31 and 40 cm. XXL: 4, 13, 22, 31 and 40 cm. XXXL: 6, 15, 24, 33 and 41 cm. INCREASE TIP (applies to sleeves): All increases are done from the right side. Work 1 edge stitch in garter stitch, knit 1, make 1 yarn over (= 1 stitch increased), knit until 2 stitches remain, make 1 yarn over (= 1 stitch increased), knit 1 and 1 edge stitch in garter stitch. On next row purl yarns over twisted. Then work the new stitches in stocking stitch. ---------------------------------------------------------- START THE PIECE HERE: ---------------------------------------------------------- JACKET - SHORT OVERVIEW OF THE PIECE: Piece is worked back and forth in parts bottom up and sewn together when finished. Pick up a band along each of the front pieces. BACK PIECE: Cast on 84-92-96-104-112-120 stitches on circular needle size 6 mm with 1 strand of each quality (= 2 strands). Purl 1 row from wrong side. Work rib, begin from right side as follows: 3 edge stitches in GARTER STITCH - read explanation above - * knit 2, purl 2 *, work from *-* until 5 stitches remain, knit 2 and 3 edge stitches in garter stitch. When rib measures 5 cm, switch to circular needle size 7 mm. Knit 1 row from right side and decrease 14-16-16-18-18-18 stitches evenly = 70-76-80-86-94-102 stitches. Work in stocking stitch with 3 edge stitches in garter stitch in each side. When piece measures 17 cm, work in stocking stitch with 1 edge stitch in garter stitch in each side. When piece measures 43-44-45-46-47-48 cm, cast off 1-3-4-5-7-9 stitches for armholes at the beginning of the next 2 rows = 68-70-72-76-80-84 stitches. Continue with stocking stitch and 1 edge stitch in garter stitch in each side. REMEMBER THE KNITTING TENSION! When piece measures 58-60-62-64-66-68 cm, cast off the middle 12-12-14-14-16-16 stitches for neck and finish each shoulder separately (= 28-29-29-31-32-34 stitches remain on each shoulder). On next row from neck cast off 1 stitch for neck = 27-28-28-30-31-33 stitches. Cast off when piece measures 62-64-66-68-70-72 cm. Work the other shoulder the same way. RIGHT FRONT PIECE: Cast on 40-44-48-52-56-60 stitches on circular needle size 6 mm with 1 strand of each quality (= 2 strands). Purl 1 row from wrong side. Work rib, begin from right side as follows: 1 edge stitch in garter stitch, * purl 2, knit 2 *, repeat from **-* until 3 stitches remain and 3 edge stitches in garter stitch. When rib measures 5 cm, switch to circular needle size 7 mm. Work next row as follows from right side: 1 edge stitch in garter stitch, A.1, work stocking stitch until 3 stitches remains and decrease 4-5-7-8-8-8 stitches evenly and 3 edge stitches in garter stitch = 36-39-41-44-48-52 stitches. Repeat A.1 vertically. When piece measures 17 cm, work in stocking stitch and A.1 as before, 1 edge stitch in garter stitch in each side. When piece measures 37-39-39-41-41-42 cm, begin decrease for neck on next row from right side as follows: 1 edge stitch in garter stitch, A.1 as before, knit 1, slip 1 stitch knitwise, knit 1, pass slipped stitch over stitch worked, knit until 1 stitch remains and 1 edge stitch in garter stitch. Decrease like this every 6th row 4 times in total, then every 4th row 4-4-5-5-6-6 times in total. AT THE SAME TIME when piece measures 43-44-45-46-47-48 cm, cast off the first 1-3-4-5-7-9 stitches for armhole on next row from wrong side. When neck decrease is done, 27-28-28-30-31-33 stitches remain on row. Cast off when piece measures 62-64-66-68-70-72 cm. LEFT FRONT PIECE: Cast on 40-44-48-52-56-60 stitches on circular needle size 6 mm with 1 strand of each quality (2 strands). Purl 1 row from wrong side. Work rib, begin from right side as follows: 3 edge stitches in garter stitch, * knit 2, purl 2 *, work from*-* until 1 stitch remains, 1 edge stitch in garter stitch. When rib measures 5 cm, switch to circular needle size 7 mm. Work next row as follows from right side: 3 edge stitches in garter stitch, A.1, work stocking stitch until 7 stitches remain and decrease 4-5-7-8-8-8 stitches evenly, work A.1 and 1 edge stitch in garter stitch = 36-39-41-44-48-52 stitches. Repeat A.1 vertically. When piece measures 17 cm, work in stocking stitch and A.1 as before, 1 edge stitch in garter stitch in each side. When piece measures 37-39-39-41-41-42 cm, begin decrease for neck on next row from right side as follows: 1 edge stitch in garter stitch, work stocking stitch until 3 stitches remain before A.1, knit 2 stitches together, knit 1, A.1 as before and 1 edge stitch in garter stitch. Decrease like this every 6th row 4 times in total, then every 4th row 4-4-5-5-6-6 times in total. AT THE SAME TIME when piece measures 43-44-45-46-47-48 cm, cast off the first 1-3-4-5-7-9 stitches for armhole on next row from right side. When neck decrease is done, 27-28-28-30-31-33 stitches remain on row. Cast off when piece measures 62-64-66-68-70-72 cm. SLEEVE: Cast on 50-50-54-54-58-58 stitches on circular needle size 6 mm with 1 strand of each quality (2 strands). Purl 1 row from wrong side. Then work as follows from right side: Work 1 edge stitch in garter stitch, * knit 2, purl 2 *, work from*-* until 1 stitch remains, 1 edge stitch in garter stitch. When rib measures 10 cm, switch to circular needle size 7 mm. Work in stocking stitch with 1 edge stitch in garter stitch in each side. On next row from right side decrease 7-7-9-9-11-11 stitches evenly = 43-43-45-45-47-47 stitches. When piece measures 14 cm, increase 1 stitch in each side - read INCREASE TIP! Increase like this every 6-4-4-3½-2½-2 cm 6-8-8-9-10-11 times in total = 55-59-61-63-67-69 stitches. SIZE S: Work until piece measures 48 cm. Cast off. Knit another sleeve the same way. SIZE M-L-XL-XXL-XXXL: Continue to work until sleeve measures 46-45-44-42-40 cm. Insert 1 marker in each side of sleeve - markers mark where bottom of armhole starts. Work until sleeve measures 48-48-48-47-46 cm (i.e. approx. 2-3-4-5-6 cm from marker). Cast off. Knit another sleeve the same way. ASSEMBLY: Sew shoulder seams inside cast-off edge. Sew in sleeves in size M-L-XL-XXL-XXXL: Sew bottom of armhole - markers inserted on sleeves should fit sides of body. Sew sleeve and side seams in one inside 1 edge stitch down until approx. 16 cm remain (= vent). RIGHT BAND: Work band bottom up towards the neck. Pick up stitches along right front piece, skip 1½ - 2 meters in on thread and use yarn end to pick up stitches with (that way you can continue to work with the ball without cutting the yarn afterwards) as follows: Begin pick up at the bottom of front piece and pick up 1 stitch in every knitted row along the entire front piece inside 1 edge stitch, use circular needle size 6 mm and 1 strand of each quality. Now continue piece at the end of row where ball is = at the bottom of front piece. Cast on 12 stitches for band as an extension of the stitches pick up at the bottom of front piece (cast on stitches from wrong side). Work band over the 12 stitches at the same time as band is knitted together with stitches picked up along the front piece as follows: ROW 1 (= right side): Slip first stitch on to right needle purlwise with strand in front of piece, * knit 1, slip 1 stitch on to right needle purlwise with strand in front of piece *, work from *-* until 1 stitch remains of the 12 band stitches, slip last stitch on to right needle knitwise, with strand behind piece, knit next stitch, pass slipped stitch over stitch worked, turn. ROW 2 (= wrong side): * Slip first/next stitch on to right needle purlwise with strand in front of piece, knit 1 *, work from *-* over all the 12 band stitches, turn. Repeat rows 1 and 2. Work BUTTONHOLES - read explanation above. When all stitches from front piece have been worked together with band, work neck edge at the back. BACK NECK EDGE: Now work over the 12 band stitches as follows: ROW 1: * Slip first/next stitch on to right needle purlwise, with strand in front of piece, knit 1 *, work from *-* over the 12 stitches. Repeat row 1 both from right side and wrong side for 7½-7½-8-8-9-9 cm. On last row from right side knit all stitches together 2 by 2 and then cast off. LEFT BAND: Work band bottom up. Pick up stitches at the top by shoulder on front piece, pick up 1 stitch in every knitted row down along the entire front piece inside 1 edge stitch, use circular needle size 6 mm and 1 strand of each quality. After the pick up cast on 12 stitches for band (= at the bottom of front piece). Work band over the 12 stitches at the same time as band is knitted together with stitches picked up along the front piece as follows: ROW 1 (= wrong side): Knit 1, * slip 1 stitch on to right needle purlwise with strand in front of piece, knit 1 *, work from *-* until 1 stitch remains of the 12 band stitches, slip the next 2 stitches on to right needle purlwise with strand in front of piece, turn. ROW 2 (= right side): Knit 2 together, *, slip 1 stitch on to right needle purlwise with strand in front of piece, knit 1 *, work from *-* until 1 stitch remains, slip last stitch on to right needle purlwise with strand in front of piece, turn. Repeat rows 1 and 2. When all stitches from front piece have been worked together with band work neck edge at the back. BACK NECK EDGE: Now work over the 12 band stitches as follows: ROW 1: * Knit 1, slip next stitch on to right needle purlwise with strand in front of piece *, work from *-* over the 12 stitches. Repeat row 1 both from right side and wrong side for 7½-7½-8-8-9-9 cm. On last row from right side work all stitches together as follows: Slip 1 stitch on to right needle knitwise, knit 1, pass slipped stitch over stitch worked. Then cast off the stitches. ASSEMBLY: Sew the band together mid back and sew it to the neck edge on back piece. Sew the buttons on to left band. |
|||||||||||||||||||
Diagram explanations |
|||||||||||||||||||
|
|||||||||||||||||||
|
|||||||||||||||||||

|
|||||||||||||||||||

|
|||||||||||||||||||
|
Have you made this or any other of our designs? Tag your pictures in social media with #dropsdesign so we can see them! Do you need help with this pattern?You'll find tutorial videos, a Comments/Questions area and more by visiting the pattern on garnstudio.com. © 1982-2024 DROPS Design A/S. We reserve all rights. This document, including all its sub-sections, has copyrights. Read more about what you can do with our patterns at the bottom of each pattern on our site. |
|||||||||||||||||||


With over 40 years in knitting and crochet design, DROPS Design offers one of the most extensive collections of free patterns on the internet - translated to 17 languages. As of today we count 304 catalogues and 11422 patterns - 11422 of which are translated into English (UK/cm).
We work hard to bring you the best knitting and crochet have to offer, inspiration and advice as well as great quality yarns at incredible prices! Would you like to use our patterns for other than personal use? You can read what you are allowed to do in the Copyright text at the bottom of all our patterns. Happy crafting!
Comments / Questions (33)
Bonjour, Je ne comprends pas la partie où il faut rabattre les mailles sur le dos pour les emmanchures, quand vous dites au début de chaque rang donc je le fais directement sur les bordures en point mousse ou je saute la bordure et je commence à rabattre sur le jersey apres. Merci
26.02.2024 - 01:46DROPS Design answered:
Bonjour Mme Karama, les 3 mailles point mousse de chaque côté en bas du dos se tricotent jusqu'à 17 cm de hauteur totale, ensuite on continue avec seulement 1 maille lisière au point mousse de chaque côté; pour les emmanchures on rabat les mailles en début de rang de chaque côté pour qu'elles soient symétriques, autrement dit en début de rang sur l'endroit et au début du rang suivant sur l'envers, on continue en jersey, avec, comme avant, 1 maille lisière au point mousse de chaque côté; Bon tricot!
26.02.2024 - 09:54Czy liczba nabranych oczek do wykonania plisy przy prawym przodzie powinna się równać liczbie rzędów jakie przerobiłam przy robieniu tego przodu. Właśnie tak zrobiłam i plisa jest za długa ( faluje się i źle to wygląda). Kardigan zrobiłam chyba z rok temu i nie mogę go zakończyć z powodu tych obszyć . Pomocy! co robię nie tak?
05.02.2024 - 17:19DROPS Design answered:
Witaj Marianno, w opisie jest napisane, aby na drutach z żyłką nr 6 nabierać 1 oczko w każdy rząd wzdłuż przodu, w odległości 1 oczka od brzegu. Jeżeli obszycie marszczy się, proponuję rzadziej nabierać oczka np. nabrać 1 oczko w 1-szy rząd, 2-gie oczko w 2-gi rząd, a 3-cie oczko już w 4-ty (czyli ominąć 3-ci rząd) i powtarzać to na całej długości. Najlepiej spróbuj to zrobić na próbce (jeśli ją wykonywałaś), albo tylko na niewielkim fragmencie przodu. Koniecznie zamieść zdjęcie gotowego swetra w naszej galerii, albo na grupie facebookowej DROPS Workshop. Powodzenia!
06.02.2024 - 08:01Olá. Quantos novelos de Drops Nepal são necessários para fazer o tamanho XL? Obrigada
07.12.2023 - 12:56DROPS Design answered:
Bom dia, São necessários 18 novelos do fio Nepal para o tamanho XL. Bons tricôs!
09.01.2024 - 10:19Et sted i oppskriften refereres det til A.2. Jeg regner med at dette er en skrivefeil og skulle vært A.1? Ser at det i kommentarfeltet har blitt påpekt feil tidligere. Er disse rettet opp i oppskriften som ligger ute på nett nå?
27.10.2023 - 15:33DROPS Design answered:
Hei Ulla. Ja, her har det nok vært en tastefeil. Det er nå rettet opp i. Takk for at du gjorde oss oppmerksom på dette. Det har vært 2 rettelser tidligere i denne oppskriften, de ble rettet opp i høsten 2022, se rød link for hva som er blitt gjort og evnt dato. mvh DROPS Design
30.10.2023 - 08:56Hej Undrar över höger framstycke, resår. Det står " sticka 2 aviga och två räta tills det återstår 3 maskor och 3 kantmaskor i rätstickning" . Ska jag sticka 6 maskor räta , 3+3?
18.09.2023 - 17:37DROPS Design answered:
Hej Marie. Du stickar 2 rm/2 am tills det återstår 3 maskor. Dessa 3 maskor stickar du då i rätstickning. Mvh DROPS Design
19.09.2023 - 12:19Üdvőzlet! Az ujját kisebb kötőtűkkel kell kötni, mint a hátát és az elejét? A leírás szerint igen…
16.07.2023 - 13:05Je commence les côtes du devant droit, après la première rangée à l'envers, je tricote donc la maille lisière et deux mailles envers, deux mailles endroits, etc..... jusqu'à la fin de la rangée mais je ne comprends pas pourquoi vous dites qu'il faut que je tricote jusqu'à ce qu'il me reste 3 mailles ? et 3 mailles encore au point mousse ? A quoi correspondent les premières 3 mailles ? Merci d'avance
26.05.2023 - 19:22DROPS Design answered:
Bonjour Anne, sur l'endroit, le devant droit commence par 1 maille lisière (on relève les mailles pour la bordure devant à 1 maille du bord ensuite) et se termine par 3 mailles de bordure au point mousse sur le côté (comme pour le dos). On a ainsi 3 mailles de bordure point mousse pour les fentes des côtés (on doit avoir 16 cm de fente côtés environ cf ASSEMBLAGE (le 1er). Bon tricot!
30.05.2023 - 10:19Sorry, it's me again with another question! I've got to the double band part of the pattern, but don't understand the instructions - "Work band over the 12 stitches at the same time as band is knitted together with stitches picked up along the front piece " Does this mean I should be knitting the original band as well as the new cast on 12 stitches in each row? Will the buttonholes just be in the new part? Apologies!
31.03.2023 - 18:36DROPS Design answered:
Dear Julia, for the left band you can work as instructed here: https://www.garnstudio.com/video.php?id=1740&lang=en. The right one, with the buttonholes, is worked similarly but the buttonholes are included in the band; you can see a video here: https://www.garnstudio.com/video.php?id=1728&lang=en. Happy knitting!
02.04.2023 - 20:07I am knitting this pattern, and have just started on the Left Front. The instructions for this seem to be different from those for the Right Front, i.e. it tells me to knit A1 at each end of the row, when for the Right Front, it's only at the start. "3 edge stitches in garter stitch, A.1, work stocking stitch until 7 stitches remain and decrease 4-5-7-8-8-8 stitches evenly, work A.1 and 1 edge stitch in garter stitch = 36-39-41-44-48-52 stitches." Is this correct?
07.01.2023 - 11:01DROPS Design answered:
Dear Julia, it seems to be a mistake in the pattern, you only work A.1 once in the row. So, in the left front, work as follows: 3 edge stitches in garter stitch, work stocking stitch until 7 stitches remain and decrease 4-5-7-8-8-8 stitches evenly, work A.1 and 1 edge stitch in garter stitch = 36-39-41-44-48-52 stitches." Happy knitting!
07.01.2023 - 18:40Bonjour, merci pour vos réponses, j'ai compris que le motif A1 disparait lors des diminutions du côté. J'avance bien. Pourriez vous me donner le diamètre du bouton, il est noté numéro 538 mais je ne trouve aucune donnée au sujet de sa dimension . Bonne journée.
13.12.2022 - 08:54DROPS Design answered:
Bonjour Marie, A.1 ne se tricote pas sur le côté, mais avant la bordure devant gauche/après la bordure devant droit, donc il continue le long de l'encolure jusqu'à la fin. Retrouvez tous les boutons ici: les n° 538 font 25 mm de diamètre. Bon tricot!
13.12.2022 - 11:25