
Popular categories
Looking for a yarn?


Comments / Questions (77)
![]() Souvigny wrote:
Souvigny wrote:
A partir des mailles montées pour les dessous de manche, il me reste encore 6cm pour finir A3, dois-je les tricoter en rond ou continuer en aller retours ? Est il normal que l'ouvrage reste ouvert sur le côté droit ? Désolée de ces questions mais c est mon premier modèle en tricot circulaire.
17.11.2024 - 19:17DROPS Design answered:
Bonjour Mme Souvigny, lorsque vous avez réuni le dos et le devant après avoir monté les 6 mailles sous chaque manche, vous tricotez en rond jusqu'à la fin, autrement dit, vous terminez A.3, cette fois vous lisez tous les rangs du diagramme sur l'endroit = de droite à gauche, pensez à bien aligner A.3 sur les diagrammes précédents pour que le motif continue comme avant. Tricote ensuite A.4 et A.5 en rond, toujours en lisant désormais tous les tours de droite à gauche. Bon tricot!
18.11.2024 - 08:30
![]() Souvigny wrote:
Souvigny wrote:
Merci pour la rapidité et la clarté de votre réponse :)
15.11.2024 - 12:30
![]() Souvigny wrote:
Souvigny wrote:
Bonjour :1 jeté entre 2 mailles, au rang suivant lâcher la maille de l’aiguille gauche, et la reprendre sur l’aiguille gauche mais dans le sens contraire (piquer l’aiguille gauche de l’arrière vers l’avant pour la reprendre). Tricoter le jeté à l’envers, dans le brin avant pour éviter un trou (la maille est torse inclinée à droite, vu sur l’endroit) Est ce le jeté ou la maille qui est avant qu il faut lâcher et reprendre sur l aiguille en torse ? Merci à vous
14.11.2024 - 19:20DROPS Design answered:
Bonjour Mme Souvigny, au rang suivant, le jeté est une maille, donc oui il s'agit bien du jeté que vous allez lâcher de l'aiguille gauche - retrouvez cette technique dans cette vidéo. Bon tricot!
15.11.2024 - 08:56
![]() Paule Schaap wrote:
Paule Schaap wrote:
Wanneer het lijf op de rondbreinaald in de rondte wordt gebreid met patroon A3. Brei je de omslagen dan verdraaid averechts of verdraaid recht? Omdat je bij rondbreien alles in recht breit moet je dan ook de omslagen recht breien? Dus het gesloten rondje brei je dan recht in de achterste lus en het open rondje zet je de omslag eerst over op de andere naald, zet je hem gedraaid terug en brei je hem dan recht? Ik heb het nu 4x uitgehaald en krijg het niet goed.
28.10.2024 - 17:27DROPS Design answered:
Dag Paule,
Ja, de omslagen brei je dan ook recht, dus gewoon recht (in de voorste lus) voor de symbolen met het open rondje en voor de symbolen met het gesloten rondje brei je in gedraaid recht, dus in de achterste lus.
31.10.2024 - 20:31
![]() Kay Bejarana wrote:
Kay Bejarana wrote:
The link you sent me doesn't work
18.10.2024 - 17:48DROPS Design answered:
Dear Kay, let's try it again (look for the video tutorial titled "How to read knitting diagrams", and the video should be HERE . Happy Knitting!
19.10.2024 - 07:42
![]() Kay Bejarana wrote:
Kay Bejarana wrote:
Having problems getting startetd. Chart isn't very clear. This is right & wrong side? Doesn't have the sides marked o chart A.1A/B/C. Confusing!
18.10.2024 - 04:29DROPS Design answered:
Dear Mrs Bejarana, in this lesson we explain how to read diagrams, this might help you understanding how to work A.1 as explained in the pattern. Happy knitting!
18.10.2024 - 08:45
![]() J Bolten wrote:
J Bolten wrote:
For the neck rib, do you cast off the edge first and then only fasten with a single stitch at each shoulder? This is sufficient to keep the neck section in place?
12.10.2024 - 12:07DROPS Design answered:
Dear J Bolten, yes, first you cast off the edge. And yes, 1 single stitch on each shoulder is enough; it's important that it doesn't get too tight, so it's better to leave it more loose than to fully sew it. The neck edge is quite wide, so it won't fold outwards easily. You can carefully sew more stitches if you'd prefer it, though. Happy knitting!
13.10.2024 - 23:08
![]() Josefin wrote:
Josefin wrote:
Hejsan. Jag stickar storlek M och ska sticka ärmarna. Enligt beskrivningen har jag 88 maskor och ska sticka A4 (6 maskor) fram och tillbaka. Men 88 är inte jämnt delbart med 88. 88/6 = 14.666666. Så hur ska jag sticka början av ärmen när maskantalet inte går ihop med mönstret?
07.08.2024 - 13:24DROPS Design answered:
Hej Josefin, det er ikke sikkert at mønsteret stemmer under ærmet, men tæl ud fra pilen så den stemmer med mærket midt ovenpå på ærmet :)
14.08.2024 - 14:49
![]() Amanda wrote:
Amanda wrote:
Hej! När man ska plocka upp maskor till ärmarna står det att man ska plocka upp maskor från botten av ärmhålet. Ska man plocka upp från mitten av de maskor man lade upp för ärmen (dvs mitten av de maskor man lade upp för att sätta ihop fram- och bakstycke) eller från sista raden på fram/bakstycke innan dessa sattes ihop? Tack för svar!
24.07.2024 - 11:53DROPS Design answered:
Hej Amanda, du plockar upp från sista varvet på fram/bakstycke (inte mitten av de nya maskorna) :)
01.08.2024 - 09:17
![]() Amanda wrote:
Amanda wrote:
Hej! Jag förstår inte instruktionerna för hur man ska sy ihop ärmhålen. Vilken del av ärmen ska man sy fast? Hittar ingen beskrivning eller video för hur man gör detta när man redan har plockat upp maskor till ärmarna. Hittar endast videor för hur man antingen plockar upp maskor runt hela ärmen, eller hur man syr fast en helt fristående ärm.
12.07.2024 - 14:29DROPS Design answered:
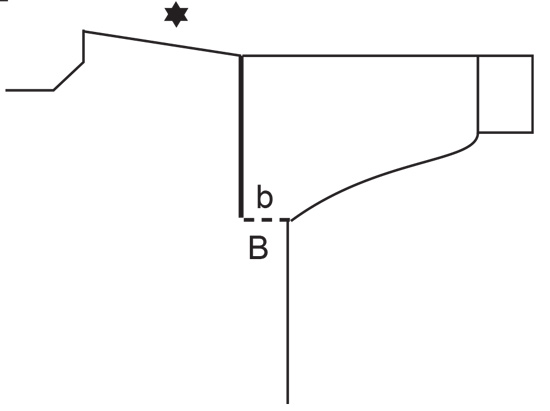
Hej Amanda. När du stickar upp maskor till ärmen stickar du först fram och tillbaka 1-4 cm (beroende på storlek) och sedan börjar du sticka ärmen runt. Det är den delen längt ner där du stickade fram och tillbaka som du sedan syr ihop enligt måttskissen där det är streckat. Mvh DROPS Design
16.07.2024 - 16:26
|
||||||||||||||||||||||||||||||||||
Variety#varietysweater |
||||||||||||||||||||||||||||||||||
 |
 |
|||||||||||||||||||||||||||||||||
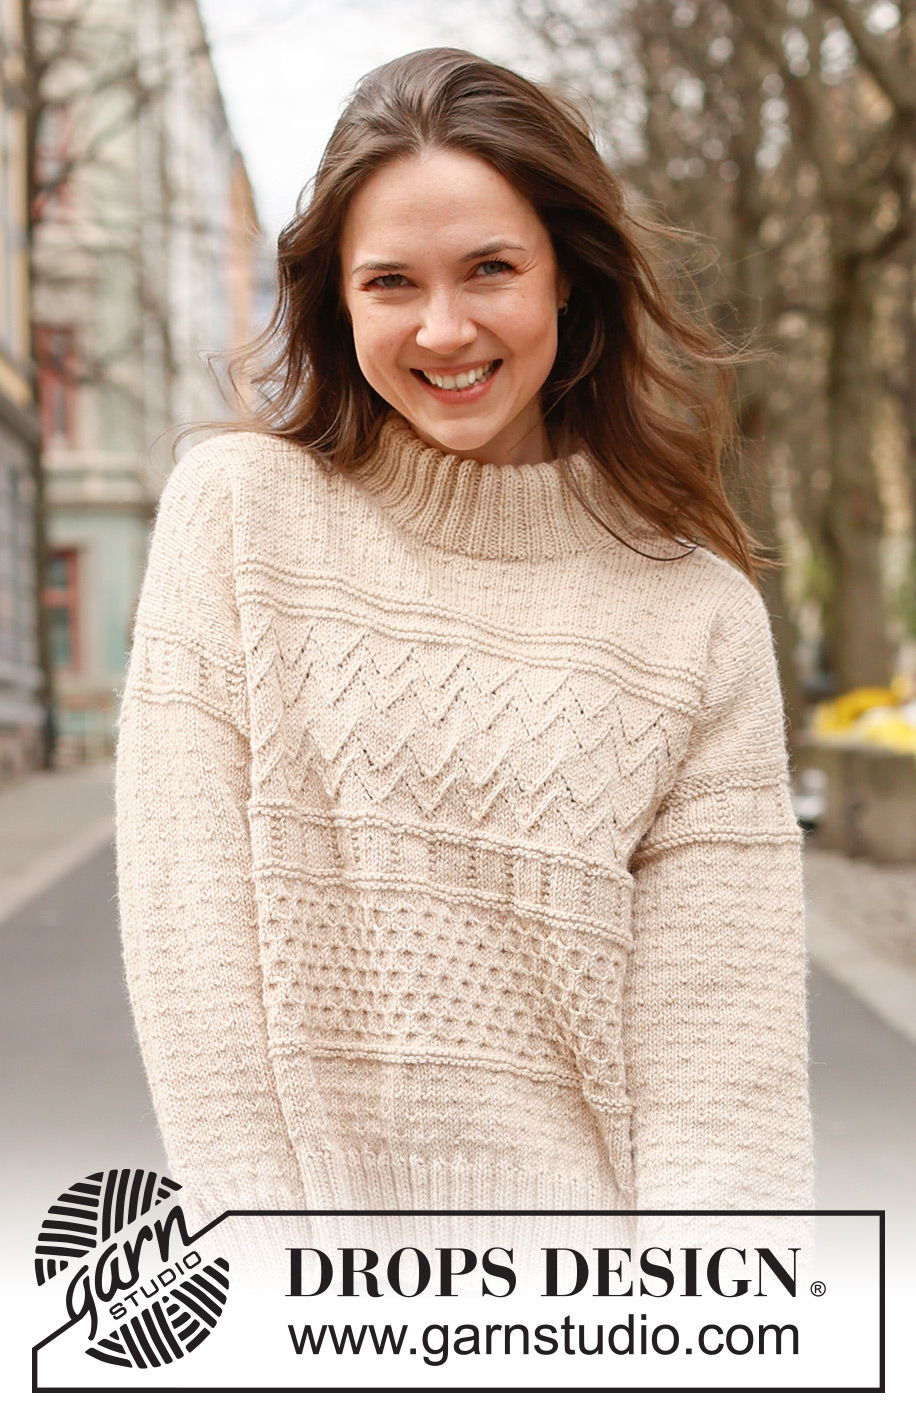
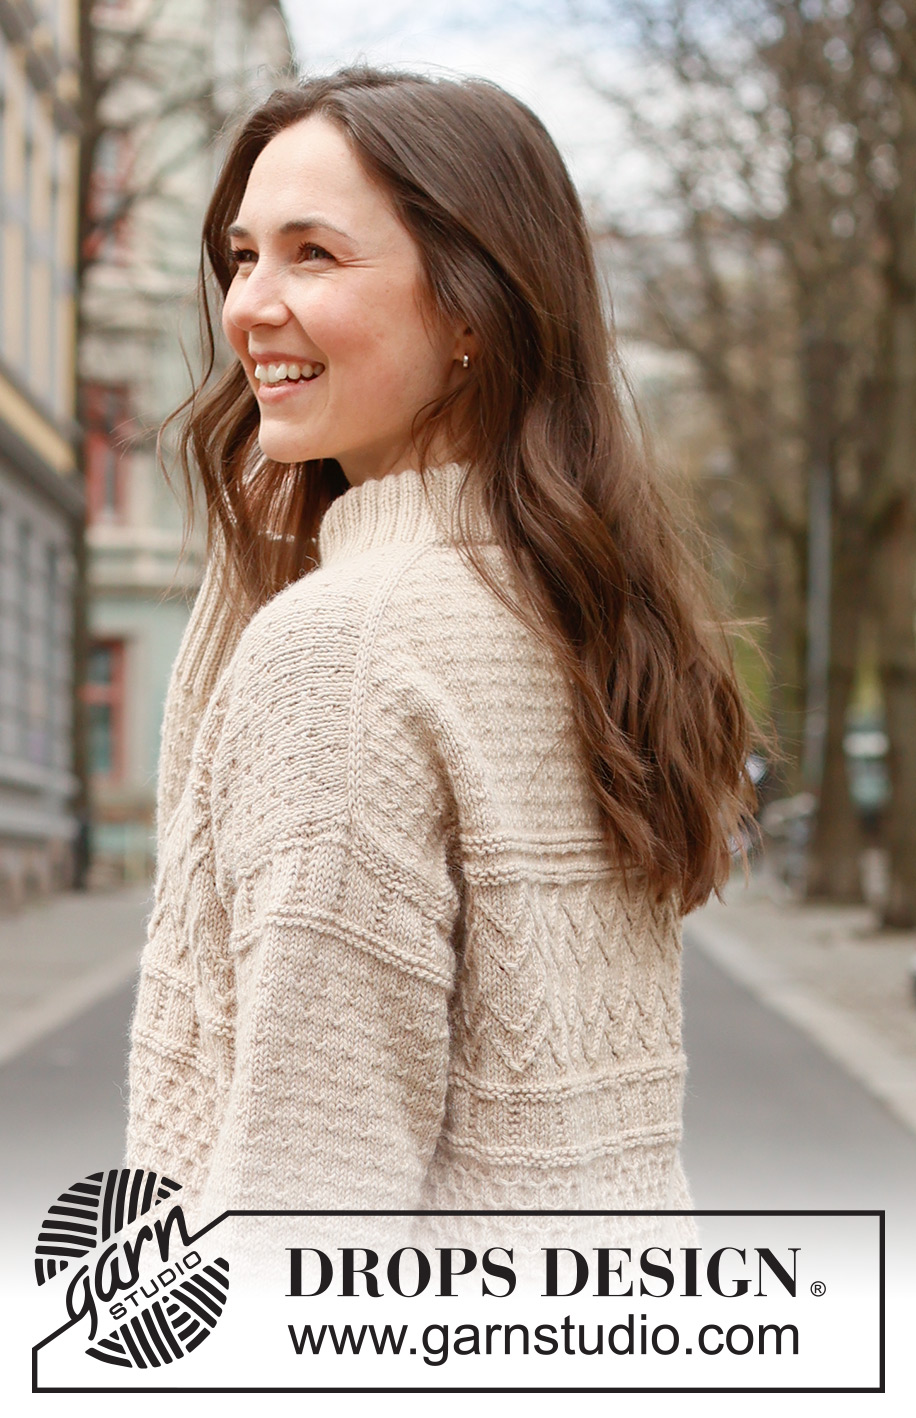
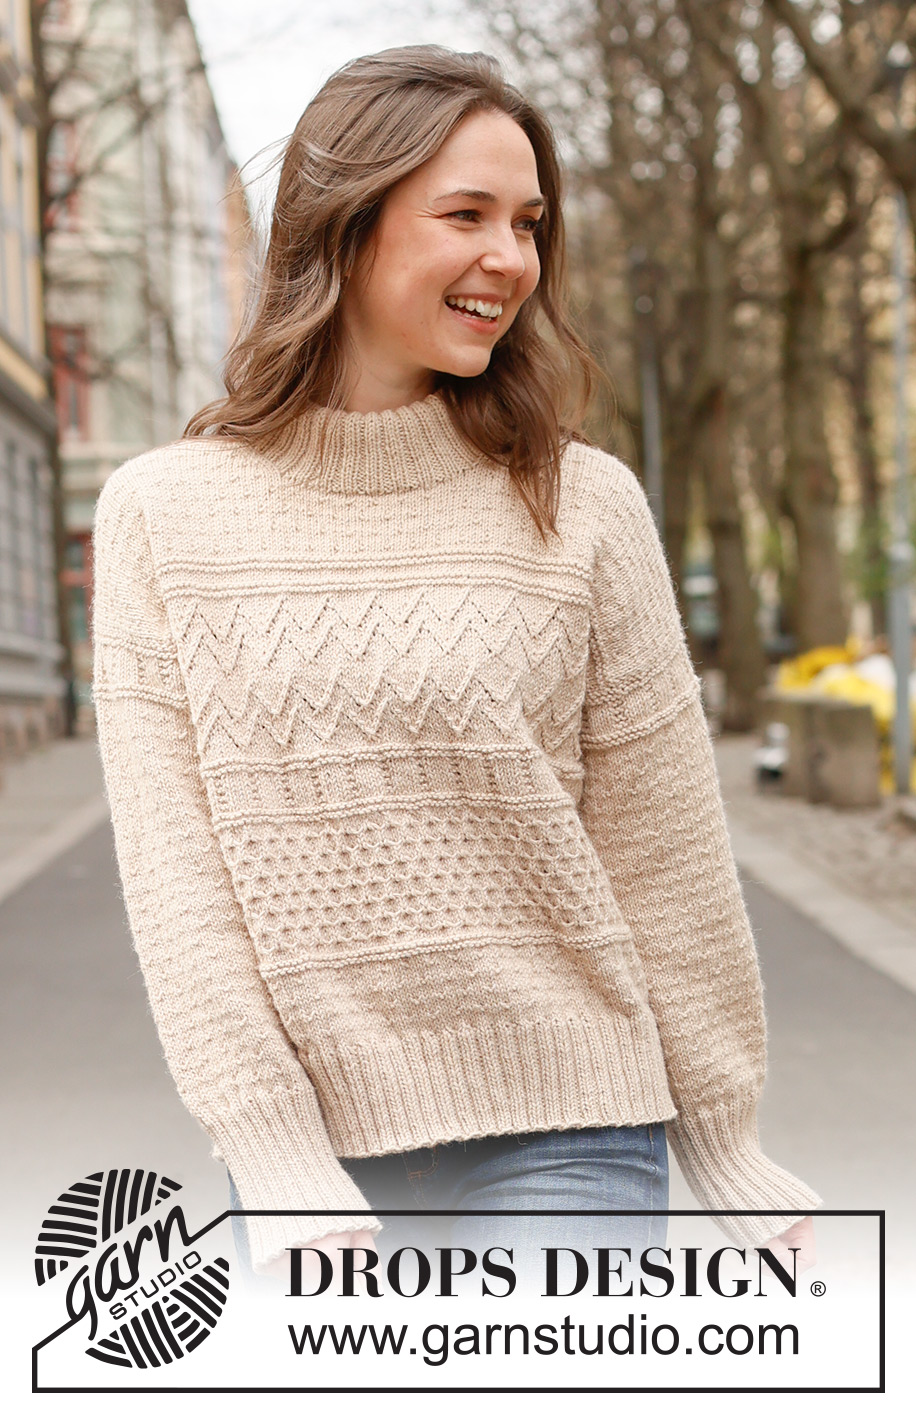
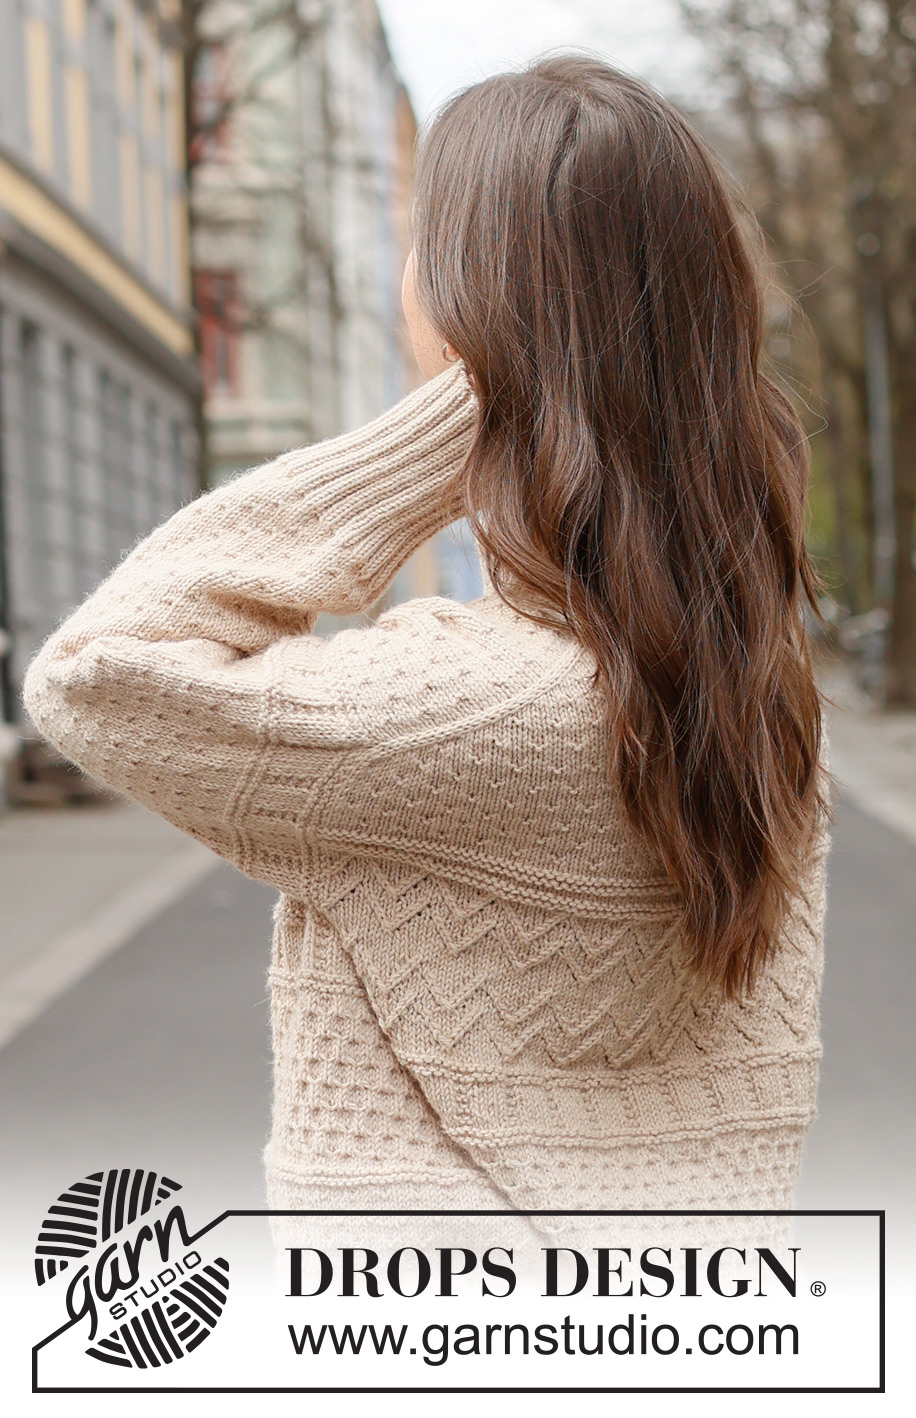
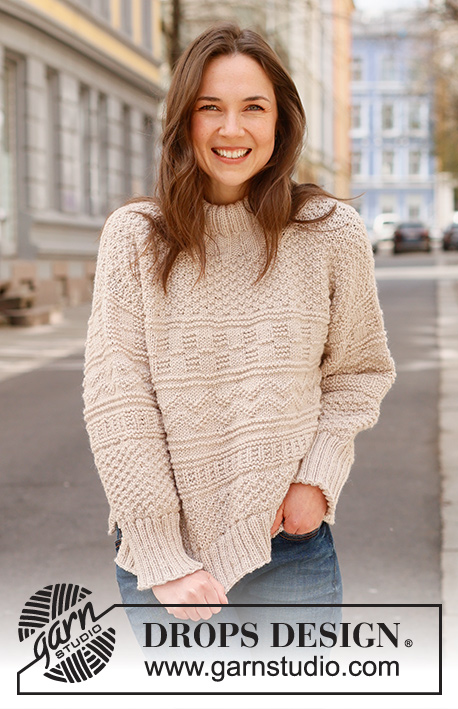
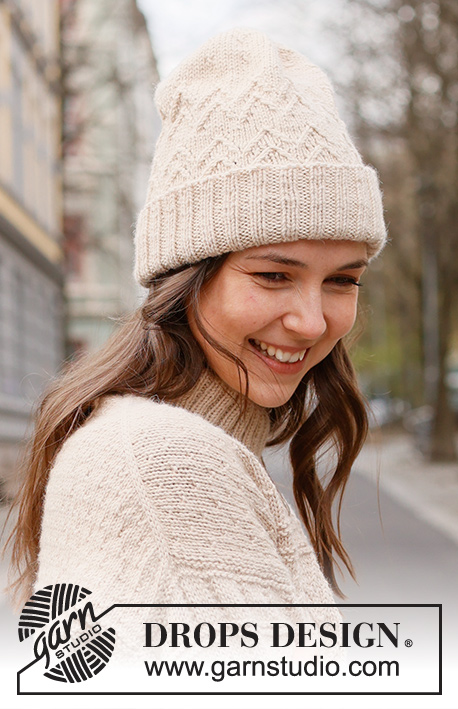
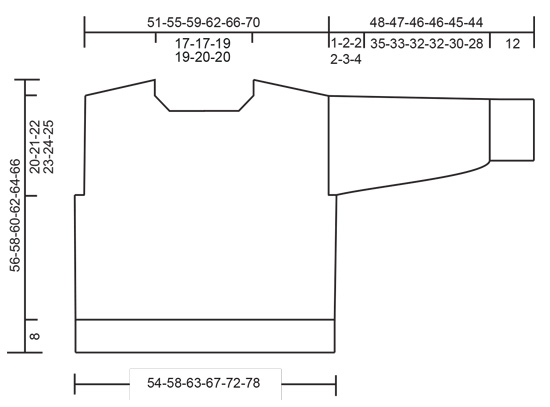
Knitted sweater in DROPS Lima or DROPS Karisma. Piece is knitted top down with European shoulder /diagonal shoulder, relief pattern and double neck edge. Size: S - XXXL
DROPS 235-3 |
||||||||||||||||||||||||||||||||||
|
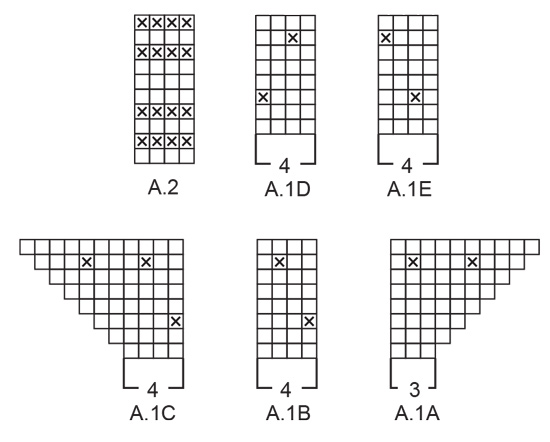
---------------------------------------------------------- EXPLANATION FOR THE PATTERN: ---------------------------------------------------------- PATTERN: See diagrams A.1 to A.6. Diagrams show all rows in pattern seen from the right side. INCREASE TIP FROM THE RIGHT SIDE: Increase towards the left AFTER MARKER: Use left needle to pick up yarn between 2 stitches from row below, pick up yarn from the front and knit in the stitch loop that is on the back of the needle. Increase towards the right BEFORE MARKER: Use left needle to pick up yarn between 2 stitches from row below, pick up yarn from the back and knit in the stitch loop that is on the front side of the needle. INCREASE TIP FROM THE WRONG SIDE: Increase towards the right AFTER MARKER: Use left needle to pick up yarn between 2 stitches from row below, pick up yarn from the back and purl in the stitch loop that is on the front side of the needle. Increase towards the left BEFORE MARKER: Use left needle to pick up yarn between 2 stitches from row below, pick up yarn from the front and purl in the stitch loop that is on the back side of the needle. DECREASE TIP (applies to mid under sleeves): Decrease 1 stitch on each side of marker thread as follows: Work until 3 stitches remain before marker thread and knit 2 together, knit 2 (marker thread is between these 2 stitches), slip 1 stitch knitwise, knit 1, pass slipped stitch over stitch worked. ---------------------------------------------------------- START THE PIECE HERE: ---------------------------------------------------------- SWEATER - SHORT OVERVIEW OF THE PIECE: Work top part of back piece back and forth on circular needle, top down until armholes are done. Then pick up stitches along each shoulder, increase for neck and work front piece back and forth on circular needle, top down until armholes are done. Slip front and back piece together. Work the body in the round on circular needle. Pick up stitches around each armhole. Work sleeve cap back and forth on circular needle, then work the rest of sleeve in the round on double pointed needles/short circular needle. Finish with a double neck edge. BACK PIECE: Cast on 39-39-43-43-47-47 stitches on circular needle size 4 MM = US 6 with DROPS Lima or DROPS Karisma. Purl 1 row from wrong side. Insert 1 marker on the inside of the 3 outermost stitches in each side. Marker should be inside the outermost 3 stitches on every row. Work first row as follows from right side: A.1A, increase AFTER marker at the beginning of row – read INCREASE TIP FROM RIGHT SIDE, work A.1B 8-8-9-9-10-10 times in total, work A.1C and increase at the same time BEFORE marker at the end of row – remember INCREASE TIP FROM RIGHT SIDE. On next row (wrong side) increase the same way – read INCREASE TIP FROM WRONG SIDE. Continue pattern like this and increase the same way from both right and wrong side 34-38-40-44-46-50 times in total – work the increased stitches in A.1B, but make sure that there are always at least 3 stitches in stockinette stitch at the edge in each side. REMEMBER THE KNITTING GAUGE! NOTE! When A.1A, A.1B and A.1C have been worked 1 time vertically, repeat A.1 vertically the same way, i.e. every time A.1 is repeated vertically, there is room for 4 more repetitions of A.1B in width. After last increase there are 107-115-123-131-139-147 stitches on needle and piece measures approx. 12-14-14-16-16-18 cm = 4¾"-5½"-5½"-6¼"-6¼"-7" from cast-on edge. Continue pattern back and forth as before until piece measures 8-10-8-9-9-11 cm = 3⅛"-4"-3⅛"-3½"-3½"-4⅜" measured at the edge along armhole (piece measures approx. 20-24-22-25-25-29 cm = 8"-9½"-8¾"-9¾"-9¾"-11⅜" from cast-on edge mid back) – finish after a row from wrong side. Then work A.2 back and forth over all stitches. When A.2 has been worked, work next row as follows from right side: 1 stitch in stockinette stitch, A.3A, work A.3B 12-13-14-15-16-17 times in total, A.3C, 1 stitch in stockinette stitch. Continue pattern like this. When back piece measures 17-18-18-19-20-21 cm = 6¾"-7"-7"-7½"-8"-8¼" measured at the edge along armhole, cut the yarn, lay the piece to one side on a thread or on an extra needle. Armholes on back piece are now done (A.3 is not done but is finished on body). Work front piece as explained below. FRONT PIECE: Begin with right shoulder (when garment is worn). Pick up from right side 34-38-40-44-46-50 stitches inside 1 stitch along right shoulder on back piece (i.e. pick up 1 stitch in every row from edge at the top of back piece). Purl 1 row from wrong side. Work next row as follows from the right side (i.e. from armhole): S, M, XXL and XXXL: 3 stitches in stockinette stitch, work A.1B until 3 stitches remain, finish with 3 stitches in stockinette stitch. L and XL: 3 stitches in stockinette stitch, work A.1B until 5 stitches, work the 2 first stitches in A.1E, finish with 3 stitches in stockinette stitch. ALL SIZES: Continue pattern back and forth like this. When piece measures 5 cm = 2" from where stitches were picked up, increase stitches towards the neck. Increase 1 stitch for neck inside 3 stitches at the end of every row from right side remember INCREASE TIP FROM THE RIGHT SIDE. Increase for neck the same way 6-6-7-7-8-8 times in total – work the increased stitches in A.1B, but make sure that there are always at least 3 stitches in stockinette stitch towards the neck. After last increase there are 40-44-47-51-54-58 stitches on needle. Cut the yarn when last increase from right side is done. Lay the piece to one side on a thread or on an extra needle then work left shoulder as explained below. Pick up from right side 34-38-40-44-46-50 stitches inside 1 stitch along left shoulder on back piece. Purl 1 row from wrong side. Work next row as follows from the right side (i.e. from neck): S, M, XXL and XXXL: 3 stitches in stockinette stitch, work A.1D until 3 stitches remain, finish with 3 stitches in stockinette stitch. L and XL: 3 stitches in stockinette stitch, work A.1E until 5 stitches, work the 2 first stitches in A.1B, finish with 3 stitches in stockinette stitch. ALL SIZES: Continue pattern back and forth like this. When piece measures 5 cm = 2" from where stitches were picked up, increase stitches towards the neck. Increase 1 stitch for neck inside 3 stitches at the beginning of every row from right side remember INCREASE TIP FROM THE RIGHT SIDE. Increase for neck the same way 6-6-7-7-8-8 times in total – work the increased stitches in A.1D/A.1E, but make sure that there are always at least 3 stitches in stockinette stitch towards the neck. After last increase there are 40-44-47-51-54-58 stitches on needle. Work next row as follows from wrong side: Work pattern as before over the 40-44-47-51-54-58 stitches from left front, cast on 27-27-29-29-31-31 stitches for neck at the end of this row, then work pattern as before over the 40-44-47-51-54-58 stitches from right front piece = 107-115-123-131-139-147 stitches. Continue A.1 back and forth until piece measures approx. 14-16-16-17-17-19 cm = 5½"-6¼"-6¼"-6¾"-6¾"-7½" from where stitches were picked up - finish after a row from wrong side as on back piece. Now insert 1 marker at the edge along armhole, 3-3-4-4-4-4 cm = 1⅛"-1⅛"-1½"-1½"-1½"-1½" from where stitches were picked up. Measure the garment by folding the piece at the top point on the inside of shoulder and at marker on front piece - make sure that A.1 is the same length on front and back piece. This important so that the pattern fits in the sides when piece is put together. Adjust the length of A.1 if needed. Then work A.2 back and forth over all stitches. When A.2 has been worked, work next row as follows from right side: 1 stitch in stockinette stitch, A.3A, work A.3B 12-13-14-15-16-17 times in total, A.3C, 1 stitch in stockinette stitch. Continue the pattern like this until piece measures 23-24-26-27-28-29 cm = 9"-9½"-10¼"-10⅝"-11"-11⅜", measured along the edge of armhole from where stitches were picked up (A.3 is not done but finish front piece on same row in diagram as back piece – this is important so that the pattern fits in the sides when piece is put together). Now put front piece and back piece together for body as explained below. BODY: Work pattern as before over the 107-115-123-131-139-147 stitches from front piece, cast on 6-8-8-10-14-18 new stitches at the end of this row (in the side under sleeve), work pattern as before over the 107-115-123-131-139-147 stitches from back piece and cast on 6-8-8-10-14-18 new stitches on row (in the side under sleeve) = 226-246-262-282-306-330 stitches. Finish A.3 - work stitches cast on in each side in stockinette stitch until A.3 is finished. Now work A.4 in the round - AT THE SAME TIME on first round increase 2-0-2-0-0-0 stitches evenly = 228-246-264-282-306-330 stitches. On next to last round in A.4 increase 32-34-36-38-38-42 stitches evenly = 260-280-300-320-344-372 stitches (this is done because the next pattern contracts the piece). When A.4 has been worked, work A.5 in the round. Repeat A.5 vertically until piece measures 41-43-45-46-46-48 cm = 16⅛"-17"-17¾"-18"-18"-19", measured from the top point on front piece in towards the neck (work A.5 approx. 3-3-4-4-4-4 times vertically and piece measures approx. 18-19-19-19-18-19 cm = 7"-7½"-7½"-7½"-7"-7½" from where stitches were cast on in each side) – AT THE SAME TIME on last round in A.5, decrease 32-36-36-40-40-44 stitches evenly = 228-244-264-280-304-328 stitches. Now work A.6 in the round over all stitches. When A.6 has been worked, work A.1B in the round over all stitches until piece measures approx. 48-50-52-54-56-58 cm = 19"-19¾"-20½"-21¼"-22"-22¾", measures from the top point on front piece in towards the neck – finish when 2 or 3 rounds in stockinette stitch have been worked after a round with purl stitches (piece measures approx. 25-26-26-27-28-29 cm = 9¾"-10¼"-10¼"-10⅝"-11"-11⅜" from where stitches were cast on in each side). Knit 1 round while increasing 56-64-68-76-76-84 stitches evenly = 284-308-332-356-380-412 stitches. Switch to circular needle size 3 MM = US 2.5. Work rib (knit 2/purl 2) for 8 cm = 3⅛". Loosely bind off. Sweater measures approx. 56-58-60-62-64-66 cm = 22"-22¾"-23⅝"-62-64-66, measured from the top point on shoulder on front piece. RIGHT SLEEVE: Use circular needle size 4 MM = US 6, pick up from right side 36-38-38-40-42-44 stitches from bottom of armhole and up to shoulder (along back piece), and 48-50-54-56-58-60 stitches from shoulder and down to the bottom of armhole on the other side (along front piece) = 84-88-92-96-100-104 stitches. Insert 1 marker thread in the middle of row – use marker thread when counting where pattern should begin and where to measure from. Begin from wrong side with 2nd row in A.4, and work A.4 back and forth – marker thread mid on top of sleeve should fit symbol in A.4. When sleeve measures 1-2-2-2-3-4 cm = ⅜"-¾"-¾"-¾"-1⅛"-1½", slip piece together and work the rest of sleeve on a short circular needle/double pointed needles. When A.4 has been worked, work A.1B in the round. AT THE SAME TIME when piece measures 3 cm = 1⅛" from where piece was put together, decrease 2 stitches mid under sleeve - read DECREASE TIP. Decrease like this every 2½-2½-2-2-1½-1½ cm = 1"-1"-¾"-¾"-½"-½" 12-12-14-14-16-16 times in total = 60-64-64-68-68-72 stitches. Work until sleeve measures 35-33-32-32-30-28 cm = 13¾"-13"-12½"-12½"-11¾"-11" from where piece was put together. 12 cm = 4¾" remain until finished measurements. Try the sweater and work to desired length before rib. Knit 1 round while increasing 16-16-16-16-20-20 stitches evenly = 76-80-80-84-88-92 stitches. Switch to double pointed needles size 3 MM = US 2.5. Work rib (knit 2/purl 2) for 12 cm = 4¾". Loosely bind off. Sleeve measures approx. 48-47-46-46-45-44 cm = 19"-18½"-18"-18"-17¾"-17¼" from stitches where knitted up. Sew bottom of armhole - see chart. LEFT SLEEVE: Use circular needle size 4 MM = US 6, pick up from right side 48-50-54-56-58-60 stitches from bottom of armhole and up to shoulder (along front piece) and 36-38-38-40-42-44 stitches from shoulder and down to the bottom of armhole on the other side (along front piece) = 84-88-92-96-100-104 stitches. Insert 1 marker thread in the middle of row – use marker thread when counting where pattern should begin and where to measure from. Work the rest of the sleeve the same way as right sleeve. Sew bottom of armhole - see chart. NECK EDGE: Begin at one shoulder line, and pick up from right side inside 1 edge stitch approx. 116-116-128-128-140-140 stitches on a short circular needle size 3 MM = US 2.5. Number of stitches must be divisible by 4. Work rib in the round (knit 2/purl 2) for 12-12-13-13-14-14 cm = 4¾"-4¾"-5⅛"-5⅛"-5½"-5½". Fold the rib down on inside of garment and fasten it with 1 stitch at each shoulder. |
||||||||||||||||||||||||||||||||||
Diagram explanations |
||||||||||||||||||||||||||||||||||
|
||||||||||||||||||||||||||||||||||
 |
||||||||||||||||||||||||||||||||||
 |
||||||||||||||||||||||||||||||||||
 |
||||||||||||||||||||||||||||||||||
 |
||||||||||||||||||||||||||||||||||
Have you finished this pattern?Tag your pictures with #dropspattern #varietysweater or submit them to the #dropsfan gallery. Do you need help with this pattern?You'll find 33 tutorial videos, a Comments/Questions area and more by visiting the pattern on garnstudio.com. © 1982-2026 DROPS Design A/S. We reserve all rights. This document, including all its sub-sections, has copyrights. Read more about what you can do with our patterns at the bottom of each pattern on our site. |
||||||||||||||||||||||||||||||||||


With over 40 years in knitting and crochet design, DROPS Design offers one of the most extensive collections of free patterns on the internet - translated to 17 languages. As of today we count 324 catalogs and 12290 patterns - 12280 of which are translated into English (US/in).
We work hard to bring you the best knitting and crochet have to offer, inspiration and advice as well as great quality yarns at incredible prices! Would you like to use our patterns for other than personal use? You can read what you are allowed to do in the Copyright text at the bottom of all our patterns. Happy crafting!
Post a comment to pattern DROPS 235-3
We would love to hear what you have to say about this pattern!
If you want to leave a question, please make sure you select the correct category in the form below, to speed up the answering process. Required fields are marked *.