
Popular categories
Looking for a yarn?


Comments / Questions (98)
![]() Nadia Meister wrote:
Nadia Meister wrote:
Bonjour Je suis entrain de tricoter le col et si je comprends bien, il devrait mesurer à la fin (5)-5-7-7-9(9) pour la hauteur totale ?
25.02.2025 - 09:04DROPS Design answered:
Bonjour Mme Meister, non le col terminé doit mesurer (3) 3-4-4-5 (5) cm, autrement dit, après avoir tricoté en côtes pendant (2) 2-3-3-4 (4) cm, vous augmentez et continuez les côtes pendant encore 1 cm. Bon tricot!
25.02.2025 - 10:10
![]() Maion Maier wrote:
Maion Maier wrote:
Hallo liebes Team von Drops Design....Ich würde diese Babayjacke gerne in Gr.104/110 stricken.Allerdings mit einer dünneren Sommerwolle wo Nadelstärke 2,5 bis 3 angegeben wird.Hätten sie zufällig dafür auch eine Strickanleitung?Ich finde das Muster so schön....Besten Dank im Vorraus...mit freundlichen Grüßen \\r\\nM.Maier
20.02.2025 - 08:41
![]() Corina Zimmel wrote:
Corina Zimmel wrote:
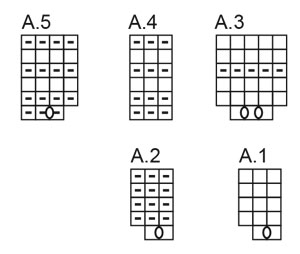
Hallo,ich komme mit der Anleitung nicht ganz mit.Bei Diagramm A1 u A2 soll in der letzten Reihe zwischen 2 Maschen immer 1 Umschlag gearbeitet werden.Da bekomme ich doch viel zu viele Maschen und das Muster stimmt dann doch nicht mehr oder??Liebe Grüße Corina Zimmel
18.02.2025 - 22:14DROPS Design answered:
Liebe Frau Zimmer, die Diagramme lesen Sie von unten nach oben, dh diese Umschläge werden bei der 1. Reihe A.1/A.2 (sowie A.3 und A.5) gestrickt. Die Maschenanzahl soll die Größe passen, dh zuerst (A.1 = 2 M, A.2 = 2 M) mit je 1 Umschlag in beiden Diagrammen bei der 1. Reihe stricken und mit noch einmal A.1 enden. Viel Spaß beim Stricken!
19.02.2025 - 07:49
![]() Candice Sadler wrote:
Candice Sadler wrote:
Can you translate the ? And answers to English?
04.02.2025 - 17:36DROPS Design answered:
Dear Mrs Sadler, we are unfortunately not able to translate every comment/questions/answer in every language, you can try using an online translator or simply use this section to ask your question, we'll do our best to help you. Happy knitting!
05.02.2025 - 07:55
![]() DORIS LEWIS wrote:
DORIS LEWIS wrote:
What do you mean when making button holes on second row you say knit yarn overs twisted to avoid holes
01.02.2025 - 19:58DROPS Design answered:
Dear Doris, the yarn overs in the buttonholes are knitted (not twisted) as indicated in the "BUTTONHOLES" section, before starting the pattern instructions. However, there may be other yarn overs and increases in those same rows; these increases are knitted twisted since we don't want to make more holes. Happy knitting!
02.02.2025 - 23:52
![]() Bogi wrote:
Bogi wrote:
Hallo Zeigt das Diagramm Hin- und Rückreihen oder nur Hinnreihen?
17.01.2025 - 09:50DROPS Design answered:
Liebe Frau Bogi, Diagramme zeigen alle Reihen dh die Hin sowie die Rückreihen,, bei den Hinreihen lesen Sie sie rechts nach links, bei den Rückreihen lesen Sie sie links nach rechts und folgen Sie die Beschreibung von den Symbolen in Rück-Reihen. Viel Spaß beim Stricken!
17.01.2025 - 13:16
![]() Annette wrote:
Annette wrote:
Hallo, auf dem Bild sieht es so aus als ob zwischen den beiden Rippmuster Blocks auch eine Krausrippe ist. In der Anleitung steht diese aber nicht. Sehe ich falsch?
04.01.2025 - 19:00DROPS Design answered:
Liebe Annette, diese Krausrippe finden Sie in den Diagrammen A.3/A.4/A.5, wenn mann die Rückreihe rechts stricken wird (4. Reihe in diesen Diagrammen). Viel Spaß beim Stricken!
20.02.2025 - 12:13
![]() Yolanda Sanchez Calero wrote:
Yolanda Sanchez Calero wrote:
Buenas, no consigo arrancar después del cuello para aumentar los 18 puntos ¿me puedes ayudar por favor?
28.11.2024 - 16:44
![]() Malvina wrote:
Malvina wrote:
Bonjour, Je suis débutante, j’ai du mal à comprendre cette indication : « Au rang suivant, sur l'endroit augmenter 1 maille envers dans une section 1 maille envers sur 2 en faisant 1 jeté » Qu’est ce qu’une Section ? Je vous remercie pour votre aide :)
06.11.2024 - 18:16DROPS Design answered:
Bonjour Malvina, les sections en mailles envers correspondent aux "groupes" de mailles envers, quand vous augmentez dans 1 sections en mailles envers des côtes sur 2 , vous aurez ensuite des côtes (1 m end, 1 m env, 1 m end, 2 m env). Bon tricot!
07.11.2024 - 08:44
![]() Shay wrote:
Shay wrote:
The photo show so ridge stitches between A1/A2 and A4/A5 however I do not see the ridge stitches described in the pattern instructions before increasing the stitches to knit 5 and 4 purl. Am I misunderstanding the instructions? Thanks
03.11.2024 - 01:57DROPS Design answered:
Dear Shay, at the start of the yoke you work 1 ridge. Then, you work a ridge as represented in the charts A.4 and A.5. Finally, you work a 3rd ridge right before dividing for the body and sleeves. Happy knitting!
03.11.2024 - 18:54
|
||||||||||
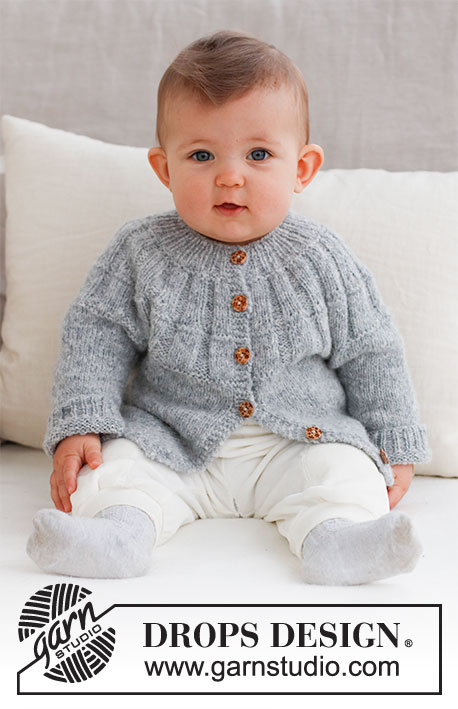
Sweet Gleam Cardigan#sweetgleamcardigan |
||||||||||
 |
 |
|||||||||
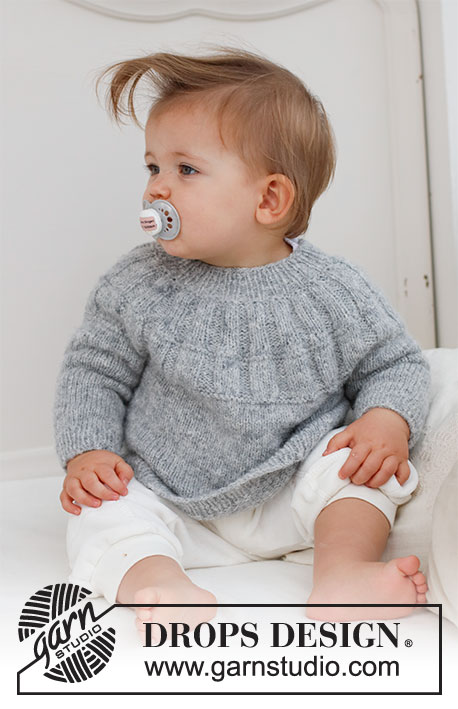
Knitted jacket for baby in DROPS Sky. The piece is worked top down, with round yoke and ribbing on the yoke. Sizes: Premature to 2 years.
DROPS Baby 43-6 |
||||||||||
|
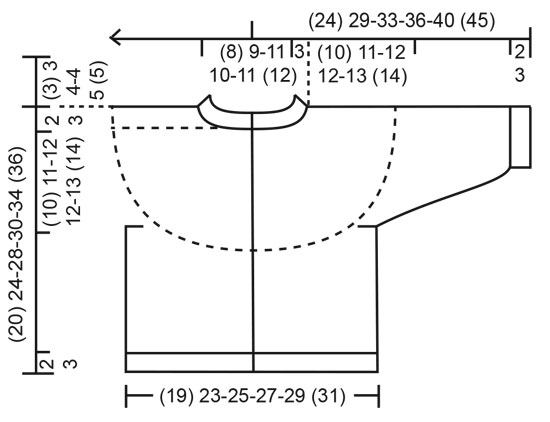
------------------------------------------------------- EXPLANATIONS FOR THE PATTERN: ------------------------------------------------------- RIDGE/GARTER STITCH (worked back and forth): Knit all rows. 1 ridge = knit 2 rows. PATTERN: See diagrams A.1 to A.5. The diagrams show all rows in the pattern from the right side. DECREASE TIP (for sleeves): Start 3 stitches left before the marker, knit 2 together, knit 2 (marker sits between these 2 stitches), slip 1 stitch as if to knit, knit 1 and pass the slipped stitch over the knitted stitch. BUTTONHOLES: Work the buttonholes on the right band (when the garment is worn). Work from the right side when there are 3 stitches left: Make 1 yarn over, knit 2 together and knit 1. On the next row (wrong side) knit the yarn over to leave a hole. The first buttonhole is worked when the neck measures 1½-2 cm = ½"-¾", the other (3) 4-5-5-5 (5) buttonholes are worked with (5) 5-5-5-5½ (6) cm = (2") 2"-2"-2"-2⅛" (2⅜") between each one. ------------------------------------------------------- START THE PIECE HERE: ------------------------------------------------------- JACKET – SHORT OVERVIEW OF THE PIECE. The neck and yoke are worked back and forth with circular needle, from mid front and top down. The yoke is divided for body and sleeves and the body continued back and forth. The sleeves are worked in the round with double pointed needles. NECK: Cast on (59) 63-71-75-79 (83) stitches with circular needle size 3 MM = US 2.5 and DROPS Sky. Purl 1 row from the wrong side, then work the next row as follows: 4 band stitches in GARTER STITCH – read description above, * knit 1, purl 1 *, work from *-* until there are 5 stitches left, knit 1 and 4 band stitches in garter stitch. Work this rib for (2) 2-3-3-4 (4) cm = (3/4") ¾"-1⅛"-1⅛"-1½" (1½") – remember the BUTTONHOLES on the right band – read description above. On the next row from the right side increase every other purl-1 to purl-2 by making 1 yarn over – start to increase in the 2nd purled stitch after the band (knit the yarn overs twisted on the next row to avoid holes) = (12) 13-15-16-17 (18) increased stitches and (71) 76-86-91-96 (101) stitches. Continue the new rib until the neck measures (3) 3-4-4-5 (5) cm = (1⅛") 1⅛"-1½"-1½"-2" (2"). Insert 1 marker after the band; the yoke is measured from this marker! YOKE: Change to circular needle size 4 MM = US 6 and work 1 ridge over all stitches – AT THE SAME TIME on the first row increase (3) 2-0-3-2 (1) stitches evenly spaced = (74) 78-86-94-98 (102) stitches. After the ridge work as follows from the right side: 4 band stitches in garter stitch, * A.1, A.2 *, work from *-* until there are 6 stitches left, A.1 and 4 band stitches in garter stitch. After the first row there are (107) 113-125-137-143 (149) stitches. Complete A.1 and A.2, then continue with knit 3 /purl 3 until the yoke measures (4) 5-5-5-6 (6) cm = (1½") 2"-2"-2"-2⅜" (2⅜") from the marker on the neck. Work the next row from the right side as follows: SIZE (<0): 4 band stitches in garter stitch, * A.3, A.4 *, work from *-* until there are 7 stitches left, A.3 and 4 band stitches in garter stitch. SIZES 0/1 – 1/3 – 6/9 – 12/18 months (2 years): 4 band stitches in garter stitch, * A.3, A.5 *, work from *-* until there are 7 stitches left, A.3 and 4 band stitches in garter stitch. After the first row there are (141) 166-184-202-211 (220) stitches. Complete A.3 and A.4/A.5, then continue with knit 5 / purl 3 in size (<0) and knit 5 / purl 4 in the other sizes until the yoke measures (8) 10-10-10-12 (12) cm = (3⅛") 4"-4"-4"-4¾" (4¾") from the marker. Knit 1 row from the right side where you adjust the number of stitches to (139) 163-175-191-195 (207) stitches. Knit 1 row from the wrong side. Continue with stockinette stitch and 4 band stitches in garter stitch on each side until the yoke measures (10) 11-12-12-13 (14) cm = (4") 4⅜"-4¾"-4¾"-5⅛" (5½") from the marker. On the next row divide for the body and sleeves as follows: Work the first (22) 26-28-30-31 (33) stitches as before, place the next (30) 34-36-40-40 (42) stitches on a thread for the sleeve, cast on (4) 4-6-6-8 (8) stitches (in side under sleeve), work (35) 43-47-51-53 (57) stitches, place the next (30) 34-36-40-40 (42) stitches on a thread for the sleeve, cast on (4) 4-6-6-8 (8) stitches (in side under sleeve), work the last (22) 26-28-30-31 (33) stitches. The body and sleeves are finished separately. The piece is now measured from here! BODY: = (87) 103-115-123-131 (139) stitches. Continue with stockinette stitch and 4 band stitches in garter stitch on each side for a further (6) 9-12-12-15 (16) cm = (2⅜") 3½"-4¾"-4¾"-6" (6¼"). Knit 1 row from the right side where you increase (12) 14-16-18-18 (20) stitches evenly spaced = (99) 117-131-141-149 (159) stitches. Change to circular needle size 3 MM = US 2.5 and work as follows from the wrong side: 4 band stitches in garter stitch, * purl 1, knit 1 *, work from *-* until there are 5 stitches left, purl 1 and 4 band stitches in garter stitch. Continue this rib for (2) 2-2-3-3 (3) cm = (3/4") ¾"-¾"-1⅛"-1⅛" (1⅛"). Bind off a little loosely. The jacket measures approx. (20) 24-28-30-34 (36) cm = (8") 9½"-11"-11¾"-13⅜" (14¼") from the shoulder down. SLEEVES: Place the (30) 34-36-40-40 (42) stitches from the thread on the one side of the piece on double pointed needles size 4 MM = US 6 and knit up 1 stitch in each of the (4) 4-6-6-8 (8) stitches cast on under the sleeve = (34) 38-42-46-48 (50) stitches. Insert a marker in the middle of the (4) 4-6-6-8 (8) stitches under the sleeve. Start at the marker and work stockinette stitch in the round for 1 cm = ⅜". Now decrease 2 stitches under the sleeve (does not apply to sizes <0 and 0/1 month) – read DECREASE TIP. Decrease like this every 4th round a total of (0) 0-1-1-1 (2) times = (34) 38-40-44-46 (46) stitches. Continue working until the sleeve measures (5) 8-10-13-15 (19) cm = (2") 3⅛"-4"-5⅛"-6" (7½") from the division. There is approx. (2) 2-2-3-3 (3) cm = (3/4") ¾"-¾"-1⅛"-1⅛" (1⅛") to finished length; try the jacket on and work to desired length. Knit 1 round where you decrease (0) 0-0-4-4 (2) stitches evenly spaced = (34) 38-40-40-42 (44) stitches. Change to double pointed needles size 3 MM = US 2.5 and work rib (knit 1, purl 1) for (2) 2-2-3-3 (3) cm = (3/4") ¾"-¾"-1⅛"-1⅛" (1⅛"). Bind off a little loosely The sleeve measures approx. (7) 10-12-16-18 (22) cm = (2¾") 4"-4¾"-6¼"-7" (8¾") from the division. Work the other sleeve in the same way. ASSEMBLY: Sew the buttons onto the left band. |
||||||||||
Diagram explanations |
||||||||||
|
||||||||||
 |
||||||||||
 |
||||||||||
Have you finished this pattern?Tag your pictures with #dropspattern #sweetgleamcardigan or submit them to the #dropsfan gallery. Do you need help with this pattern?You'll find 29 tutorial videos, a Comments/Questions area and more by visiting the pattern on garnstudio.com. © 1982-2026 DROPS Design A/S. We reserve all rights. This document, including all its sub-sections, has copyrights. Read more about what you can do with our patterns at the bottom of each pattern on our site. |
||||||||||


With over 40 years in knitting and crochet design, DROPS Design offers one of the most extensive collections of free patterns on the internet - translated to 17 languages. As of today we count 324 catalogs and 12290 patterns - 12280 of which are translated into English (US/in).
We work hard to bring you the best knitting and crochet have to offer, inspiration and advice as well as great quality yarns at incredible prices! Would you like to use our patterns for other than personal use? You can read what you are allowed to do in the Copyright text at the bottom of all our patterns. Happy crafting!
Post a comment to pattern DROPS Baby 43-6
We would love to hear what you have to say about this pattern!
If you want to leave a question, please make sure you select the correct category in the form below, to speed up the answering process. Required fields are marked *.