
Popular categories
Looking for a yarn?


Comments / Questions (28)
![]() Heidi wrote:
Heidi wrote:
Hei. Neulotaanko hihan reunus vain hihan kuvioiden jatkeeksi ikäänkuin perhoshihan tapaiseksi vai pomitaanko myös kainalon silmukat mukaan?
17.05.2026 - 15:47DROPS Design answered:
Hei, kainalon kohdalta ei poimita silmukoita, halutessasi voit kuitenkin ommella reunuksen yhteen.
18.05.2026 - 17:03
![]() Marcela wrote:
Marcela wrote:
Muy útil las 19 instrucciones del modelo muchas gracias
06.10.2025 - 19:50
![]() Marianne wrote:
Marianne wrote:
Fjin
07.08.2025 - 08:44
![]() Julie wrote:
Julie wrote:
Når der står "...strik de første 2 masker i A.2" som er de sidste 2 masker i mønster delen, skal der så også omslag med (som er en del af mønsteret A.2 mellem de to første masker)?
25.07.2025 - 00:50DROPS Design answered:
Hei Julie. Ja, det stemmer, omslaget skal være med. mvh DROPS Design
18.08.2025 - 10:35
![]() Momo wrote:
Momo wrote:
My word these instructions are confusing! "PATTERN: Work in stocking stitch until 1st marker, etc etc..." Ok, no problem. "REMEMBER THE KNITTING TENSION!" OMG why are you yelling at me?? "RAGLAN: At the same time on first round begin increases for RAGLAN..." Wait, what??!? ::Re-reads paragraph 6 more times before it makes sense.:: DX
20.03.2025 - 01:46
![]() Tara Kramer wrote:
Tara Kramer wrote:
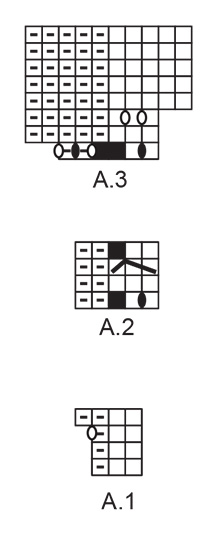
The A1 chart has me very confused. It looks like the first row of the ribbing is all K2,p2 while placing the stitch markers. Then on the 2nd row we are increasing while making a hole in the ribbing? Is that right? I saw questions about the close hole vs. open hole being wrong in the English version but I just printed this off and it shows an open circle for the YO.
26.10.2024 - 20:36DROPS Design answered:
Dear Tara, the charts are read from the bottom up. The 1st and 2nd rounds of the charts are: knit 2, purl 1. Then, on the 3rd round, we have: knit 2, purl 1, 1 yarn over. On the next round we have: knit 2, purl 1, purl yarn over twisted (it doesn't make a hole) so technically you have: knit 2, purl 2. There are no mistakes in the chart: the white oval = it should not make a hole; while the black oval = it should make a hole, as explained above the charts. In this case, it's a white oval, so the yarn over is worked twisted to avoid leaving a hole. Happy knitting!
27.10.2024 - 13:41
![]() Kerstin wrote:
Kerstin wrote:
Die Anleitung konnte gut nachgestrickt werden, lediglich die Taille war für mich in Größe S 4cm zu hoch. Habe die Zunahmen also nach unten verschoben und dann passte es. Vielen Dank für die schöne Anleitung!
27.07.2024 - 15:57
![]() Dominique wrote:
Dominique wrote:
J ai compris mon erreur ! Désolée !
13.06.2024 - 11:55
![]() Dominique wrote:
Dominique wrote:
Bonjour, concernant le col vous indiquez dans votre réponse du 27/02/24 qu'il faut "tricoter 32 mailles de A1 soit 10 fois les 3 mailles de A1 + les 2 premières mailles de A1". Pourquoi seulement les 3 premières mailles de A1 ? Il ne faut pas faire le diagramme en totalité avec le jeté ? Merci ! Cordialement
13.06.2024 - 11:33DROPS Design answered:
Bonjour Dominique, les diagrammes se lisent de bas en haut, autrement dit, au 1er tour, vous n'avez que 3 mailles dans chaque A.1; pour tricoter 32 mailles deA.1 vous répétez 10 fois les 3 mailles de A.1 et terminez par les 2 premières mailles, le motif est ainsi symétrique. Au 3ème tour, vous augmentez 1 maille dans chacun des 10 A.1. Bon tricot!
13.06.2024 - 13:58
![]() Louaked wrote:
Louaked wrote:
Bonsoir, j en suis à la bordure des manches, est-ce qu'il faut tricoter en rond ou en allers et retours sur l aiguille circulaire ? Merci
14.03.2024 - 23:34DROPS Design answered:
Bonjour Mme Louaked, la bordure des manches se tricote en allers et retour (sans couture non plus pour conserver l'effet voulu des manches). Bon tricot!
15.03.2024 - 09:29
|
|||||||||||||||||||
White Roses Top#whiterosestop |
|||||||||||||||||||
 |
 |
||||||||||||||||||
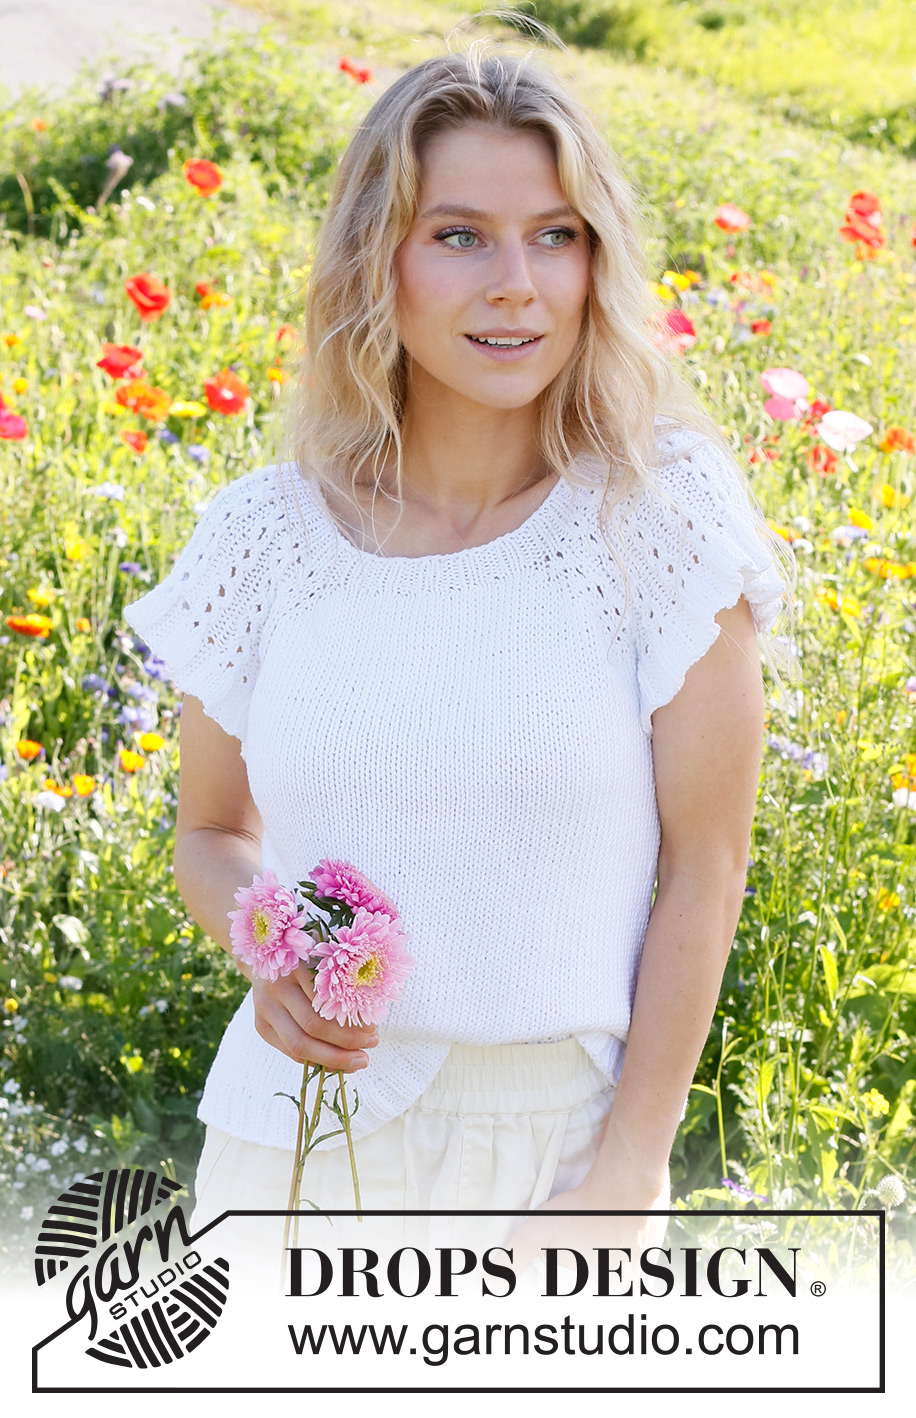
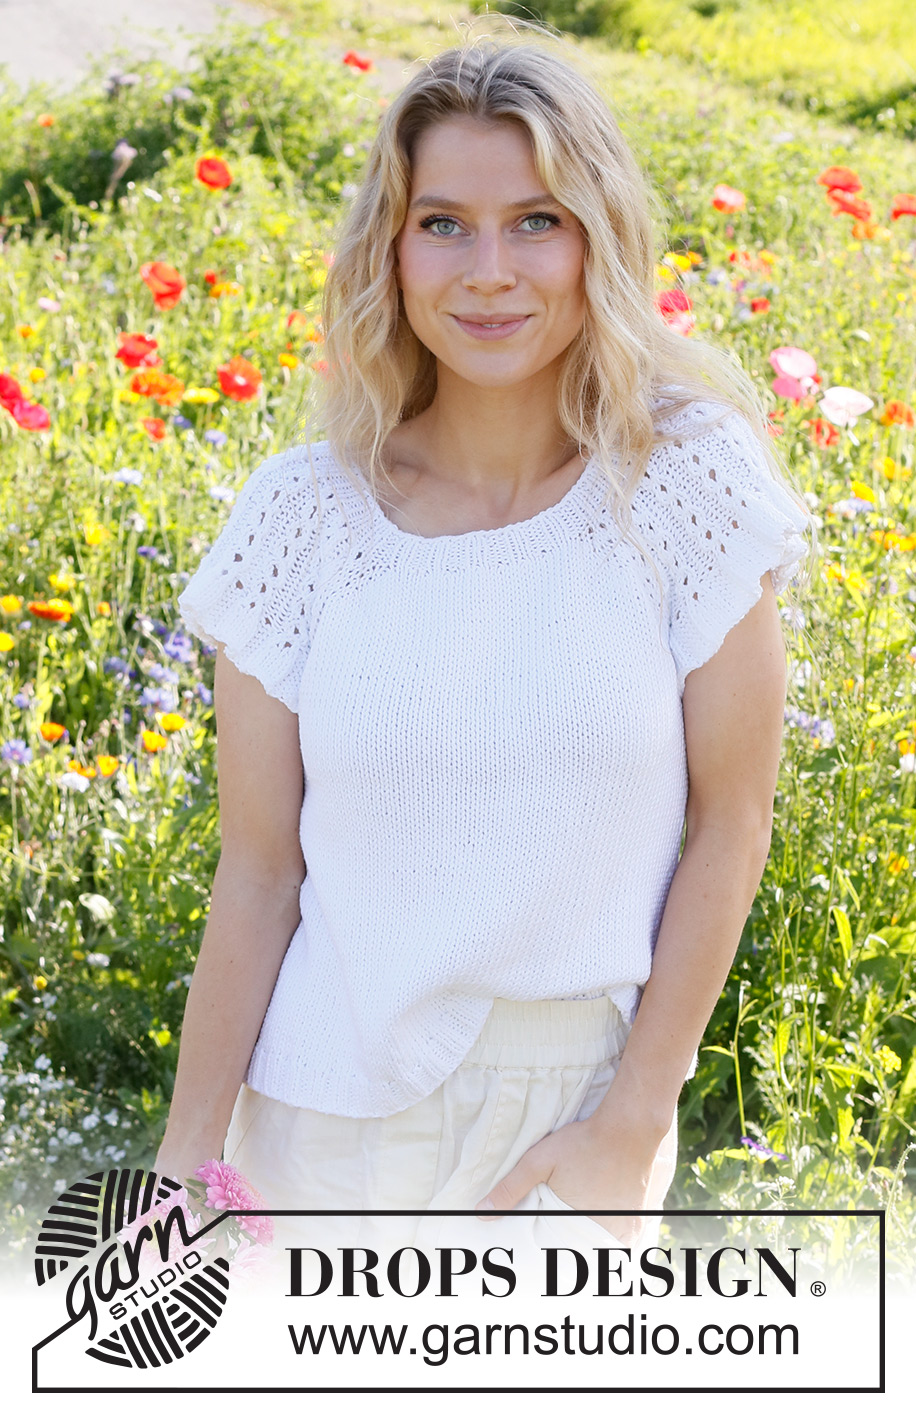
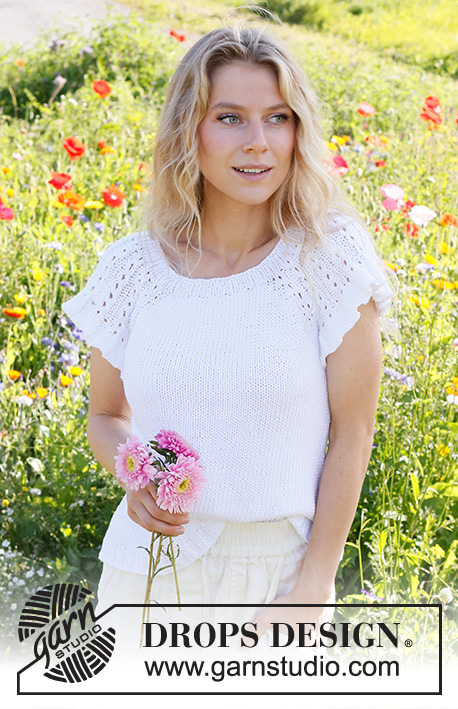
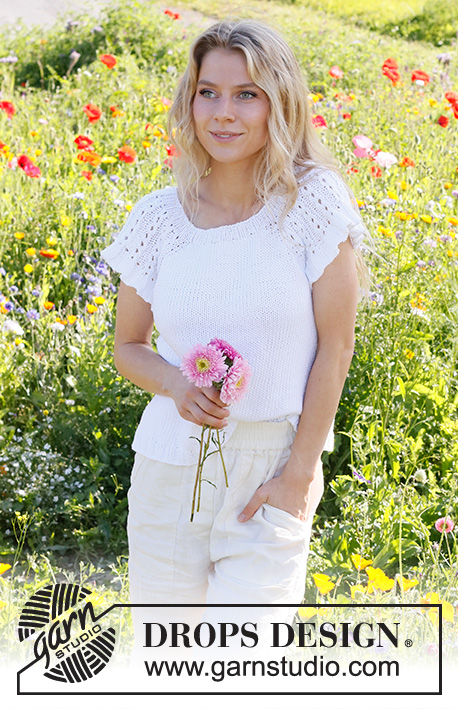
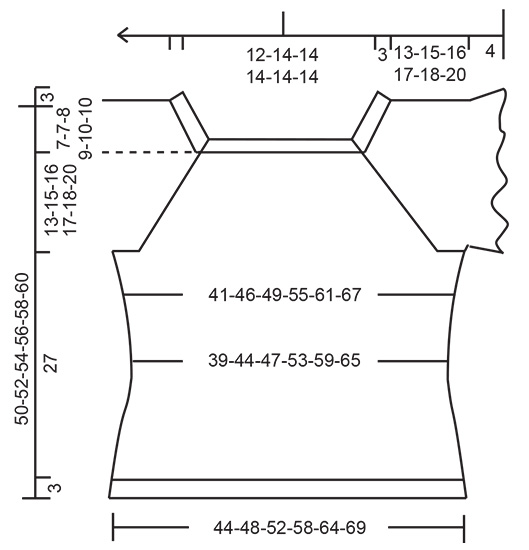
Knitted top in DROPS Paris. Piece is knitted top down with raglan, cables and flounce on sleeves. Size: S - XXXL
DROPS 231-25 |
|||||||||||||||||||
|
---------------------------------------------------------- EXPLANATION FOR THE PATTERN: ---------------------------------------------------------- GARTER STITCH (worked in the round): 1 ridge vertically = 2 rounds, i.e. knit 1 round and purl 1 round. GARTER STITCH (back and forth): Knit all rows. 1 ridge vertically = knit 2 rows. PATTERN: See diagrams A.1 to A.3. Diagrams show all rows in pattern seen from the right side. RAGLAN: All increases are done on front and back piece (do not increase on sleeves). First increase 2 stitches towards every raglan on front and back piece (= 8 stitches increased on round), then increase 1 stitch towards every raglan on front and back piece (= 4 stitches increased on round). Increase 2 stitches before 1st and 3rd marker thread as follows: Work until 2 stitches remain before marker thread: Make 1 yarn over, knit 1, make 1 yarn over, knit 1, marker thread is here. Increase 2 stitches after 2nd and 4th marker thread as follows: Knit 1, make 1 yarn over, knit 1, make 1 yarn over. Increase 1 stitch before 1st and 3rd marker thread as follows: Work until 1 stitch remains before marker thread, make 1 yarn over, knit 1, marker thread is here. Increase 1 stitch after 2nd and 4th marker thread as follows: Knit 1, make 1 yarn over. On next round knit yarn overs twisted to avoid holes. Then work the new stitches in stockinette stitch. DECREASE TIP: Decrease 1 stitch on each side of marker thread as follows: Work until 3 stitches remain before marker thread, knit 2 together, knit 2 stitches (marker thread is between these 2 stitches), slip 1 stitch knitwise, knit 1, pass slipped stitch over stitch worked (= 2 stitches decreased). INCREASE TIP-1 (applies to sides of body): Work until 2 stitches remain before marker thread, make 1 yarn over, knit 4 (marker thread is in the middle of these stitches), make 1 yarn over (= 2 stitches increased). Repeat in the other side (= 4 stitches increased on round). On next round knit yarn overs twisted to avoid holes. Then work the new stitches in stockinette stitch. INCREASE TIP-2 (evenly): To calculate how to increase evenly, count the number of stitches to be increased (e.g. 148 stitches) and divide number by stitches of increases to be done (e.g. 28) = 5.2. In this example increase by making 1 yarn over after approx. every 5th stitch. On next round work yarn overs twisted to avoid holes. BIND-OFF TIP: To avoid a tight bind-off edge when binding off, you may use a larger needle. If this still is too tight make 1 yarn over after approx. every 4th stitch while binding off (bind off yarn overs as stitches). ---------------------------------------------------------- START THE PIECE HERE: ---------------------------------------------------------- TOP - SHORT OVERVIEW OF THE PIECE: Work neck edge and yoke in the round on circular needle from approx. mid back, top down. Now divide yoke for body and sleeves. Work the body in the round on circular needle. Work sleeve edges back and forth on circular needle. NECK EDGE: Cast on 100-108-114-120-126-126 stitches on circular needle size 4 MM = US 6 with DROPS Paris. Knit 1 round. Now work rib as follows: Work (knit 2/purl 2) over the first 8-12-12-12-12-12 stitches, insert 1st marker thread here, work A.1 over the next 30-30-33-36-39-39 stitches, work the first 2 stitches in A.1, insert 2nd marker thread here, work (purl 2/knit 2) over the next 16-20-20-20-20-20 stitches, purl 2, insert 3rd marker thread here, work A.1 over the next 30-30-33-36-39-39 stitches, work the first 2 stitches in A.1, insert 4th marker thread here, work (purl 2/knit 2) over the last 10-10-10-10-10-10 stitches on round. Continue like this and repeat the first 2 rounds in A.1 until piece measures 3 cm = 1⅛". Work next round as follows: Work in stockinette stitch until 1st marker thread, work 3rd round in A.1 until 2nd marker (= 10-10-11-12-13-13 stitches increased), work in stockinette stitch until 3rd marker thread, work 3rd round in A.1 until 4th marker thread (= 10-10-11-12-13-13 stitches increased), work in stockinette stitch the rest of round = 120-128-136-144-152-152 stitches. Work 1 more round with last round in A.1 and stockinette stitch over the remaining stitches. Insert a marker at beginning of round mid back. Now measure piece from here. YOKE: Switch to circular needle size 5 MM = US 8. Now work pattern, at the same time increase for raglan. Read all of the following section before continuing. PATTERN: Work in stockinette stitch until 1st marker thread, work A.2 over the next 40-40-44-48-52-52 stitches (= 10-10-11-12-13-13 repetitions), work the first 2 stitches in A.2, 2nd marker thread is here, work in stockinette stitch until 3rd marker thread, work A.2 over the next 40-40-44-48-52-52 stitches (= 10-10-11-12-13-13 repetitions), work the first 2 stitches in A.2, 4th marker thread is here, work in stockinette stitch the rest of round. REMEMBER THE KNITTING GAUGE! RAGLAN: At the same time on first round begin increases for RAGLAN – read explanation above. Increase 2 stitches every other round 10-10-11-14-16-19 times in total, then increase 1 stitch every other round 1-3-3-2-2-1 times in total = 21-23-25-30-34-39 stitches increased in each side of front and back piece. When all increases for raglan are done, there are 204-220-236-264-288-308 stitches on round. Work until piece measures 13-15-16-17-18-20 cm = 5⅛"-6"-6¼"-6¾"-7"-8" from marker – adjust to finish after 3rd round in A.2 – i.e. next round to be worked is 4th round in A.2. Now divide piece for body and sleeve edges as follows (the outermost part of cables in each side are now worked on body): Work as before over the first 31-37-39-44-48-53 stitches (= approx. half back piece), slip the next 38-38-42-46-50-50 stitches on a thread for sleeve edge, cast on 6-6-8-8-10-10 new stitches on needle (= in the side under sleeve), work as before over the next 64-72-76-86-94-104 stitches (= front piece), slip the next 38-38-42-46-50-50 stitches on a thread for sleeve edge, cast on 6-6-8-8-10-10 new stitches on needle (= in the side under sleeve), and work as before over the next 33-35-37-42-46-51 stitches. Now finish body and sleeves separately. NOW MEASURE PIECE FROM HERE! BODY: = 140-156-168-188-208-228 stitches. Insert 1 marker thread in each side, in the middle of the new stitches cast-on under sleeve (= 3-3-4-4-5-5 new stitches on each side of marker thread). Move the marker threads upwards when working; they should be used for increase and decrease in the sides later. Work in stockinette stitch with 6-6-8-8-10-10 stitches in GARTER STITCH – read explanation above, over the new stitches cast on under sleeve in each side. When 2 ridges have been worked over the 6-6-8-8-10-10 stitches in each side, work in stockinette stitch over all stitches. When piece measures 4 cm = 1½" from division, decrease 1 stitch on each side of marker threads - read DECREASE TIP. Decrease like this approx. every 4 cm = 1½" 2 times in total = 132-148-160-180-200-220 stitches. When piece measures 14 cm = 5½" from division, increase 1 stitch on each side of marker threads - read INCREASE TIP-1. Increase like this approx. every 3 cm = 1⅛" 4 times in total = 148-164-176-196-216-236 stitches. Work until piece measures approx. 27 cm = 10⅝" from division. Approx. 3 cm = 1⅛" rib remain until finished measurements. Try the top and work to desired length before rib. To stop the rib from contracting increase 28-32-36-40-44-48 stitches evenly - read INCREASE TIP-2 = 176-196-212-236-260-284 stitches. Switch to circular needle size 4 MM = US 6. Work rib (knit 2/purl 2) in the round for 3 cm = 1⅛". Bind off with knit over knit and purl over purl - read BIND-OFF TIP. Top measures approx. 50-52-54-56-58-60 cm = 19¾"-20½"-21¼"-22"-22¾"-23⅝" from shoulder and down. SLEEVE EDGE: Slip the 38-38-42-46-50-50 stitches from thread in one side on circular needle size 5 MM = US 8. Begin from wrong side and work as follows: 2 stitches in GARTER STITCH - read explanation above, work last row in A.2 as before until 2 stitches remain, work 2 stitches in garter stitch. Then work as follows from right side: Work 2 stitches in garter stitch, A.3 until 4 stitches remain on needle, work the first 2 stitches in A.3, 2 stitches in garter stitch. When all increases in A.3 are done, there are 89-89-99-109-119-119 stitches on row. Continue back and forth until A.3 has been worked. Bind off with knit over knit and purl over purl - remember BIND-OFF TIP. Work the other sleeve edge the same way. |
|||||||||||||||||||
Diagram explanations |
|||||||||||||||||||
|
|||||||||||||||||||
 |
|||||||||||||||||||
 |
|||||||||||||||||||
Have you finished this pattern?Tag your pictures with #dropspattern #whiterosestop or submit them to the #dropsfan gallery. Do you need help with this pattern?You'll find 29 tutorial videos, a Comments/Questions area and more by visiting the pattern on garnstudio.com. © 1982-2026 DROPS Design A/S. We reserve all rights. This document, including all its sub-sections, has copyrights. Read more about what you can do with our patterns at the bottom of each pattern on our site. |
|||||||||||||||||||


With over 40 years in knitting and crochet design, DROPS Design offers one of the most extensive collections of free patterns on the internet - translated to 17 languages. As of today we count 325 catalogs and 12298 patterns - 12288 of which are translated into English (US/in).
We work hard to bring you the best knitting and crochet have to offer, inspiration and advice as well as great quality yarns at incredible prices! Would you like to use our patterns for other than personal use? You can read what you are allowed to do in the Copyright text at the bottom of all our patterns. Happy crafting!
Post a comment to pattern DROPS 231-25
We would love to hear what you have to say about this pattern!
If you want to leave a question, please make sure you select the correct category in the form below, to speed up the answering process. Required fields are marked *.