
Popular categories
Looking for a yarn?


Comments / Questions (13)
![]() Maria wrote:
Maria wrote:
Hvordan ved jeg hvilken størrelse jeg skal vælge? Der står ingen brystmål eller lign
21.01.2026 - 16:50DROPS Design answered:
Hei Maria, Du finner en målskisse på bunnen av oppskriften, med all mål til de forskjellige størrelsene. Hilsen Drops Team.
22.01.2026 - 07:22
![]() Resma wrote:
Resma wrote:
Jag har kommit till mönstret. Jag har nu 213 maskor. Det står att mönstret stickas 15x12 maskor men då har jag 33 maskor till framkantmaskorna. 6+1, ( 33-14 =19) ska jag sticka dessa utanför mönstret???
10.01.2026 - 11:19
![]() Robyn wrote:
Robyn wrote:
I am making spring parade 230-7 and have a question re stitch count/chart work. The pattern counts are not divisible by 12 (chart repeats) unless I reduce number by one stitch starting at yoke increase and including throughout the rest of the pattern. Is this an error?
11.04.2023 - 15:11DROPS Design answered:
Dear Robyn, when working diagrams from RS always finish with the first stitch in diagram before front band stitches (from WS work the first stitch in diagram then repeat diagrams reading now from the left towards the right) so that pattern is symmetrical. Happy knitting!
11.04.2023 - 16:55
![]() Pavlína Skopalová wrote:
Pavlína Skopalová wrote:
Dobrý den. Pletla jsem tento svetr s přízí i jehlicemi přesně podle návodu, utahovala jsem přiměřeně, ale z 49 cm, které měl mít podle návodu, má pouhých 27 cm na šířku. Zmenšil se mi tedy asi o polovinu. Při použití silnějších jehlic se mi tvořila velká oka, pomalu až díry. Chtěla bych se zeptat, v čem jsem udělala chybu a jak zabránit, aby se mi tento problém opakoval. Děkuji za odpověď.
01.06.2022 - 23:23
![]() Joan Smith wrote:
Joan Smith wrote:
Figured it out. The chart is correct but the casting on should be in violet not unicorn
31.03.2022 - 15:44DROPS Design answered:
Dear Mrs Smith, thanks for noticing, pattern has been now updated. Happy knitting!
04.04.2022 - 11:30
![]() Joan Smith wrote:
Joan Smith wrote:
In reading the chart I think that there is an error in that the violet should be the first colour instead of unicorn which is how it appears in the picture of the cardigan. Am I correct? Thanks
29.03.2022 - 22:48
![]() Helena wrote:
Helena wrote:
Goedenavond, geeft het telpatroon de goede en de verkeerde kant weer of alleen de goede kant? Ik ben met het 2e motief (A1) bezig, de helft van het telpatroon A1 en mijn werk meet nu al 19 cm.. Ik heb de verkeerde kant niet meegeteld. Ik heb het idee dat ik fout zit. Klopt het? Alvast bedankt voor jullie hulp!!
10.03.2022 - 21:44DROPS Design answered:
Dag Helena,
Het telpatroon geeft alle naalden in het patroon weer, dus zowel de goede als de verkeerde kant.
14.03.2022 - 13:11
![]() Elena wrote:
Elena wrote:
Hi, thx for the pattern. in the section DIVIDE is a small error: 6 band stitches shall be included before 42-... and 43-... . they are missed in english but correctly mentioned in the norwegian version. ;)
04.03.2022 - 12:10DROPS Design answered:
Dear Elena, thanks for your feedback, pattern has been now edited. Happy knitting!
04.03.2022 - 16:21
![]() Sonja wrote:
Sonja wrote:
Tulip Gardens
05.02.2022 - 06:46
![]() Linda wrote:
Linda wrote:
Tulip wins
18.01.2022 - 14:38
|
|||||||||||||||||||
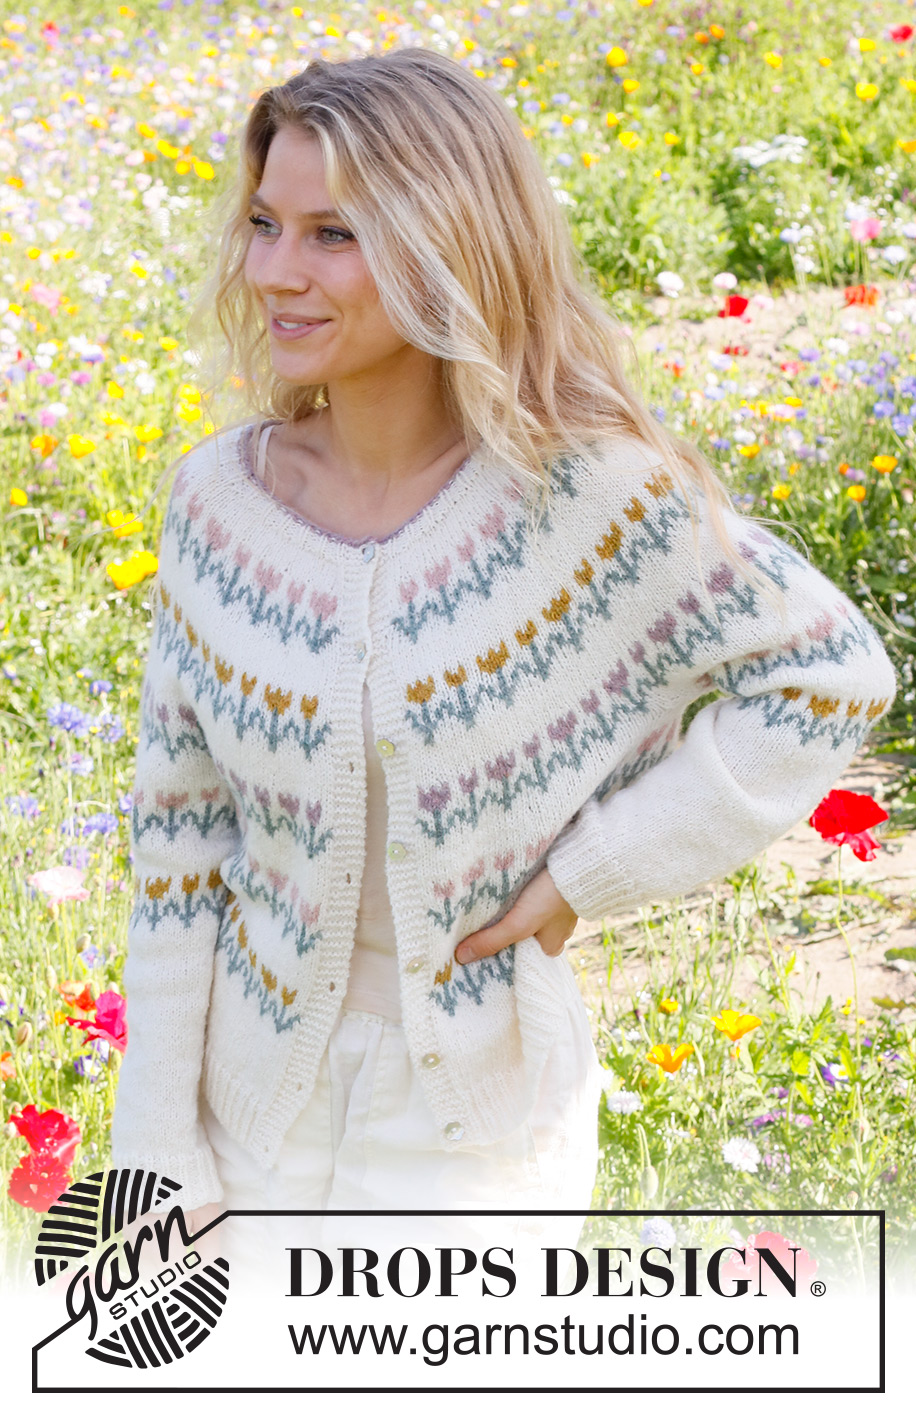
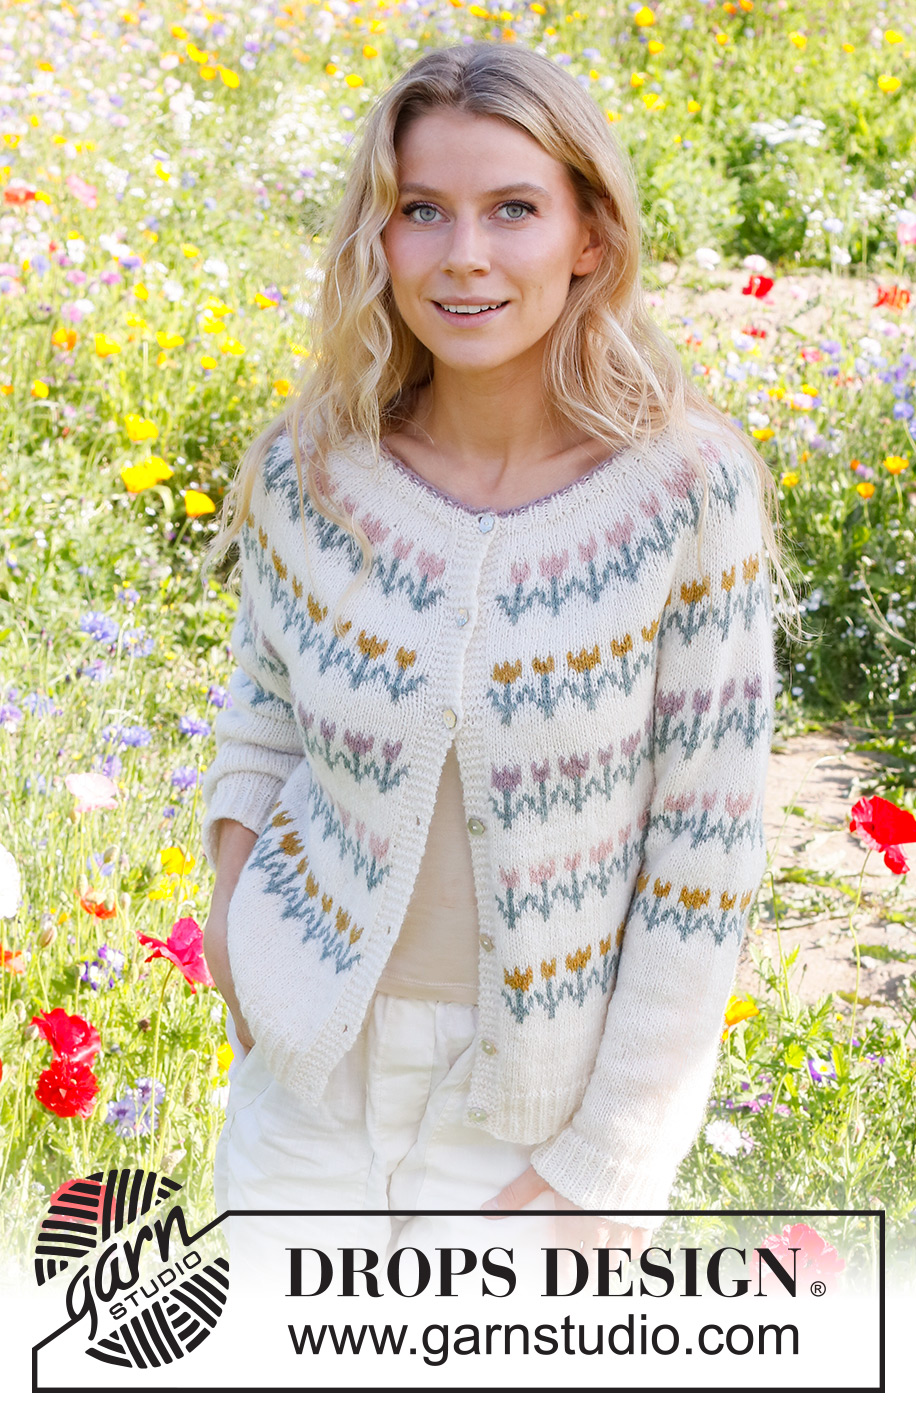
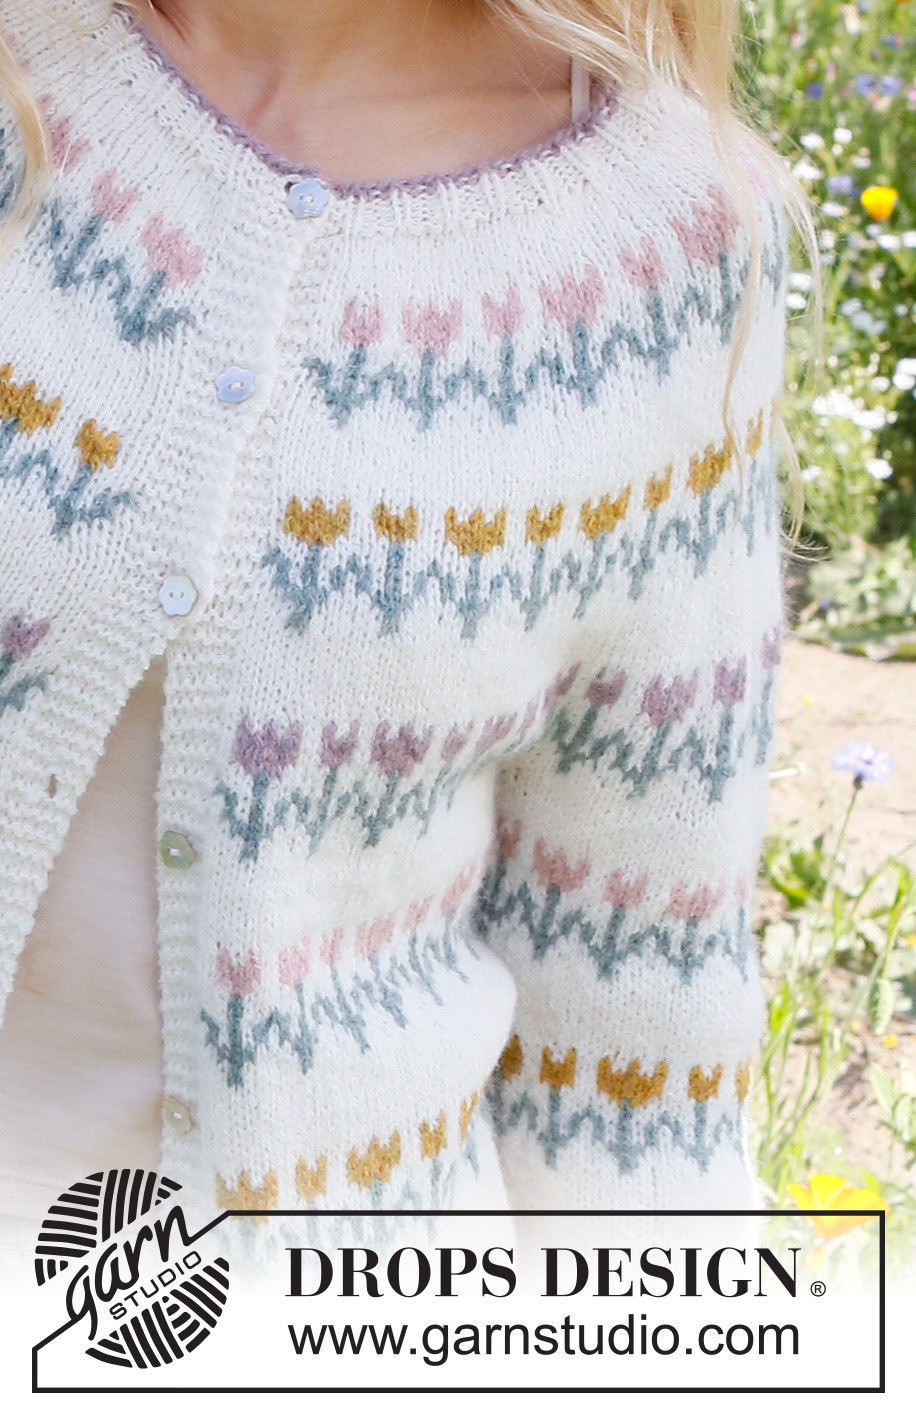
Spring Parade Cardigan#springparadecardigan |
|||||||||||||||||||
 |
 |
||||||||||||||||||
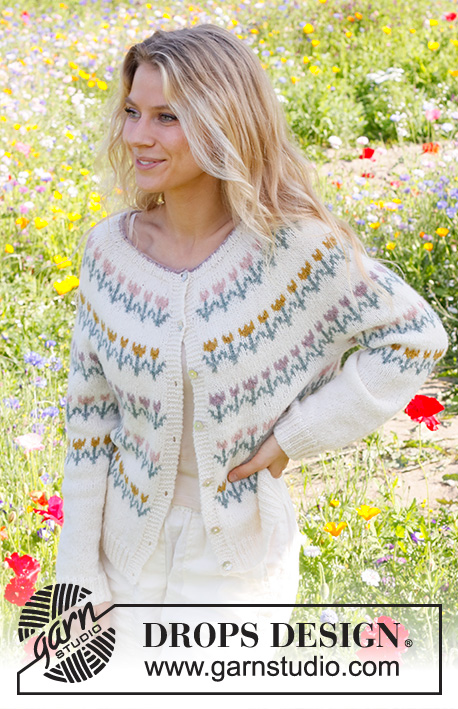
Knitted jacket in DROPS Sky. The piece is worked top down with round yoke, flowers/folklore pattern. Sizes S - XXXL.
DROPS 230-7 |
|||||||||||||||||||
|
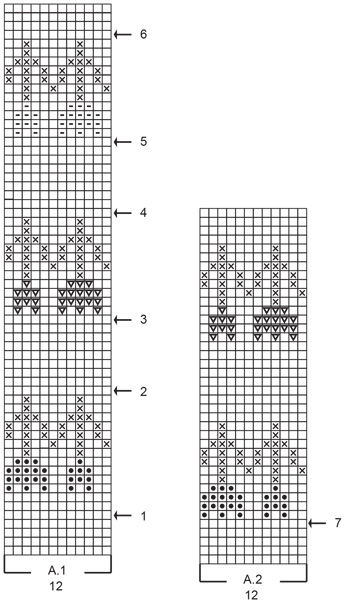
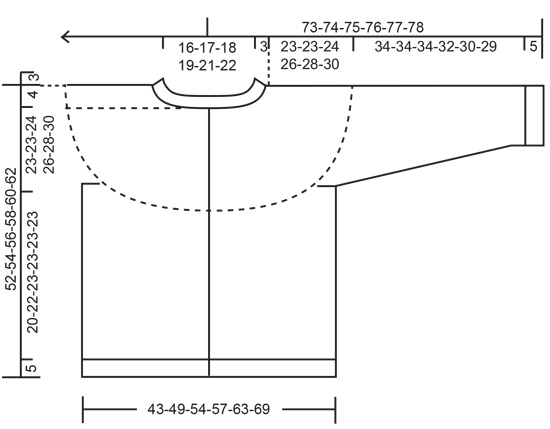
------------------------------------------------------- EXPLANATIONS FOR THE PATTERN: ------------------------------------------------------- RIDGE/GARTER STITCH (worked back and forth): Knit all rows. 1 ridge = knit 2 rows. PATTERN: See diagrams A.1 and A.2. The diagrams are worked in stockinette stitch. INCREASE TIP-1 (evenly spaced): To work out how to increase evenly, count the total number of stitches on the needle (e.g. 115 stitches) minus the bands (e.g. 12 stitches) and divide the remaining stitches by the number of increases to be made (e.g. 42) = 2.4. In this example, increase by making 1 yarn over after alternately each 2nd and 3rd stitch. Do not increase over the bands. On the next row purl the yarn overs twisted to avoid holes. DECREASE TIP (for sleeves): Decrease 1 stitch on either side of the marker as follows: Work until there are 3 stitches left before the marker, knit 2 together, knit 2 (marker sits between these 2 stitches), slip 1 stitch as if to knit, knit 1 and pass the slipped stitch over the knitted stitch. BUTTONHOLES: Work buttonholes on the right band (when the garment is worn). Work from the right side when there are 3 stitches left on the row as follows: Make 1 yarn over, knit 2 together and knit 1. On the next row, knit the yarn over to leave a hole. The first buttonhole is worked when the rib on the neck measures approx. 1½-2 cm = ½"-¾". Then work the other 6-6-7-7-7-7 buttonholes with approx. 7 cm = 2¾" between each one. ------------------------------------------------------- START THE PIECE HERE: ------------------------------------------------------- JACKET – SHORT OVERVIEW OF THE PIECE. The neck and yoke are worked back and forth with circular needle, from mid front and top down. The yoke is divided for body and sleeves and the body continued back and forth with circular needle. The sleeves are worked in the round with double pointed needles/short circular needle. NECK: Cast on 112-115-121-124-133-136 stitches with circular needle size 3 MM = US 2.5 and the color dusty violet DROPS Sky. Purl 1 row from the wrong side. Change to color white. Work the next row from the right side as follows: 6 band stitches in GARTER STITCH – read description above, * knit 1, purl 2 *, work from *-* until there are 7 stitches left, knit 1 and 6 band stitches in garter stitch. Continue this rib for 3 cm = 1⅛". Remember the BUTTONHOLE on the right band – read description above. Insert 1 marker after the band at the beginning of the row; the yoke is measured from this marker! YOKE: Change to circular needle size 4 MM = US 6. Knit 1 row from the right side where you increase 33-42-36-45-48-57 stitches evenly spaced – read INCREASE TIP = 145-157-157-169-181-193 stitches. Purl 1 row from the wrong side with 6 band stitches in garter stitch on each side. Now work pattern, starting from the right side, as follows: 6 band stitches in garter stitch, A.1,11-12-12-13-14-15 times in width, work the first stitch in A.1 and 6 band stitches in garter stitch. REMEMBER THE KNITTING GAUGE! Increase evenly spaced on each row with an arrow in the diagram as follows (do not increase over the bands): Arrow 1: Increase 36-36-48-36-48-48 stitches = 181-193-205-205-229-241 stitches. A.1 is repeated 14-15-16-16-18-19 times in width. Arrow 2: Increase 36-36-36-36-48-48 stitches = 217-229-241-241-277-289 stitches. A.1 is worked 17-18-19-19-22-23 times in width. Arrow 3: Increase 36-36-36-36-36-48 stitches = 253-265-277-277-313-337 stitches. A.1 is worked 20-21-22-22-25-27 times in width. Arrow 4: Increase 24-36-36-36-36-36 stitches = 277-301-313-313-349-373 stitches. A.1 is worked 22-24-25-25-28-30 times in width. Arrow 5: Increase 24-24-36-36-36-36 stitches = 301-325-349-349-385-409 stitches. A.1 is worked 24-26-28-28-31-33 times in width. Arrow 6: Increase 0-12-36-36-24-24 stitches = 301-337-385-385-409-433 stitches. A.1 is worked 24-27-31-31-33-35 times in width. When A.1 has been completed in height the yoke measures approx. 23 cm = 9" from the marker. Now work pattern and AT THE SAME TIME divide for the body and sleeves. Read the next section before continuing! PATTERN: Work as follows: 6 band stitches in garter stitch, A.2, 24-27-31-31-33-35 times in width, work the first stitch in A.2 and 6 band stitches in garter stitch. Increase evenly on the last increase-row as follows: Arrow 7: Increase 0-0-0-0-12-12 stitches = 301-337-385-385-421-445 stitches. A.2 is worked 24-27-31-31-34-36 times in width. DIVIDE: When the piece measures 23-23-24-26-28-30 cm = 9"-9"-9½"-10¼"-11"-11¾" from the neck, divide for the body and sleeves as follows: Work 6 front band stitches in garter stitch, 42-48-54-54-60-66 stitches, slip the next 60-66-78-78-84-84 stitches on a thread for the sleeve, cast on 6-6-6-12-12-12 stitches under the sleeve, work 84-96-108-108-120-132 stitches, slip the next 60-66-78-78-84-84 stitches on a thread for the sleeve, cast on 6-6-6-12-12-12 stitches under the sleeve and work 43-49-55-55-61-67 6 front band stitches in garter stitch. The body and sleeves are finished separately. BODY: = 193-217-241-253-277-301 stitches. Continue A.2 with 6 band stitches in garter stitch on each side. When A.2 has been completed in height, repeat the first 0-0-0-16-16-16 rounds in A.2 one more time. Now continue with color white, stockinette stitch and 6 band stitches in garter stitch on each side. When the piece measures 20-22-23-23-23-23 cm = 8"-8¾"-9"-9"-9"-9" from the division, purl 1 row from the wrong side where you increase 6-6-6-12-12-12 stitches evenly spaced (do not increase over the bands) = 199-223-247-265-289-313 stitches. Change to circular needle size 3 MM = US 2.5 and work rib as follows from the right side: 6 band stitches in garter stitch, * knit 1, purl 2 *, work from *-* until there are 7 stitches left, knit 1 and 6 band stitches in garter stitch. Work this rib for 5 cm = 2". Bind off. The jacket measures approx. 52-54-56-58-60-62 cm = 20½"-21¼"-22"-22¾"-23⅝"-24⅜" from the shoulder down. SLEEVES: Place the 60-66-78-78-84-84 sleeve-stitches on the one side of the piece on short circular needle/double pointed needles size 4 MM = US 6 and knit up 1 stitch in each of the 6-6-6-12-12-12 stitches cast on under the sleeve = 66-72-84-90-96-96 stitches. Insert a marker in the middle of the new stitches under the sleeve. Now work pattern and decrease AT THE SAME TIME. Read the next section before continuing! PATTERN: Continue A.2. When A.2 has been completed in height, repeat the first 0-0-0-16-16-16 rounds in A.2 one more time. Then work stockinette stitch with color white. DECREASE: When the sleeve measures 4 cm = 1½" from the division, decrease 2 stitches under the sleeve – read DECREASE TIP. Decrease like this every 3-2½-1½-1½-1-1 cm = 1⅛"-1"-½"-½"-⅜"-⅜" a total of 8-10-15-17-19-18 times = 50-52-54-56-58-60 stitches. Work until the sleeve measures 34-34-34-32-30-29 cm = 13⅜"-13⅜"-13⅜"-12½"-11¾"-11⅜". Knit 1 round where you increase 4-2-3-1-2-0 stitches evenly spaced = 54-54-57-57-60-60 stitches. Change to double pointed needles size 3 MM = US 2.5 and work rib (knit 1, purl 2) for 5 cm = 2". Bind off. Work the other sleeve in the same way. ASSEMBLY: Sew the buttons onto the left band. |
|||||||||||||||||||
Diagram explanations |
|||||||||||||||||||
|
|||||||||||||||||||
 |
|||||||||||||||||||
 |
|||||||||||||||||||
Have you finished this pattern?Tag your pictures with #dropspattern #springparadecardigan or submit them to the #dropsfan gallery. Do you need help with this pattern?You'll find 30 tutorial videos, a Comments/Questions area and more by visiting the pattern on garnstudio.com. © 1982-2026 DROPS Design A/S. We reserve all rights. This document, including all its sub-sections, has copyrights. Read more about what you can do with our patterns at the bottom of each pattern on our site. |
|||||||||||||||||||


With over 40 years in knitting and crochet design, DROPS Design offers one of the most extensive collections of free patterns on the internet - translated to 17 languages. As of today we count 324 catalogs and 12290 patterns - 12280 of which are translated into English (US/in).
We work hard to bring you the best knitting and crochet have to offer, inspiration and advice as well as great quality yarns at incredible prices! Would you like to use our patterns for other than personal use? You can read what you are allowed to do in the Copyright text at the bottom of all our patterns. Happy crafting!
Post a comment to pattern DROPS 230-7
We would love to hear what you have to say about this pattern!
If you want to leave a question, please make sure you select the correct category in the form below, to speed up the answering process. Required fields are marked *.