
Popular categories
Looking for a yarn?


Comments / Questions (7)
![]() DANIELA wrote:
DANIELA wrote:
Non capisco come si esegue il motivo COSTA/LEGACCIO con i ferro circolare. grazie per la risposta
07.09.2023 - 10:04DROPS Design answered:
Buonasera Daniela, la lavorazione delle COSTE A MAGLIA LEGACCIO è solo in piano, per cui deve lavorare tutte le maglie a diritto. Buon lavoro!
07.09.2023 - 23:17
![]() Lorraine Simard wrote:
Lorraine Simard wrote:
Je ne comprends pas le diagramme. Il s’agit seulement d’augmentations et non de point fantaisie. Comment ça peut donner 14 motifs de 5 mailles. Y a-t-il eu une correction que je ne vois pas?
29.12.2022 - 14:15DROPS Design answered:
Bonjour Mme Simard, le diagramme correspond aux augmentations de l'empiècement, il se tricote au 1er rang sur 5 mailles, on augmente 2 mailles (cf 2ème symbole) on a ainsi 7 mailles au 2ème rang. Quand vous devez tricoter 14 fois les 5 m de A.1 = 70 m, vous avez 14 x 7 = 98 mailles quand A.1 est terminé. Bon tricot!
02.01.2023 - 11:58
![]() Rosa Barth wrote:
Rosa Barth wrote:
Ik overweeg deze trui te breien met Drops Nepal. Zouden jullie mij dat ook adviseren of komt het model dan minder goed uit?
14.12.2022 - 16:15DROPS Design answered:
Dag Rosa,
Qua dikte is het patroon prima te vervangen door DROPS Nepal. Alleen Nepal is zwaarder dan Air. DROPS Air is een heel licht blowgaren. Het werk wordt dus wel wat zwaarder.
15.12.2022 - 21:53
![]() Ann wrote:
Ann wrote:
Forstår ikke fellingen på ermene . Står det skal felles for hver 7 cm 4 ganger. Det går ikke opp med cm på ermene. Skal de være runde og ikke cm?
05.03.2022 - 18:31DROPS Design answered:
Hej Ann, du feller når ærmet måler 3, 10, 17 og 24 cm. God fornøjelse!
09.03.2022 - 10:14
![]() Mille wrote:
Mille wrote:
Kan man ikke strikke flæsen direkte på trøjen, så man ikke skal sy den på til sidst? Jeg tænker at strikke maskerne op langs mærketråden.
08.12.2021 - 20:44DROPS Design answered:
Hej Mille, det kan du sikkert, men vi kan desværre ikke hjælpe dig med at skrive opskriften om. Du kan sikkert selv løse det, eller så spørg din DROPS forhandler :)
09.12.2021 - 09:27
![]() Giovanna wrote:
Giovanna wrote:
Buongiorno, non riesco a capire come vada attaccata la balza. Nelle istruzioni c'è scritto che durante il lavoro del corpo bisogna passare un filo lungo tutte le maglie, ma poi non mi è chiaro come questo filo sia utilizzato per attaccare la balza. Potreste spiegarmelo meglio o realizzare un video? Grazie mille.
27.11.2021 - 13:14DROPS Design answered:
Buonasera Giovanna, la balza viene lavorata a parte e poi cucita al maglione da segnapunti a segnapunti. Buon lavoro!
08.12.2021 - 19:19
![]() Ingrid Thyberg wrote:
Ingrid Thyberg wrote:
Stickar 122/128 Förstår inte minskningarna på ärmen. Minska var 8 cm 4 ggr blir 32 cm. (Exkl de redan 3 cm som är stickade) Men sedan står att man ska sticka tills att ärmen mäter 29 cn
13.11.2021 - 20:43
|
|||||||
Red Hibiscus#redhibiscusjumper |
|||||||
 |
 |
||||||
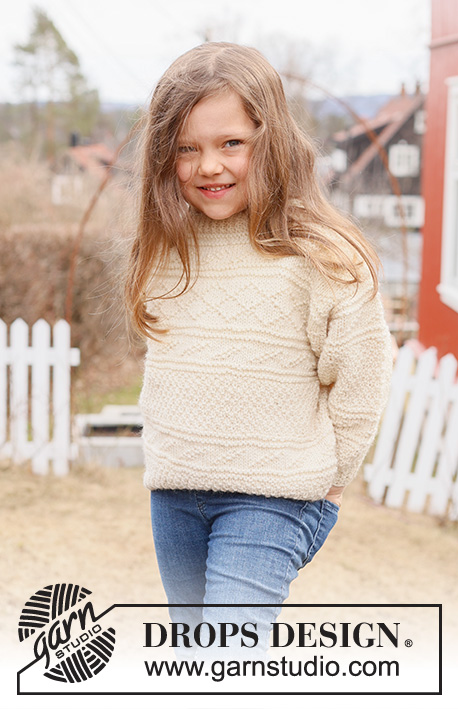
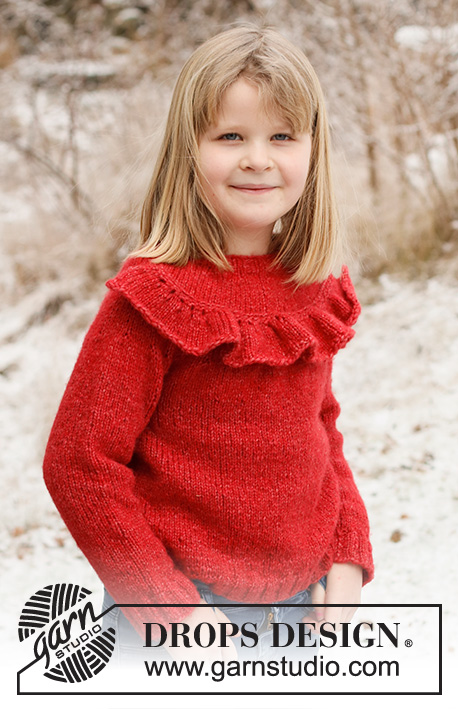
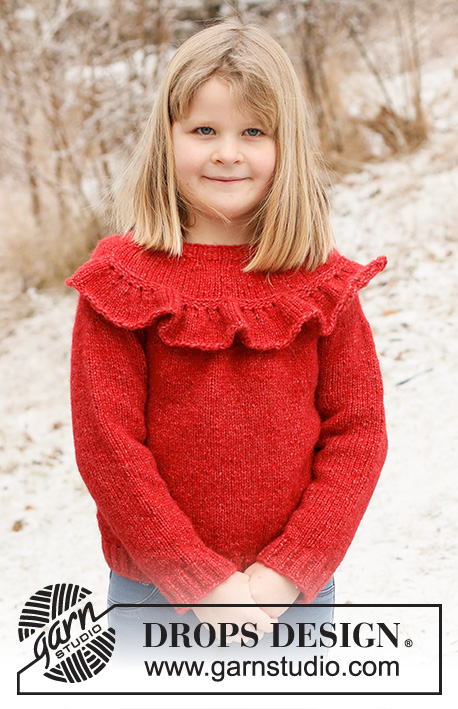
Knitted sweater for children in DROPS Air. The piece is worked top down, with round yoke and flounce. Sizes 3 – 12 years.
DROPS Children 41-5 |
|||||||
|
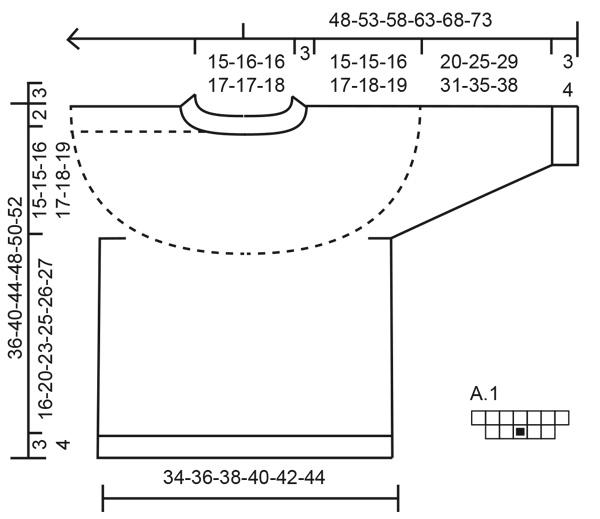
------------------------------------------------------- EXPLANATIONS FOR THE PATTERN: ------------------------------------------------------- RIDGE/GARTER STITCH (worked back and forth): Knit all rows. 1 ridge = knit 2 rows. INCREASE TIP (evenly spaced): To work out how to increase evenly, count the total number of stitches on the needle (e.g. 68 stitches) and divide by the number of increases to be made (e.g. 7) = 9.7. In this example, increase by making 1 yarn over after alternately each 9th and 10th stitch (approx.). On the next round knit the yarn overs twisted to avoid holes. PATTERN: See diagram A.1. DECREASE TIP (for sleeves): Decrease 1 stitch on either side of the marker thread as follows: Work until there are 3 stitches left before the marker thread, knit 2 together, knit 2 (marker thread sits between these 2 stitches), slip 1 stitch as if to knit, knit 1 and pass the slipped stitch over the knitted stitch. BINDING-OFF TIP: To avoid the bind-off edge being tight you can bind off with a larger size needle. If the edge is still tight, make 1 yarn over after approx. each 4th stitch at the same time as binding off; the yarn overs are bind off as normal stitches. ------------------------------------------------------- START THE PIECE HERE: ------------------------------------------------------- SWEATER – SHORT OVERVIEW OF THE PIECE: The neck and yoke are worked in the round with circular needle, top down. The yoke is divided for body and sleeves and the body is continued in the round with circular needle. The sleeves are worked with short circular needle/double pointed needles, top down. A flounce is worked and sewn to the front piece to finish. YOKE: Cast on 64-68-68-72-72-76 stitches with short circular needle size 4 MM = US 6 and DROPS Air. Knit 1 round, then work rib (knit 2, purl 2) for 3 cm = 1⅛" (= neck). Change to short circular needle size 5 MM = US 8 and knit 1 round where you increase 1-2-7-3-8-4 stitches evenly spaced – read INCREASE TIP = 65-70-75-75-80-80 stitches. Insert 1 marker here. THE YOKE IS MEASURED FROM HERE! Work stockinette stitch for 2-2-2-2-3-3 cm = ¾"-¾"-¾"-¾"-1⅛"-1⅛". REMEMBER THE KNITTING GAUGE! Work A.1 over all stitches (= 13-14-15-15-16-16 repeats of 5 stitches). When A.1 has been completed you have increased 26-28-30-30-32-32 stitches = 91-98-105-105-112-112 stitches. When the piece measures 5-6-6-6-7-7 cm = 2"-2⅜"-2⅜"-2⅜"-2¾"-2¾", pull a thread through all the stitches; this will be used when attaching the flounce later. Continue with stockinette stitch until the piece measures 7-7-7-8-9-9 cm = 2¾"-2¾"-2¾"-3⅛"-3½"-3½". Now work as follows: Knit 1-1-0-0-1-1, A.1 over the next 90-95-105-105-110-110 stitches (= 18-19-21-21-22-22 repeats of 5 stitches), knit 0-2-0-0-1-1. When A.1 has been completed you have increased 36-38-42-42-44-44 stitches = 127-136-147-147-156-156 stitches. Continue with stockinette stitch until the piece measures 12-12-12-13-15-15 cm = 4¾"-4¾"-4¾"-5⅛"-6"-6". Now work as follows: Knit 1-1-1-1-1-1, work A.1 over the next 125-135-145-145-155-155 stitches (= 25-27-29-29-31-31 repeats of 5 stitches), knit 1-0-1-1-0-0. When A.1 has been completed you have increased 50-54-58-58-62-62 stitches = 177-190-205-205-218-218 stitches. Continue with stockinette stitch until the piece measures 15-15-16-17-18-19 cm = 6"-6"-6¼"-6¾"-7"-7½", on the last round adjust the number of stitches to 176-188-196-200-212-220 stitches. Now divide for the body and sleeves as follows: Work 26-28-29-30-32-33 stitches (= half back piece), place the next 36-38-40-40-42-44 stitches on a thread (= sleeve), cast on 6-6-6-8-8-8 stitches, work 52-56-58-60-64-66 stitches (= front piece), place the next 36-38-40-40-42-44 stitches on a thread (= sleeve), cast on 6-6-6-8-8-8 stitches, work the last 26-28-29-30-32-33 stitches (= half back piece). THE PIECE IS NOW MEASURED FROM HERE! BODY: 116-124-128-136-144-148 stitches. Continue with stockinette stitch in the round for 16-20-23-25-26-27 cm = 6¼"-8"-9"-9¾"-10¼"-10⅝" (or to desired length; there is 3-3-3-4-4-4 cm = 1⅛"-1⅛"-1⅛"-1½"-1½"-1½" left to finished length). Knit 1 round and increase 8-8-8-8-8-8 stitches evenly spaced = 124-132-136-144-152-156 stitches. Change to circular needle size 4 MM = US 6. Work rib (knit 2, purl 2) for 3-3-3-4-4-4 cm = 1⅛"-1⅛"-1⅛"-1½"-1½"-1½". Loosely bind off with knit over knit and purl over purl – read BINDING-OFF TIP! Cut and fasten the strand. The sweater measures approx. 36-40-44-48-50-52 cm = 14¼"-15¾"-17¼"-19"-19¾"-20½" from the shoulder down. SLEEVES: Place the 36-38-40-40-42-44 stitches from the thread on the one side of the piece on double pointed needles/short circular needle size 5 MM = US 8 and knit up 1 stitch in each of the 6-6-6-8-8-8 stitches cast on under the sleeve = 42-44-46-48-50-52 stitches. Insert a marker thread in the middle of the 6-6-6-8-8-8 stitches under the sleeve. . Start at the marker thread and work stockinette stitch in the round for 3 cm = 1⅛". Now decrease 2 stitches under the sleeve – read DECREASE TIP. Decrease like this every 5-7-8-9-10-11 cm = 2"-2¾"-3⅛"-3½"-4"-4⅜" a total of 4 times = 34-36-38-40-42-44 stitches. Continue working until the sleeve measures 20-25-29-31-35-38 cm = 8"-9¾"-11⅜"-12¼"-13¾"-15" from the division (or to desired length; there is 3-3-3-4-4-4 cm = 1⅛"-1⅛"-1⅛"-1½"-1½"-1½" left to finished length). Knit 1 round where you increase 6-4-6-4-6-4 stitches evenly spaced = 40-40-44-44-48-48 stitches. Change to double pointed needles size 4 MM = US 6 and work rib (knit 2, purl 2) for 3-3-3-4-4-4 cm = 1⅛"-1⅛"-1⅛"-1½"-1½"-1½". Bind off with knit over knit and purl over purl – remember BINDING-OFF TIP! The sleeve measures approx. 23-28-32-35-39-42 cm = 9"-11"-12½"-13¾"-15¼"-16½" from the division. Work the other sleeve in the same way. FLOUNCE: Cast on 46-50-54-54-58-58 stitches with circular needle size 4 MM = US 6 and DROPS Air. Work 2 RIDGES – read explanation above. Change to circular needle size 5 MM = US 8 and continue with stockinette stitch as follows: ROW 1 (= right side): * Knit 2, make 1 yarn over *, work from *-* until there are 2 stitches left, knit 2. You have increased 22-24-26-26-28-28 stitches and there are 68-74-80-80-86-86 stitches on the needle. ROW 2 (= wrong side): Purl; yarn overs purled to leave holes. ROW 3 (= right side): * Knit 3, make 1 yarn over *, work from *-* until there are 2 stitches left, knit 2. You have increased 22-24-26-26-28-28 stitches and there are 90-98-106-106-114-114 stitches on the needle. ROW 4 (= wrong side): Purl; yarn overs purled to leave holes. Continue with stockinette stitch (knit from the right side, purl from the wrong side) until the piece measures 6-6-6-7-7-7 cm = 2⅜"-2⅜"-2⅜"-2¾"-2¾"-2¾". Work the next row from the wrong side as follows: * Purl 2, knit 2 *, work from *-* until there are 2 stitches left, purl 2. Turn and loosely bind off from the right side with knit over knit and purl over purl – remember BINDING-OFF TIP. ASSEMBLY: Sew the flounce to the front piece with small stitches, along the marker thread from shoulder to shoulder. |
|||||||
Diagram explanations |
|||||||
|
|||||||
 |
|||||||
Have you finished this pattern?Tag your pictures with #dropspattern #redhibiscusjumper or submit them to the #dropsfan gallery. Do you need help with this pattern?You'll find 29 tutorial videos, a Comments/Questions area and more by visiting the pattern on garnstudio.com. © 1982-2026 DROPS Design A/S. We reserve all rights. This document, including all its sub-sections, has copyrights. Read more about what you can do with our patterns at the bottom of each pattern on our site. |
|||||||


With over 40 years in knitting and crochet design, DROPS Design offers one of the most extensive collections of free patterns on the internet - translated to 17 languages. As of today we count 324 catalogs and 12291 patterns - 12281 of which are translated into English (US/in).
We work hard to bring you the best knitting and crochet have to offer, inspiration and advice as well as great quality yarns at incredible prices! Would you like to use our patterns for other than personal use? You can read what you are allowed to do in the Copyright text at the bottom of all our patterns. Happy crafting!
Post a comment to pattern DROPS Children 41-5
We would love to hear what you have to say about this pattern!
If you want to leave a question, please make sure you select the correct category in the form below, to speed up the answering process. Required fields are marked *.