
Popular categories
Looking for a yarn?


Comments / Questions (107)
![]() Aletta wrote:
Aletta wrote:
Wat betreft de mouwranden: Moet je 136 steken opnemen wanneer je maat S breit?
20.09.2024 - 21:36DROPS Design answered:
Dag Aletta,
Ja, inderdaad ongeveer 136 steken voor de kleinste maat.
25.09.2024 - 08:42
![]() Jennifer wrote:
Jennifer wrote:
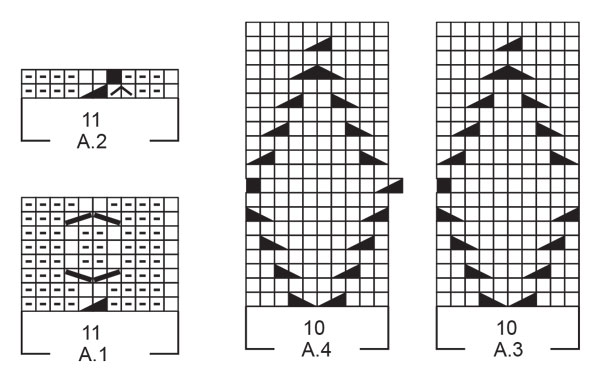
Hej! Fråga om A.1 mönstret. Finns en symbol (svarta V-formade strecken som täcker 4 rutor) som inte står med i beskrivningen. Hur ska man tänka där?
30.07.2024 - 13:44DROPS Design answered:
Hej Jennifer, det er 2 symboler med fletter som kommer efter hinanden :)
02.08.2024 - 10:48
![]() Csilla Balazsik wrote:
Csilla Balazsik wrote:
Gyonyoru melleny, de a mintaleiras hibas es a magyarazaton nem lehet kiigazodni.
06.05.2024 - 12:38
![]() Iris wrote:
Iris wrote:
Wie viele Knäuel Wolle benötige ich für Größe 42 also L
17.03.2024 - 12:12DROPS Design answered:
Liebe Iris, die Garnmenge finden Sie oben beim Kopfteil, so in L brauchen Sie entweder 400 g < a href="https://www.garnstudio.com/yarn.php?show=drops-lima&cid=9">DROPS Lima/50 g das Knäuel = 8 Knäuel oder 400 g DROPS Merino Extra Fine/50 g das Knäuel = 8 Knäuel. Viel Spaß beim Stricken!
18.03.2024 - 10:24
![]() Rachel Hill wrote:
Rachel Hill wrote:
Hi I'm not sure I understand how many stitches to increase in this sentence Now increase 1 purl stitch in approx. every other section with purl stitches. Then work knit over knit and purl over purl until neck edge measures Please could you let me know
29.02.2024 - 16:18DROPS Design answered:
Dear Rachel, it means, work new rib as follows: knit 1, purl 1, knit 1, purl 1 (+ increase). Repeat like this, increasing in every 4th stitch (which should be a purl stitch). On next row/round, the rib should then look as follows: knit1, purl1, knit1, purl2. Happy knitting!
29.02.2024 - 22:23
![]() Roxane wrote:
Roxane wrote:
Is there an error in cast on stitches for size XL? Cast on 137 stitches, 2 garter stitches on both edges, 11 stitch pattern repeat 12 times. My math comes up with 136 stitches. Did I miss something in the pattern? Thank you
12.02.2024 - 21:04DROPS Design answered:
Hi Roxane, You work the first stitch in A.1 at the end of the round, before the last 2 garter stitches. This gives you a stitch count of 137 stitches. Happy knitting!
13.02.2024 - 06:41
![]() Roxane wrote:
Roxane wrote:
Is there an error in cast on stitches for size XL? Cast on 137 stitches, 2 garter stitches on both edges, 11 stitch pattern repeat 12 times. My math comes up with 136 stitches. Did I miss something in the pattern? Thank you
12.02.2024 - 20:36DROPS Design answered:
Dear Roxane, work the 137 stitches as follows: 2 sts in garter stitch, repeat the 11 sts in A.1 a total of 12 times (= over the next 132 sts), then work the first stitch in A.1 (so that the pattern is symmetrical) and finish with 2 edge stitches in garter stitch = 2+132+1+2=137 stitches. Happy knitting!
13.02.2024 - 08:25
![]() Lévai Barbara wrote:
Lévai Barbara wrote:
Üdv! Magyar nyelven nem elérhető a minta és a minta lmagyarázata
09.11.2023 - 13:55
![]() Tiina wrote:
Tiina wrote:
Olen neulomassa Diamond sky- liiviä. Ohjeen ruutupiirroksessa on musta ruutu, joka tarkoittaa "tämä silmukka kavennettu pois työstä, siirry seuraavaan merkkiin". Mutta kun se silmukka on siinä puikolla, mitä teen sille? Neulonko oikein vai nostanko? Tämä esiintyy ruutupiirroksessa A.2 ,A.3 ja A.4
28.09.2023 - 00:44DROPS Design answered:
Hei, tässä tarkoitetaan vain ruutupiirroksessa olevaa silmukkaa. Eli puikon seuraava silmukka neulotaan mustan ruudun jälkeisen ruudun mukaan.
02.10.2023 - 17:26
![]() Marleen Buckens wrote:
Marleen Buckens wrote:
In het patroon staat meerder 1 steek in elk ander deel . Hoe doe je dat wand ik begrijp dat niet
05.08.2023 - 00:34DROPS Design answered:
Dag Marleen,
Je bent boordsteek aan het breien in 1 recht, 1 averecht en als je meerdert, meerder je bij de ene averecht wel en de andere averecht niet. De boordsteek ziet er dan zo uit: 1 recht, 1 averecht, 1 recht, 2 averecht.
05.08.2023 - 07:30
|
|||||||||||||||||||||||||
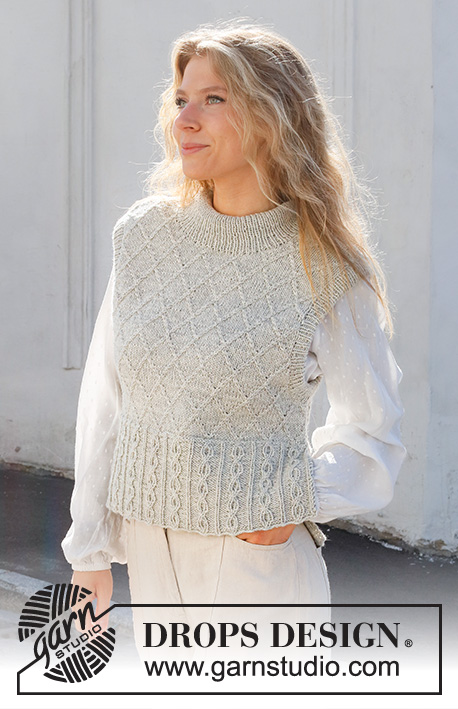
Diamond Sky#diamondskyslipover |
|||||||||||||||||||||||||
 |
 |
||||||||||||||||||||||||
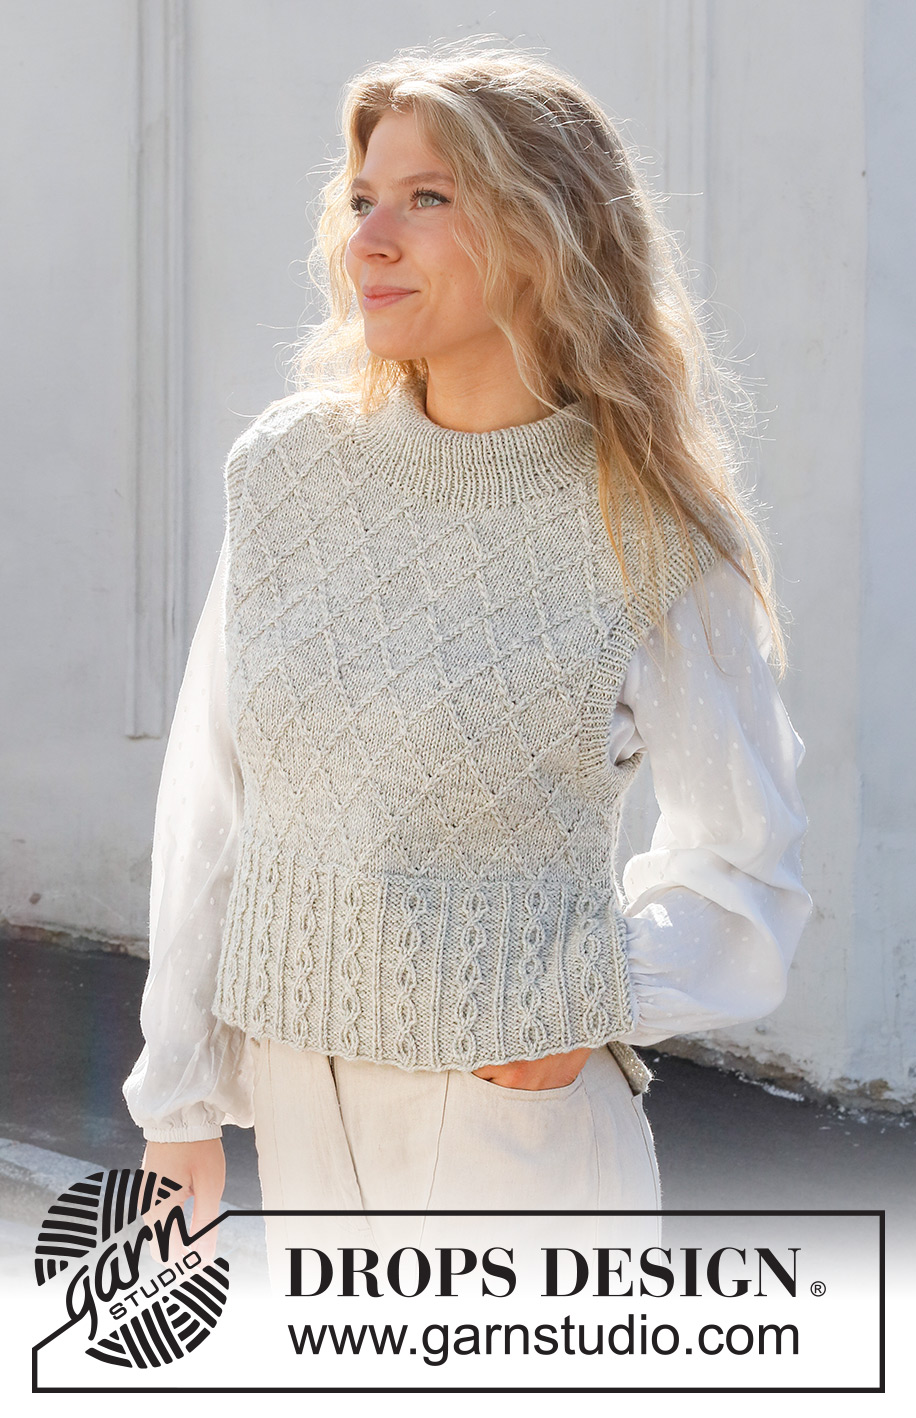
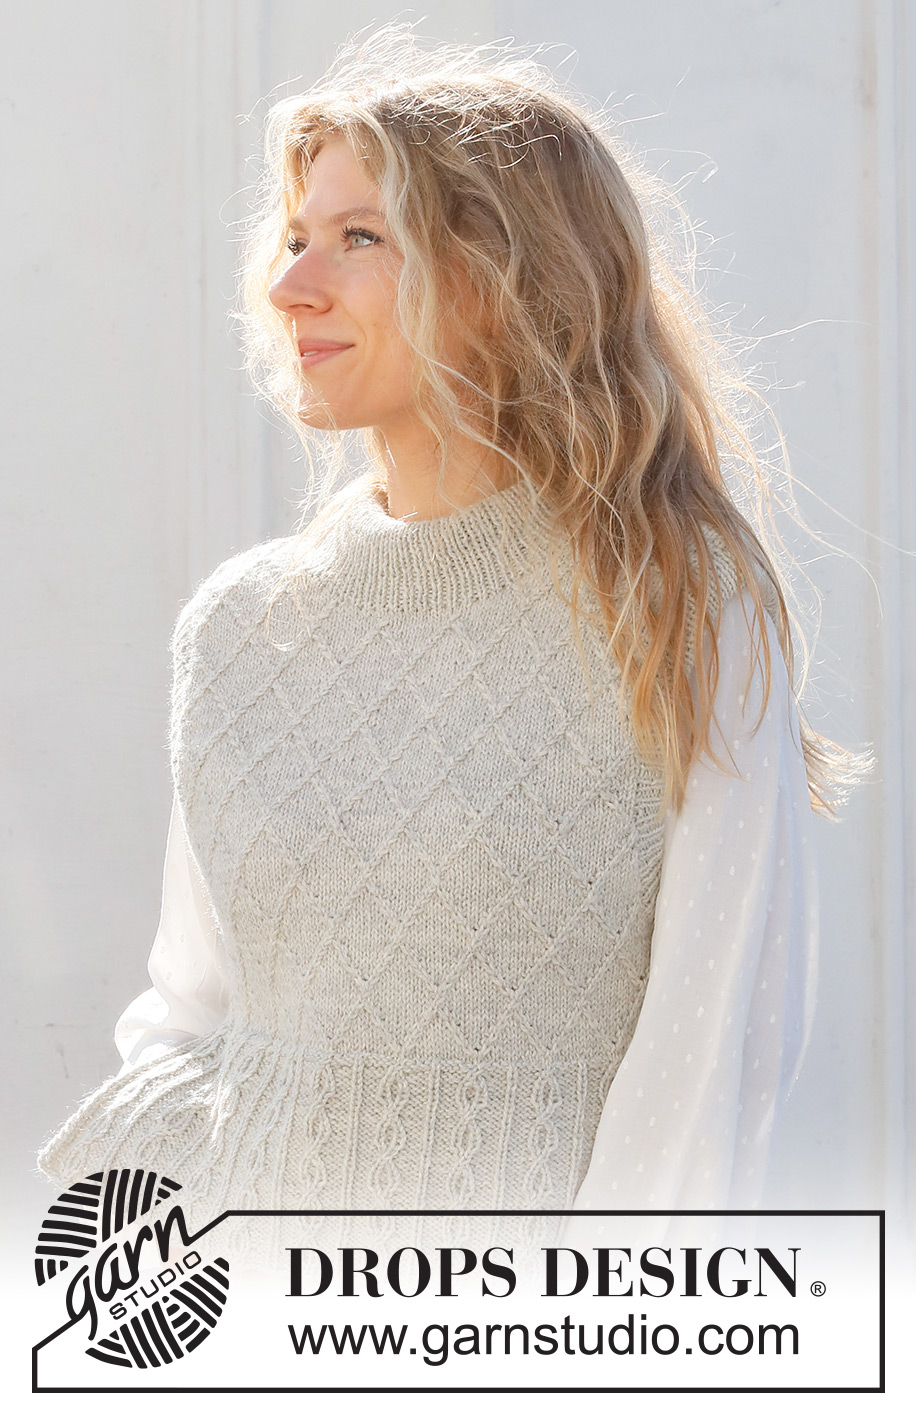
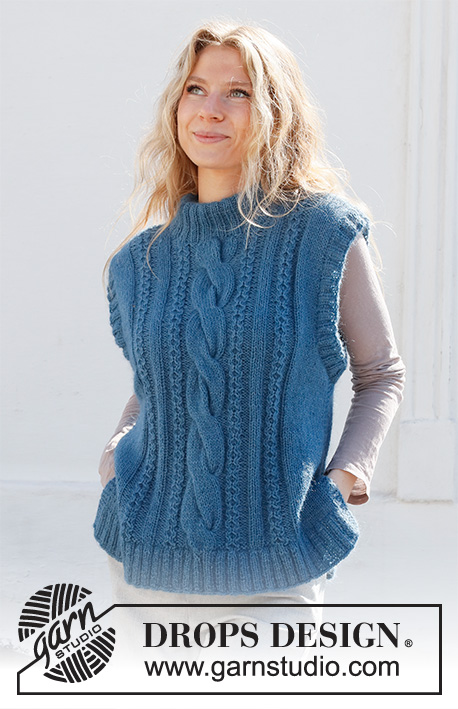
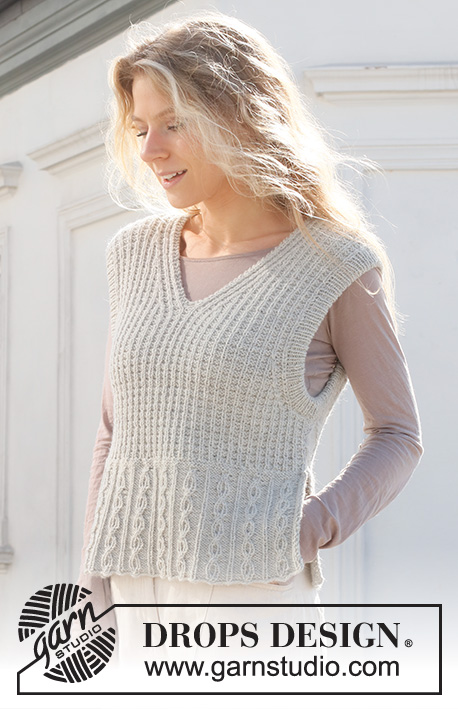
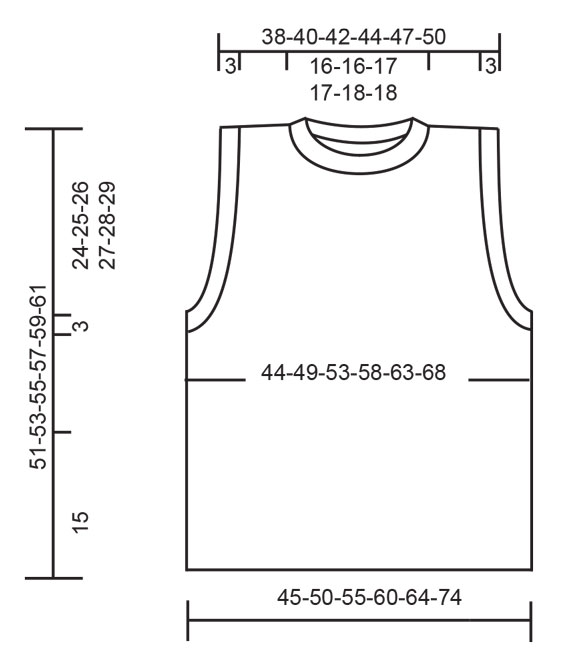
Knitted vest in DROPS Lima or DROPS Merino Extra Fine. Piece is knitted with cables, textured pattern, double neck edge and sleeve edges. Size: S - XXXL
DROPS 228-8 |
|||||||||||||||||||||||||
|
---------------------------------------------------------- EXPLANATION FOR THE PATTERN: ---------------------------------------------------------- GARTER STITCH (back and forth): Knit all rows. 1 ridge vertically = knit 2 rows. PATTERN: See diagrams A.1 to A.4. Diagrams show all rows in pattern seen from the right side. BIND-OFF TIP: To avoid a tight bind-off edge when binding off, you may use a larger needle. If this still is too tight make 1 yarn over after approx. every 4th stitch while binding off (bind off yarn overs as stitches). ---------------------------------------------------------- START THE PIECE HERE: ---------------------------------------------------------- VEST – SHORT SUMMARY OF PIECE: Work front and back piece back and forth in 2 parts. Then assemble the piece at the shoulder seems and sew the side seams. Finish with a double neck edge and sleeve edges in the round on a circular needle. BACK PIECE: Cast on 104-115-126-137-148-159 stitches (including 2 edge stitches in each side) on circular needle size 4 MM = US 6 with DROPS Lima or DROPS Merino Extra Fine. Purl 1 row from wrong side. Then work pattern as follows: 2 edge stitches in GARTER STITCH – read explanation above, A.1 over the next 99-110-121-132-143-154 stitches (= 9-10-11-12-13-14 repetitions of 11 stitches), work first stitch in A.1, 2 edge stitches in garter stitch. Continue back and forth until A.1 has been worked 5 times vertically. REMEMBER THE KNITTING GAUGE. Work next row as follows: Knit 2 together (= 1 stitch decreased), work A.2 over every repetition of A.1 (1 stitch is decreased in each repetition A.2 = 9-10-11-12-13-14 stitches decreased), knit the next 3 together (= 2 stitches decreased), cast on 1 stitch at the end of row (= edge stitch). Turn and work 1 edge stitch in garter stitch, purl 1, work A.2 until 1 stitch remains, purl 1, cast on 1 stitch at the end of row (= 1 edge stitch in garter stitch) = 94-104-114-124-134-144 stitches on needle and piece measures approx. 15 cm = 6". Now work pattern as follows: 1 edge stitch in garter stitch, 1 stitch in stockinette stitch, A.3 over the next 10 stitches, A.4 over the next 80-90-100-110-120-130 stitches (= 8-9-10-11-12-13 repetitions of 10 stitches), work 1 stitch in stockinette stitch, and finish with 1 edge stitch in garter stitch. Continue back and forth like this. On 9th row in A.4 knit 1 when last repetition is finished. When piece measures 24-25-26-27-28-29 cm = 9½"-9¾"-10¼"-10⅝"-11"-11⅜", bind off 6-6-9-9-12-12 stitches for armholes at the beginning of the next 2 rows. Then bind off stitches in each side (bind off stitches at the beginning of the row) as follows: Bind off 2 stitches on every other row 1-2-2-2-2-2 times, then bind off 1 stitch on every other row 1-1-1-3-3-5 times and finally 1 stitch every 4th row 4-5-5-6-5-5 times = 68-72-76-80-86-92 stitches. Continue to work until piece measures 49-51-53-55-57-59 cm = 19¼"-20"-21"-21⅝"-22½"-23¼". Now bind off the middle 32-32-34-34-36-36 stitches for neck and finish each shoulder separately. Then bind off 1 stitch on next row from the neck = 17-19-20-22-24-27 stitches remain on each shoulder. Now finish each shoulder separately. Continue to work until piece measures 51-53-55-57-59-61 cm = 20"-21"-21⅝"-22½"-23¼"-24". Bind off knitting from right side. Work the other shoulder the same way. FRONT PIECE: Cast on and work as on back piece until piece measures 43-45-46-48-49-51 cm = 17"-17¾"-18"-19"-19¼"-20". Now slip the middle 16-16-18-18-20-20 stitches on a stitch holder and finish each shoulder separately. Then bind off stitches on every row from neck as follows: Bind off 3 stitches 1 time, 2 stitches 2 times and 1 stitch 2 times = 17-19-20-22-24-27 stitches remain for shoulder. Bind off when piece measures 51-53-55-57-59-61 cm = 20"-21"-21⅝"-22½"-23¼"-24". Work the other shoulder the same way. ASSEMBLY: Sew the shoulder seams. Sew side seam from armholes and down to where 1 edge stitch was cast on in each side (= approx. 15 cm = 6" vent). DOUBLE SLEEVE EDGES: Begin mid under sleeve in side seam and pick up approx. 136 to 162 stitch around armhole with circular needle size 3 MM = US 2.5 and DROPS Lima or DROPS Merino Extra Fine. Number of stitches must be divisible by 2. Work rib in the round (= knit 1/purl 1) for 6 cm = 2⅜". Bind off – read BIND-OFF TIP. Fold the rib around sleeves on inside of garment. Fasten rib to get a double sleeve edge. To avoid a tight sleeve edge that sticks out it is important to keep the seam elastic. DOUBLE NECK EDGE: Pick up from right side approx. 100 to 116 stitches (including stitch on stitch holder) inside 1 edge stitch around the neck on circular needle size 3 MM = US 2.5 with DROPS Lima or DROPS Merino Extra Fine. Number of stitches must be divisible by 2. Work rib in the round (= knit 1/purl 1) for 10 cm = 4". Now increase 1 purl stitch in approx. every other section with purl stitches. Then work knit over knit and purl over purl until neck edge measures 14 cm = 5½". Bind off stitches with knit over knit and purl over purl - make sure to avoid a tight neck edge - remember BIND-OFF TIP. Fold rib at the top of neck down on inside of garment. Fasten rib to get a double neck edge. To avoid a tight neck edge that sticks out it is important to keep the seam elastic. |
|||||||||||||||||||||||||
Diagram explanations |
|||||||||||||||||||||||||
|
|||||||||||||||||||||||||
 |
|||||||||||||||||||||||||
 |
|||||||||||||||||||||||||
Have you finished this pattern?Tag your pictures with #dropspattern #diamondskyslipover or submit them to the #dropsfan gallery. Do you need help with this pattern?You'll find 31 tutorial videos, a Comments/Questions area and more by visiting the pattern on garnstudio.com. © 1982-2026 DROPS Design A/S. We reserve all rights. This document, including all its sub-sections, has copyrights. Read more about what you can do with our patterns at the bottom of each pattern on our site. |
|||||||||||||||||||||||||


With over 40 years in knitting and crochet design, DROPS Design offers one of the most extensive collections of free patterns on the internet - translated to 17 languages. As of today we count 325 catalogs and 12298 patterns - 12288 of which are translated into English (US/in).
We work hard to bring you the best knitting and crochet have to offer, inspiration and advice as well as great quality yarns at incredible prices! Would you like to use our patterns for other than personal use? You can read what you are allowed to do in the Copyright text at the bottom of all our patterns. Happy crafting!
Post a comment to pattern DROPS 228-8
We would love to hear what you have to say about this pattern!
If you want to leave a question, please make sure you select the correct category in the form below, to speed up the answering process. Required fields are marked *.