


Komentáře / Otázky (32)
![]() Ellen napsala:
Ellen napsala:
Er nesten ferdig med å strikke Lamb Dance jakke i størrelse 11/12. Har en halv arm igjen og garnet strekker ikke til. I mønsteret står det 300 g med fargen med fargen pistasj som er forlite. Det må våre 350 g. Vennligst rett opp. Er spent på om det er mulig å finne garnet med samme fargnings nummer.
05.02.2025 - 13:29
![]() Ellen napsala:
Ellen napsala:
Str. 11/12. Strikket mønster i 18 omganger. Har 211 m. med mønster+riller. Startet 18.omg. med A2 1m+A2 med 5m blå, 5m hvit,5m blå osv. Avlutter med 5m hvit som ikke stemmer med mønsteret. Får 1/2 sau på venstre side. Er dette feil? Ser ut som at maskeantallet er riktig.
05.01.2025 - 14:14Odpověď DROPS Design :
Hei Ellen. Ser ut som du har feil maskeantall. Du startet med 109 masker når du starter med diagram A.1/A.2. Da strikkes det 5 stolpemasker + A.1 (7 masker x 14 ganger) + A.2 (1 maske) + 5 stolpemasker = 109 masker. Når du har strikket 18 pinner av diagrammet har du økt 8 masker pr gang du har strikket diagrammet (14 x 8 = 112 masker + 109 masker = 221 masker. Da skal du få "hele" sauer omgangen rundt. mvh DROPS Design
07.01.2025 - 15:41
![]() Ellen napsala:
Ellen napsala:
Ønsker å strikke denne jakken, men finner ikke fargen 17 cerise. Kan dere foreslå en annet alternativ farge?
13.11.2024 - 13:00Odpověď DROPS Design :
Hei Ellen, Du kunne kjøpe nr 25 rosa, eller for en sterkere kontrast nr 34 lyng. God fornøyelse!
14.11.2024 - 07:10
![]() Richtje Wijnen napsala:
Richtje Wijnen napsala:
Wat voegt telpatroon A2 toe? Ik snap dat niet.
14.04.2024 - 11:41Odpověď DROPS Design :
Dag Richtje,
Patroon A.2 is toegevoegd om het patroon symmetrisch te maken bij de sluiting voor.
15.04.2024 - 21:22
![]() Yvonne Johansson napsala:
Yvonne Johansson napsala:
Kan man sticka denna kofta i något av era bomullsgarn?
02.01.2024 - 18:30Odpověď DROPS Design :
Hej Yvonne, ja, du kan sticka den i DROPS Muskat och DROPS Cotton Light och DROPS Cotton Merino - testa garnkalkulatorn för att se hur mycket du behöver i din storlek :)
03.01.2024 - 07:58
![]() Margriet Sijm napsala:
Margriet Sijm napsala:
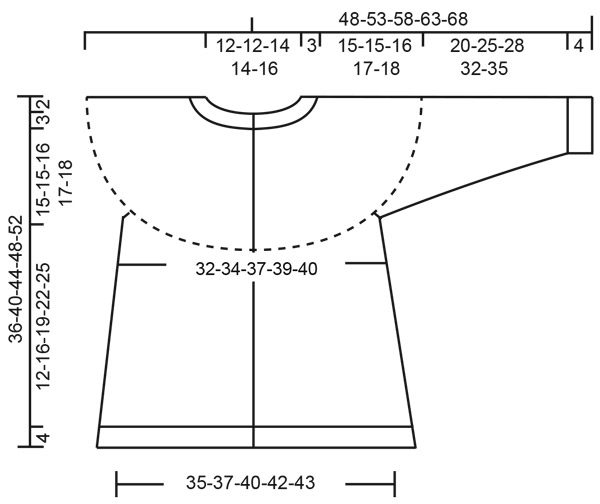
Patroon Lambs Dance, Wat betekent een omstreek verhouding? Ik brei nu het pasje, ik kom niet uit het aantal steken, ik ben nu bij pen 31, patroon A1,maat 146/152 , ik heb nu 222 steken, nog 2 x meerderen, dan kom ik aan het einde van de pas niet aan het 292 steken. Wat gaat er verkeerd? Graag reactie. Vriendelijke groet, Margriet S.
15.11.2023 - 16:20Odpověď DROPS Design :
Dag Margriet,
A.1 heeft op het eind 20 steken in de breedte en omdat je A.1 14 keer in de breedte herhaalt heb je 280 steken, plus de steek van A.2 en de 5 voorbiessteken aan elke kant = 299 steken. Wanneer je nog 2 keer meerderingen moet maken zou je 263 steken op de naald moeten hebben. Waarschijnlijk is er ergens iets mis gegaan... Het is jammer dat ik niet mee kan kijken vanaf hier. Misschien heb je een ander aantal herhalingen?
18.11.2023 - 15:03
![]() Jaroslava Hudrlíková napsala:
Jaroslava Hudrlíková napsala:
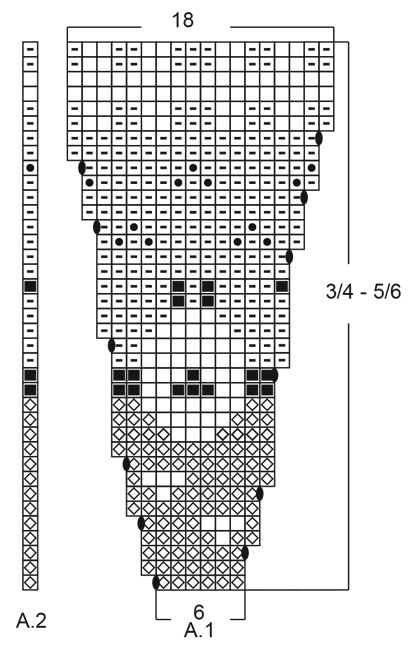
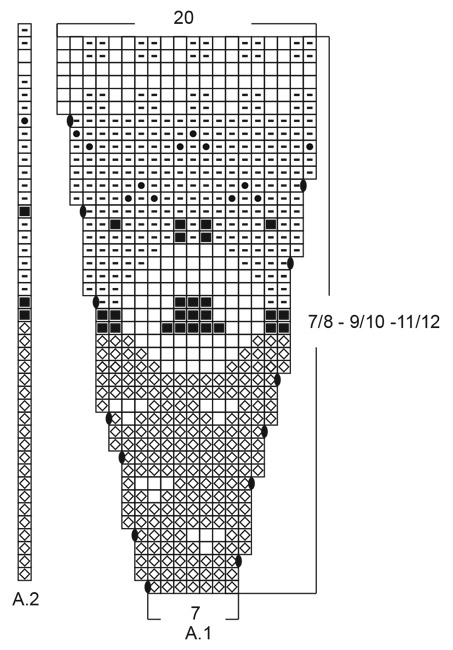
Nerozumím tomu pletení vzoru dle nákresu. Mezi jednotlivými 7 oky je kolik ok než pokračuji znova 7mi okami. Děkuji.
03.07.2023 - 17:31
![]() Marianne Verduin napsala:
Marianne Verduin napsala:
Bij het telpatroon: zijn daar alleen de naalden aan de goede kant aangegeven of de heen en weer naalden?
27.10.2022 - 09:24Odpověď DROPS Design :
Dag Marianne,
In de telpatronen zijn altijd alle naalden weergegeven, dus zowel de heengaande als de teruggaande naalden.
27.10.2022 - 20:47
![]() Marianne Verduin napsala:
Marianne Verduin napsala:
Waar vind ik telpatroon A2?
25.10.2022 - 20:04Odpověď DROPS Design :
Dag Marianne,
Deze staat naast telpatroon A.1 en is 1 steek breed.
26.10.2022 - 08:39
![]() Cathy Dicharrry napsala:
Cathy Dicharrry napsala:
J'ai fait le même modèle 3 fois, 1fois en taille 9/10 et 2 fois en taille 5/6 ans. Je trouve que les augmentations ne sont pas bien réparties, pas régulières donc l'allure du gilet est un peu bizarre... Dommage ! Je joins une photo de l'un d'entre eux...
14.10.2022 - 12:44
|
|||||||||||||||||||
Lamb Dance#lambdancecardigan |
|||||||||||||||||||
 |
 |
||||||||||||||||||
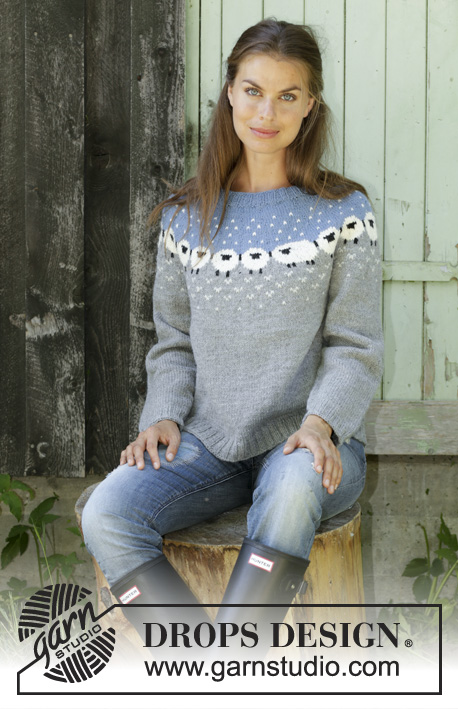
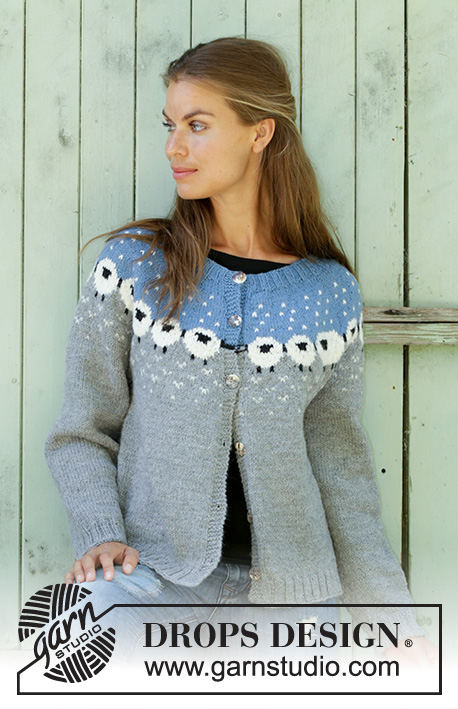
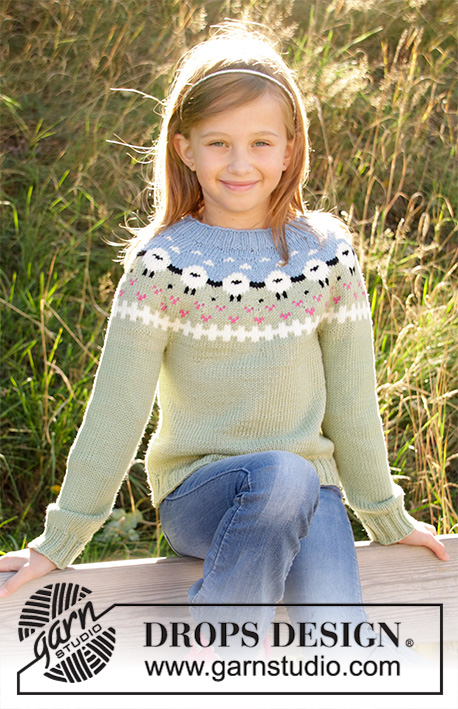
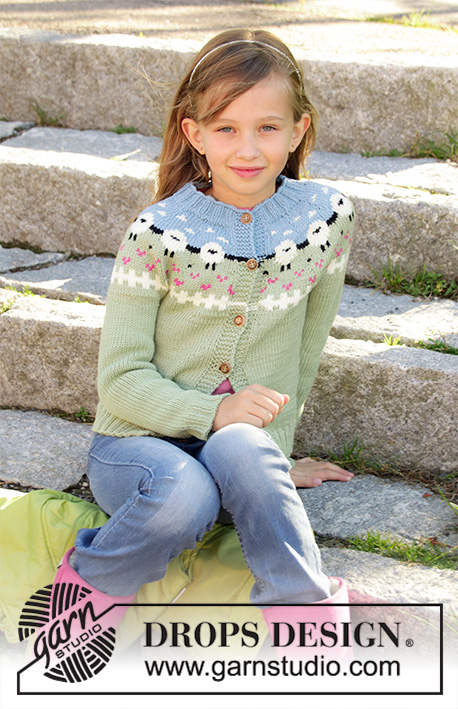
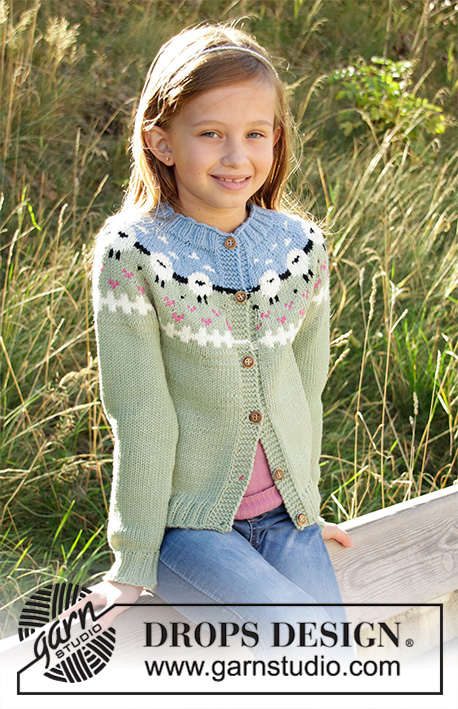
Dětský propínací svetr s norským vzorem s ovečkami pletený shora dolů z příze DROPS Merino Extra Fine nebo DROPS Lima. Velikost 3-12 let
DROPS Children 34-1 |
|||||||||||||||||||
|
---------------------------------------------------------- VYSVĚTLIVKY: ---------------------------------------------------------- VZOR: Viz schémata A.1 a A.2. Zvolte si schéma pro požadovanou velikost. Zobrazeny jsou všechny řady vzoru nahlížené z lícové strany. TIP – UJÍMÁNÍ/PŘIDÁVÁNÍ: Abychom vypočítali, v jakých rozestupech musíme ujímat/přidávat, odečteme od celkového počtu ok v řadě (např. 84 ok) oka obou lég (tj.10 ok) a zbytek vydělíme počtem ok, která potřebujeme ujmout/přidat (tj. 7), takže 84 – 10 = 74 : 7 = 10,5. V tomto případě tedy spleteme dohromady střídavě každé 9. a 10. oko a každé 10. a 11. oko. Pokud přidáváme, tak 1x nahodíme střídavě za každým 10. a 11. okem; v následující řadě pleteme nahození za zadní nit, aby se v pletenině netvořily dírky. Přidáváme mimo oka obou lég. TIP – PŘIDÁVÁNÍ (boky): Přidáváme na obou stranách každé značky, takto – začínáme 1 oko před značkou: 1x nahodíme, 2 oka upleteme hladce (značka leží mezi nimi), 1x nahodíme = přidali jsme 2 oka. V následující řadě pleteme nahození za zadní nit, aby se v pletenině netvořily dírky. Nová oka pak pleteme lícovým žerzejem. TIP - UJÍMÁNÍ (rukávy): Na každé straně značky ujmeme 1 oko, takto - začínáme 3 oka před značkou: 2 oka spleteme hladce, 2 oka upleteme hladce (značka leží mezi nimi), 1 oko sejmeme hladce, 1 oko upleteme hladce a sejmuté přes ně přetáhneme (= ujmuli jsme 2 oka). KNOFLÍKOVÉ DÍRKY: Knoflíkové dírky vyplétáme v léze pravého předního dílu (na svetr se díváme, jako by byl oblečený). 1 dírka = začínáme z rubové strany: spleteme hladce 2. a 3. oko od předního okraje, 1x nahodíme. V následující řadě pleteme nahození hladce – vznikne dírka. První knoflíkovou dírku vypleteme ve výši 2 cm (tj. v lemu průkrčníku). Každou z dalších 5-5-6-6-6 dírek pak vyplétáme vždy po 6-7-6,5-7-8 cm výšky. ------------------------------------------------------- POPIS PRÁCE: ------------------------------------------------------- SVETR - JAK BUDEME POSTUPOVAT: Pleteme v řadách na kruhové jehlici, od předního okraje jedné légy k okraji druhé, shora dolů. Rukávy pleteme v kruhových řadách na ponožkových jehlicích/krátké kruhové jehlici. SEDLO: Na kruhovou jehlici č.3 nahodíme světlou šedomodrou přízí 84-88-102-106-114 ok (včetně 5 ok légy na každé straně) a upleteme 1 rubovou řadu obrace. Následující lícovou řadu pleteme takto: 5 ok légy VROUBKOVÝM VZOREM – viz výše, *2 oka hladce, 2 obrace*, *-* opakujeme až po posledních 7 ok, 2 oka upleteme hladce a 5 ok légy vroubkovým vzorem. V tomto rozvržení upleteme pružným vzorem 3 cm výšky – končíme lícovou řadou (= lem průkrčníku). Pamatujeme na vyplétání KNOFLÍKOVÝCH DÍREK v pravé léze – viz výše. Pleteninu převedeme na kruhovou jehlici č.4. Pak upleteme 1 rubovou řadu obrace a SOUČASNĚ ujmeme rovnoměrně 7-5-7-4-5 ok - viz TIP – UJÍMÁNÍ/PŘIDÁVÁNÍ = 77-83-95-102-109 ok. Pak začneme plést vzor, takto – začínáme lícovou řadou: 5 ok légy vroubkovým vzorem, vzor A.1 – sekvenci vzoru opakujeme až po posledních 6 ok v řadě – POZN.: zvolte si schéma pro požadovanou velikost (= 11-12-12-13-14 sekvencí vzoru po 6-6-7-7-7 okách), pak vzor A.2 (= 1 oko) a končíme 5 oky légy vroubkovým vzorem. V tomto rozvržení vzoru pokračujeme a přidáváme podle schématu. Po dokončení 1 celé sekvence vzoru A.1 a A.2 (na výšku) máme na jehlici 209-227-251-271-291 ok. Pokračujeme pistáciovou přízí. Následující lícovou řadu upleteme lícovým žerzejem a (5 ok légy na každé straně pleteme dál vroubkovým vzorem) a SOUČASNĚ přidáme rovnoměrně 13-11-5-1-1 ok = na jehlici máme 222-238-256-272-292 ok. Pleteme lícovým žerzejem s 5 oky légy vroubkovým vzorem na každé straně až do výše asi 15-15-16-17-18 cm od pružného lemu. Pak pleteninu rozdělíme na rukávy a trup a ty dokončíme odděleně – začínáme lícovou řadou: 5 ok légy vroubkovým vzorem, 31-33-36-36-37 ok lícovým žerzejem (= přední díl), následujících 44-48-51-54-62 ok odložíme na pomocnou jehlici (= rukáv), nahodíme 6 nových ok (= podpaží), 62-66-72-82-84 ok upleteme lícovým žerzejem (= zadní díl), dalších 44-48-51-54-62 ok odložíme na pomocnou jehlici (= rukáv), nahodíme 6 nových ok (= podpaží), 31-33-36-36-37 ok upleteme lícovým žerzejem a končíme 5 oky légy vroubkovým vzorem (= přední díl). TRUP: Na jehlici máme 146-154-166-176-180 ok. NYNÍ MĚŘÍME DÍL OD TOHOTO MÍSTA! Doprostřed 6 nových ok na každé straně (= v podpaží) vložíme značku (= označuje boky svetru). Pokračujeme v řadách lícovým žerzejem s 5 oky légy vroubkovým vzorem na každé straně. Ve výši 3 cm přidáme na obou stranách obou značek 1 oko (= přidáme celkem 4 oka v řadě) – viz TIP – PŘIDÁVÁNÍ. Toto přidávání opakujeme vždy po 3-4-5-6-7 cm výšky, celkem 3x = 158-166-178-188-192 ok. Pak pokračujeme v pletení až do výše asi 12-16-19-22-25 cm. Upleteme 1 lícovou řadu a SOUČASNĚ přidáme rovnoměrně 10-6-6-8-12 ok (přidáváme mimo obě légy) = 168-172-184-196-204 ok. Pleteninu převedeme na kruhovou jehlici č.3 a následující rubovou řadu pleteme takto: 5 ok légy vroubkovým vzorem, 2 oka obrace, pak pružným vzorem 2/2 (= střídáme 2 oka hladce, 2 obrace) až po posledních 5 ok, končíme 5 oky légy vroubkovým vzorem (nahození pleteme za zadní nit, aby se v pletenině netvořily dírky). Další lícovou řadu pak pleteme takto: 5 ok légy vroubkovým vzorem, 2 oka hladce, *2 oka obrace, 2 oka hladce*, *-* opakujeme až po posledních 5 ok, končíme 5 oky légy vroubkovým vzorem. Když je pružný lem vysoký 4 cm, všechna oka z lícové strany volně dle vzoru uzavřeme. Přízi odstřihneme a konce zapošijeme. RUKÁV: Odložená oka jednoho rukávu vrátíme z pomocné jehlice zpět na krátkou kruhovou jehlici/ponožkové jehlice č.4 (= 44-48-51-54-62 ok) a navíc k nim nabereme po 1 oku z každého ze 6 nových ok v podpaží (= 50-54-57-60-68 ok). Doprostřed těchto 6 nově nabraných ok vložíme značku – kruhová řada začíná zde. Pleteme v kruhových řadách lícovým žerzejem. Když je díl vysoký 2 cm, ujmeme 1 oko na každé straně značky - viz TIP - UJÍMÁNÍ! Pokračujeme v pletení lícovým žerzejem a ujímání opakujeme vždy po 4-3,5-4-4-3,5 cm výšky, ujmeme celkem 5-7-7-8-10x = na jehlicích máme 40-40-43-44-48 ok. Pleteme lícovým žerzejem až do výše 21-26-29-33-36 cm. Pak upleteme 1 kruhovou řadu hladce a SOUČASNĚ přidáme rovnoměrně 4-4-5-4-4 ok = 44-44-48-48-52 ok. Pleteninu převedeme na ponožkové jehlice č.3. Pleteme v kruhových řadách lem pružným vzorem 2/2. Když je lem vysoký 4 cm, všechna oka volně dle vzoru uzavřeme. Přízi odstřihneme a konce zapošijeme. Stejným způsobem upleteme i druhý rukáv. DOKONČENÍ: Na levou légu přišijeme knoflíky. |
|||||||||||||||||||
Vysvětlivky ke schématu |
|||||||||||||||||||
|
|||||||||||||||||||
|
|||||||||||||||||||
|
|||||||||||||||||||
|
|||||||||||||||||||
Dokončili jste tento model?Pak označte své fotky tagem #dropspattern #lambdancecardigan nebo je pošlete do galerie #dropsfan. Potřebujete s tímto návodem poradit?Otevřete-li si návod na stránce garnstudio.com, najdete tam 27 výukových video-ukázek, Komentáře/Dotazy a další užitečné informace. © 1982-2025 DROPS Design A/S. Vyhrazujeme si veškerá práva. Tento dokument, včetně všech jeho dílčích částí, podléhá autorským právům. Podrobnější komentář k možnostem užití našich návodů najdete dole pod každým návodem na našich stránkách. |
|||||||||||||||||||


V oblasti pletené a háčkované módy působí DROPS Design více než 40 let. Díky tomu vám můžeme nabídnout jednu z nejrozsáhlejších kolekcí modelů s bezplatnými návody dostupnými na internetu - navíc v 17 jazycích. K dnešnímu dni máme na 314 katalogů a 11822 návodů celkem - z nich je už 7048 dostupných v [češtině].
Přidejte komentář k návodu DROPS Children 34-1
Rádi bychom věděli, co si o tomto modelu myslíte!
Pokud se chcete na něco zeptat, dbejte prosím na to, abyste ve formuláři níže vybrali správnou kategorii - díky tomu se dříve dozvíte, co potřebujete vědět. Povinná pole jsou označena *.