
Popular categories
Looking for a yarn?


|
||||||||||||||||||||||
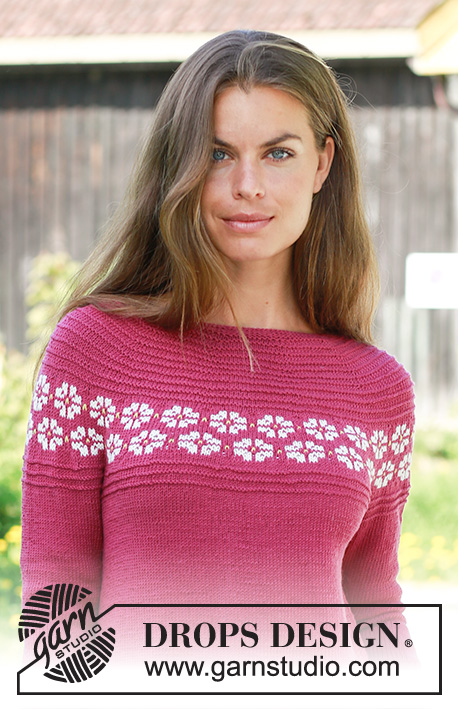
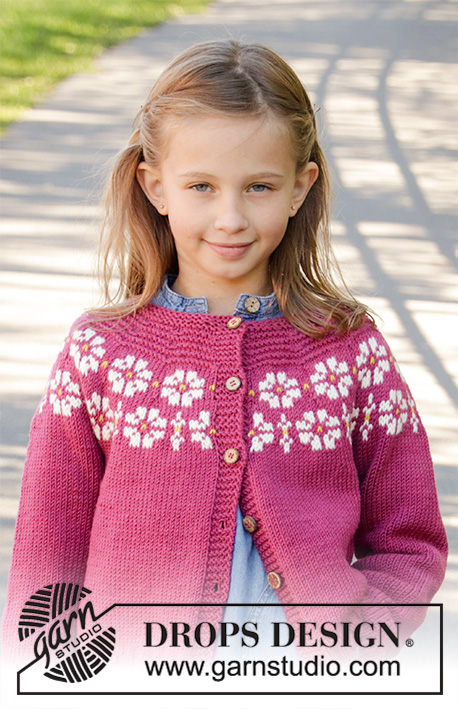
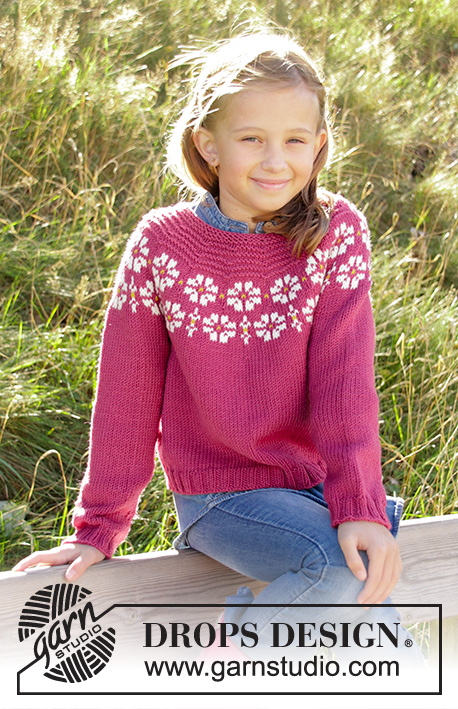
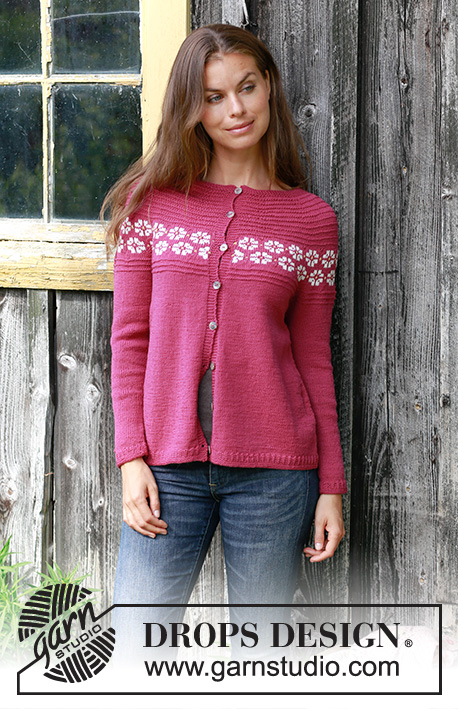
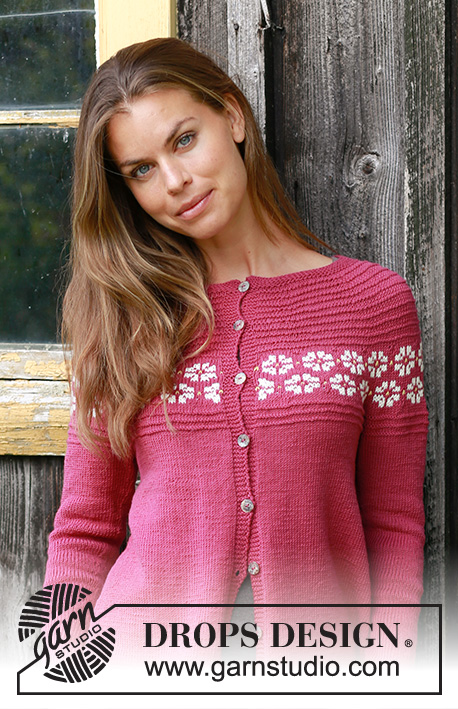
Daisy Delight Cardigan |
||||||||||||||||||||||
 |
 |
|||||||||||||||||||||
Knitted jacket with round yoke in DROPS BabyMerino. Piece is knitted top down with Nordic pattern and garter stitch. Size: S - XXXL
DROPS 196-3 |
||||||||||||||||||||||
|
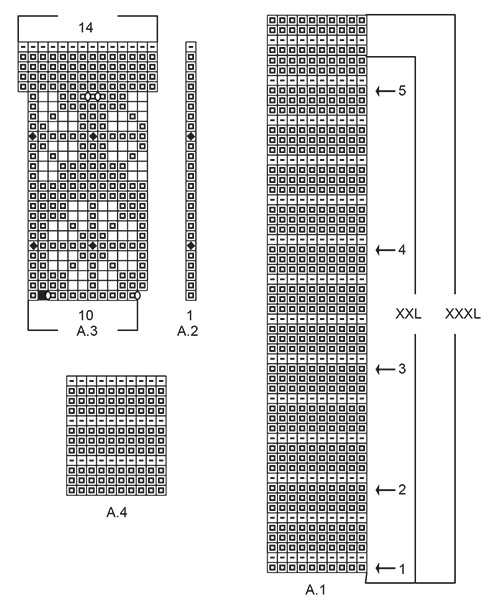
---------------------------------------------------------- EXPLANATION FOR THE PATTERN: ---------------------------------------------------------- GARTER STITCH (worked in the round): 1 ridge = 2 rounds. Knit 1 round and purl 1 round. GARTER STITCH (back and forth): 1 ridge = knit 2 rows. PATTERN: See diagrams A.1 to A.4. Choose diagram for your size (applies to A.1). Diagrams show all rows in pattern seen from the right side. KNITTING TIP: To avoid the garment losing elasticity when working pattern, it is important not to tighten the strands on back side of piece. Switch to a higher needle number when working pattern if the pattern is somewhat tight. INCREASE TIP-1 (evenly): To calculate how to increase evenly, use the total number of stitches on row (e.g. 116 stitches), minus bands (= 5 stitches in each side of piece = 10 stitches) and divide stitches by number of increases to be done (e.g. 5) = 21.2. In this example increase by making 1 yarn over after approx. every 21st stitch. On next row work yarn overs twisted to avoid holes. INCREASE TIP-2 (applies to sides of body): All increases are done from the right side. Work until 8 stitches remain before marker thread, make 1 yarn over, knit 16 (marker thread is in the middle of these stitches), make 1 yarn over. On next row purl yarn over twisted to avoid hole. ELEVATION: Insert 1 marker thread in the middle stitch on needle (= mid back). Begin from right side with plum and work in stockinette stitch until 8-8-8-9-9-10 stitches have been worked past marker, turn, tighten yarn and work 16-16-16-18-18-20 stitches in stockinette stitch. Turn, tighten yarn and work 24-24-24-27-27-30 stitches in stockinette stitch, turn, tighten yarn and work in stockinette stitch until 5 stitches remain on needle, 5 band stitches in garter stitch. Work 1 row from wrong side. RAGLAN: All increases are done from the right side. Increase 1 stitch on each side of every marker thread (= 8 stitches increased on round): Work until 1 stitch remains before marker thread, make 1 yarn over, knit 2 (marker thread is between these stitches), make 1 yarn over. Repeat at the other marker threads. On next row work yarn overs twisted to avoid holes DECREASE TIP (applies to sleeves): Decrease 1 stitch on each side of marker thread as follows: Work until 3 stitches remain before marker thread and knit 2 together, knit 2 (marker thread is between these stitches), slip 1 stitch knitwise, knit 1, pass slipped stitch over stitch worked. BUTTONHOLES: Decrease for buttonholes on right band (when garment is worn). 1 BUTTONHOLE = work from right side until 3 stitches remain on needle, make 1 yarn over, knit 2 together and finish by knitting 1. On next row (wrong side) knit the yarn over to make a hole. Decrease first buttonhole when neck edge measures 1½-2 cm. Then decrease the next 7-7-7-8-8-8 buttonholes, approx. 7 cm / 2¾" apart. ---------------------------------------------------------- START THE PIECE HERE: ---------------------------------------------------------- JACKET - SHORT OVERVIEW OF THE PIECE: Worked back and forth on circular needle, top down. Work sleeves in the round on double pointed needles/a short circular needle. NECK EDGE: Cast on 116-120-125-135-140-144 stitches on circular needle size 2.5 mm / US 1.5 with plum. Work 5 ridges in GARTER STITCH - read explanation above. Decrease for BUTTONHOLES on right band - read explanation above. YOKE: Switch to circular needle size 3 mm / US 2.5. Work next row as follows from right side: 5 band stitches in garter stitch, stockinette stitch until 5 stitches remain on needle, AT THE SAME TIME increase 5-11-16-16-21-27 stitches evenly – read INCREASE TIP-1, 5 band stitches in garter stitch = 121-131-141-151-161-171 stitches. Work 1 row from wrong side. For better fit work an elevation at the back of neck so that yoke is somewhat higher on back piece. This elevation can be skipped, to make the neck the same at the front and back - read ELEVATION. Insert 9-10-10-10-11-11 marker threads in piece without working as follows: Insert first marker thread after 12-11-12-12-10-10 stitches, insert each of the next 8-9-9-9-10-10 marker threads after 12-12-13-14-14-15 stitches, 13-12-12-13-11-11 stitches remain on row after last marker thread. Move the marker threads upwards when working. Now work pattern A.1 (choose diagram for your size) – read KNITTING TIP, with 5 band stitches in garter stitch in each side, AT THE SAME TIME on every row with arrow in diagram increase on each side of marker threads as follows: REMEMBER THE GAUGE! ARROW-1: Increase 1 stitch on each side of every marker thread (= 18-20-20-20-22-22 stitches increased) = 139-151-161-171-183-193 stitches. ARROW-2: Increase 1 stitch on each side of every marker thread (= 18-20-20-20-22-22 stitches increased) = 157-171-181-191-205-215 stitches. ARROW-3: Increase 1 stitch on each side of every marker thread (= 18-20-20-20-22-22 stitches increased) = 175-191-201-211-227-237 stitches. ARROW-4: Increase 1 stitch on each side of every marker thread (= 18-20-20-20-22-22 stitches increased) = 193-211-221-231-249-259 stitches. ARROW-5: Increase 1 stitch on each side of every marker thread (= 18-20-20-20-22-22 stitches increased) = 211-231-241-251-271-281 stitches. When entire A.1 has been worked vertically, piece measures approx. 11-12-13-14-15-16 cm / 4⅜"-4¾"-5⅛"-5½"-6"-6¼" from cast-on edge and down mid front. Remove the marker threads. Now work pattern as follows: 5 band stitches in garter stitch, A.2 (= 1 stitch), work A.3 until 5 stitches remain on row (= 20-22-23-24-26-27 repetitions of 10 stitches) and 5 band stitches in garter stitch. On next to last row in A.2 and A.3 increase 10-11-12-14-11-11 stitches evenly = 301-330-345-361-386-400 stitches. When entire A.2 and A.3 has been worked vertically, piece measures approx. 19-20-21-22-23-24 cm / 7½"-8"-8¼"-8¾"-9"-9½" from cast-on edge and down mid front. Now insert 4 marker threads in the piece as follows: Insert 1st marker thread after the first 50-54-56-60-65-69 stitches (= left front piece), insert 2nd marker thread after the next 55-62-66-66-68-67 stitches (= sleeve), insert 3rd marker thread after the next 91-98-101-109-120-128 stitches (= back piece) and insert 4th marker thread after the next 55-62-66-66-68-67 stitches (= sleeve). 50-54-56-60-65-69 stitches remain on row after last marker thread (= right front piece). Now work pattern A.4 with 5 band stitches in garter stitch in each side, at the same time on first row from right side begin increase for RAGLAN – read explanation above. Increase like this every other row 5-6-8-10-11-13 times in total = 341-378-409-441-474-504 stitches. NOTE: When A.4 has been worked vertically 1 time, continue with stockinette stitch and 5 band stitches in garter stitch in each side until all increases for raglan are done and piece measures 22-24-26-28-30-32 cm / 8⅝"-9⅜"-10 ¼"-11"-11 ¾"-12 ½" from cast-on edge. Work next row as follows from wrong side: 5 band stitches in garter stitch, 50-55-59-65-71-77 stitches in stockinette stitch (= right front piece), slip the next 65-74-82-86-90-93 stitches on 1 stitch holder for sleeve, cast on 10-10-12-12-14-16 new stitches on row (= in the side under sleeve), work 101-110-117-129-142-154 stitches (= back piece), slip the next 65-74-82-86-90-93 stitches on 1 stitch holder for sleeve edges, cast on 10-10-12-12-14-16 new stitches on row (= in the side under sleeve) and work the remaining 50-55-59-65-71-77 stitches in stockinette stitch (= left front piece), 5 band stitches in garter stitch. Finish body and sleeves separately. NOW MEASURE THE PIECE FROM HERE! BODY: = 231-250-269-293-322-350 stitches. Insert 1 marker thread 60-65-70-76-83-90 stitches in from each side (there are now 111-120-129-141-156-170 stitches between marker threads on back piece). Continue with plum, stockinette stitch and 5 band stitches in garter stitch in each side towards mid front. When piece measures 4 cm / 1½" from division, increase 2 stitches in each side - read INCREASE TIP-2 (= 4 stitches increased). Increase like this approx. every 2 cm / ¾" 12 times in total = 279-298-317-341-370-398 stitches. Work the new stitches in stockinette stitch. When piece measures 28 cm from division, increase 8-10-12-12-16-18 stitches = 287-308-329-353-386-416 stitches. Switch to circular needle size 2.5 mm / US 1.5. Work rib as follows: 5 band stitches in garter stitch, * knit 1, 2 stitches in garter stitch *, work from *-* back and forth for 2 cm / ¾". Work 2 ridges and bind off. Jacket measures approx. 56-58-60-62-64-66 cm / 22"-22¾"-23⅝"-24⅜"-25¼"-26" from shoulder and down. SLEEVE: Slip the 65-74-82-86-90-93 stitches from stitch holder in one side of piece on double pointed needles or a short circular needle size 3 mm / US 2.5 and pick in addition up 1 stitch in each of the 10-10-12-12-14-16 new stitches cast on under sleeve = 75-84-94-98-104-109 stitches. Insert 1 marker thread in the middle of the 10-10-12-12-14-16 stitches mid under sleeve and begin round here. Continue with plum and in stockinette stitch. When piece measures 4 cm / 1½", decrease 2 stitches mid under sleeve - read DECREASE TIP. Decrease like this every 8th-6th-5th-4th-4th-3rd round 13-17-21-22-23-24 times in total = 49-50-52-54-58-61 stitches. Continue until piece measures 40-38-37-35-33-32 cm / 15 ¾"-14⅞"-14 ½"-13 ¾"-13"-12 ½" from division (shorter measurements in the larger sizes because of wider neck and longer yoke). Knit 1 round while increasing 2-4-5-6-5-5 stitches evenly = 51-54-57-60-63-66 stitches. Switch to double pointed needles size 2.5 mm / US 1.5. Now work rib * knit 1, 2 stitches in garter stitch *, work from *-* in the round for 2 cm / ¾". Work 2 ridges and bind off. Work the other sleeve the same way. ASSEMBLY: Sew the buttons on to left band. |
||||||||||||||||||||||
Diagram explanations |
||||||||||||||||||||||
|
||||||||||||||||||||||

|
||||||||||||||||||||||
|
||||||||||||||||||||||

|
||||||||||||||||||||||
|
Have you made this or any other of our designs? Tag your pictures in social media with #dropsdesign so we can see them! Do you need help with this pattern?You'll find tutorial videos, a Comments/Questions area and more by visiting the pattern on garnstudio.com. © 1982-2024 DROPS Design A/S. We reserve all rights. This document, including all its sub-sections, has copyrights. Read more about what you can do with our patterns at the bottom of each pattern on our site. |
||||||||||||||||||||||


With over 40 years in knitting and crochet design, DROPS Design offers one of the most extensive collections of free patterns on the internet - translated to 17 languages. As of today we count 304 catalogs and 11422 patterns - 11417 of which are translated into English (US/in).
We work hard to bring you the best knitting and crochet have to offer, inspiration and advice as well as great quality yarns at incredible prices! Would you like to use our patterns for other than personal use? You can read what you are allowed to do in the Copyright text at the bottom of all our patterns. Happy crafting!
Comments / Questions (21)
I was just looking through the pattern (XL) at the end of the yoke it goes from 251 sts - add 14sts and suddenly there are 361 sts. Am I missing something or is the pattern wrong?
14.07.2021 - 19:04DROPS Design answered:
Dear Mrs Fox, after you have worked A.1 there are 251 sts, but then you work A.3 where you will increase as shown in diagram (= 24 repeats of 10 sts increased each to 14 sts = 24 x 4 increases = 96 sts increased + 251= 347 sts + 14 sts increased evenly = 361 sts. Happy knitting!
15.07.2021 - 09:44Bonjour, Je ne comprends pas les augmentations-2. Pour ma taille je dois faire 22 augmentations. Où dois-je les faire? Tout les combien de mailles? Merci
13.09.2020 - 13:19DROPS Design answered:
Bonjour Carine, les augmentations-2 concernent les côtés du gilet (après la division de l'ouvrage pour les manches et le bas du gilet). Si vous devez augmenter 22 m aux rangs avec une flèche 1 à 5, vous augmentez de chaque côté de chacun des fils marqueurs (=vous avez 11 fils marqueurs = 1 m de chaque côté de ces fils marqueurs = 22 augmentations). Bon tricot!
14.09.2020 - 09:04Me again! I don’t understand how to work the rib at the bottom of the cardigan. *K1, 2 stitches in garter stitch* work from * to * That reads to me that you knit all the stitches? What am I missing here?
22.02.2020 - 16:07DROPS Design answered:
Dear Mrs Juras, from RS you will knit all stitches but from WS, only the stitches in garter stitch will be knitted, the K1 from RS will be purled from WS. Happy knitting!
24.02.2020 - 08:24I’m working the medium size and just starting charts A.2 and A.3 Why does the pattern say to work 22 repeats of 10 stitches when the A.3 chart shows repeats of 12 stitches? I’m confused.
22.12.2019 - 12:54DROPS Design answered:
Dear Sally, the black square in the pattern means that there is no stitch there, and you should skip it. Without it there is 10 stitches in the 1st row of the A.3 pattern. Happy Knitting!
24.12.2019 - 17:55Hola. Voy a iniciar está labor. Es mi primer chaqueta con esta página. Mi primera pregunta es por qué al elegir la talla no se cual será más acertada si la XL O LA XXL. Me podrian decir que medidas de contorno de pecho y de cadera tienen estás tallas. Gracias.
06.04.2019 - 18:43DROPS Design answered:
Hola Maria. Las medidas del contorno de pecho están en el diagrama bajo el patrón. Si tienes dudas al elegir entre dos tallas, recomendamos elegir la talla más grande. Recuerda que es importante mantener la misma tensión del tejido al trabajar la labor, para seguir las instrucciones del patrón.
06.04.2019 - 20:48Bonjour, j'aurais une autre question. À la fin des explications pour le dos/devant, les dernières augmentations doivent t'elles se faire selon augmentation-2 ou elles doivent être réparties? Aussi, pour les côtes du dos/devant, je ne comprends pas qu'il fasse tricoter en rond. Et autant pour le dos que les manches, tricoter *1 m endroit, 2 m en mousse*, il me semble que ça donne que du point mousse, pas des côtes Merci
12.01.2019 - 23:11DROPS Design answered:
Bonjour Laure, augmentez à intervalles réguliers (= AUGMENTATIONS-1). On ne tricote effectivement pas en rond (supprimé des explications, merci) mais bien comme avant en allers et retours. La m endroit des côtes va se tricoter à l'env sur l'envers. Bon tricot!
14.01.2019 - 10:56ÖNSKAR mer utförliga stickmönster. Alla är inte experter. Jag stickar koftan 196-3. Här kommit till mönstret och måste riva upp ett varv då det inte står hur många maskor som ska stickas efter fem frsmkantamaskor. Det stårsticcka A2 1 maska, A3 tills det återstår 5 kantmaskor. Hur många maskor innan mönstret börjar?
07.01.2019 - 20:57DROPS Design answered:
Hei Margareta. Etter at du har strikket A.1, strikker slik: 5 kantmasker i rille, A.2 (over 1 maske), så strikker du A.3 over alle maskene, til det gjenstår 5 kantmasker, som strikkes i rille. Altså: Etter at du har strikket A.2 over den første masken (etter kantmaskene) skal A.3 gjentas: 20-22-23-24-26-27 ganger. Det er 10 masker i A.3. Du strikker A.3 over 200-220-230-240-260-270 masker. God fornøyelse
10.01.2019 - 15:29Bonjour, (1er jacquard!) pour la couleur "naturel", est-il préférable de couper le fil à chaque rang puisque la couleur est espacée de 11rang, ou de le faire suivre jusqu'au rang suivant? Y'a t'il une vidéo explicative pour ce type de patron? Merci
28.12.2018 - 21:16DROPS Design answered:
Bonjour Laure, quand on tricote A.3 (= le jacquard), on doit faire suivre le fil à chaque rang, le motif va se tricoter sur l'endroit et sur l'envers (lisez les rangs sur l'endroit de droite à gauche en commençant en bas et les rangs sur l'envers de gauche à droite). Cette vidéo montre comment tricoter le jacquard de A.3 (avec un autre motif, mais répétez le diagramme en largeur le nombre de fois indiqué). Bon tricot!
02.01.2019 - 10:38Det skal økes ut 12 masker fra 241 m (str. L) før mønster i bærestykke, jevnt fordelt i A2 og A3 til 345 masker (str L). Men hvordan kan dette bli 345 masker etter økningen? Det må jo bli 104 masker som skal økes? Eller? Hvis det skal økes 12 m jevnt fordelt i hver rapport på 10 masker, så blir jo antall økte masker 120.
06.11.2018 - 14:00DROPS Design answered:
Hei May. Du skal øke 12 masker jevnt fordelt på hele omgangen - på den nest siste pinnen av A.3. Du har da allerede økt 4 masker i hver rapport av A.3, dette er tegnet inn i diagrammet (2 masker på 1 omgang og 2 masker på 20 omgang. Det vil si at når du har strikket A.2 og A.3 i høyden har du økt 92 masker som en del av diagram A.3 (4 masker per 23 rapporter av A.3) og du har økt de 12 maskene jevnt fordelt på den nest siste omgangen = 104 masker økt totalt, og 345 masker på pinnen. God fornøyelse
20.11.2018 - 13:18Forstår ikke afslutningskanten nederst på trøjen, hvad betyder 1r,2r
01.10.2018 - 02:09DROPS Design answered:
Hei Marianne. Jeg kan skjønne at dette er en forvirrende formulering på dansk siden begge deler heter rett. Men du skal altså strikke 1 rettmaske (= rett fra retten, vrang fra vrangen) og 2 masker rettstrikk (rett fra retten, rett fra vrangen). Dette gjentas rundt omgangen. God fornøyelse.
01.10.2018 - 15:16