Valentino by DROPS Design

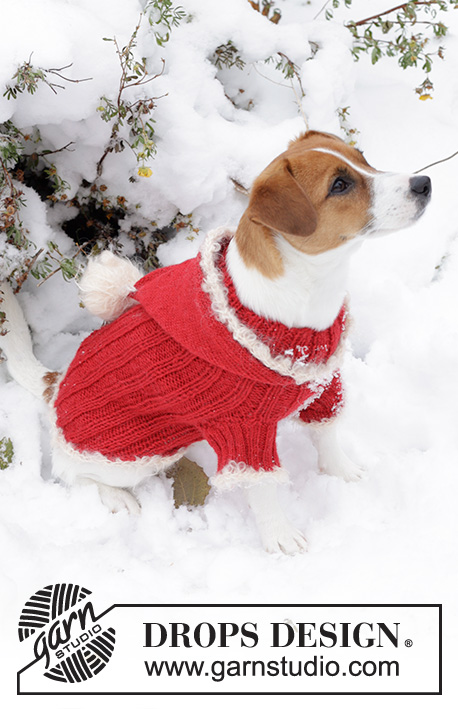
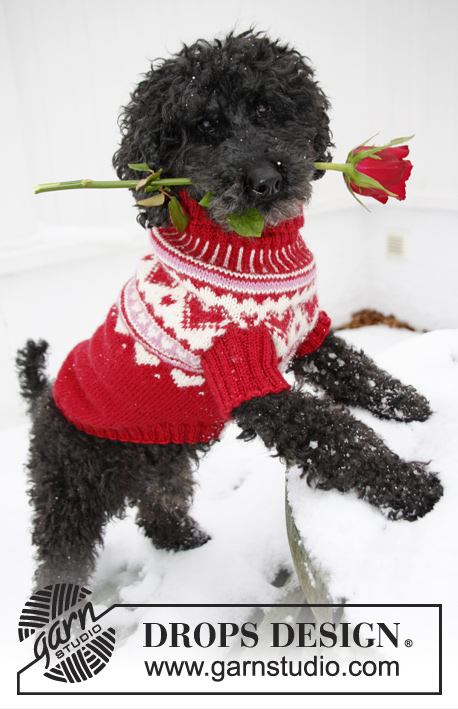
Knitted DROPS dog's Christmas jumper for valentine with hearts in ”Karisma”. Size XS - L.

DROPS Extra 0-1010
DROPS design: Pattern no u-699
Yarn group B
-----------------------------------------------------------
Size: XS - S - M - L
Dog's measurements:
Chest width: approx. 28/32 - 40/44 - 50/54 - 60/66 cm /
11"/12½" - 15¾"/17¼" - 19¾"/21¼" - 23½"/26"
Back length: approx. 24/26 - 32/34 - 40/42 - 48/52 cm /
9½"/10¼" - 12½"/13½" - 15¾"/16½" - 19"/20½"

Example of dog races:
XS = Chihuahua, S = Bichon Frisé, M = Cocker Spaniel, L = Irish setter.

Materials:
DROPS KARISMA from Garnstudio
100-100-150-200 g color no 48, wine red
50-50-50-50 g color no 01, off white
50-50-50-50 g color no 33, medium pink

DROPS DOUBLE POINTED NEEDLES (for size XS), CIRCULAR NEEDLE (40 cm / 16'' for size S and M and 60 cm / 24'' for size L) SIZE 3.5 mm / US 4 – or size needed to get 22 sts x 30 rows in stockinette st = 10 x 10 cm / 4'' x 4''.

DROPS DOUBLE POINTED NEEDLES (all sizes) and CIRCULAR NEEDLE (40 cm / 16'' for size S and M and 60 cm / 24'' for size L) SIZE 3 mm /US 2.5 - for rib.

-------------------------------------------------------

Knitting tension – See how to measure it and why here
Alternative Yarn – See how to change yarns here
Yarn Groups A to F – Use the same pattern and change the yarn here
Yarn usage using an alternative yarn – Use our yarn converter here

-------------------------------------------------------


100% Wool
from 3.00 $ /50g
DROPS Karisma uni colour DROPS Karisma uni colour 3.00 $ /50g
Wool Warehouse Direct Ltd
Order
DROPS Karisma mix DROPS Karisma mix 3.00 $ /50g
Wool Warehouse Direct Ltd
Order
needles DROPS Needles & Hooks
You can get the yarn to make this pattern from 12.00$. Read more.

Pattern instructions

NOTE: This pattern is written in American English. All measurements in charts are in cm. For conversion from inches to cm - click here. There are different terms for crocheting in American and British English. If this pattern includes crochet, click for "crochet terms" here. For this pattern in British English, please click here.
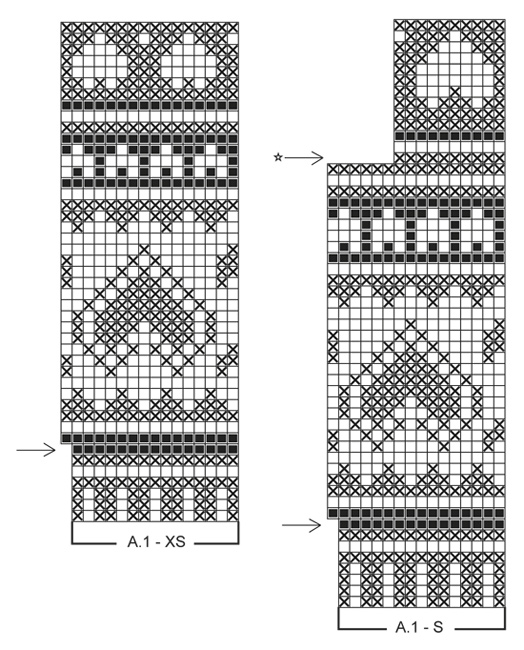
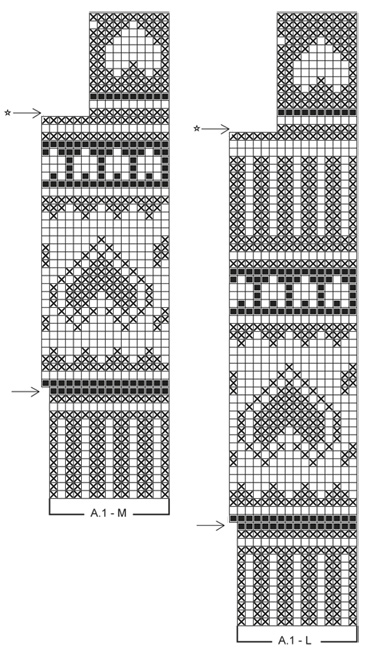
PATTERN:
See diagram A.1 (choose diagram for correct size). All rows in pattern are worked in stockinette st.

ADJUSTMENT TIP:
If you're knitting for another dog race than given here, note the distance between the dog's front legs (for example a Dachshund has a longer distance between the front legs than a Cocker Spaniel). The distance can be adjusted by slipping more or fewer sts on the stitch holder mid under belly. In addition the circumference on body can be adjusted by adding or subtracting sts (adjust so that sts fit the repetition) and the back can be worked longer or shorter.
----------------------------------------------------------

JUMPER:
Worked in the round on double pointed needles/circular needle from the neck down. The smallest size is worked on double pointed needles, the other sizes on circular needle.
Cast on 64-92-112-140 sts on double pointed needles/circular needle size 3 mm / US 2.5 with wine red.
Work rib = K 2/P 2 for 6-8-10-12 cm / 2½"-3"-4"-4 3/4" (= neck). Switch to double pointed needles/circular needle size 3.5 mm / US 4 – NOW MEASURE PIECE FROM HERE!
Work 2 rounds in stockinette st while AT THE SAME TIME dec 4-2-7-5 sts evenly on 1st round = 60-90-105-135 sts.
READ ALL OF THE FOLLOWING SECTION BEFORE CONTINUING:
Then work pattern according to diagram A.1 (choose diagram for correct size) = 4-6-7-9 repetitions on round.
AT THE SAME TIME on 1st round marked with arrow in diagram (i.e. 1st round with medium pink) inc 4-6-7-9 sts evenly = 64-96-112-144 sts.
When piece measures 4-6-9-12 cm / 1½"-2½"-3½"-4 3/4" (measured after neck), divide for front legs as follows: bind off 1 st, work the next 15-15-31-31 sts and then slip them on 1 stitch holder (= under the belly), bind off 1 st, then continue pattern back and forth on needle over the remaining 47-79-79-111 sts (= back piece).
AT THE SAME TIME on round marked with arrow and star in diagram (= 1 round with wine red and applies to all sizes except Size XS), adjust no of sts to 47-83-77-107.
When piece measures 10-14-18-22 cm / 4"-5½"-7"-8 3/4" (opening for legs measures approx. 6-8-9-10 cm / 2½"-3"-3½"-4" and the adjustment of no of sts should now be finished in the 3 largest sizes), slip sts on 1 new stitch holder.
Slip sts from stitch holder under the belly back on needle (= 15-15-31-31 sts) and work pattern over these sts, the same length as on back piece.
Slip all sts on the same needle again and cast on 1 new st in each side between over and under piece = 64-100-110-140 sts. Finish the pattern, then work with wine red until finished measurements.
When piece measures 16-20-25-30 cm / 6 1/4"-8"-9 3/4"-11 3/4" work next round as follows: Work 2-0-8-6 sts, cast of the next 13-17-17-21 sts (= mid under belly) and work the rest of row. Then work back and forth on needle - AT THE SAME TIME bind off at the beg of every row in each side as follows: 2 sts 1-3-4-6 times, 1 st 9-8-9-8 times, 2 sts 1-3-4-6 times and 3 sts 1 time = 19-37-37-49 sts remain on needle. Piece measures approx. 30-38-47-56 cm / 11 3/4"-15"-18½"-22" incl the neck.

ASSEMBLY:
Slip the remaining sts on double pointed needles/circular needle size 3 mm / US 2.5, pick in addition up sts with wine red around the cast-off edge so that there are 84-112-144-188 sts in total. Work rib = K 2/P 2 for 2½-3-3-3½ cm / 3/4"-1"-1"-1 1/4", then loosely bind off with K over K and P over P.

LEG:
Pick up 36-44-52-60 sts on double pointed needles size 3 mm / US 2.5 with wine red around one opening for leg. Work rib = K 2/P 2 until leg measures approx. 4-5-6-8 cm / 1½"-2"-2½"-3", then loosely bind off with K over K and P over P.
Repeat around the other opening.

NOTE: The neck is folded double when worn.

Diagram

All measurements in charts are in cm.

symbols = wine red
symbols = off white
symbols = medium pink
diagram
diagram

Do you need help with this pattern?

Thank you for choosing a DROPS Design pattern. We take pride in providing patterns that are correct and easy to understand. All patterns are translated from Norwegian and you can always check the original pattern (DROPS Extra 0-1010) for measurements and calculations.

Are you having trouble following the pattern? See below for a list of resources to help you finish your project in no time - or why not, learn something new.

signature-image signature

Are you having trouble following the pattern? See below for a list of resources to help you finish your project in no time - or why not, learn something new.

Each of our patterns has specific tutorial videos to help you.

We have also step-by-step guides for different techniques which you'll find here.

1) Why is the knitting/crochet tension so important?

Knitting tension is what determines the final measurements of your work, and is usually measured per 10 x 10 cm. It is provided like so: number of stitches in width x number of rows in height - eg: 19 stitches x 26 rows = 10 x 10 cm.

The knitting tension is very individual; some people knit/crochet loosely while others work tightly. You adjust the knitting tension with the needle size, which is why the suggested needle size only serve as a guide! You need to adjust this (up or down) to ensure that YOUR knitting tension matches the knitting tension provided in the pattern. If you work with a different knitting tension than provided you will have a different yarn consumption, and your work will have different measurements than what the pattern suggests.

The knitting tension also determines which yarns can replace each other. As long as you achieve the same knitting tension you can replace one yarn with another.

See DROPS lesson: How to measure your tension/gauge

See DROPS video: How to make a gauge tension swatch

to top

2) What are the yarn groups?

All our yarns are categorised into yarn groups (from A to F) according to thickness and knitting tension – group A contains the thinnest yarns and group F the thickest. This makes it easier for you to find alternative yarns to our patterns, should you wish to switch yarn. All yarns within the same group have a similar knitting tension and can easily replace each other. However, different yarn qualities have different structures and properties which will give the finished work a unique look and feel.

Click here for an overview of the yarns in each yarn group

to top

3) Can I use a different yarn than what the pattern suggests?

The important thing when changing from one yarn to another is that the knitting/crochet tension remains the same. This is so that the measurements of the finished piece will be the same as on the sketch provided. It is easier to achieve the same knitting tension using yarns from the same yarn group. It is also possible to work with multiple strands of a thinner yarn to achieve the knitting tension of a thicker one. Please try our yarn converter. We recommend you to always work a test swatch.

Please NOTE: when changing yarn the garment might have a different look and feel to the garment in the photo, due to individual properties and qualities of each yarn.

See DROPS lesson: Can I use a different yarn than the one mentioned in the pattern?

to top

4) How do I use the yarn converter?

At the top of all our patterns you’ll find a link to our yarn converter, which is a helpful tool should you wish to use a different yarn than suggested. By filling in the yarn quality you wish to replace, the amount (in your size) and number of strands, the converter will present good alternative yarns with the same knitting tension. Additionally it will tell you how much you’ll require in the new qualities and whether you’ll need to work with multiple strands. Most skeins are 50g (some are 25g or 100g).

If the pattern is worked with multiple colours, every colour will have to be converted separately. Similarly, if the pattern is worked with several strands of different yarns (for example 1 strand Alpaca and 1 strand Kid-Silk) you will have to find alternatives for each, individually.

Click here to see our yarn converter

to top

5) Why do I get the wrong knitting tension with the suggested needle size?

The needle size provided in the pattern serves only as a guide, the important thing is to follow the knitting tension. And since knitting tension is very individual, you will have to adjust the needle size to ensure that YOUR tension is the same as in the pattern – maybe you’ll have to adjust 1, or even 2 needle sizes, up or down to achieve the correct tension. For this, we recommend that you work test swatches.

Should you work with a different knitting tension than the one provided, the measurements of the finished garment might deviate from the measurement sketch.

See DROPS lesson: How to measure your tension/gauge

See DROPS video: How to make a gauge tension swatch

to top

6) Why is the pattern worked top-down?

Working a garment top-down provides more flexibility and room for personal adjustment. For example it is easier to try the garment on while working, as well as making adjustments to length of yoke and shoulder caps.

The instructions are carefully explaining every step, in the correct order. Diagrams are adjusted to the knitting direction and are worked as usual.

to top

7) Why are the sleeves shorter in larger sizes?

The total width of the garment (from wrist-to-wrist) will be larger in the larger sizes, despite the actual sleeves being shorter. The larger sizes have longer sleeve caps and wider shoulders, so there will be a good fit in all sizes.

to top

8) What is a repeat?

Diagrams are often repeated on the round or in height. 1 repeat is the diagram the way it appears in the pattern. If it says to work 5 repeats of A.1 in the round, then you work A.1 a total of 5 times after/next to each other in the round. If it says to work 2 repeats of A.1 vertically/in height you work the entire diagram once, then begin again at the start and work the entire diagram one more time.

to top

9) How do I work according to a knitting diagram?

The diagram depicts all rows/rounds, and every stitch seen from the right side. It is read from bottom to top, from right to left. 1 square = 1 stitch.

When working back and forth, every other row is worked from the right side and every other row is worked from the wrong side. When working from the wrong side, the diagram will have to be worked reversed: from left to right, knit stitches are purled, purl stitches are knit etc.

When working in the round every round is worked from the right side and the diagram are worked from right to left on all rounds.

See DROPS lesson: How to read knitting diagrams

to top

10) How do I work according to a crochet diagram?

The diagram depicts all rows/rounds, and every stitch seen from the right side. It is worked from bottom to top, from right to left.

When working back and forth every other row is worked from the right side: from right to left and every other row is worked from the wrong side: from left to right.

When working in the round, every row in the diagram are worked from the right side, from right to left.

When working a circular diagram you start in the middle and work your way outwards, counter clockwise, row by row.

The rows usually start with a given number of chain stitches (equivalent to the height of the following stitch), this will either be depicted in the diagram or explained in the pattern.

See DROPS lesson: How to read crochet diagrams

to top

11) How do I work several diagrams simultaneously on the same row/round?

Instructions for working several diagrams after each other on the same row/round, will often be written like so: “work A.1, A.2, A.3 a total of 0-0-2-3-4 times". This means you work A.1 once, then A.2 is worked once, and A.3 is repeated (in width) the number of times provided for your size – in this case like so: S = 0 times, M = 0 times, L=2 times, XL= 3 times and XXL = 4 times.

The diagrams are worked as usual: begin with the first row in A.1, then work the first row in A.2 etc.

See DROPS lesson: How to read knitting diagrams

See DROPS lesson: How to read crochet diagrams

to top

12) Why does the piece start with more chain stitches than it’s worked with?

Chain stitches are slightly narrower than other stitches and to avoid working the cast-on edge too tight, we simply chain more stitches to begin with. The stitch count will be adjusted on the following row to fit the pattern and measurement sketch.

to top

13) Why increase before the rib edge when the piece is worked top-down?

The rib edge is more elastic and will contract slightly compared to, for example, stocking stitch. By increasing before the rib edge, you avoid a visible difference in width between the rib edge and the rest of the body.

to top

14) Why increase in the cast-off edge?

It’s very easy to cast off too tightly, and by making yarn overs while casting off (and simultaneously casting these off) you avoid a too tight cast off edge.

See DROPS video: How to bind off with yarn overs (yo)

to top

15) How do I increase/decrease on every 3rd and 4th row/round alternately?

To achieve an even increase (or decrease) you can increase on, for example: every 3rd and 4th row alternately, like so: work 2 rows and increase on the 3rd row, work 3 rows and increase on the 4th. Repeat this until the increase is complete.

See DROPS lesson: Increase or decrease 1 st on every 3rd and 4th row alternately

to top

16) Why is the pattern slightly different than what I see in the photo?

Pattern repeats can vary slightly in the different sizes, in order to get the correct proportions. If you’re not working the exact same size as the garment in the photo, yours might deviate slightly. This has been carefully developed and adjusted so that the complete impression of the garment is the same in all sizes.

Make sure to follow instructions and diagrams for your size!

to top

17) How can I work a jacket in the round instead of back and forth?

Should you prefer to work in the round instead of back and forth, you may of course adjust the pattern. You’ll need to add steeks mid-front (usually 5 stitches), and follow the instructions. When you would normally turn and work from the wrong side, simply work across the steek and continue in the round. At the end you’ll cut the piece open, pick up stitches to work bands, and cover the cut edges.

See DROPS video: How to knit steeks and cut open

to top

18) Can I work a jumper back and forth instead of in the round?

Should you prefer to work back and forth instead of in the round, you may of course adjust the pattern so you work the pieces separately and then assemble them at the end. Divide the stitches for the body in 2, add 1 edge stitch in each side (for sewing) and work the front and back pieces separately.

See DROPS lesson: Can I adapt a pattern for circular needles into straight needles?

to top

19) Why do you show discontinued yarns in the patterns?

Since different yarns have different qualities and textures we have chosen to keep the original yarn in our patterns. However, you can easily find options among our available qualities by using our yarn converter, or simply pick a yarn from the same yarn group.

It is possible that some retailers still have discontinued yarns in stock, or that someone has a few skeins at home that they would like to find patterns for.

The yarn converter will provide both alternative yarn as well as required amount in the new quality.

to top

20) How do I make a women’s size garment into a men’s size one?

If you have found a pattern you like which is available in women’s size it’s not very difficult to convert it to men’s size. The biggest difference will be the length of sleeves and body. Start working on the women size that you think would fit across the chest. The additional length will be worked right before you cast off for the armhole/sleeve cap. If the pattern is worked top-down you can add the length right after the armhole or before the first decrease on sleeve.

Regarding additional yarn amount, this will depend on how much length you add, but it is better with a skein too many than too few.

to top

21) How do I prevent a hairy garment from shedding?

All yarns will have excess fibres (from production) that might come off as lint or shedding. Brushed yarns (ie hairier yarns) have more of these loose, excess fibres, causing more shedding.

Shedding also depends on what is worn under or over the garment, and whether this pulls at the yarn fibres. It’s therefore not possible to guarantee that there will be no shedding

Below are some tips on how to get the best result when working with hairier yarns:

1. When the garment is finished (before you wash it) shake it vigorously so the looser hairs come off. NOTE: do NOT use a lint roller, brush or any method that pulls at the yarn.

2. Place the garment in a plastic bag and put it in your freezer - the temperature will cause the fibres to become less attached to each other, and excess fibres will come off easier.

3. Leave in the freezer for a few hours before taking it out and shaking it again.

4. Wash the garment according to the instructions on the yarn label.

to top

22) Where on the garment is the length measured?

The measurement sketch/schematic drawing provides information regarding the full length of the garment. If it’s a jumper or a jacket the length is measured from the highest point on the shoulder (usually closest to the neckline), and straight down to the bottom of the garment. It is NOT measured from the tip of shoulder. Similarly, the length of yoke is measured from the highest point on the shoulder and down to where yoke is split into body and sleeves.

See DROPS lesson: How to read a schematic drawing

to top

23) How do I know how many balls of yarn I need?

The required amount of yarn is provided in grams, eg: 450 g. To calculate how many balls you’ll need you first need to know how many grams are in 1 ball (25g, 50g or 100g). This information is available if you click on the individual yarn quality on our pages. Divide the amount required with the amount of each ball. For example, if each ball is 50g (the most common amount), the calculation will be as follows: 450 / 50 = 9 balls.

to top

Have you purchased DROPS yarn to make this pattern? Then you are entitled to receive help from the store where you bought the yarn. Find a list of DROPS stores here!
Still can't find the answer you need? Then scroll down and leave your question so one of our experts can try to help you. This will be done normally within 5 to 10 working days. In the meantime, you can read the questions and answers that others have left to this pattern or join the DROPS Workshop on Facebook to get help from fellow knitters/crocheters!

Comments / Questions (59)

country flag Andrée wrote:

Bonjour, il est indiqué coloris 48 rouge foncé je l'ai commandé mais il me semble plus aller sur le bordeaux Sur la photo cela a l'air plus rouge que rouge foncé .merci

23.12.2022 - 11:11

DROPS Design answered:

Bonjour Andrée, pour toute assistance au choix d'une couleur, merci de bien vouloir contacter directement votre magasin DROPS, on pourra ainsi mieux vous aider et vous orienter, même par mail ou téléphone. Bon tricot!

02.01.2023 kl. 08:15

country flag Janne wrote:

Men mønsteret går ikke opp med 79 masker? Men 80 som jeg klarer og telle meg frem til. Hvordan skal jeg få det til og stemme når jeg skal strikke frem og tilbake? Har

01.12.2022 - 15:09

DROPS Design answered:

Hej Janne, da hopper du bare over sidste maske i diagrammet Mønsteret skal stemme over de masker du har tilbage og som du har strikket ifølge diagrammet hele vejen til du lukker maskerne af under maven. :)

02.12.2022 kl. 08:39

country flag Janne wrote:

Hei strikker i str m og skal ha 79 masker etter at jeg har lagt av masker men når jeg prøver og strikke mønstert så står jeg alltid igjen med en maske på mønsteret? Hva gjør jeg feil

30.11.2022 - 20:24

DROPS Design answered:

Hej Janne, du strikker mønsteret som tidligere over de 79 masker du har tilbage :)

01.12.2022 kl. 14:16

country flag Marie DE RASSE wrote:

Bonjour, Je ne suis pas sure d'avoir bien compris le diagramme : je tricote en XS, j'ai bien rabattu 1 m, mis 15 mailles de coté, rabattu 1m et tricoté en aller-retour, mais... du coup, il manque une maille par rapport au diagramme sur un motif? Pouvez-vous me confirmer que quand on tourne les aiguilles sur l'endroit (ou l'envers), il y a bien une case du diagramme à sauter pour poursuivre le dessin correctement, s'il vous plaît? Merci!

06.05.2022 - 19:58

DROPS Design answered:

Bonjour Mme De Rasse, tout à fait, vous rabattez la 1ère m du tour et la 1ère maille du 2ème motif de A.1, notez bien la maille suivante sur votre diagramme et tricotez, sur l'envers à partir de cette maille et de gauche à droite, et, sur l'endroit, à partir de la 2ème maille du diagramme. Bon tricot!

09.05.2022 kl. 08:01

country flag Doreen wrote:

Hi I am struggling to understand your decreasing instructions ie 2st 1,3,4,6 times etc , I can’t make the stitches reduce from 110 for the 3rd size down to 47 help!

24.01.2022 - 17:10

DROPS Design answered:

Hi Doreen, The number 47 is the measurement in cm you get when you have finished decreasing. You decrease from 110 stitches to 37 stitches by first casting off 17 stitches under the stomach = 93 stitches now worked back and forth. Then you cast off at the beginning of each row: 2 stitches x 4 on each side = 16 decreases, 1 stitch x 9 on each side = 18 decreases, 2 stitches x 4 on each side = 16 stitches and then 3 stitches x 1 on each side = 6 decreases. 93 - 56 = 37 stitches remaining. Hope this helps and happy knitting!

25.01.2022 kl. 07:58

country flag Harriet wrote:

Når jeg begynner å strikke mønster frem og tilbake over 79 masker får jeg det ikke til å stemme. Hva gjør jeg feil?

09.12.2021 - 00:35

DROPS Design answered:

Hej Harriet, du starter med samme maske (eller masken lige ovenfor) den maske som du sluttede pinden med og strikker tilbage. God fornøjelse!

09.12.2021 kl. 09:30

country flag Nicole wrote:

Pas vraiment. Je fais de cette façon et j'ai bien mes 79 mailles mais le diagramme en a 16m je n'arrive jamais à la fin du diagramme. Ça fait à peu près 6 fois que je défais et réessaye. Ça serait plaisant que maintenant dans vos beaux modèles nous puissions avoir un vidéo pas à pas du début à la fin pour celles qui ne sont pas trop expertes. Merci

11.09.2021 - 17:24

DROPS Design answered:

Bonjour Nicole, il vous reste 79 mailles = autrement dit, vous avez rabattu la 1ère m du 1er motif, et la 1ère maille du 3ème motif, il vous reste ainsi sur l'aiguille: les 15 dernières mailles du 3ème motif + 16 mailles des 4ème, 5ème, 6ème et 7ème motif (15 + 4x16 m = 79 m). Lorsque ces mailles sont tricotées, tournez et tricotez en lisant maintenant de gauche à droite (sur l'envers), vous terminerez par l'avant-dernière maille du diagramme. Tournez, commencez (sur l'endroit) par la 2ème maille du diagramme et continuez comme avant. Bon tricot!

13.09.2021 kl. 08:40

country flag Nicole wrote:

Je n'y arrive pas. Vous dites la 1 ère des 31 m qu,on va tricoter sur l'envers mais ces 31 mailles sont sur un arrêt de mailles en attente, je demandais si la m rabattue en premier on la met dans les 31 m en attente avec un total de 31 en attente elle compterait dans les 31 merci

08.09.2021 - 22:09

DROPS Design answered:

Bonjour Nicole, la maille rabattue ne fait pas partie des 31 mailles, vos mailles doivent se présenter ainsi à partir du début des tours: 1 maille rabattue (= ouverture patte), 31 mailles en attente (devant/sous le ventre), 1 maille rabattue (= ouverture patte), 79-111 mailles sur l'aiguille (= dos). Cela répond-il à votre question?

09.09.2021 kl. 08:48

country flag Nicole wrote:

Bonjour est-ce que la 1ère maille rabattue doit être mise dans nos 31 mailles transférées sur l'arrêt de mailles où si on compte les 31m après cette première maille rabattue. Si elle ne compte pas dans les 31m est-ce que ça sera notre 1ère maille sur l'envers? merci

03.09.2021 - 18:08

DROPS Design answered:

Bonjour Nicole, la 1ère des 31 mailles que l'on va tricoter sur l'envers sera la dernière maille du diagramme tricotée sur l'endroit; Notez dans le diagramme quelle maille vous avez tricoté en dernier sur l'endroit, et au rang suivant sur l'envers, suivez le diagramme de gauche à droite et tricotez cette maille en premier. Bon tricot!

06.09.2021 kl. 07:10

country flag Noemie wrote:

C'est le tournez qui m'embête. Je l'ai fais une fois avec le diagramme lu de gauche à droite. Mais quand je regardais mon tricot ça faisait des bosses et non uni comme le motif sur la ligne 27-28. Quand je finis ma ligne 28 j'ai les fils sur l'aiguille droite. Pouvez-vous me dire de quel côté sont mes fils pour repartir et lire de gauche à droite. Je suis un peu débutante dans le jacquard. Merci

02.09.2021 - 20:47

DROPS Design answered:

Bonjour Noemie, lorsque vous divisez votre ouvrage pour l'ouverture des pattes, vous devez tricoter en rangs, et plus en rond, donc alternativement sur l'endroit (comme avant, en rond, en lisant le diagramme de droite à gauche) et sur l'envers (en lisant de gauche à droite). Regardez nos vidéos sur le jacquard en rond: avec le fil dans la main droite ou bien, en fonction de votre façon de tricoter dans la main gauche, elles vous aideront peut être. Bon tricot!

03.09.2021 kl. 07:19

Post a comment to pattern DROPS Extra 0-1010

We would love to hear what you have to say about this pattern!

If you want to leave a question, please make sure you select the correct category in the form below, to speed up the answering process. Required fields are marked *.

From the #dropsfan gallery

Valentino

UffdaKnits, United Kingdom