
Looking for a yarn?


Comments / Questions (113)
![]() Joy Toole wrote:
Joy Toole wrote:
I am starting the sleeve and I am confused why your pattern has two cables beside each other in the underarm. The end of M.2A is cable and then M.2B is also cable
16.06.2025 - 21:42DROPS Design answered:
Dear Mrs Toole, note that M.2A ends with purl stitches, the last 3 sts are M.2B = cable. Hope it can help. Happy knitting!
19.06.2025 - 10:44
![]() Gabriele Auer wrote:
Gabriele Auer wrote:
Bei den Ärmel unten die 8 Abnahmen stehe auf den Schlauch heisst es die 4 Zopfmaschen und auf jeder Seite 2 weitere oder liege ich da falsch bitte um Hilfe
30.04.2025 - 00:51DROPS Design answered:
Liebe Frau Auer, am Ende vom Ärmel wird man unter den Ärmel die 8 mittleren Maschen abketten, dh die 4 letzten Maschen der Runde + die 4 ersten Maschen der nächsten Runde. Viel Spaß beim Stricken!
30.04.2025 - 08:15
![]() Gabriele Auer wrote:
Gabriele Auer wrote:
Okay Rechenfehler von mir stimmt alles
30.04.2025 - 00:44
![]() Gabriele Auer wrote:
Gabriele Auer wrote:
Bei der Jacke
26.04.2025 - 09:02
![]() Gabriele Auer wrote:
Gabriele Auer wrote:
Bei der 2. Größe stimmt die Maschenanzahl nicht es bleiben 2 Maschen mehr über
26.04.2025 - 08:56DROPS Design answered:
Liebe Frau Auer, am welchen Teil von der Jacke? Ich habe die richtige Maschenanzahl am Ende Rumpf. Danke im voraus.
28.04.2025 - 09:35
![]() Miranda Decabooter wrote:
Miranda Decabooter wrote:
Ik heb problemen met het breien van de mouw voor maat 2/3 j. In beschrijving staat : Maat 2/3 jaar: M.2B (= 4 st), 2 av, M.2A over de volgende 56 st, M.2B (= 4 st) en 2 av. Dit klopt bij mij niet wel als ik het volgende brei. M2b, 2av, M2B , en dan pas M2a tot je nog 2 steken hebt om deze 2 av te breien Klopt mijn redenering ?
05.02.2025 - 13:06DROPS Design answered:
Dag Miranda,
Zoals ik het bekijk klopt het wel zoals het in het patroon staat beschreven. Wanneer je M.2A over 56 steken breit betekent dit dus dat je M.2A 3,5 keer in de breedte herhaalt. (Als je het doet zoals je beschrijft dan zou je 2 keer achter elkaar kabels krijgen.)
05.02.2025 - 19:43
![]() Aurélie wrote:
Aurélie wrote:
Bonjour, je suis actuellement en train de réaliser le bonnet Lille Trille en 12/18 mois. Il est indiqué dès le départ de faire 6cm en point mousse puis de placer un marqueur (pli). Ai-je bien compris qu'il y aura donc un repli qur le bonnet et que je dois donc refaire 6cm de point mousse depuis mon marqueur pli avant de commencer mes augementations ? Par avance, merci. Bonne journée
23.11.2024 - 12:34DROPS Design answered:
Bonjour Aurélie, tout à fait, vous allez ainsi former un petit ourlet d'environ 6 cm, le bonnet sera plié à ce niveau et les 6 cm point mousse seront donc repliés en double sur l'endroit. Mesurez les 6 cm à partir du marqueur avant d'augmenter (= 12 cm depuis le rang de montage). Bon tricot!
25.11.2024 - 08:08
![]() Emily wrote:
Emily wrote:
Hej. Det står på mössa/vante/strumpa att man ska sticka ett rätt varv och ett avigt varv för rätsrickning men det känns fel? Det stickas ju runt, ska det inte bara vara samma då?
31.10.2024 - 11:26DROPS Design answered:
Hej Emily. Om du ska sticka rätstickning när du stickar runt så måste du sticka vartannat varv rät och vartannat varv avigt. Om du stickar alla varv räta när du stickar runt så blir det slätstickning. Mvh DROPS Design
31.10.2024 - 11:55
![]() Lorna wrote:
Lorna wrote:
Thanks for you quick response. After the decrease on the upper 18 stitches I am left with 32 stitches. As per the toe decrease the number of stitches should be equal on top and bottom, 16 stitches. Therefore my markers should be between these 16 stitches division, correct?
20.01.2024 - 00:47
![]() Lorna wrote:
Lorna wrote:
Hello, I am working on the socks. How do I determine where the sides should be? I am working in the round from start to finish. Thank you.
19.01.2024 - 14:32DROPS Design answered:
Dear Lorna, which side do you mean? The heel will be worked over the 16-18 sts (see size) on mid back, then you insert a marker on each side of foot (see video for toe decreases). Hope it can help. Happy knitting!
19.01.2024 - 16:05
|
||||||||||
Lille Trille#lilletrilleset |
||||||||||
 |
 |
|||||||||
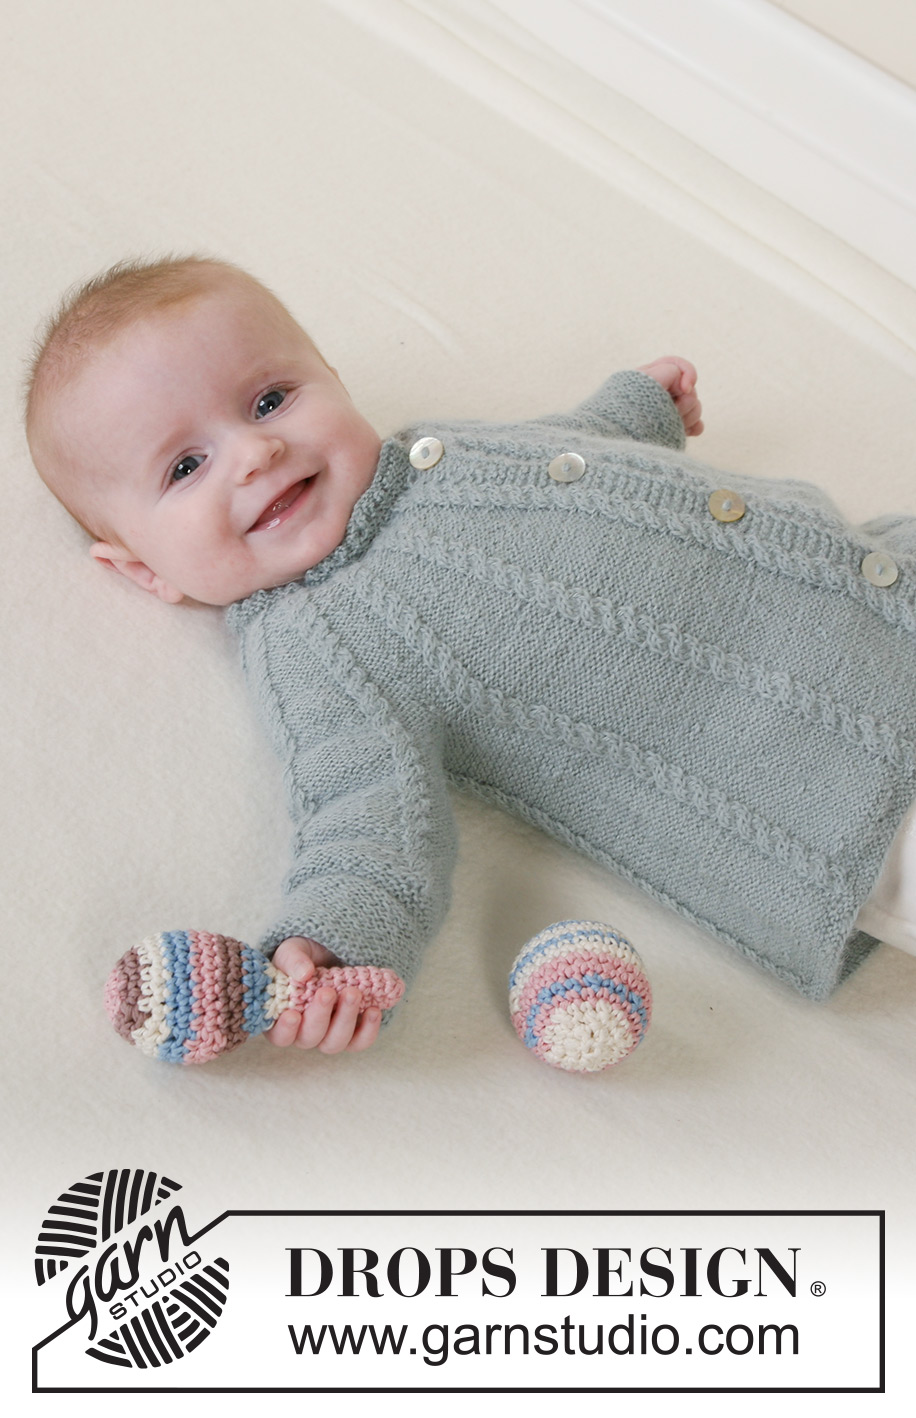
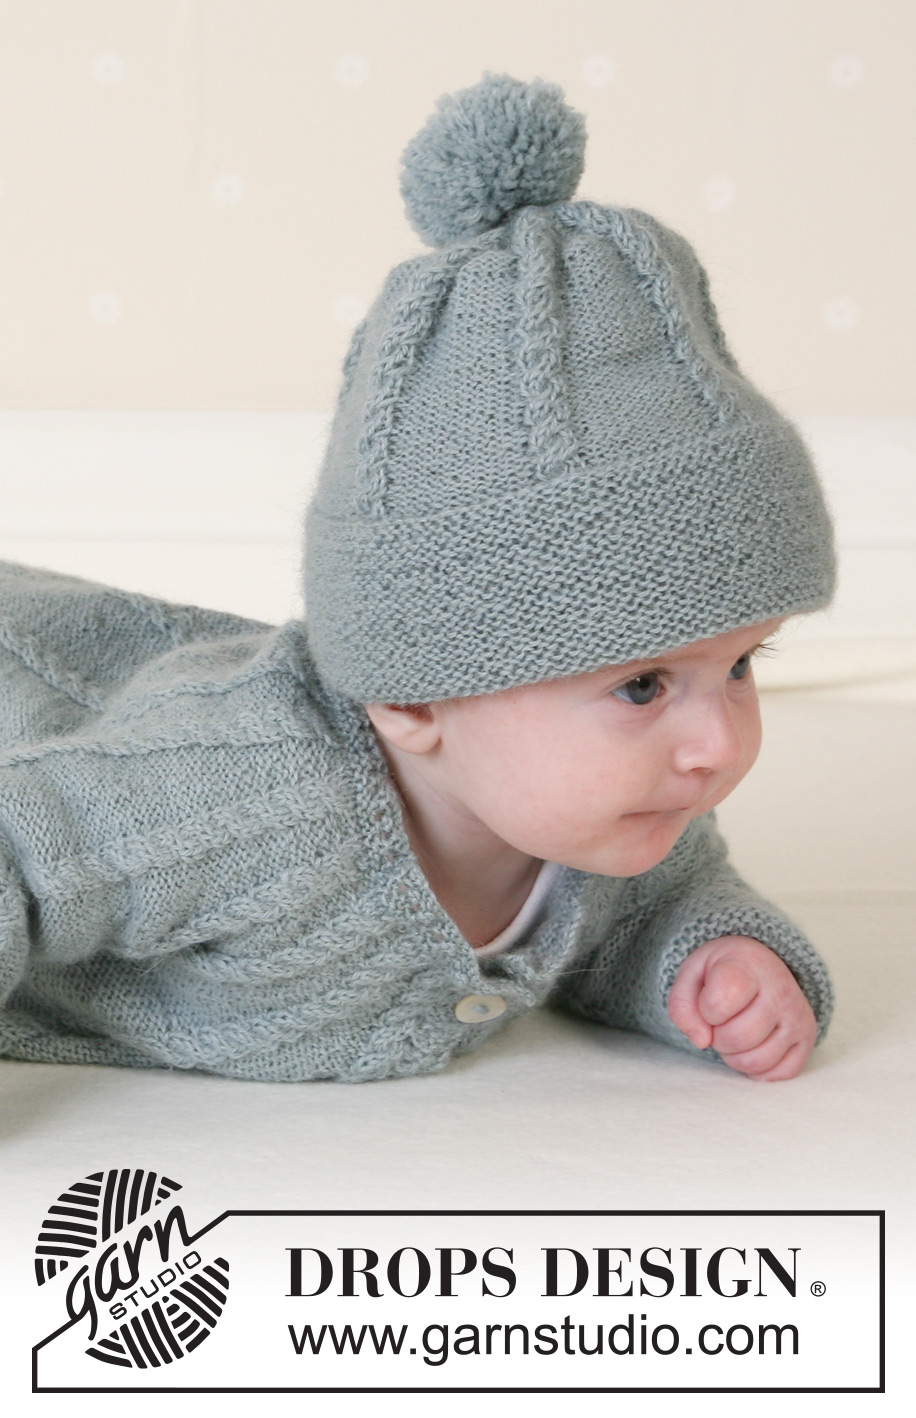
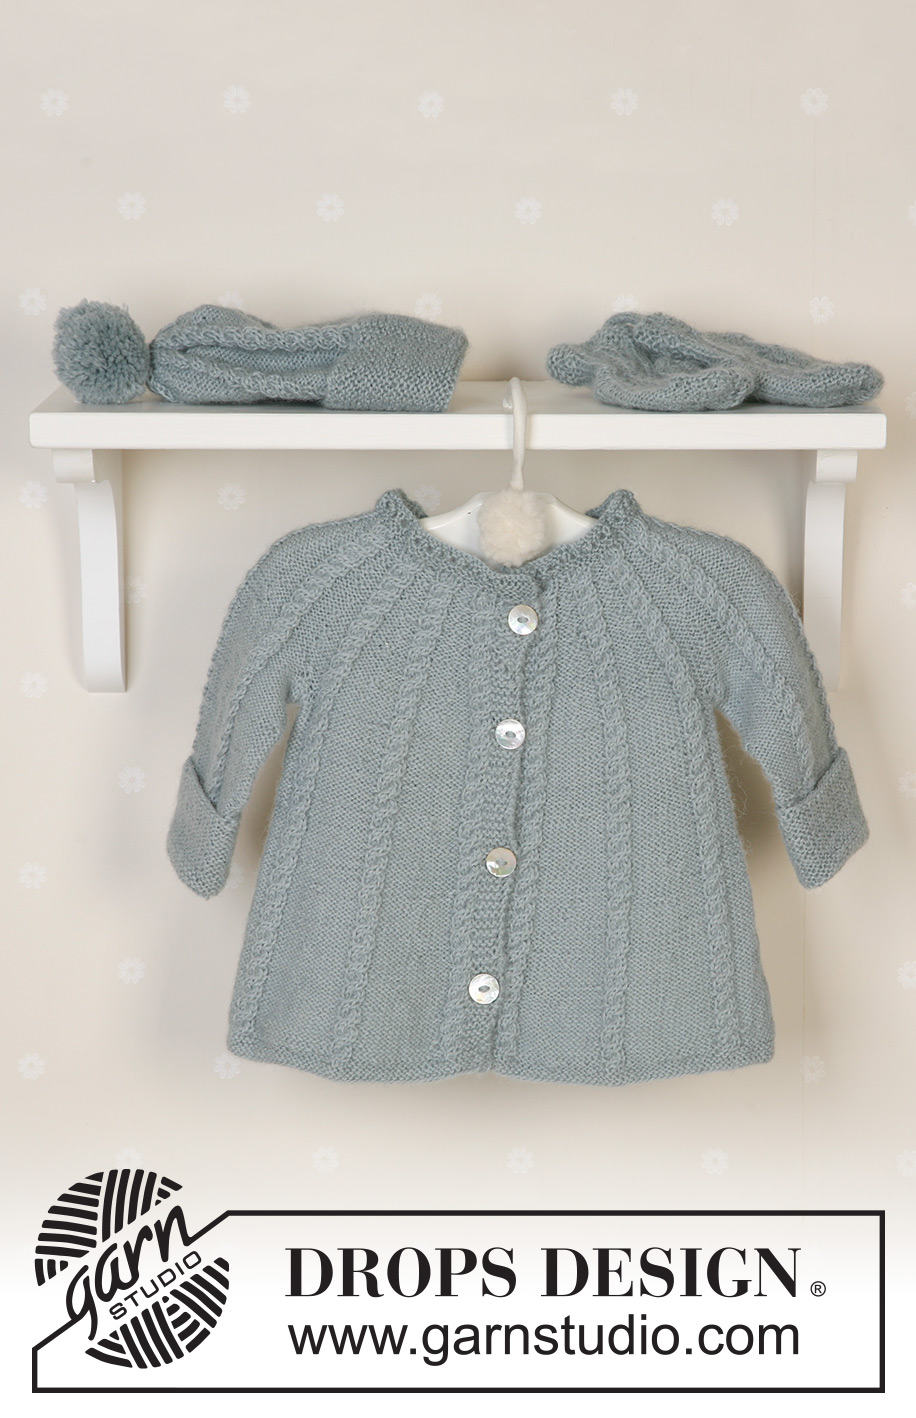
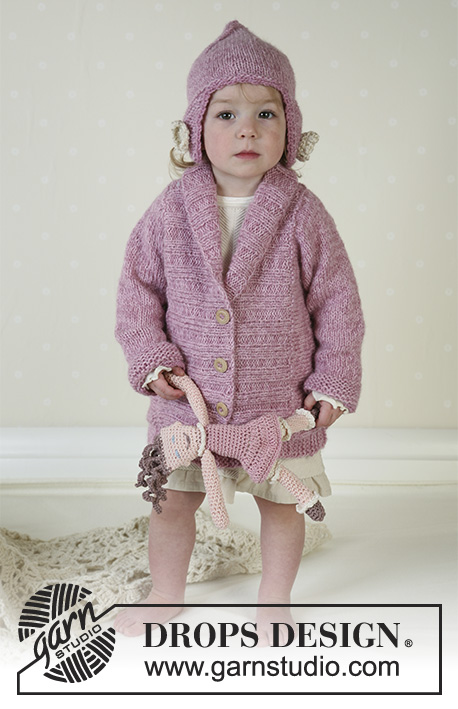
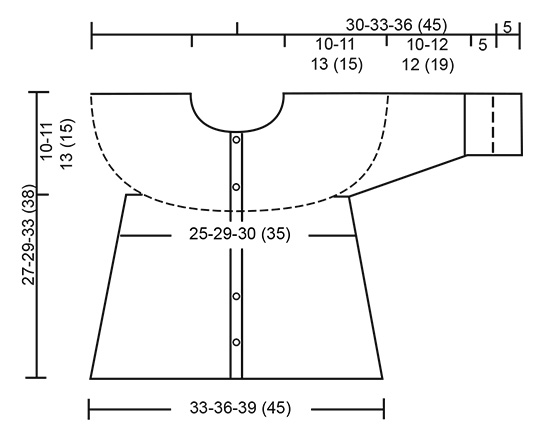
Knitted jacket with round yoke and cables, hat with pompons, mittens and socks in DROPS Alpaca for baby and children. Size 1 to 3 years.
DROPS Baby 14-2 |
||||||||||
|
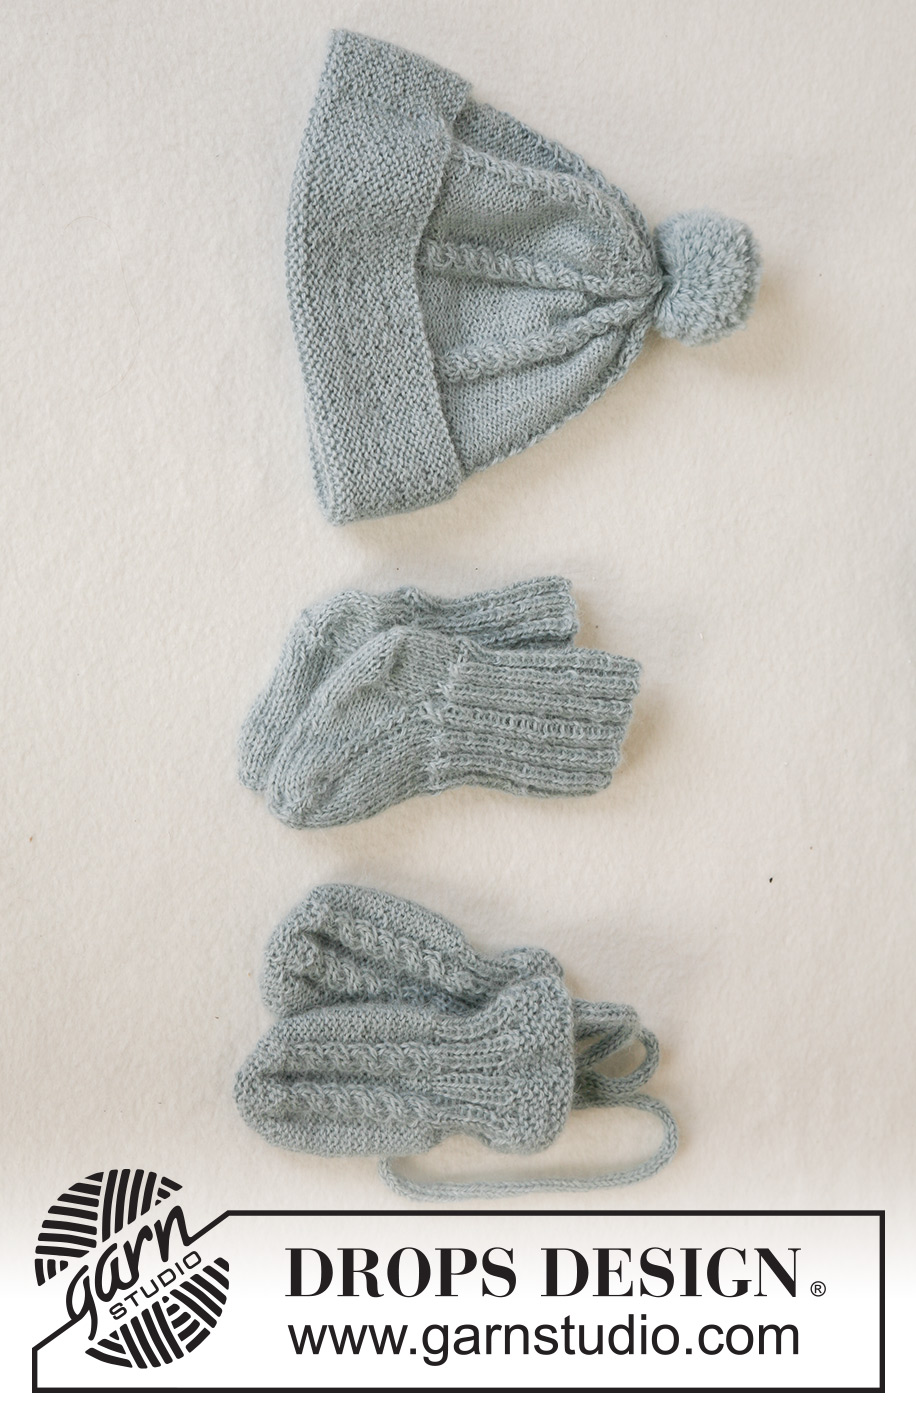
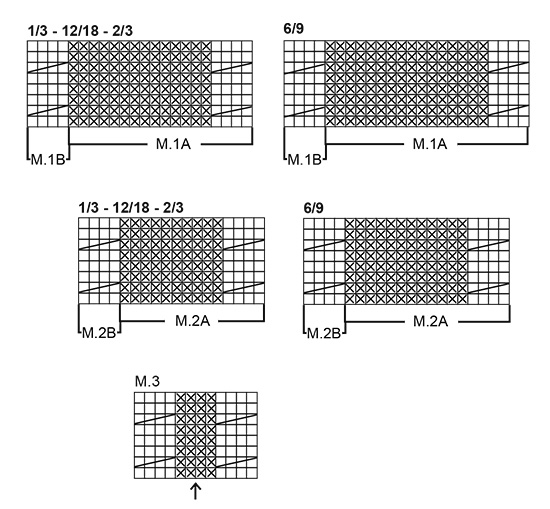
Gauge: 26 sts x 34 rows on needles size 2.5 mm / US 1or2 in stockinette sts = 10 x 10 cm / 4" x 4". Pattern: See diagrams M.1 to M.3. The diagrams show all the rows in the pattern seen from the right side. Garter sts (back and forth): Knit all rows Garter sts (in the round on circular needle): knit 1 round, purl 1 round Button holes: Make button holes on right front band from the right side as follows: Knit tog 2nd and 3rd st from the edge, 1 yo (knit yo on next row). Make buttonholes as follows: Size 1/3 months: 5, 12, 19 and 26.5 cm / 2",4¾",7½",10½" Size 6/9 months: 7, 14, 21 and 28.5 cm / 2¾",5½",8¼",11¼" Size 12/18 months: 8, 16, 24 and 32.5 cm / 3⅛",6¼",9½",12¾" Size 2/3 years: 9, 16, 23, 30 and 37.5 cm / 3½",6¼",9",11¾",14¾" JACKET: Front and back piece: Knit the jacket back and forth on circular needle from mid front. Remember buttonholes on right front band – see above. Cast on 179-199-213 (246) sts (includes 5 front band sts, knitted in garter sts throughout) with Alpaca on needle size 2.5mm/US 1 or 2 and knit 6 rows garter sts (1st row = right side). Continue with 1 row stockinette sts, at the same time inc 15-15-17 (20) sts evenly on row (do not inc over front band sts) = 194-214-230 (266) sts. Work next row as follows from the wrong side: 5 front band sts, M.1B (= 4 sts), M.1A over the next 180-200-216 (252) sts (chose diagram for appropriate size - from wrong side, read the diagram from left to right) and finish with 5 front band sts. Continue the pattern. At the same time, when piece measures 4-5-5 (6) cm / 1½"-2"-2" (2⅜") dec 1 st in each purled section by purling the 2 middle P sts tog (seen from the right side). Repeat the dec on every 3.5-3.5-4.5 (5) cm / 1¼"-1¼"-1¾" (2") a total of 3 times until there are 10-12-10 (10) P sts left in each purled section = 154-174-182 (210) sts on row. When piece measures 17-18-20 (23) cm / 6¾"-7"-8" (9"), work next row as follows: K 39-43-45 (52) sts (= front piece), bind off 6-8-8- (8) sts for armhole, K 64-72-76 (90) sts (= back piece), bind off 6-8-8 (9) sts for armhole, K 39-43-45 (52) sts (= front piece). Put the piece aside and work the sleeves. Sleeve: Cast on 40-42-44 (48) sts with Alpaca on double pointed needles size 2.5mm / US 1or2 and work garter sts in the round on needles. When piece measures 5 cm / 2", insert a marker – measure piece from here. Continue in garter sts until piece measures 5 cm / 2" and then work 1 round stockinette sts, at the same time inc 4-6-18 (20) sts evenly on round = 44-48-62 (68) sts. Work next round as follows – remember diagram for appropriate size: Size 1/3 months: M.2B (= 4 sts), P4, M.2A over the next 28 sts, M.2B (= 4 sts), P4 Size 6/9 months: M.2B (= 4 sts), P4, M.2A over the next 32 sts, M.2B (= 4 sts), P4 Size 12/18 months: P1, M.2A over the next 56 sts, M.2B (= 4 sts), P1 Size 2/3 years: M.2B (= 4 sts), P2, M.2A over the next 56 sts, M.2B (= 4 sts), P2 Insert a marker at the beginning of round and let the marker follow the piece as you progress (for size 1/3 months + 6/9 months + 2/3 years, insert the marker in the middle of the first cable on round) = mid underarm. Continue in pattern as described above – at the same time when piece measures 6 cm / 2⅜" inc 2 sts mid under arm (for size 1/3 months + 6/9 months + 2/3 years, inc 1 st on each side of cable). Inc 2 sts a total of 5-8-5 (9) times, for size 1/3 months: on every 6th round, for size 6/9 months: on every 5th round, for size 12/18 months: on every 8th round, for size 2/3 years: on every 7th round = 54-64-72 (86) sts – purl new sts. When piece measures 15-17-17 (24) cm / 6"-6¾"-6¾" (9½") – adjust so that next row is worked on the same row in diagram as back and front pieces so that pattern continues when body and sleeves are put in on the same needle – bind off 6-8-8 (8) sts mid under arm = 48-56-64 (78) left. Put sts on a holder and work the other sleeve. Yoke: Put sleeves in on the same needle as body piece where you bound off for armholes = 238-270-294 (350) sts. There are now 10-12-10 (10) purled sts (seen from the right side) between each cable all the way round. Continue in pattern as before. Work 3 or 4 rows (for size 2/3 years, work 7 or 8 rows) before starting the decreases – make sure that 1st row with dec are worked from the right side. Now dec 1 st in each purled section by purling tog the 2 middle P sts from the right side. Dec on every 6th row: 0-0-6 (8) times, on every 4th row: 8-8-2- (0) times and on every other row 0-2-0 (0) times. After the last dec there are 2 purled sts between each cable all the way round and there are 110-110-134 (158) sts on row. Discontinue the pattern after 1 row after a cable. Now work 1 row from the right side, at the same time adjusting number of sts to 63-65-69 (73) (do not dec over the front band sts). Knit 3 rows garter sts and knit next row as follows (holes): K5, *yo, K2 tog*, repeat from *-* until there are 4 sts left and knit these in garter sts. Knit 2 rows garter sts and bind off loosely from wrong side. Assembly: Sew the openings under the sleeves. Sew on buttons. Fold 5 cm / 2" on each sleeve edge towards the right side and attach with small, neat sts. HAT: Size: 1/3 – 6/9 – 12/18 months (2/4 years) To fit head circumference: 40/42 – 42/44 – 44/46 (48/50) cm / 16"-17"-17½" (19½") The hat is worked in the round. Loosely cast on 104-109-114 (120) sts with Alpaca on circular needle size 2.5 mm / US 1or2 and work in garter sts. When piece measures 5-6-6 (7) cm / 2"-2½"-2½" (2¾") insert a marker (folding edge) - measure piece from here. When piece measures 5-6-6 (7) cm / 2"-2½"-2½" (2¾") knit 1 round, at the same time inc evenly to 112-128-126 (140) sts. Now work diagram M.2A (remember diagram for appropriate size). When piece measures 12-12-14 (16) cm / 4¾"-4¾"-5½" (6¼") dec 1 st in each purled section by purling tog the 2 middle P sts on each round (the last time P tog 1 P and 1 K st) until there are 32-32-36 (40) sts left. Pull a double strand of Alpaca through the remaining sts and pull tight. The hat measures approx 15-16-17 (19) cm / 6"-6¼"-6¾" (7½") from marker. Fold the bottom edge towards the right side and attach each side with neat sts. Pompon: Make a pompon with a diameter of approx 5-6 cm / 2"-2½" and attach to top of hat. MITTENS: Size: 1/3 – 6/9 – 12/18 months (2/4 years) The 2 bigger sizes have thumbs, the 2 smaller sizes are without.. The mitten is worked in the round. Loosely cast on 34-36-36 (38) sts with Alpaca on double pointed needles size 2.5mm/US 1or2 and work garter sts – se explanation above – until piece measures 2 cm / ¾". Now K1 round and at the same time dec 6-4-4- (2) sts evenly = 28-32-32- (36) sts. Continue in Rib with K2/P2. When piece measures 4-4-5 (6) cm / 1½"-1½"-2" (2½") K1 round, at the same time increasing evenly to 32-36-39 (40) sts – insert a marker at the beginning of round and a marker after 16-18-18 (20) sts – measure piece from here. Now purl all sts and at the same time working M.3 over the middle 12 sts on top of hand (the first 16-18-18 (20) sts = top of hand) – arrow in diagram marks the middle. The 2 bigger sizes: At the same time, after 1 (2) cm / ½"-¾" in pattern, put the last 5 (6) sts on round on a holder for thumb. Cast on 5 (6) new sts over the holder on next row. All sizes: When piece measures 6-7-8 (9) cm / 2½"-2¾"-3" (3½") – adjust after 1 or 2 rounds after a cable – dec 8-9-9 (10) sts evenly on every other round a total of 3 times = 8-9-9 (10) sts left (dec 1 st by P2 tog). Pull a double strand of Alpaca through remaining sts, pull tight and sew. Thumb: Put the 5 (6) sts from holder back on double pointed needles size 2.5mm/US 1or2 and pick up 7 (8) sts behind these = 12 (14) sts. Purl until thumb measures 3 (4) cm / 1" (1½"). Now P2 tog around. Pull yarn through remaining sts and sew. Make another mitten, but make thumb in the other side (applies to the 2 bigger sizes). String: Cast on 4 sts using Alpaca on needles size 2.5mm/US 1 or 2 and knit a tube as follows: *K1, put yarn in front of piece, slip 1 st as if to purl, put yarn behind piece*, repeat from *-* on all rows until string measures approx 62-67-74 (86 to 96) cm / 24½"-26½"-29" (334" to 38") (length between child’s wrists). Bind off and attach string to each mitten. SOCKS: Size: 1/3 – 6/9 – 12/18 months (2/4 years) To fit foot length: 10-11-12 (14) cm / 4"-4½"-4¾" (5½") The sock is worked in the round top down. Cast on 44-48-52 (56) sts using Alpaca on double pointed needles size 2.5mm/ US 1or2. K1 round and continue in Rib with K2/P2 until piece measures 8-8-9 (10) cm / 3"-3¼"-3½" (4"). K1 round, at the same time dec 4-8-8 (8) sts evenly = 40-40-44 (48) sts. Now work heel as follows: work 3-3.5–3.5 (4.5) cm / 1"-1¼"-1¼" (1¾") in stockinette stitch back and forth over 16-16-16 (18) sts mid back. Heel decreases: (1st row = right side): K 9-9-9 (10), K2 tog into back of st, K1, turn the piece, 2nd row: slip 1 st as if to knit, P 3-3-3 (4), P2 tog, P1, turn the piece, 3rd row: slip 1 st as if to knit, K 4-4-4 (5), K2 tog into back of st, K1, turn the piece, 4th row: slip 1 st as if to knit, P 5-5-5 (6), P2 tog, P1, turn the piece, 5th row: slip 1 st as if to knit, K 6-6-6 (7), K2 tog into back of st, K1, turn the piece, 6th row: slip 1 st as if to knit, P 7-7-7 (8), P2 tog, P1, turn the piece, 7th row: K2 tog, K 6-6-6 (8), K2 tog into back of st = 8-8-8 (10) sts on row ( = total 32-32-36 (40) sts. Pick up 7-8-8- (11) sts on each side of heel and put all sts on same needle = 46-48-52 (62) sts. Continue in stockinette st over all sts. At the same time, dec 1 st on each side of the upper 18-20-22 (26) sts: on every other row a total of 7 times = 32-34-38 (48) sts. When foot measures 8-9-9 (11) cm / 3"-3½"-3½" (4½") from the beginning of the dec for heel, insert a marker each side. Now dec on both sides of each marker (= 4 dec per round) on every round a total of 7-7-8 (10) times. Pull yarn though remaining sts and sew. BLANKET: see pattern 14-20 RATTLE: see pattern 14-30 |
||||||||||
Diagram explanations |
||||||||||
|
||||||||||
|
||||||||||
|
||||||||||
Have you finished this pattern?Tag your pictures with #dropspattern #lilletrilleset or submit them to the #dropsfan gallery. Do you need help with this pattern?You'll find 23 tutorial videos, a Comments/Questions area and more by visiting the pattern on garnstudio.com. © 1982-2025 DROPS Design A/S. We reserve all rights. This document, including all its sub-sections, has copyrights. Read more about what you can do with our patterns at the bottom of each pattern on our site. |
||||||||||


With over 40 years in knitting and crochet design, DROPS Design offers one of the most extensive collections of free patterns on the internet - translated to 17 languages. As of today we count 314 catalogs and 11822 patterns - 11812 of which are translated into English (US/in).
We work hard to bring you the best knitting and crochet have to offer, inspiration and advice as well as great quality yarns at incredible prices! Would you like to use our patterns for other than personal use? You can read what you are allowed to do in the Copyright text at the bottom of all our patterns. Happy crafting!
Post a comment to pattern DROPS Baby 14-2
We would love to hear what you have to say about this pattern!
If you want to leave a question, please make sure you select the correct category in the form below, to speed up the answering process. Required fields are marked *.