
Popular categories
Looking for a yarn?


|
||||||||||
Lille Trille |
||||||||||
 |
 |
|||||||||
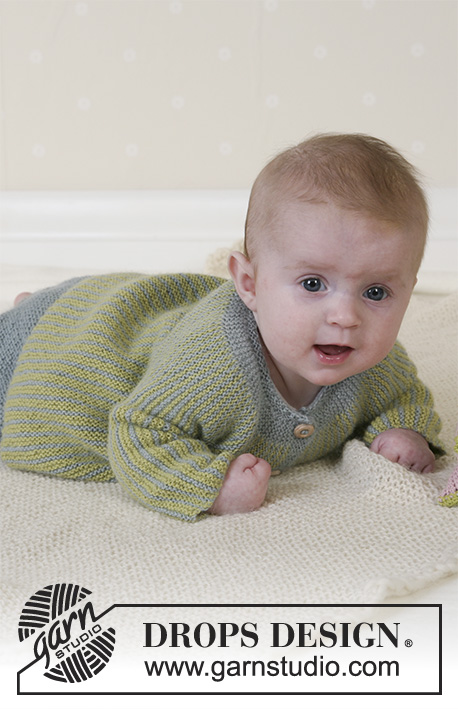
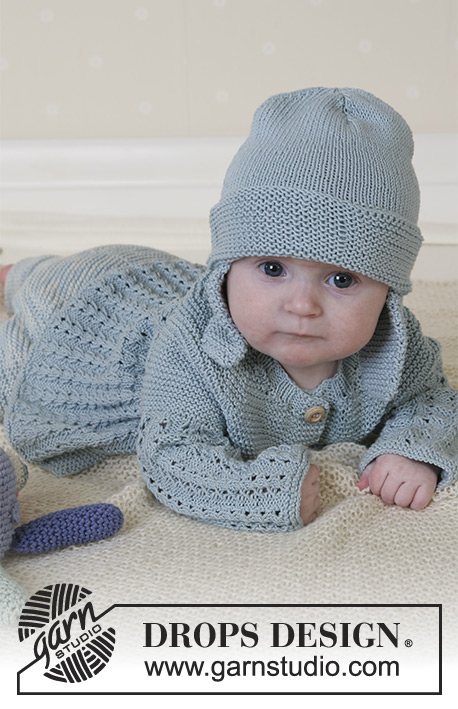
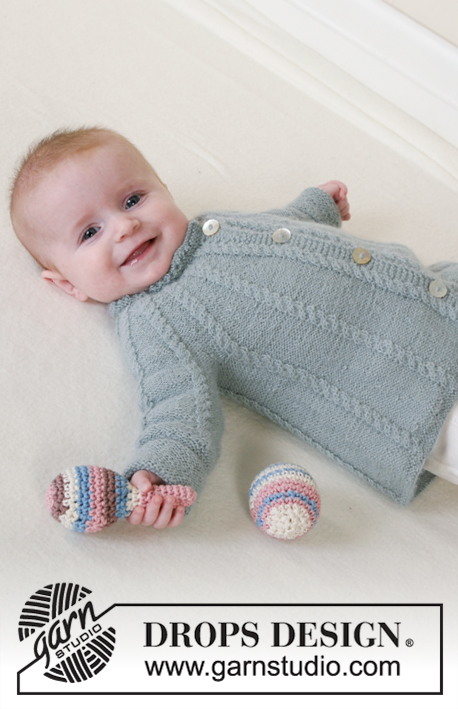
Knitted jacket with round yoke and cables, hat with pompons, mittens and socks in DROPS Alpaca for baby and children. Size 1 to 3 years.
DROPS Baby 14-2 |
||||||||||
|
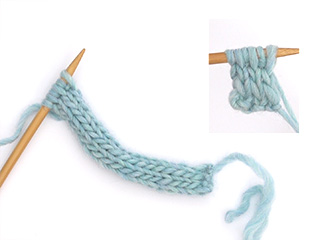
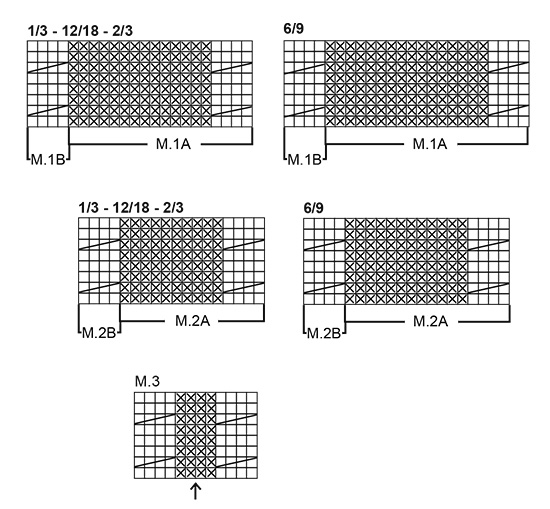
Gauge: 26 sts x 34 rows on needles size 2.5 mm / US 1or2 in stockinette sts = 10 x 10 cm / 4" x 4". Pattern: See diagrams M.1 to M.3. The diagrams show all the rows in the pattern seen from the right side. Garter sts (back and forth): Knit all rows Garter sts (in the round on circular needle): knit 1 round, purl 1 round Button holes: Make button holes on right front band from the right side as follows: Knit tog 2nd and 3rd st from the edge, 1 yo (knit yo on next row). Make buttonholes as follows: Size 1/3 months: 5, 12, 19 and 26.5 cm / 2",4¾",7½",10½" Size 6/9 months: 7, 14, 21 and 28.5 cm / 2¾",5½",8¼",11¼" Size 12/18 months: 8, 16, 24 and 32.5 cm / 3⅛",6¼",9½",12¾" Size 2/3 years: 9, 16, 23, 30 and 37.5 cm / 3½",6¼",9",11¾",14¾" JACKET: Front and back piece: Knit the jacket back and forth on circular needle from mid front. Remember buttonholes on right front band – see above. Cast on 179-199-213 (246) sts (includes 5 front band sts, knitted in garter sts throughout) with Alpaca on needle size 2.5mm/US 1 or 2 and knit 6 rows garter sts (1st row = right side). Continue with 1 row stockinette sts, at the same time inc 15-15-17 (20) sts evenly on row (do not inc over front band sts) = 194-214-230 (266) sts. Work next row as follows from the wrong side: 5 front band sts, M.1B (= 4 sts), M.1A over the next 180-200-216 (252) sts (chose diagram for appropriate size - from wrong side, read the diagram from left to right) and finish with 5 front band sts. Continue the pattern. At the same time, when piece measures 4-5-5 (6) cm / 1½"-2"-2" (2⅜") dec 1 st in each purled section by purling the 2 middle P sts tog (seen from the right side). Repeat the dec on every 3.5-3.5-4.5 (5) cm / 1¼"-1¼"-1¾" (2") a total of 3 times until there are 10-12-10 (10) P sts left in each purled section = 154-174-182 (210) sts on row. When piece measures 17-18-20 (23) cm / 6¾"-7"-8" (9"), work next row as follows: K 39-43-45 (52) sts (= front piece), bind off 6-8-8- (8) sts for armhole, K 64-72-76 (90) sts (= back piece), bind off 6-8-8 (9) sts for armhole, K 39-43-45 (52) sts (= front piece). Put the piece aside and work the sleeves. Sleeve: Cast on 40-42-44 (48) sts with Alpaca on double pointed needles size 2.5mm / US 1or2 and work garter sts in the round on needles. When piece measures 5 cm / 2", insert a marker – measure piece from here. Continue in garter sts until piece measures 5 cm / 2" and then work 1 round stockinette sts, at the same time inc 4-6-18 (20) sts evenly on round = 44-48-62 (68) sts. Work next round as follows – remember diagram for appropriate size: Size 1/3 months: M.2B (= 4 sts), P4, M.2A over the next 28 sts, M.2B (= 4 sts), P4 Size 6/9 months: M.2B (= 4 sts), P4, M.2A over the next 32 sts, M.2B (= 4 sts), P4 Size 12/18 months: P1, M.2A over the next 56 sts, M.2B (= 4 sts), P1 Size 2/3 years: M.2B (= 4 sts), P2, M.2A over the next 56 sts, M.2B (= 4 sts), P2 Insert a marker at the beginning of round and let the marker follow the piece as you progress (for size 1/3 months + 6/9 months + 2/3 years, insert the marker in the middle of the first cable on round) = mid underarm. Continue in pattern as described above – at the same time when piece measures 6 cm / 2⅜" inc 2 sts mid under arm (for size 1/3 months + 6/9 months + 2/3 years, inc 1 st on each side of cable). Inc 2 sts a total of 5-8-5 (9) times, for size 1/3 months: on every 6th round, for size 6/9 months: on every 5th round, for size 12/18 months: on every 8th round, for size 2/3 years: on every 7th round = 54-64-72 (86) sts – purl new sts. When piece measures 15-17-17 (24) cm / 6"-6¾"-6¾" (9½") – adjust so that next row is worked on the same row in diagram as back and front pieces so that pattern continues when body and sleeves are put in on the same needle – bind off 6-8-8 (8) sts mid under arm = 48-56-64 (78) left. Put sts on a holder and work the other sleeve. Yoke: Put sleeves in on the same needle as body piece where you bound off for armholes = 238-270-294 (350) sts. There are now 10-12-10 (10) purled sts (seen from the right side) between each cable all the way round. Continue in pattern as before. Work 3 or 4 rows (for size 2/3 years, work 7 or 8 rows) before starting the decreases – make sure that 1st row with dec are worked from the right side. Now dec 1 st in each purled section by purling tog the 2 middle P sts from the right side. Dec on every 6th row: 0-0-6 (8) times, on every 4th row: 8-8-2- (0) times and on every other row 0-2-0 (0) times. After the last dec there are 2 purled sts between each cable all the way round and there are 110-110-134 (158) sts on row. Discontinue the pattern after 1 row after a cable. Now work 1 row from the right side, at the same time adjusting number of sts to 63-65-69 (73) (do not dec over the front band sts). Knit 3 rows garter sts and knit next row as follows (holes): K5, *yo, K2 tog*, repeat from *-* until there are 4 sts left and knit these in garter sts. Knit 2 rows garter sts and bind off loosely from wrong side. Assembly: Sew the openings under the sleeves. Sew on buttons. Fold 5 cm / 2" on each sleeve edge towards the right side and attach with small, neat sts. HAT: Size: 1/3 – 6/9 – 12/18 months (2/4 years) To fit head circumference: 40/42 – 42/44 – 44/46 (48/50) cm / 16"-17"-17½" (19½") The hat is worked in the round. Loosely cast on 104-109-114 (120) sts with Alpaca on circular needle size 2.5 mm / US 1or2 and work in garter sts. When piece measures 5-6-6 (7) cm / 2"-2½"-2½" (2¾") insert a marker (folding edge) - measure piece from here. When piece measures 5-6-6 (7) cm / 2"-2½"-2½" (2¾") knit 1 round, at the same time inc evenly to 112-128-126 (140) sts. Now work diagram M.2A (remember diagram for appropriate size). When piece measures 12-12-14 (16) cm / 4¾"-4¾"-5½" (6¼") dec 1 st in each purled section by purling tog the 2 middle P sts on each round (the last time P tog 1 P and 1 K st) until there are 32-32-36 (40) sts left. Pull a double strand of Alpaca through the remaining sts and pull tight. The hat measures approx 15-16-17 (19) cm / 6"-6¼"-6¾" (7½") from marker. Fold the bottom edge towards the right side and attach each side with neat sts. Pompon: Make a pompon with a diameter of approx 5-6 cm / 2"-2½" and attach to top of hat. MITTENS: Size: 1/3 – 6/9 – 12/18 months (2/4 years) The 2 bigger sizes have thumbs, the 2 smaller sizes are without.. The mitten is worked in the round. Loosely cast on 34-36-36 (38) sts with Alpaca on double pointed needles size 2.5mm/US 1or2 and work garter sts – se explanation above – until piece measures 2 cm / ¾". Now K1 round and at the same time dec 6-4-4- (2) sts evenly = 28-32-32- (36) sts. Continue in Rib with K2/P2. When piece measures 4-4-5 (6) cm / 1½"-1½"-2" (2½") K1 round, at the same time increasing evenly to 32-36-39 (40) sts – insert a marker at the beginning of round and a marker after 16-18-18 (20) sts – measure piece from here. Now purl all sts and at the same time working M.3 over the middle 12 sts on top of hand (the first 16-18-18 (20) sts = top of hand) – arrow in diagram marks the middle. The 2 bigger sizes: At the same time, after 1 (2) cm / ½"-¾" in pattern, put the last 5 (6) sts on round on a holder for thumb. Cast on 5 (6) new sts over the holder on next row. All sizes: When piece measures 6-7-8 (9) cm / 2½"-2¾"-3" (3½") – adjust after 1 or 2 rounds after a cable – dec 8-9-9 (10) sts evenly on every other round a total of 3 times = 8-9-9 (10) sts left (dec 1 st by P2 tog). Pull a double strand of Alpaca through remaining sts, pull tight and sew. Thumb: Put the 5 (6) sts from holder back on double pointed needles size 2.5mm/US 1or2 and pick up 7 (8) sts behind these = 12 (14) sts. Purl until thumb measures 3 (4) cm / 1" (1½"). Now P2 tog around. Pull yarn through remaining sts and sew. Make another mitten, but make thumb in the other side (applies to the 2 bigger sizes). String: Cast on 4 sts using Alpaca on needles size 2.5mm/US 1 or 2 and knit a tube as follows: *K1, put yarn in front of piece, slip 1 st as if to purl, put yarn behind piece*, repeat from *-* on all rows until string measures approx 62-67-74 (86 to 96) cm / 24½"-26½"-29" (334" to 38") (length between child’s wrists). Bind off and attach string to each mitten. SOCKS: Size: 1/3 – 6/9 – 12/18 months (2/4 years) To fit foot length: 10-11-12 (14) cm / 4"-4½"-4¾" (5½") The sock is worked in the round top down. Cast on 44-48-52 (56) sts using Alpaca on double pointed needles size 2.5mm/ US 1or2. K1 round and continue in Rib with K2/P2 until piece measures 8-8-9 (10) cm / 3"-3¼"-3½" (4"). K1 round, at the same time dec 4-8-8 (8) sts evenly = 40-40-44 (48) sts. Now work heel as follows: work 3-3.5–3.5 (4.5) cm / 1"-1¼"-1¼" (1¾") in stockinette stitch back and forth over 16-16-16 (18) sts mid back. Heel decreases: (1st row = right side): K 9-9-9 (10), K2 tog into back of st, K1, turn the piece, 2nd row: slip 1 st as if to knit, P 3-3-3 (4), P2 tog, P1, turn the piece, 3rd row: slip 1 st as if to knit, K 4-4-4 (5), K2 tog into back of st, K1, turn the piece, 4th row: slip 1 st as if to knit, P 5-5-5 (6), P2 tog, P1, turn the piece, 5th row: slip 1 st as if to knit, K 6-6-6 (7), K2 tog into back of st, K1, turn the piece, 6th row: slip 1 st as if to knit, P 7-7-7 (8), P2 tog, P1, turn the piece, 7th row: K2 tog, K 6-6-6 (8), K2 tog into back of st = 8-8-8 (10) sts on row ( = total 32-32-36 (40) sts. Pick up 7-8-8- (11) sts on each side of heel and put all sts on same needle = 46-48-52 (62) sts. Continue in stockinette st over all sts. At the same time, dec 1 st on each side of the upper 18-20-22 (26) sts: on every other row a total of 7 times = 32-34-38 (48) sts. When foot measures 8-9-9 (11) cm / 3"-3½"-3½" (4½") from the beginning of the dec for heel, insert a marker each side. Now dec on both sides of each marker (= 4 dec per round) on every round a total of 7-7-8 (10) times. Pull yarn though remaining sts and sew. BLANKET: see pattern 14-20 RATTLE: see pattern 14-30 |
||||||||||
Diagram explanations |
||||||||||
|
||||||||||
|
||||||||||

|
||||||||||
|
Have you made this or any other of our designs? Tag your pictures in social media with #dropsdesign so we can see them! Do you need help with this pattern?You'll find tutorial videos, a Comments/Questions area and more by visiting the pattern on garnstudio.com. © 1982-2024 DROPS Design A/S. We reserve all rights. This document, including all its sub-sections, has copyrights. Read more about what you can do with our patterns at the bottom of each pattern on our site. |
||||||||||


With over 40 years in knitting and crochet design, DROPS Design offers one of the most extensive collections of free patterns on the internet - translated to 17 languages. As of today we count 304 catalogs and 11422 patterns - 11417 of which are translated into English (US/in).
We work hard to bring you the best knitting and crochet have to offer, inspiration and advice as well as great quality yarns at incredible prices! Would you like to use our patterns for other than personal use? You can read what you are allowed to do in the Copyright text at the bottom of all our patterns. Happy crafting!
Comments / Questions (105)
Carol wrote:
Please can you tell me what type of yarn is used double knitting or Aran Thanks
20.02.2017 - 13:56DROPS Design answered:
Dear Carol, please click on shadecard to get further informations about the yarn. Happy knitting!
20.02.2017 - 15:56Frances wrote:
When it comes to the cable pattern for the sleeves in a 12/18 month size it reads: P1 M2A over next 56sts M2B(=4sts) P1 however shouldn't it be P1 M2B (=4sts) M2A over next 56sts M2B (=4sts) P1 so that the sleeve and body pattern continues when joined? It worked for me! But when it comes to length it reads 'when piece measures 15-17-17(24) cm' surely for a 12/18 month old it should be about 19cm or thereabouts so 15-17-19 (24). 17cm for 6/9 month and 12/18 month?
02.01.2017 - 07:15DROPS Design answered:
Dear Frances, you have to work P1, M2A (= cable + P sts), then finish with M.2B (only cable), P1 - inc mid under sleeve will then come before first M2A and after M2B. Measurement on sleeve is correct, yoke will be then somewhat longer (see also measurement chart). Happy knitting!
02.01.2017 - 09:15Frances wrote:
I have found a few discrepancies knitting jacket for 12/18 month old. Firstly where it tells you to repeat decreases In jacket body a total of 3 times until 10-12-12(10) P sts are left between cables it should be 10-12-10 (10). For 2/3 year old in the jacket body it reads Cast off 6-8-8(9), (at underarm) it should be Cast off 6-8-8-(8).
02.01.2017 - 07:07Jeg strikker str 6-9 mdr og kan ikke få det mønster i beskriver til at passe, jeg har været i forretningen hvor jeg købte garn, de kan heller ikke finde ud af det, og de svar i har skrevet til andre er jo bare en gentagelse af det der står i opskriften, har i prøvet selv at strikke det, for at se at det ikke stemmer ? Jeg kan ihverfald ikke få det til at passe. Jeg håber at i vil tjekke det rigtigt, så jeg kan få hjælp med det.
20.12.2016 - 23:16DROPS Design answered:
Hej Yvonne. Nu er det jo ikke saadan at vi sidder og prövestrikker hver eneste opskrift selv, men jo - vi tester faktisk ind imellem naar der er tvivl ;-). Men hvis du nu pröver at beskrive praecist hvad du synes er fejl, saa kan vi pröve at kigge igen og evt forklare dig det.
21.12.2016 - 14:10Hallo, sind die Angaben für den Halsausschnitt richtig? Es bleiben 110 M, dann sollen 63 M abgenommen werden, es bleiben 47 M, das ist dann viel zu eng um den Hals. Auf dem Foto schaut es auch weiter aus. Danke für Ihre Info.
07.05.2016 - 09:45DROPS Design answered:
Liebe Anita, vielen Dank für den Hinweis, Sie haben völlig recht, da ist bei der Übersetzung ein Fehler passiert. Wir werden das gleich korrigieren, richtig muss es heissen: ... gleichzeitig gleichmässig verteilt Maschen abnehmen, bis noch 63-65-69 (73) M. übrig sind.
10.05.2016 - 09:33Skal man strikke 2 x 5 cm med rib i starten på ærmet? Det fremgår ikke ret tydeligt, at man skal strikke yderligere 5 cm efter mærketråden i opskriften, men det ser sådan ud på billedet.
05.05.2016 - 09:36DROPS Design answered:
Hej Susanne, Når arb måler 5 cm sættes der 1 mærketråd - herfra måles arb! Fortsæt i retstrik til arb måler 5 cm (fra mærketråden). God fornøjelse!
06.05.2016 - 10:16Guten Tag, ich verstehe die Abkürzungen vom Diagramm M1A nicht Str 1/3 mnd + 12/18 mnd + 2/4 'ar bitte erklären und wann nimmt man die 15 Maschen auf ? nachdem man die 3 Krausrippen gestrickt hat? Vielen Dank
14.04.2016 - 16:19DROPS Design answered:
Hallo Anita, das sind die Größen. mnd = Monate und år= Jahr. Das Diagramm ist ein Bild, daher konnten wir bei dieser älteren Anleitung die norwegischen Wörter nicht übersetzen. "Gleichzeitig" aufnehmen bedeutet: aufnehmen, sobald man mit den Krausrippen beginnt, also in der ersten R.
15.04.2016 - 07:19Bonjour, J'aimerais tricoter cet ensemble mais je me pose une question pour la quantité de laine à acheter pour le bonnet, les moufles et les chaussettes, c'est 100g pour chaque élément ou 100g pour la totale ? D'avance, je vous remercie de votre réponse
08.04.2016 - 10:36DROPS Design answered:
Bonjour Nathalie, dans les 2 premières tailles, il faut 100 g en DROPS Alpaca pour réaliser l'ensemble: bonnet, moufles et chaussettes. Bon tricot!
08.04.2016 - 12:01Thank you very much for your help. I now know how to read a diagram. I was reading It left to right instead of right to left. Thank you!
31.10.2015 - 20:17As I read the pattern the 4 purls in between M2B and M2A is not correct because since M2A begins with 12 purls it adds up to 16 purls in the first of 2 M2A (32 stitches). I began the row with M2B (For cable). Should I begin with the 4 purls?
31.10.2015 - 16:53DROPS Design answered:
Dear Mrs Conceição, in size 6/9 months, work: M.2B (= K 4), P4, M.2A over the next 32 sts (= *K4, P12* repeat from *-* a total of 2 times), M.2B (= K4), P4. read more about diagrams here. Happy knitting!
31.10.2015 - 18:22