
Popular categories
Looking for a yarn?


Comments / Questions (99)
![]() Marter, Manuela wrote:
Marter, Manuela wrote:
Hallo, ich bin dabei das Kleid zu stricken. Beim Ärmel heißt es nach der 1. Abnahme von 6 M an der unteren Ärmelmitte, dass ich am Anfang jeder Reihe 2 M. bds. abketten muss, bis die Arbeit 22 cm hat. Zwischen 18 und 22 cm sind 4 cm, das kann dann also sein, dass ich insgesamt 10 M abnehmen muss, verstehe ich das richtig? Und dann nochmal 3 M bds.
29.04.2025 - 07:48DROPS Design answered:
Liebe Frau Martel, also diese 2 Maschen sollen Sie beidseitig abketten, so stricken Sie bis die Ärmel ca 22 cm misst, aber passen Sie so an, daß Sie dieselbe Anzahl beidseitig abgekettet haben damit die Ärmelkugel symmetrisch wird, nach 2 Reihen (1 Hin- + 1 Rückreihe) haben Sie 2 Maschen beidseitig (insgesamt 4) abgekettet , nach 4 Reihen, wurden 4 Maschen beidseitig (insgesamt 8) abgekettet usw. Dann noch 3 Mal am Anfang der 2 nächsten Reihen abketten und die restlichen Maschen abketten. Viel Spaß beim Stricken!
29.04.2025 - 09:12
![]() Linda wrote:
Linda wrote:
I am knitting the booties/socks and have a question. I have gotten to the part where you put 13 stitches on a holder for each end. Now ready to purl across the 12 middle stitches. Do I cut the yarn end from the 1st 13 stitches on holder and then start with a new end to purl the 12 middles sts? Or do I simply pull it across the 13 sts on the holder to the 12 sts in the middle and start my purl rows? Thanks.
10.04.2025 - 19:33DROPS Design answered:
Dear Linda, you can cut the yarn before slipping the first 13 sts so that you join the yarn to work the middle 12 sts from WS, then cut it after the middle part is done, then joining it when starting from the 13 sts on the right side to work sole over all stitches. Happy knitting!
11.04.2025 - 09:11
![]() Agneta Malmberg wrote:
Agneta Malmberg wrote:
Det passar inte när jag ska montera ihop ärmarna med klänningen. Ser inte ut som på ritningen
11.09.2024 - 08:22DROPS Design answered:
Hej Agneta, hvad er det som ikke passer, er det mønsteret, målene på ærmerne eller målene på ærmegabet? Du finder alle mål i måleskitsen nederst i opskriften.
13.09.2024 - 14:22
![]() Agneta Malmberg wrote:
Agneta Malmberg wrote:
Ärmarna passar inte till klänningen. Ser inte ut som på mönstret heller.
10.09.2024 - 12:01DROPS Design answered:
Hej Agneta, det er samme mønster M2 på ærmerne som øverst på klänningen. Hvad er det du ikke får til at stemme?
11.09.2024 - 07:43
![]() Anna wrote:
Anna wrote:
Buongiorno, probabilmente non traduco correttamente, ma non riesco a capire come fare le diminuzioni alla fine della gonna. Se parto da 192 maglie e riduco in ogni sezione le maglie a diritto da 3 a 1 e quelle a rovescio da 3 a 2 mi ritrovo con 96 maglie e non con 112 come nel progetto. Cosa sbaglio? Grazie
02.07.2024 - 11:45DROPS Design answered:
Buonasera Anna, per le maglie rovescio, deve diminuire a sezioni alterne, non in tutte le sezioni a rovescio. Buon lavoro!
03.07.2024 - 18:20
![]() Anne wrote:
Anne wrote:
Wordt het onderste gedeelte in het rond gebreidt? Of heen en weer?
03.12.2022 - 15:58DROPS Design answered:
Dag Anne,
Het rokgedeelte wordt in de rondte gebreid.
04.12.2022 - 16:02
![]() Veronique Renouard wrote:
Veronique Renouard wrote:
Merci beaucoup pour votre réponse ! Je vais pouvoir continuer mon ouvrage Vos modèles et les explications sont vraiment très bien J adore tricoter vos ouvrages
23.11.2022 - 09:39
![]() Renouard Veronique wrote:
Renouard Veronique wrote:
Bonjour , je suis en train de faire la robe, et je ne comprend pas les explications à partir du devant droit pour « rabattre les 10 premières mailles côté milieu devant » doit on rabattre les 10 premières des 70 mailles? , et pour le devant gauche je ne comprend pas « relever au dos du devant droit »et relever d’un côté à l autre sur le haut du rang envers » Merci pour votre aide
22.11.2022 - 17:15DROPS Design answered:
Bonjour Mme Renouard, pour le devant droit, vous rabattez les 10 premières mailles en début de rang sur l'endroit, puis diminuez pour l'encolure du même côté (début de rang sur l'endroit). Pour le devant gauche, relevez 1 maille derrière les mailles du devant droit (en commençant sur le côté, vous laisserez les 10 dernières mailles) - comme on le montre au time code 01:02 dans cette vidéo (pour un col châle, mais la technique pour relever les mailles sera la même), et vous diminuerez cette fois en fin de rang sur l'endroit. Bon tricot!
23.11.2022 - 08:49
![]() Jilke wrote:
Jilke wrote:
Hallo!\r\n\r\nWat een schattig setje! Ik wil deze graag breien, maar ik zie de tekeningen M.1 en M.2 nergens staan. Kunt u helpen?\r\n\r\nAlvast veel dank!
16.08.2022 - 19:18DROPS Design answered:
Dag Jilke,
De teltekeningen M.1 en M.2 staan rechts onder naast de maattekening van het jurkje onderaan de beschrijving.
16.08.2022 - 21:11
![]() Marja De Jonge wrote:
Marja De Jonge wrote:
Ik ben dit patroon aan het breien maar kom nu wol tekort en kan het verfbad niet meer krijgen. dus dacht ik er een overgooiertje van te maken. nu denk ik dat ik bij de armsgaten dan anders moet gaan minderen zou u kunnen zeggen hoeveel en wanneer dat ik dan moet minderen? Met vr.gr. Marja de Jonge
17.11.2021 - 16:55DROPS Design answered:
Dag Marja,
In principe hoef je het armsgat niet aan te passen. Je zou een rand rondom het armsgat kunnen haken, net als de rand bij de voorpanden.
23.11.2021 - 12:52
|
||||||||||||||||
Sunday Stroll#sundaystrollset |
||||||||||||||||
 |
 |
|||||||||||||||
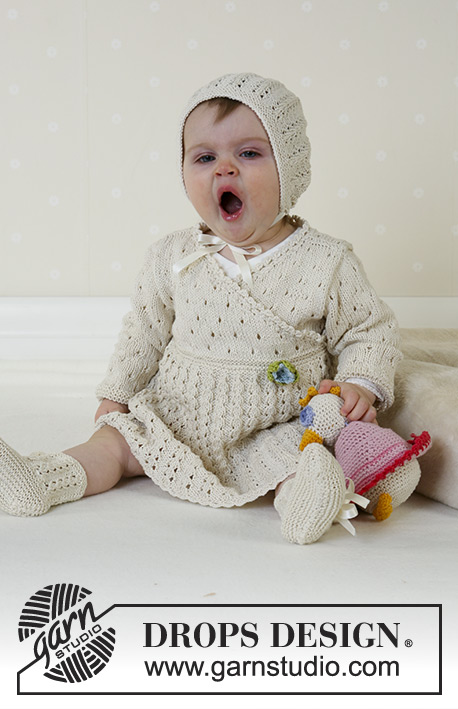
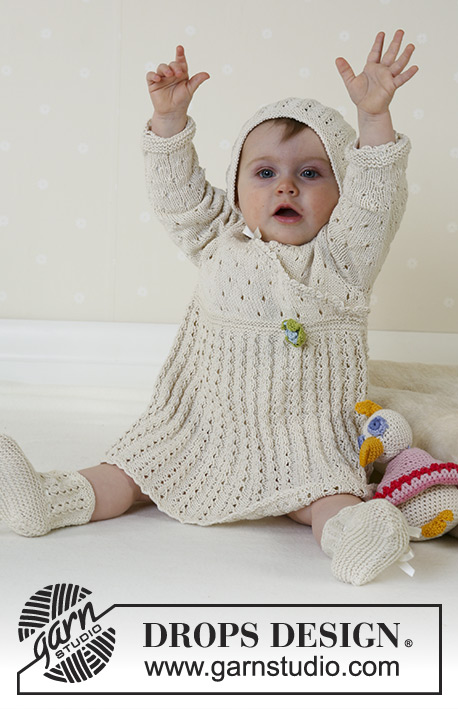
The DROPS set comprises: Dress, bonnet, and socks.
DROPS Baby 13-17 |
||||||||||||||||
|
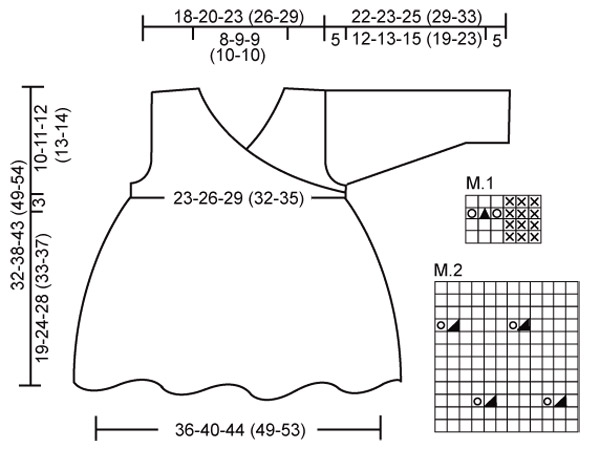
Knitting gauge: 24 sts x 32 rows on needles size 3 mm / US 2or3 in stockinette sts = 10 x 10 cm / 4" x 4" and 27 sts x 32 rows in chart M.1 = 10 x 10 cm / 4" x 4". Garter sts (circular needles): Knit 1 round, Purl 1 round. Garter sts (back and forth on needle): Knit all sts. Pattern: See diagram M.1 and M.2. The diagram is showing all rows seen from the right side. DRESS: Dress: The piece is knitted on circular needles from the bottom and up. Cast on 192-216-240 (264-288) sts loosely on circular needles size 3 mm / US 2or3 and knit 2 rounds of garter sts. Continue in chart M.1. When the piece measures 17-22-26 (31-35) cm / 6¾"-8¾"-10¼" (12¼"-13¾") – adjust to a whole repeat –bind off to 112-126-140 (154-168) sts as follows: K the 3 K’s tog to 1K. In addition reduce every other P-repeat from 3P to 2P as follows: P2 tog. Insert a marker at the beginning of next round and another one after 56-63-70 (77-84) sts. Knit 8 round of garter sts. Split the piece at the markers and continue each piece separately. Back piece: = 56-63-70 (77-84) sts. Work following chart M.2 – sts that does not fit into pattern are worked in stockinette sts. Note! At the same time when the piece measures 22-27-31 (36-40) cm / 8¾"-10⅝"-12¼" (14¼"-15¾") bind off for armhole each side on every other row: 3 sts 1 time, 2 sts 1 time and 1 st 2 times = 42-49-56 (63-70) sts. When the piece measures 31-37-42 (48-53) cm / 12¼"-14½"-16½" (19"-21") bind off the middle 18-19-20 (21-22) sts for the neck. Continue to bind off 1 st at the neck side = 11-14-17 (20-23) sts left for shoulder. Bind off remaining sts when the piece measures 32-38-43 (49-54) cm / 12½"-15"-17" (19¼"-21¼"). Right front: = 56-63-70 (77-84) sts. Work following chart M.2 at the same time bind off for the slanting front edge as follows: Bind off the first 10 sts. Continue to bind off towards mid front on every other row as follows: 2 sts 8-10-13 (15-18) times and 1 st 12-12-10 (10-8) times. At the same time when the piece measures 22-27-31 (36-40) cm / 8¾"-10⅝"-12¼" (14¼"-15¾") bind off for the armhole as done on the back piece. After all bind off’s for the front edge and the armhole = 11-14-17 (20-23) sts left for the shoulder. Bind off remaining sts when the piece measures 32-38-43 (49-54) cm / 12½"-15"-17" (19¼"-21¼"). Left front: Pick up 56-63-70 (77-84) sts on the backside of the right front piece on needles size 3 mm / US 2or3 (– pick up from side to side in the top purl row). Continue to work follow chart M.2 at the same time bind off for the slanting edge and the armhole as done for the right front piece but opposite. Sleeve: Cast on 36-36-36 (42-42) sts on double pointed needles size 3 mm / US 2or3 and knit 8 rounds of garter sts, continue in M.2. When the piece measures 5 cm / 2" inc 2 sts mid under arm on every 6.-5.-4. (6.-6.) round a total of 6-8-11 (10-12) times = 48-52-58 (62-66) sts – knit new sts into M.2 as you go along. When the piece measures 17-18-20 (24-28) cm / 6¾"-7"-8" (9½"-11") bind off 6 sts mid under and now work back and forth on row. Continue to bind off for the sleeve cap 2 sts on every other row until the piece measures 21-22-24 (28-32) cm / 8¼"-8¾"-9½" (11"-12½"). Then bind off 3 sts each side 1 time and bind off remaining sts when the piece measures approx. 22-23-25 (29-33) cm / 8¾"-9"-9¾" (11⅜"-13"). Put the piece aside and knit the other sleeve. Assembly: Sew the shoulder seams. Sew the side seams in the outer most part of the outer st so the seam cannot be seen. Sew in the sleeves. Crochet edge: Crochet an edge around booth sleeves and the bottom part of the dress on hook size C as follows: 1 sc in the first st, *ch 4, skip 2 sts, 1 sc in the next st*, repeat from *-* and end with ch 4 and a sl st in the first sc from beginning of round. Crochet around the slanting edge and the neck on hook size C as follows: crochet 1 row of sc and the next row as follows: 1 sc in the first st, *ch 4, 1 dc in the first of these ch, skip 1 st, 1 sc in the next sc*, repeat from *-*. Crochet flower: Ch 3 with hook size C and light blue and make a circle with a sl st in 1st ch. 1st round: Crochet 5 sc around the circle and finish with a sl st in the sc from beginning of round. 2nd round: *ch 4, 1 dc in the 1st of the 4 ch, 1 sc in the next st*, repeat from *-* = 5 leaves, fasten off. Ch 3 with hook size C and green and make a circle with a sl st in 1st ch. 1st round: Crochet 5 sc around the circle and finish with a sl st in the sc from beginning of round. 2nd round: *ch 4, 3 dc in the 1st of the 4 ch, 1 sc in the next st*, repeat from *-* = 5 leaves, fasten off. Sew the light blue flower on to the green flower and sew it onto the dress. _________________________________________ BONNET: To fit head circumference: approx 40/42 – 42/44 – 44/46 (48/50 – 50/52) cm / 16-17-18 (19-20) inches Bonnet: The bonnet is knitted back and forth on circular needle. Cast on loosely 77-83-89 (95-101) sts (including 1 edge st each side) on circular needle size 3 mm / US 2or3. Knit 8 rows of garter sts. Knit the next row as follows from the right side: 1 edge st, chart M.1 over the following 72-78-84 (90-96) sts, P3 and 1 edge st. Continue this way until the piece measures 11-12-13 (14-15) cm / 4⅜"-4¾"-5⅛" (5½"-6"). Stop after a full repeat of M.1 and then work 2 rows of stockinette sts over all sts. Bind off 26-28-30 (32-34) sts each side = 25-27-29 (31-33) sts left on row (= the middle section on the back of the bonnet). Measure the piece from here for now on! Knit in garter sts and bind off when the middle piece measures 10-11-12 (13-14) cm / 4"-4⅜"-4¾" (5⅛"-5½"). Sew the middle piece to the side pieces. Pick up 78-82-90 (94-102) sts from the right side on circular needle size 3 mm / US 2or3 at the bottom edge of the bonnet. K 1 row, and continue as follows: *K2 tog, make a yo* repeat from *-*, finish with K2. Continue to knit 2 rows of garter sts and bind off loosely. Pull silk ribbon, approx 80 cm / 32", through the eyelet row. _________________________________________ SOCKS: To fit foot length: 10-11-12 (14-15) cm / 4"-4⅜"-4¾" (5½"-6") Socks: The sock is knitted back and forth from mid back. Fold a circular needle size 3 mm / US 2or3 and cast on with Safran on both needles (this is done to make the edge more stretchy) 47-53-53 (59-59) sts. Pull out one of the needles and knit 4 rows of garter sts. Knit the next row as follows from the right side: K1, chart M.1 over the following 42-48-48 (54-54) sts, P3 and K1. Continue this way until the piece measures 5-6-6 (7-8) cm / 2"-2½"-2½" (2⅜"-3⅛"). Purl 1 row from the wrong side at the same time dec 9-11-7- (9-9) sts evenly distributed on row = 38-42-46 (50-50) sts. Knit the following row as follows from the right side: K1, *K2 tog, make a yo*, repeat from *-*, and finish with K1. Purl 1 row from the wrong side. Now put the outermost 13-15-17 (18-18) sts each side on a stitch holder. Knit 3-4-5 (6-7) cm / 1⅛"-1½"-2" (2¾"-3⅛") garter sts over the middle 12-12-12 (14-14) sts. Put sts from holder back on needle and pick up 8-10-12 (14-16) sts on each side of middle piece = 54-62-70(78-82) sts. Work 3.5-4-4.5 (5-5.5) cm / 1¼"-1½"-1¾" (2"-2¼") garter sts over all sts, at the same time after 2-2-2 (3-3) cm / ¾"-¾"-¾" (1⅛"-1⅛") dec on every other row until finished measurements as follows: Dec 1 st at the beginning and at the end of row and K2 tog on each side of the 2 middle sts. Bind off when foot measures 10-11-12 (14-15) cm / 4"-4⅜"-4¾" (5½"-6") and sew seam under foot and mid back. Pull a silk ribbon approx. 50 cm / 20" through the eyelet row. |
||||||||||||||||
Diagram explanations |
||||||||||||||||
|
||||||||||||||||
|
||||||||||||||||
Have you finished this pattern?Tag your pictures with #dropspattern #sundaystrollset or submit them to the #dropsfan gallery. Do you need help with this pattern?You'll find 29 tutorial videos, a Comments/Questions area and more by visiting the pattern on garnstudio.com. © 1982-2025 DROPS Design A/S. We reserve all rights. This document, including all its sub-sections, has copyrights. Read more about what you can do with our patterns at the bottom of each pattern on our site. |
||||||||||||||||


With over 40 years in knitting and crochet design, DROPS Design offers one of the most extensive collections of free patterns on the internet - translated to 17 languages. As of today we count 314 catalogs and 11822 patterns - 11812 of which are translated into English (US/in).
We work hard to bring you the best knitting and crochet have to offer, inspiration and advice as well as great quality yarns at incredible prices! Would you like to use our patterns for other than personal use? You can read what you are allowed to do in the Copyright text at the bottom of all our patterns. Happy crafting!
Post a comment to pattern DROPS Baby 13-17
We would love to hear what you have to say about this pattern!
If you want to leave a question, please make sure you select the correct category in the form below, to speed up the answering process. Required fields are marked *.