
Popular categories
Looking for a yarn?


|
||||||||||||||||
Sunday Stroll |
||||||||||||||||
 |
 |
|||||||||||||||
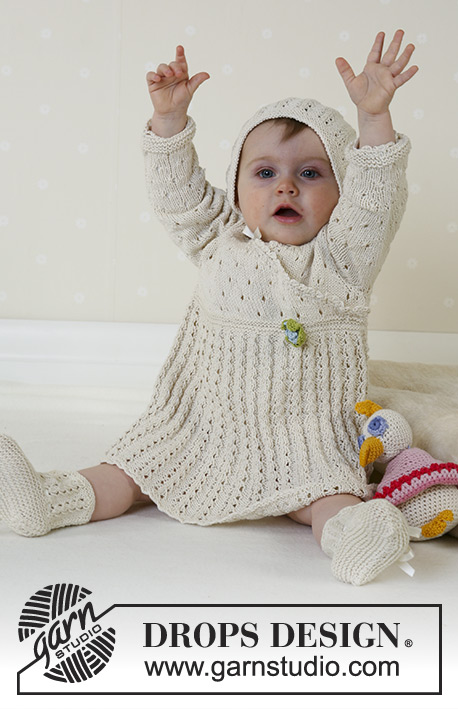
The DROPS set comprises: Dress, bonnet, and socks.
DROPS Baby 13-17 |
||||||||||||||||
|
Knitting gauge: 24 sts x 32 rows on needles size 3 mm / US 2or3 in stockinette sts = 10 x 10 cm / 4" x 4" and 27 sts x 32 rows in chart M.1 = 10 x 10 cm / 4" x 4". Garter sts (circular needles): Knit 1 round, Purl 1 round. Garter sts (back and forth on needle): Knit all sts. Pattern: See diagram M.1 and M.2. The diagram is showing all rows seen from the right side. DRESS: Dress: The piece is knitted on circular needles from the bottom and up. Cast on 192-216-240 (264-288) sts loosely on circular needles size 3 mm / US 2or3 and knit 2 rounds of garter sts. Continue in chart M.1. When the piece measures 17-22-26 (31-35) cm / 6¾"-8¾"-10¼" (12¼"-13¾") – adjust to a whole repeat –bind off to 112-126-140 (154-168) sts as follows: K the 3 K’s tog to 1K. In addition reduce every other P-repeat from 3P to 2P as follows: P2 tog. Insert a marker at the beginning of next round and another one after 56-63-70 (77-84) sts. Knit 8 round of garter sts. Split the piece at the markers and continue each piece separately. Back piece: = 56-63-70 (77-84) sts. Work following chart M.2 – sts that does not fit into pattern are worked in stockinette sts. Note! At the same time when the piece measures 22-27-31 (36-40) cm / 8¾"-10⅝"-12¼" (14¼"-15¾") bind off for armhole each side on every other row: 3 sts 1 time, 2 sts 1 time and 1 st 2 times = 42-49-56 (63-70) sts. When the piece measures 31-37-42 (48-53) cm / 12¼"-14½"-16½" (19"-21") bind off the middle 18-19-20 (21-22) sts for the neck. Continue to bind off 1 st at the neck side = 11-14-17 (20-23) sts left for shoulder. Bind off remaining sts when the piece measures 32-38-43 (49-54) cm / 12½"-15"-17" (19¼"-21¼"). Right front: = 56-63-70 (77-84) sts. Work following chart M.2 at the same time bind off for the slanting front edge as follows: Bind off the first 10 sts. Continue to bind off towards mid front on every other row as follows: 2 sts 8-10-13 (15-18) times and 1 st 12-12-10 (10-8) times. At the same time when the piece measures 22-27-31 (36-40) cm / 8¾"-10⅝"-12¼" (14¼"-15¾") bind off for the armhole as done on the back piece. After all bind off’s for the front edge and the armhole = 11-14-17 (20-23) sts left for the shoulder. Bind off remaining sts when the piece measures 32-38-43 (49-54) cm / 12½"-15"-17" (19¼"-21¼"). Left front: Pick up 56-63-70 (77-84) sts on the backside of the right front piece on needles size 3 mm / US 2or3 (– pick up from side to side in the top purl row). Continue to work follow chart M.2 at the same time bind off for the slanting edge and the armhole as done for the right front piece but opposite. Sleeve: Cast on 36-36-36 (42-42) sts on double pointed needles size 3 mm / US 2or3 and knit 8 rounds of garter sts, continue in M.2. When the piece measures 5 cm / 2" inc 2 sts mid under arm on every 6.-5.-4. (6.-6.) round a total of 6-8-11 (10-12) times = 48-52-58 (62-66) sts – knit new sts into M.2 as you go along. When the piece measures 17-18-20 (24-28) cm / 6¾"-7"-8" (9½"-11") bind off 6 sts mid under and now work back and forth on row. Continue to bind off for the sleeve cap 2 sts on every other row until the piece measures 21-22-24 (28-32) cm / 8¼"-8¾"-9½" (11"-12½"). Then bind off 3 sts each side 1 time and bind off remaining sts when the piece measures approx. 22-23-25 (29-33) cm / 8¾"-9"-9¾" (11⅜"-13"). Put the piece aside and knit the other sleeve. Assembly: Sew the shoulder seams. Sew the side seams in the outer most part of the outer st so the seam cannot be seen. Sew in the sleeves. Crochet edge: Crochet an edge around booth sleeves and the bottom part of the dress on hook size C as follows: 1 sc in the first st, *ch 4, skip 2 sts, 1 sc in the next st*, repeat from *-* and end with ch 4 and a sl st in the first sc from beginning of round. Crochet around the slanting edge and the neck on hook size C as follows: crochet 1 row of sc and the next row as follows: 1 sc in the first st, *ch 4, 1 dc in the first of these ch, skip 1 st, 1 sc in the next sc*, repeat from *-*. Crochet flower: Ch 3 with hook size C and light blue and make a circle with a sl st in 1st ch. 1st round: Crochet 5 sc around the circle and finish with a sl st in the sc from beginning of round. 2nd round: *ch 4, 1 dc in the 1st of the 4 ch, 1 sc in the next st*, repeat from *-* = 5 leaves, fasten off. Ch 3 with hook size C and green and make a circle with a sl st in 1st ch. 1st round: Crochet 5 sc around the circle and finish with a sl st in the sc from beginning of round. 2nd round: *ch 4, 3 dc in the 1st of the 4 ch, 1 sc in the next st*, repeat from *-* = 5 leaves, fasten off. Sew the light blue flower on to the green flower and sew it onto the dress. _________________________________________ BONNET: To fit head circumference: approx 40/42 – 42/44 – 44/46 (48/50 – 50/52) cm / 16-17-18 (19-20) inches Bonnet: The bonnet is knitted back and forth on circular needle. Cast on loosely 77-83-89 (95-101) sts (including 1 edge st each side) on circular needle size 3 mm / US 2or3. Knit 8 rows of garter sts. Knit the next row as follows from the right side: 1 edge st, chart M.1 over the following 72-78-84 (90-96) sts, P3 and 1 edge st. Continue this way until the piece measures 11-12-13 (14-15) cm / 4⅜"-4¾"-5⅛" (5½"-6"). Stop after a full repeat of M.1 and then work 2 rows of stockinette sts over all sts. Bind off 26-28-30 (32-34) sts each side = 25-27-29 (31-33) sts left on row (= the middle section on the back of the bonnet). Measure the piece from here for now on! Knit in garter sts and bind off when the middle piece measures 10-11-12 (13-14) cm / 4"-4⅜"-4¾" (5⅛"-5½"). Sew the middle piece to the side pieces. Pick up 78-82-90 (94-102) sts from the right side on circular needle size 3 mm / US 2or3 at the bottom edge of the bonnet. K 1 row, and continue as follows: *K2 tog, make a yo* repeat from *-*, finish with K2. Continue to knit 2 rows of garter sts and bind off loosely. Pull silk ribbon, approx 80 cm / 32", through the eyelet row. _________________________________________ SOCKS: To fit foot length: 10-11-12 (14-15) cm / 4"-4⅜"-4¾" (5½"-6") Socks: The sock is knitted back and forth from mid back. Fold a circular needle size 3 mm / US 2or3 and cast on with Safran on both needles (this is done to make the edge more stretchy) 47-53-53 (59-59) sts. Pull out one of the needles and knit 4 rows of garter sts. Knit the next row as follows from the right side: K1, chart M.1 over the following 42-48-48 (54-54) sts, P3 and K1. Continue this way until the piece measures 5-6-6 (7-8) cm / 2"-2½"-2½" (2⅜"-3⅛"). Purl 1 row from the wrong side at the same time dec 9-11-7- (9-9) sts evenly distributed on row = 38-42-46 (50-50) sts. Knit the following row as follows from the right side: K1, *K2 tog, make a yo*, repeat from *-*, and finish with K1. Purl 1 row from the wrong side. Now put the outermost 13-15-17 (18-18) sts each side on a stitch holder. Knit 3-4-5 (6-7) cm / 1⅛"-1½"-2" (2¾"-3⅛") garter sts over the middle 12-12-12 (14-14) sts. Put sts from holder back on needle and pick up 8-10-12 (14-16) sts on each side of middle piece = 54-62-70(78-82) sts. Work 3.5-4-4.5 (5-5.5) cm / 1¼"-1½"-1¾" (2"-2¼") garter sts over all sts, at the same time after 2-2-2 (3-3) cm / ¾"-¾"-¾" (1⅛"-1⅛") dec on every other row until finished measurements as follows: Dec 1 st at the beginning and at the end of row and K2 tog on each side of the 2 middle sts. Bind off when foot measures 10-11-12 (14-15) cm / 4"-4⅜"-4¾" (5½"-6") and sew seam under foot and mid back. Pull a silk ribbon approx. 50 cm / 20" through the eyelet row. |
||||||||||||||||
Diagram explanations |
||||||||||||||||
|
||||||||||||||||

|
||||||||||||||||
|
Have you made this or any other of our designs? Tag your pictures in social media with #dropsdesign so we can see them! Do you need help with this pattern?You'll find tutorial videos, a Comments/Questions area and more by visiting the pattern on garnstudio.com. © 1982-2024 DROPS Design A/S. We reserve all rights. This document, including all its sub-sections, has copyrights. Read more about what you can do with our patterns at the bottom of each pattern on our site. |
||||||||||||||||


With over 40 years in knitting and crochet design, DROPS Design offers one of the most extensive collections of free patterns on the internet - translated to 17 languages. As of today we count 304 catalogs and 11422 patterns - 11417 of which are translated into English (US/in).
We work hard to bring you the best knitting and crochet have to offer, inspiration and advice as well as great quality yarns at incredible prices! Would you like to use our patterns for other than personal use? You can read what you are allowed to do in the Copyright text at the bottom of all our patterns. Happy crafting!
Comments / Questions (94)
Ich bin dabei dieses schöne Modell zu stricken und bin bei dem ersten Ärmel angekommen. Nun meine Frage: Was heißt es genau Maschen "in der Mitte unter dem Ärmel" aufzuschlagen? Kommen die zusätzlichen Maschen in der Mitte des Teils (nach 18M für Größe 76/80)? Aber warum heißt es dann "unter dem Ärmel"? Oder eher an den Seiten? Vielen Dank
23.07.2019 - 23:40DROPS Design answered:
Liebe Elena, die Anleitung wurde beim Ärmel etwas umformuliert, vielleicht ist es nun deutlicher. Sie nehmen 2 Maschen an der unteren Ärmelmitte zu, d.h. an der Unterseite/Rückseite des Ärmels. Sie können den Rundenbeginn als untere Ärmelmitte festlegen und wie folgt an der unteren Ärmelmitte zunehmen: die 1. Masche stricken, 1 Umschlag arbeiten, dann im Muster bis 1 Masche vor Rundenende stricken, 1 Umschlag arbeiten und die letzte Masche der Runde stricken. Die Umschläge stricken Sie in der nächsten Runde verschränkt und arbeiten die neuen Maschen nach und nach ins Muster ein. Gutes Gelingen!
24.07.2019 - 17:20Nu har jeg ikke strikket ud fra opskrifter så længe og har virkelig problemer med at forstå hva jeg skal gøre efter jeg har strikket de 17 cm mønster på kjolen? Håbede der var en der kunne skære det ud i pap for mig😊 på forhånd tak
02.06.2019 - 03:04DROPS Design answered:
Hei Danielle. Når arbeidet måler 17 cm skal du felle 112 masker. Du har strikket M.1 over alle maskene (3 vrang, 3 rett). Du skal nå strikke alle rettmaskene sammen slik: 3 rett sammen. Samtidig skal du også felle i vrangmaskene på annenhver M.1 slik: 2 vrang sammen, 1 vrang. Dvs omgangen strikkes slik: 3 vrang, 3 rett sammen (= 1. rapport av M.1), 2 vrang sammen, 1 vrang, 3 rett sammen (= 2. rapport av M.1). Gjenta dette ut hele omgangen. Videre strikkes 4 riller (= 8 pinner rettstrikning) og arbeidet deles til forstykke og bakstykke.
03.06.2019 - 08:20Bonjour, je suis en train de faire les chaussettes. Je ne sais pas si il faut continuer les diminutions jusqu'à 10 cms de hauteur de pied ou les arrêter à 3,5cms. Merci d'avance pour votre aide
28.12.2017 - 09:38DROPS Design answered:
Bonjour Madame Raban, on doit tricoter 3,5 cm, la phrase avec les 10 cm a été supprimée, merci pour votre retour. Bon tricot!
02.01.2018 - 09:44He empezado el vestido en lana Baby Merino (en vez de Safran) y en M.1. el resultado no me queda igual, mis agujeros casi no se notan. No se bien debido a qué es, podría ser por cómo estoy tejiendo las lazadas? ¿Cuándo tejo las lazadas (las de la cuarta fila de M.1) tengo que tejerlas por la hebra delantera o por la hebra posterior. Espero su respuesta, gracias por adelantado.
02.12.2017 - 15:51DROPS Design answered:
Hola Mela, puedes consultar como tejer las lazadas aquí:
How to increase with a yarn over (yo) from Garnstudio Drops design on Vimeo.
17.12.2017 - 18:40Hallo, ich verstehe bei M1 nicht, was "li von rechts, re von links" meint. Können Sie das erklären?
24.11.2017 - 22:42DROPS Design answered:
Liebe Michaela, re von rechts, li von links = 1 M glatt rechts, dh diese Masche stricken Sie immer rechts in die Runde oder Hinreihe re und Rückreihe li. Viel Spaß beim stricken!
27.11.2017 - 08:55Hej! Jag ska börja med rad 2 på M1. Ska den raden läsas från vänster till höger, alltså att varvet börjar med tre räta maskor (som då hamnar över de tre aviga maskor som blev på första varvet), eller ska samtliga rader läsas från höger till vänster? Tack på förhand
23.07.2017 - 00:28DROPS Design answered:
Då du stickar runt ska alla rader läsas från höger till vänster, stickar du fram och tillbaka läser du raderna från rätsidan från höger till vänster och raderna från avigsidan från vänster till höger.
24.07.2017 - 13:50Bonjour Kathy je voudrais faire le bonnet par contre vous dites de monter 836 m!!!!y a-t-il erreure svp? Merci
31.03.2017 - 22:08DROPS Design answered:
Bonjour Gertrude, c'était une faute de frappe, on doit monter 83 m dans la 2ème taille. Merci, bon tricot!
03.04.2017 - 08:47I am confused about binding off for the neck on the back side. Starting with 42 stitches on the needles after the armhole decreases, it then says to bind off the center 18 stitches. This would leave 24 stitches on the needles, 12 on each side of the bound off stitches. Then it says to bind off 1 stitch at the neck side (what is the neck side?). This would leave 23 stitches total, but the pattern says there should be 11 stitches left.
06.10.2016 - 17:23DROPS Design answered:
Dear Charlotte, when you bind off 18 sts for neckline, 24 sts remain, ie 12 sts for each shoulder. Finish each shoulder separately and bind off then 1 st on next row from neckline = 11 sts remain for shoulder. Happy knitting!
07.10.2016 - 08:18Thanks you soooo much!!!! :-)
14.05.2016 - 16:32Hi - I love this pattern. I made the hat and i am trying to make the booties. It says to pick up 8 stitches from the middle. Since I end of the middle section how can i pick up stitches on the same side. I tried to pick them up but one of the seams was on the outside. Do i need to bind off the middle section and start again at the edge so i can pick them all up from the front? Sorry for confusion in advance :-) I am a new knitter :-)
13.05.2016 - 14:58DROPS Design answered:
Dear Kathy, after you have worked the middle sts for 3 cm, cut the yarn, then start a new row from RS knitting the first 13 sts from st holder, pick up 8 sts along right side of middle part, work the 12 mid sts, pick up 8 sts long left of middle part, and work the remaining 13 sts from st holder = 54 sts. Continue then in garter st. Happy knitting!
13.05.2016 - 15:28