
Looking for a yarn?


Comments / Questions (43)
![]() Ursula wrote:
Ursula wrote:
Hallo, ich verstehe nicht warum unten vorm Bündchen Maschen zugenommen werden sollen. Wird die Jacke nicht dadurch noch breiter oder ist das notwendig durch das Bündchenmuster.
22.02.2025 - 11:11
![]() Ursula wrote:
Ursula wrote:
Hallo, ich verstehe nicht warum unten vorm Bündchen Maschen zugenommen werden sollen. Wird die Jacke nicht dadurch noch breiter oder ist das notwendig durch das Bündchenmuster.
22.02.2025 - 11:08DROPS Design answered:
Liebe Ursula, für den gleichen Umfang bzw für die gleiche Breite braucht man für das Rippenmuster mehr Maschen mit den kleineren Nadeln als für das Glattrechts mit den grösseren Nadeln, deshalb wird man vor Bündchen zunehmen, Viel Spaß beim Stricken!
24.02.2025 - 08:11
![]() Carmen wrote:
Carmen wrote:
Hi! What’s the meaning of: Insert 1 marker inside the 3 outermost meshes on each side.? I have to put the mark in the mesh between the first and the third one? Than you!
21.01.2025 - 22:22DROPS Design answered:
Dear Carmen, inserting a marker inside 3 sts on each side (= 3 sts, 1 marker, middle of piece, 1 marker, 3 sts) will help you increasing on the right place, ie always after the first 3 sts and before the last 3 sts. See for example this lesson. Happy knitting!
22.01.2025 - 09:21
![]() Carmen wrote:
Carmen wrote:
Hi! What’ s the meaning of: Insert 1 marker inside the 3 outermost meshes on each side.? I have to out the marker in the mesh between the first and the third? Thank you
21.01.2025 - 22:20
![]() Franziska Neugeborn wrote:
Franziska Neugeborn wrote:
Hallo liebes Drops-Team, ich hätte eine Frage zu dem Anfang der Arme bzw. der verkürzten Reihen. Bei Größe L habe ich 72 Maschen aufgenommen, setzte ich den Maschenmarkierer bei der Hälfte (36 Masche) oder nach den 45 Maschen (Vorderteil)? Also wo liegt der Mittelpunkt der verkürzten Reihen?
31.10.2024 - 19:57DROPS Design answered:
Liebe Frau Neugeborn, der Mittelpunkt beim Ärmel ist bei der Markierung = die Hälfte der Maschen so in L nach 36 Maschen; die Schulterlinie ist schräg beim Rückenteil, die Mitte vom Ärmel ist dann etwas weiter am Vorderteil - schauen Sie mal diese Lektion, so sehen Sie die Markierung und die Schulterlinie. Viel Spaß Stricken!
01.11.2024 - 08:25
![]() Amanda wrote:
Amanda wrote:
Hej! Ska ökningarna mot vara till höger eller vänster? Är på första framstycket, vänstra. Med vänlig hälsning, Amanda
23.10.2024 - 14:11DROPS Design answered:
Hej Amanda, udtagningerne til V-hals skal være fra retsiden efter kantmaskerne/markøren. Se også vores videoer som viser hvordan man gør :)
24.10.2024 - 09:56
![]() Aiden wrote:
Aiden wrote:
Dear drops design, . I know that the 4 cm is to be measured from the picked. Should I start measuring after all stitches are picked or from 1st stitch
04.10.2024 - 18:00DROPS Design answered:
Dear Aiden, the stitches are all picked up in the same row. You should measure from that specific first row, including this row. Since in this case the beginning of both front pieces is that row of picked up stitches, you should measure 4cm from the beginning of the front pieces, so it includes the row with picked up stitches. Happy knitting!
06.10.2024 - 13:25
![]() Aiden wrote:
Aiden wrote:
In the left and right front piece, it is mentioned when the piece measures 4 cm. Is it 4 cm from top of the piece or the measurement starts after the 28 stitches are knit up
03.10.2024 - 13:28DROPS Design answered:
Dear Aiden, measure these 4 cm from the stitches picked up for front piece/shoulders. Happy knitting!
03.10.2024 - 16:21
![]() Julie Parker wrote:
Julie Parker wrote:
With the Elodie cardigan I am up to the right front side measuring 26 cm. How do you cast in the 12 stitches from the wrong side and work the 90 stitches on the back
05.09.2024 - 11:42DROPS Design answered:
Dear Mrs Parker, work the stitches from right front piece as before from wrong side, then cast on 12 sts (see lesson or video), work the 90 sts on the back from wrong side, cast on 12 sts a s before and work the stitches on left front piece as before. See also under Video/Lesson tabs how to join front/back pieces together for a jumper (same as for a jacket, you will just here work in rows instead of in the round). Happy knitting!
06.09.2024 - 07:51
![]() Julie Parker wrote:
Julie Parker wrote:
When picking up stitches to knit the left front piece, what does it mean by “knit up stitches inside 1 stitch?
29.08.2024 - 23:44DROPS Design answered:
Dear Mrs Parker, please look at this video where you will see how to pick up stitches along shoulders, inside 1 stitch. Happy knitting!
30.08.2024 - 14:37
|
||||||||||
Elodie Cardigan#elodiecardigan |
||||||||||
 |
 |
|||||||||
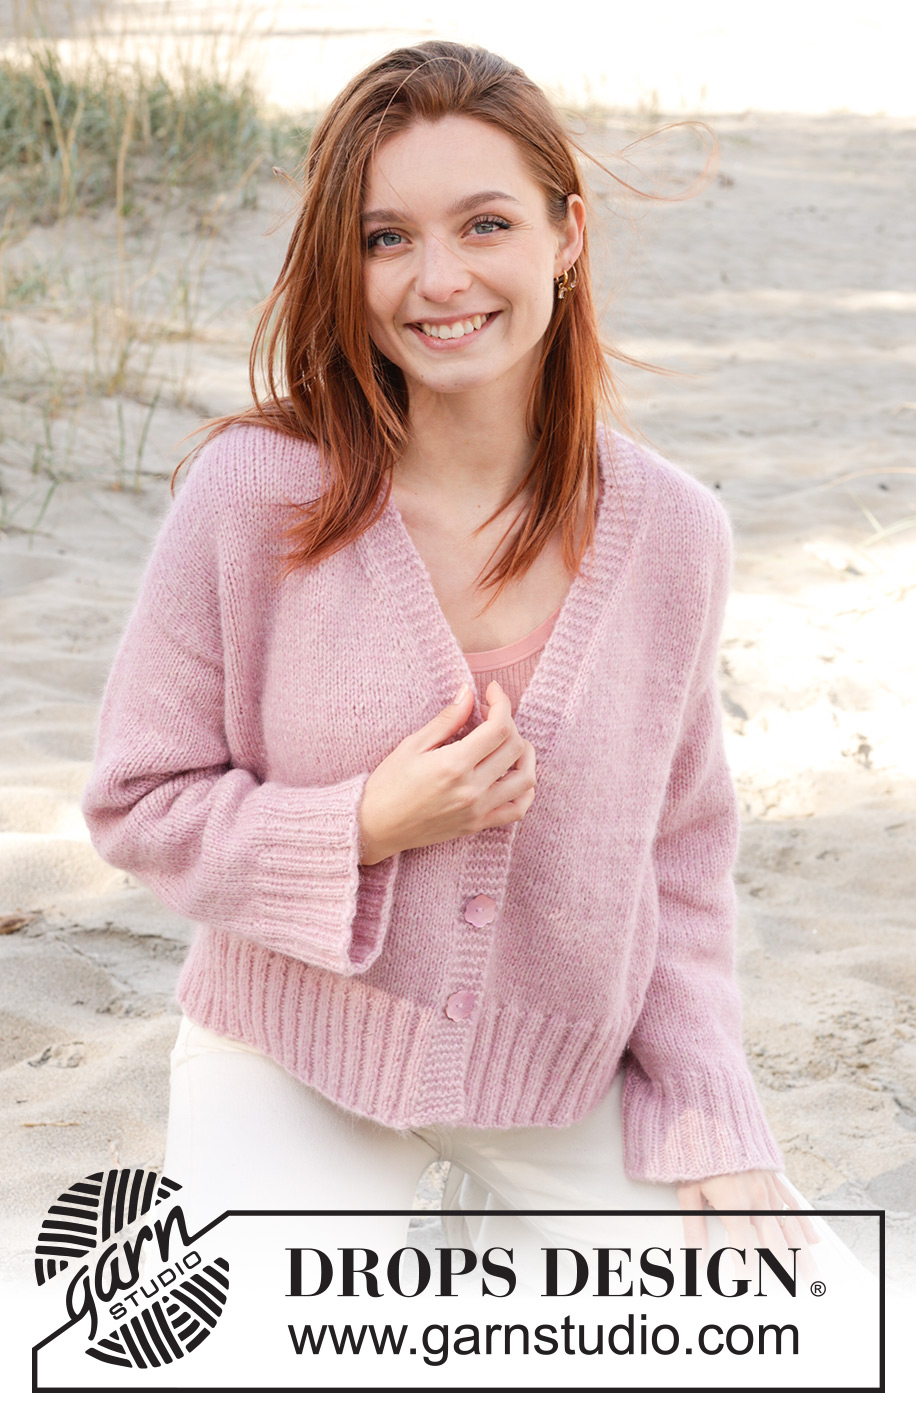
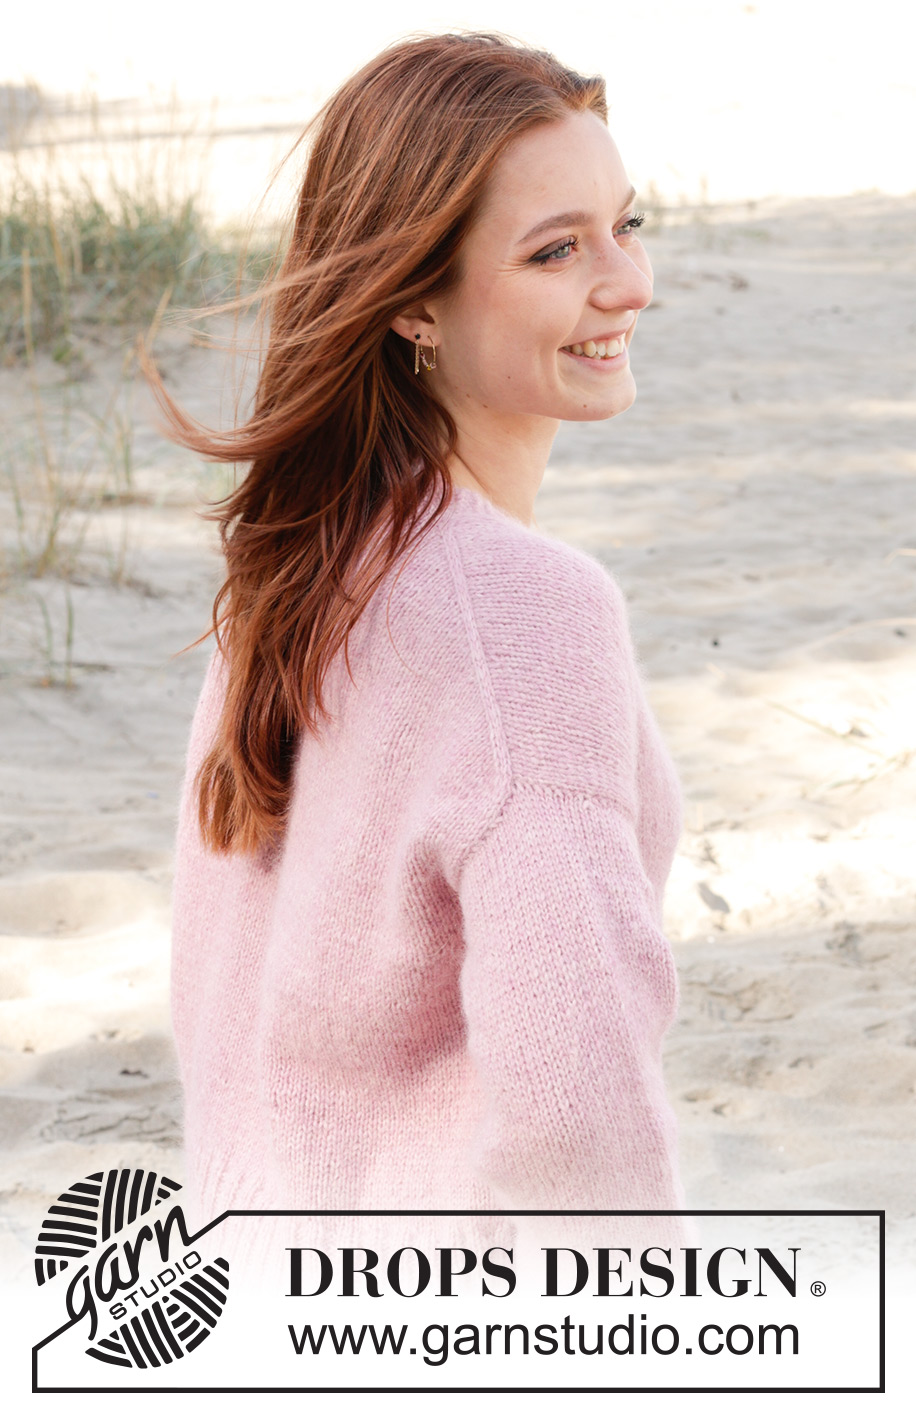
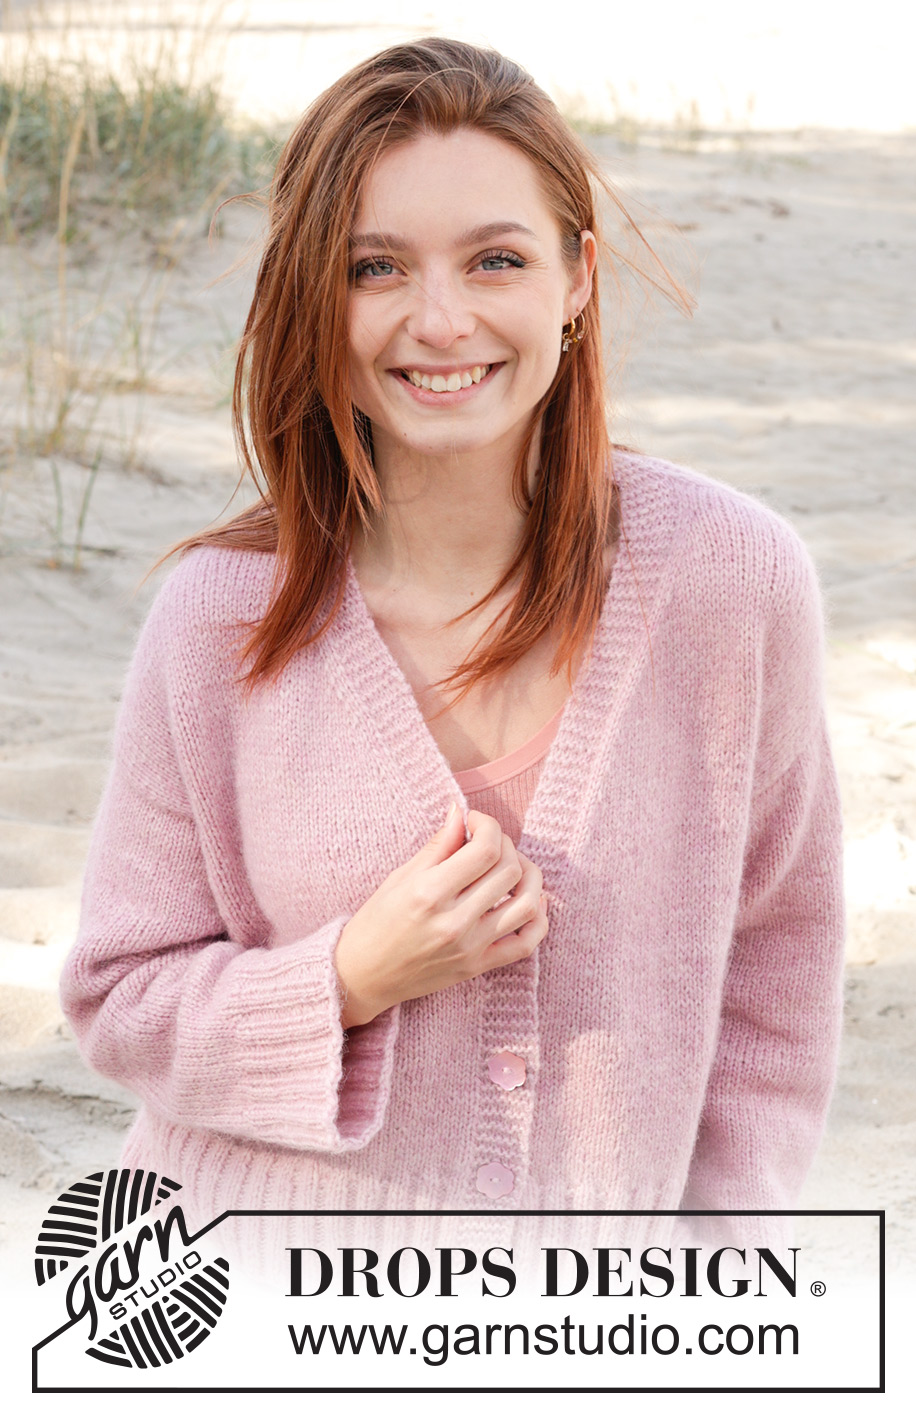
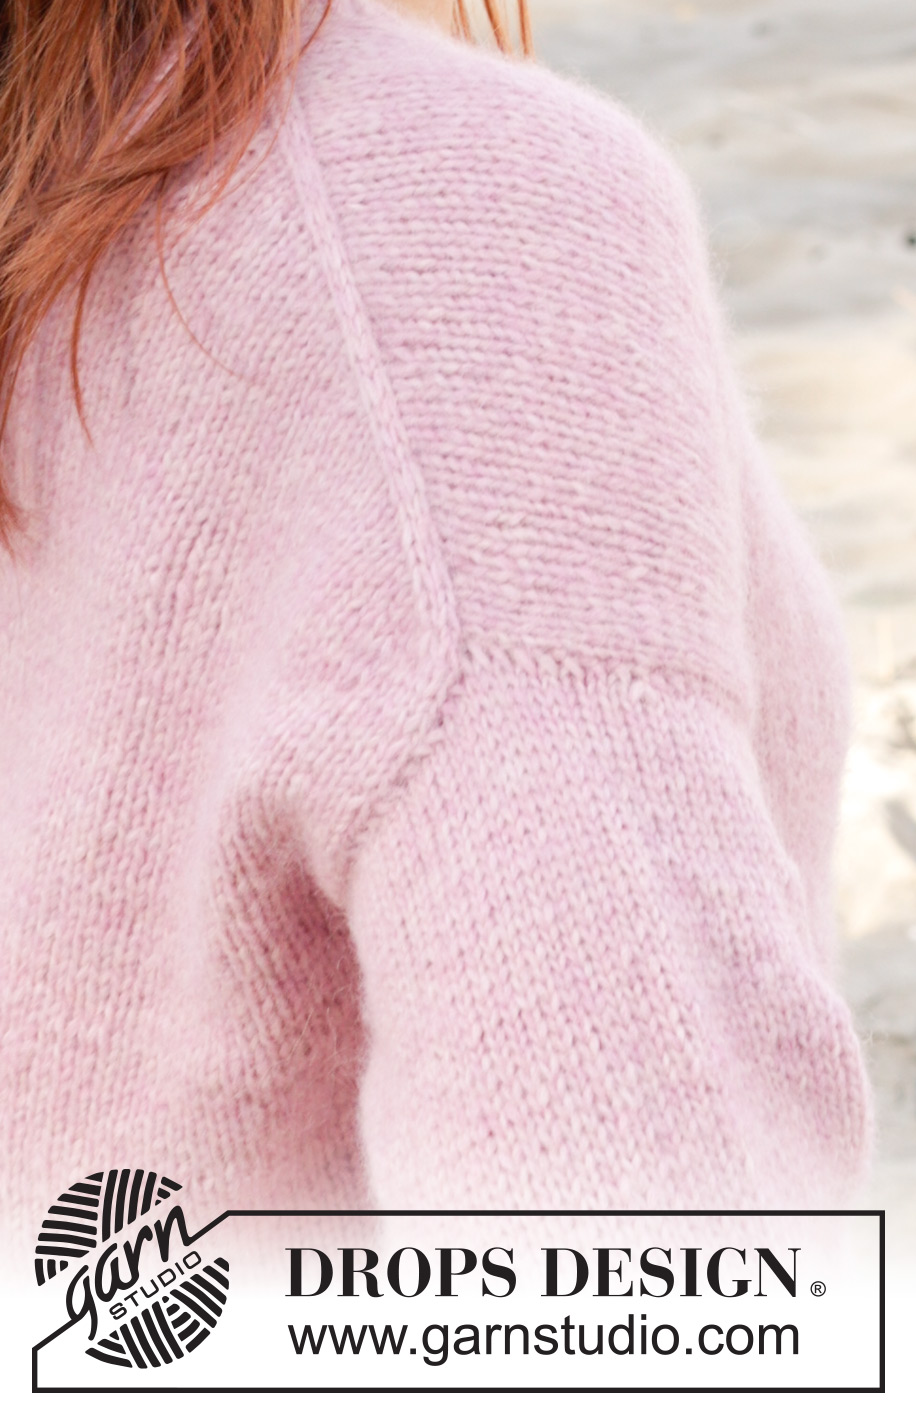
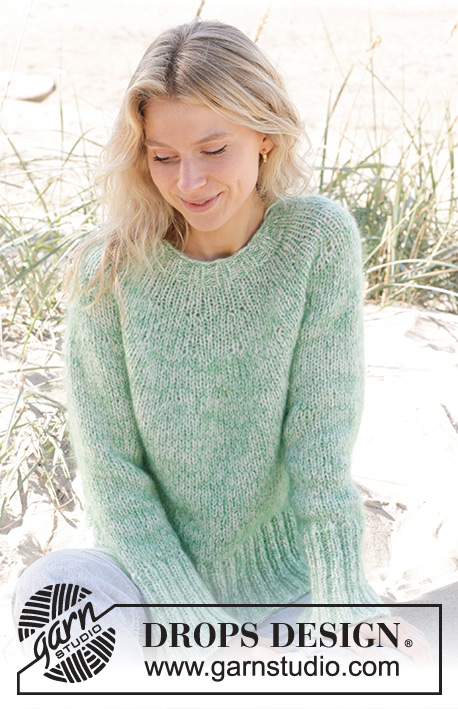
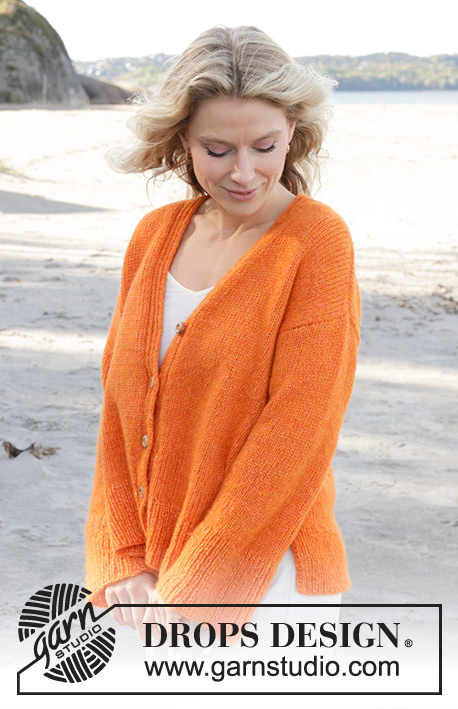
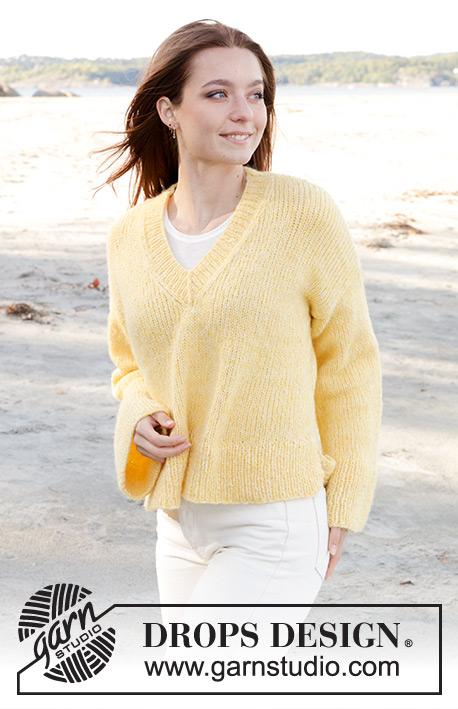
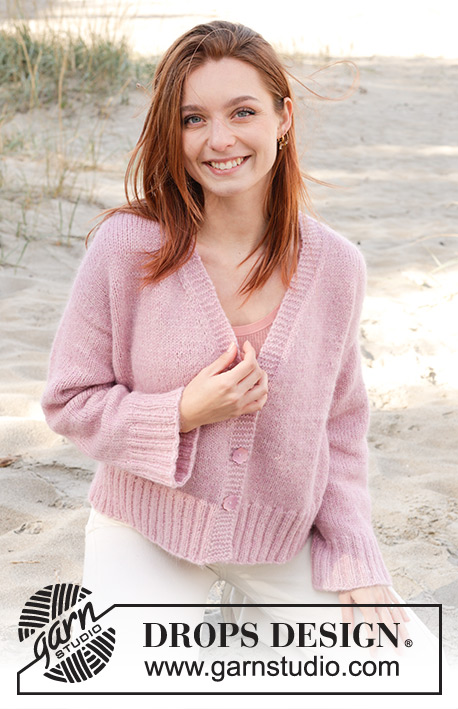
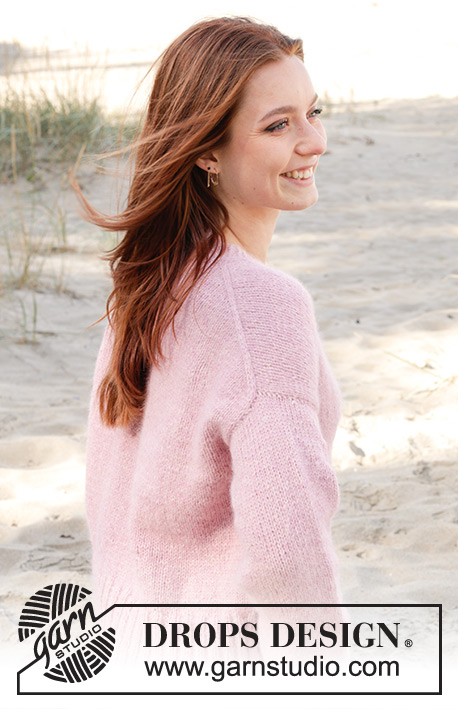
Knitted jacket in DROPS Air. The piece is worked top down with European/diagonal shoulders and V-neck. Sizes S - XXXL.
DROPS 240-29 |
||||||||||
|
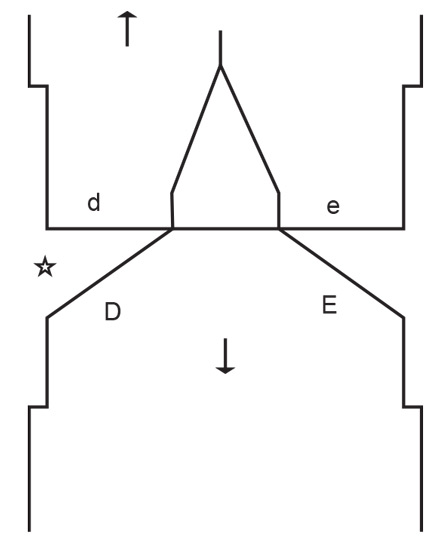
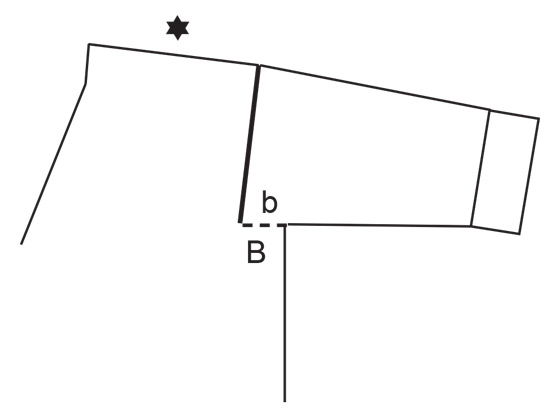
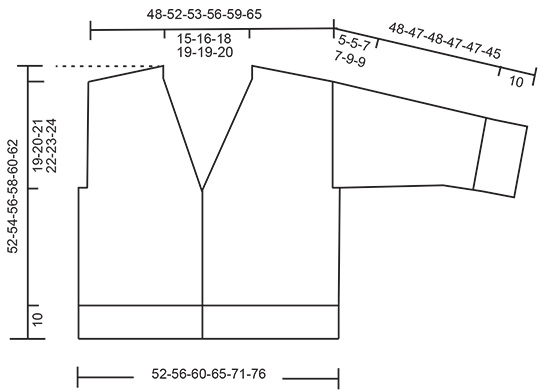
------------------------------------------------------- EXPLANATIONS FOR THE PATTERN: ------------------------------------------------------- RIDGE/GARTER STITCH (worked back and forth): Knit all rows. 1 ridge = knit 2 rows. INCREASE TIP FROM RIGHT SIDE Increase towards the left AFTER MARKER: Use left needle to pick up thread between 2 stitches from row below, pick up thread from front and knit stitch in back loop. Increase towards the right BEFORE MARKER: Use left needle to pick up thread between 2 stitches from row below, pick up thread from behind and knit stitch in front loop. INCREASE TIP FROM WRONG SIDE: Increase towards the left AFTER MARKER: Use left needle to pick up thread between 2 stitches from row below, pick up thread from behind and purl stitch in front loop. Increase towards the right BEFORE MARKER: Use left needle to pick up thread between 2 stitches from row below, pick up thread from front and purl stitch in back loop. BUTTONHOLES: Work buttonholes on the right band (when the garment is worn). Work from the right side when there are 4 stitches left on the row as follows: Make 1 yarn over, knit 2 together and knit 2. On the next row (wrong side), knit the yarn over to leave a hole. Work buttonholes when the piece measures: S: 27, 34 and 41 cm = 10⅝", 13⅜" and 16⅛" M: 27, 35 and 43 cm = 10⅝", 13¾" and 17" L: 29, 37 and 45 cm = 11⅜", 14½" and 17¾" XL: 30, 38 and 47 cm = 11¾", 15" and 18½" XXL: 32, 40 and 49 cm = 12½", 15¾" and 19¼" XXXL: 33, 42 and 51 cm = 13", 16½" and 20" DECREASE TIP (for sleeves): Decrease 1 stitch on either side of the marker-thread as follows: Work until there are 3 stitches left before the marker-thread, knit 2 together, knit 2 (marker-thread sits between these 2 stitches), slip 1 stitch as if to knit, knit 1 and pass the slipped stitch over the knitted stitch. ------------------------------------------------------- START THE PIECE HERE: ------------------------------------------------------- JACKET – SHORT OVERVIEW OF THE PIECE. The pattern uses both long and short needles; start with the length which fits the number of stitches and change when necessary. The piece is started by casting on stitches at the back of the neck and working the back piece top down, while increasing stitches on each side for the shoulders, which become slightly diagonal. The back piece is worked as far as the armholes. The front pieces are started by knitting up stitches along the back shoulders, working downwards while increasing for the neck and working until the armholes are finished. The front and back pieces are joined on the same circular needle and the body finished, working back and forth. Stitches are knitted up around the armholes for the sleeves, which are started back and forth for the sleeve cap, then finished in the round. Then work an edge for neck on back piece. BACK PIECE: Cast on 30-32-34-36-36-38 stitches with circular needle size 5 MM = US 8 and DROPS Air. Purl 1 row from the wrong side. Insert 1 marker inside the 3 outermost stitches on each side. Keep the markers inside these 3 stitches onwards. Work stockinette stitch back and forth. AT THE SAME TIME, increase AFTER the marker at the beginning of the row (seen from the right side) and BEFORE the marker at the end of the row – read INCREASE FROM RIGHT SIDE. On the next row (wrong side) increase in the same way – read INCREASE FROM WRONG SIDE. Increase from both the right and wrong side a total of 26-28-28-30-32-36 times. After the last increase there are 82-88-90-96-100-110 stitches. THE PIECE IS NOW MEASURED FROM HERE! Continue working until the piece measures 14-15-16-17-17-18 cm = 5½"-6"-6¼"-6¾"-6¾"-7". Cut the yarn, put stitches on a thread or on an extra needle and work the front pieces as explained below. LEFT FRONT PIECE: Start on the left shoulder (when the garment is worn). Cast on 7 stitches (band), knit up 26-28-28-30-32-36 stitches inside 1 stitch along the left shoulder on the back piece (knit up 1 stitch in each row) = 33-35-35-37-39-43 stitches. Work stockinette stitch with 7 stitches in GARTER STITCH-see description above, mid-front. When the piece measures 4 cm = 1½", increase at the beginning of each row from the right side for the neck, after the 7 garter stitches + 2 stockinette stitches – remember INCREASE FROM RIGHT SIDE. Increase 1 stitch every 2nd row 10-11-12-13-13-14 times, every 4th row 3 times and every 6th row 2 times = 48-51-52-55-57-62 stitches. When the piece measures 24-25-26-27-29-30 cm = 9½"-9¾"-10¼"-10⅝"-11⅜"-11¾", stitches on a thread or on an extra needle, after working the last row from the right side. Cut the yarn. Work the right front piece as explained below. RIGHT FRONT PIECE: Knit up 26-28-28-30-32-36 stitches inside 1 stitch along the right shoulder on the back piece then cast on 7 stitches at the end of the row (band) = 33-35-35-37-39-43 stitches. Work stockinette stitch with 7 stitches in garter stitch mid-front. When the piece measures 4 cm = 1½" increase at the end of each row from the right side for the neck, before 2 stockinette stitches + 7 garter stitches – remember INCREASE FROM RIGHT SIDE. Increase 1 stitch every 2nd row 10-11-12-13-13-14 times, every 4th row 3 times and every 6th row 2 times = 48-51-52-55-57-62 stitches. When the piece measures 24-25-26-27-29-30 cm = 9½"-9¾"-10¼"-10⅝"-11⅜"-11¾", work as follows from the wrong side: Work the 48-51-52-55-57-62 stitches on the right front piece, cast on 6-8-12-14-20-20 stitches work the 82-88-90-96-100-110 stitches on the back piece, cast on 6-8-12-14-20-20 stitches, work the 48-51-52-55-57-62 stitches on the left front piece. BODY: = 190-206-218-234-254-274 stitches. Continue back and forth with stockinette stitch and garter stitch - REMEMBER THE BUTTONHOLES – see description above, for a further 42-44-46-48-50-52 cm = 16½"-17¼"-18"-19"-19¾"-20½". Knit 1 row from the right side and increase 62-62-70-74-82-90 stitches evenly spaced (do not increase over the bands) = 252-268-288-308-336-364 stitches. Change to circular needle size 4 MM = US 6. Work rib as follows from the wrong side: 7 garter stitches, * purl 2, knit 2 *, work from *-* until there are 9 stitches left, purl 2 and 7 garter stitches. Continue this rib for 10 cm = 4". Bind off. LEFT SLEEVE: Using circular needle size 5 MM = US 8, knit up from the right side 40-42-45-45-49-51 stitches from the bottom of the armhole and up the front piece to the shoulder, then 24-26-27-29-29-31 stitches from the shoulder to the bottom of the armhole down the back piece = 64-68-72-74-78-82 stitches. Insert 1 marker in the middle of the stitches picked up. Work now back and forth in stockinette stitch with short rows for the sleeve cap, to gives a better shape to the sleeve. 1st row (from wrong side): work to 16 stitches after marker, turn. 2nd row (from right side): work to 16 stitches after marker, turn. 3rd row (from wrong side): work to 20 stitches after marker, turn. 4th row (from right side): work to 20 stitches after marker, turn. 5th row (from wrong side): work to 24 stitches after marker, turn. 6th row (from right side): work to 24 stitches after marker, turn. 7th row (from wrong side): work to the beginning of the row. Work stockinette stitch back and forth for 5-5-7-7-9-9 cm = 2"-2"-2¾"-2¾"-3½"-3½", measure from where the stitches were picked up (all length are measured mid on top of sleeve). Join the sleeve, using short circular needle/double pointed needles size 5 MM = US 8 and continue in the round. Insert 1 marker thread at the beginning of the round (mid-under sleeve). Allow the thread to follow your work onwards. Start at the marker-thread and continue with stockinette stitch until the sleeve measures 7-7-9-9-11-11 cm = 2¾"-2¾"-3½"-3½"-4⅜"-4⅜" from the knitted-up stitches. Decrease 2 stitches under the sleeve – read DECREASE TIP. Decrease like this every5½-4½ -3½-3½ -2½-2 cm = 2⅛"-1⅝"-1¼"-1¼"-1"-¾" a total of 6-7-8-8-9-10 times = 52-54-56-58-60-62 stitches. Continue working until the sleeve measures 38-37-38-37-37-35 cm = 15"-14½"-15"-14½"-14½"-13¾". There is approx. 10 cm = 4" left; try the jacket on and work to desired length before the rib. Knit 1 round and increase 16-18-16-18-20-18 stitches evenly spaced = 68-72-72-76-80-80 stitches. Change to double pointed needles size 4 MM = US 6 and work rib (knit 2, purl 2) for 10 cm = 4". Bind off a little loosely. The sleeve measures approx. 48-47-48-47-47-45 cm = 19"-18½"-19"-18½"-18½"-17¾". RIGHT SLEEVE: Work the same way as the left sleeve, but first knit up 24-26-27-29-29-31 stitches from the bottom of the armhole up the back piece to the shoulder, then 40-42-45-45-49-51 stitches from the shoulder down the front piece. Sew the bottom of the armholes. NECK Knit up 1 stitch in each of the 7 garter stitches at the top of the right front piece, work garter stitch back and forth for 8-9-9-10-10-10 cm = 3⅛"-3½"-3½"-4"-4"-4"; check that the band reaches approx. midway at the back of the neck when stretched slightly. Bind off. Work in the same way from the band on the left front piece. Sew the bands together mid-back and sew the neck to the neckline. ASSEMBLY: Sew the buttons onto the left band. |
||||||||||
Diagram explanations |
||||||||||
|
||||||||||
|
||||||||||
|
||||||||||
|
||||||||||
Have you finished this pattern?Tag your pictures with #dropspattern #elodiecardigan or submit them to the #dropsfan gallery. Do you need help with this pattern?You'll find 31 tutorial videos, a Comments/Questions area and more by visiting the pattern on garnstudio.com. © 1982-2025 DROPS Design A/S. We reserve all rights. This document, including all its sub-sections, has copyrights. Read more about what you can do with our patterns at the bottom of each pattern on our site. |
||||||||||


With over 40 years in knitting and crochet design, DROPS Design offers one of the most extensive collections of free patterns on the internet - translated to 17 languages. As of today we count 314 catalogs and 11822 patterns - 11812 of which are translated into English (US/in).
We work hard to bring you the best knitting and crochet have to offer, inspiration and advice as well as great quality yarns at incredible prices! Would you like to use our patterns for other than personal use? You can read what you are allowed to do in the Copyright text at the bottom of all our patterns. Happy crafting!
Post a comment to pattern DROPS 240-29
We would love to hear what you have to say about this pattern!
If you want to leave a question, please make sure you select the correct category in the form below, to speed up the answering process. Required fields are marked *.