


Komentáře / Otázky (43)
![]() Ursula napsala:
Ursula napsala:
Hallo, ich verstehe nicht warum unten vorm Bündchen Maschen zugenommen werden sollen. Wird die Jacke nicht dadurch noch breiter oder ist das notwendig durch das Bündchenmuster.
22.02.2025 - 11:11
![]() Ursula napsala:
Ursula napsala:
Hallo, ich verstehe nicht warum unten vorm Bündchen Maschen zugenommen werden sollen. Wird die Jacke nicht dadurch noch breiter oder ist das notwendig durch das Bündchenmuster.
22.02.2025 - 11:08Odpověď DROPS Design :
Liebe Ursula, für den gleichen Umfang bzw für die gleiche Breite braucht man für das Rippenmuster mehr Maschen mit den kleineren Nadeln als für das Glattrechts mit den grösseren Nadeln, deshalb wird man vor Bündchen zunehmen, Viel Spaß beim Stricken!
24.02.2025 - 08:11
![]() Carmen napsala:
Carmen napsala:
Hi! What’s the meaning of: Insert 1 marker inside the 3 outermost meshes on each side.? I have to put the mark in the mesh between the first and the third one? Than you!
21.01.2025 - 22:22Odpověď DROPS Design :
Dear Carmen, inserting a marker inside 3 sts on each side (= 3 sts, 1 marker, middle of piece, 1 marker, 3 sts) will help you increasing on the right place, ie always after the first 3 sts and before the last 3 sts. See for example this lesson. Happy knitting!
22.01.2025 - 09:21
![]() Carmen napsala:
Carmen napsala:
Hi! What’ s the meaning of: Insert 1 marker inside the 3 outermost meshes on each side.? I have to out the marker in the mesh between the first and the third? Thank you
21.01.2025 - 22:20
![]() Franziska Neugeborn napsala:
Franziska Neugeborn napsala:
Hallo liebes Drops-Team, ich hätte eine Frage zu dem Anfang der Arme bzw. der verkürzten Reihen. Bei Größe L habe ich 72 Maschen aufgenommen, setzte ich den Maschenmarkierer bei der Hälfte (36 Masche) oder nach den 45 Maschen (Vorderteil)? Also wo liegt der Mittelpunkt der verkürzten Reihen?
31.10.2024 - 19:57Odpověď DROPS Design :
Liebe Frau Neugeborn, der Mittelpunkt beim Ärmel ist bei der Markierung = die Hälfte der Maschen so in L nach 36 Maschen; die Schulterlinie ist schräg beim Rückenteil, die Mitte vom Ärmel ist dann etwas weiter am Vorderteil - schauen Sie mal diese Lektion, so sehen Sie die Markierung und die Schulterlinie. Viel Spaß Stricken!
01.11.2024 - 08:25
![]() Amanda napsala:
Amanda napsala:
Hej! Ska ökningarna mot vara till höger eller vänster? Är på första framstycket, vänstra. Med vänlig hälsning, Amanda
23.10.2024 - 14:11Odpověď DROPS Design :
Hej Amanda, udtagningerne til V-hals skal være fra retsiden efter kantmaskerne/markøren. Se også vores videoer som viser hvordan man gør :)
24.10.2024 - 09:56
![]() Aiden napsala:
Aiden napsala:
Dear drops design, . I know that the 4 cm is to be measured from the picked. Should I start measuring after all stitches are picked or from 1st stitch
04.10.2024 - 18:00Odpověď DROPS Design :
Dear Aiden, the stitches are all picked up in the same row. You should measure from that specific first row, including this row. Since in this case the beginning of both front pieces is that row of picked up stitches, you should measure 4cm from the beginning of the front pieces, so it includes the row with picked up stitches. Happy knitting!
06.10.2024 - 13:25
![]() Aiden napsala:
Aiden napsala:
In the left and right front piece, it is mentioned when the piece measures 4 cm. Is it 4 cm from top of the piece or the measurement starts after the 28 stitches are knit up
03.10.2024 - 13:28Odpověď DROPS Design :
Dear Aiden, measure these 4 cm from the stitches picked up for front piece/shoulders. Happy knitting!
03.10.2024 - 16:21
![]() Julie Parker napsala:
Julie Parker napsala:
With the Elodie cardigan I am up to the right front side measuring 26 cm. How do you cast in the 12 stitches from the wrong side and work the 90 stitches on the back
05.09.2024 - 11:42Odpověď DROPS Design :
Dear Mrs Parker, work the stitches from right front piece as before from wrong side, then cast on 12 sts (see lesson or video), work the 90 sts on the back from wrong side, cast on 12 sts a s before and work the stitches on left front piece as before. See also under Video/Lesson tabs how to join front/back pieces together for a jumper (same as for a jacket, you will just here work in rows instead of in the round). Happy knitting!
06.09.2024 - 07:51
![]() Julie Parker napsala:
Julie Parker napsala:
When picking up stitches to knit the left front piece, what does it mean by “knit up stitches inside 1 stitch?
29.08.2024 - 23:44Odpověď DROPS Design :
Dear Mrs Parker, please look at this video where you will see how to pick up stitches along shoulders, inside 1 stitch. Happy knitting!
30.08.2024 - 14:37
|
||||||||||
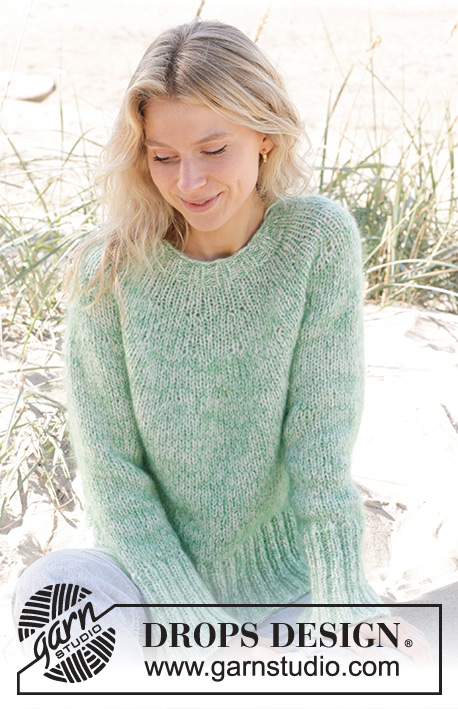
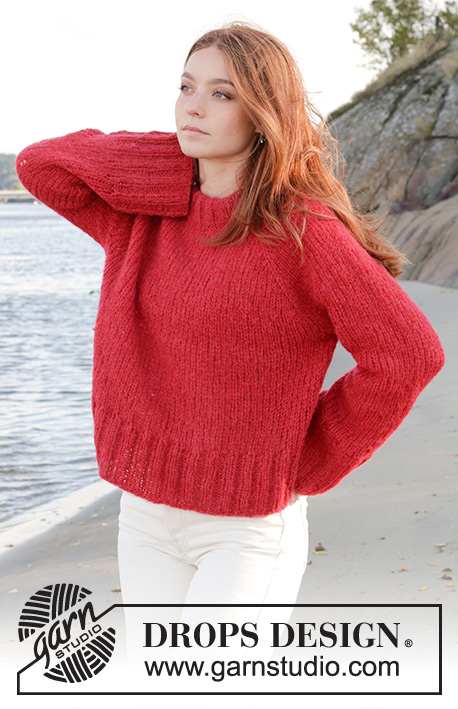
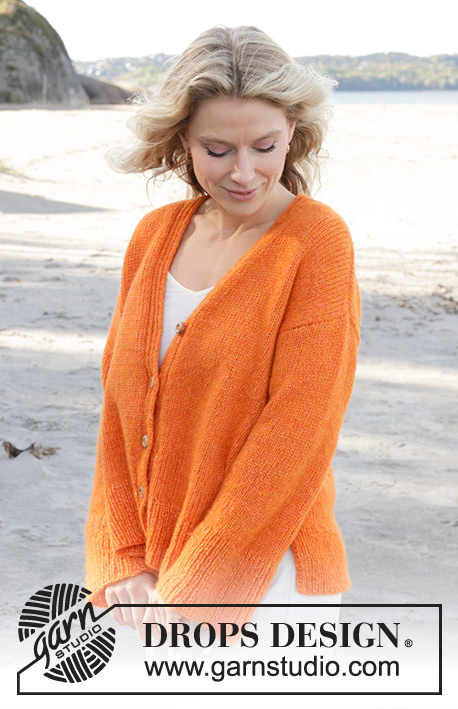
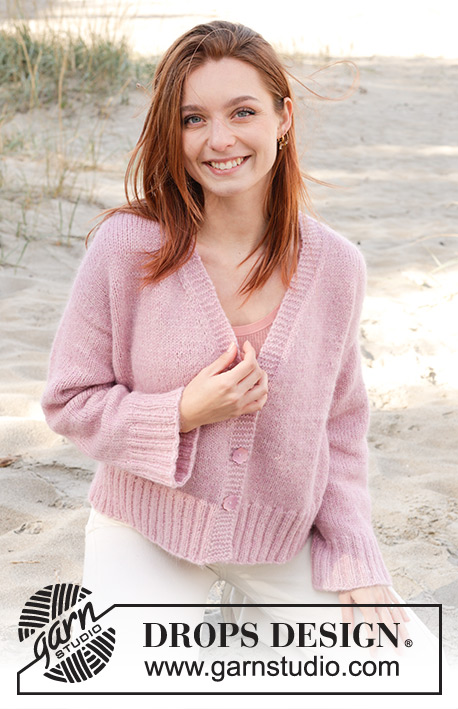
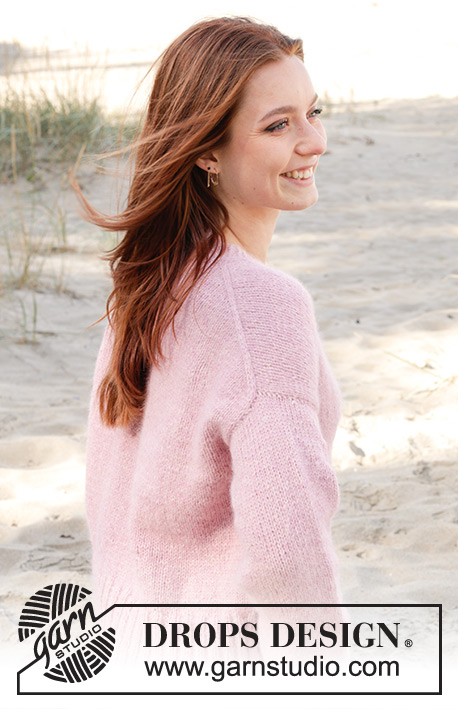
Elodie Cardigan#elodiecardigan |
||||||||||
 |
 |
|||||||||
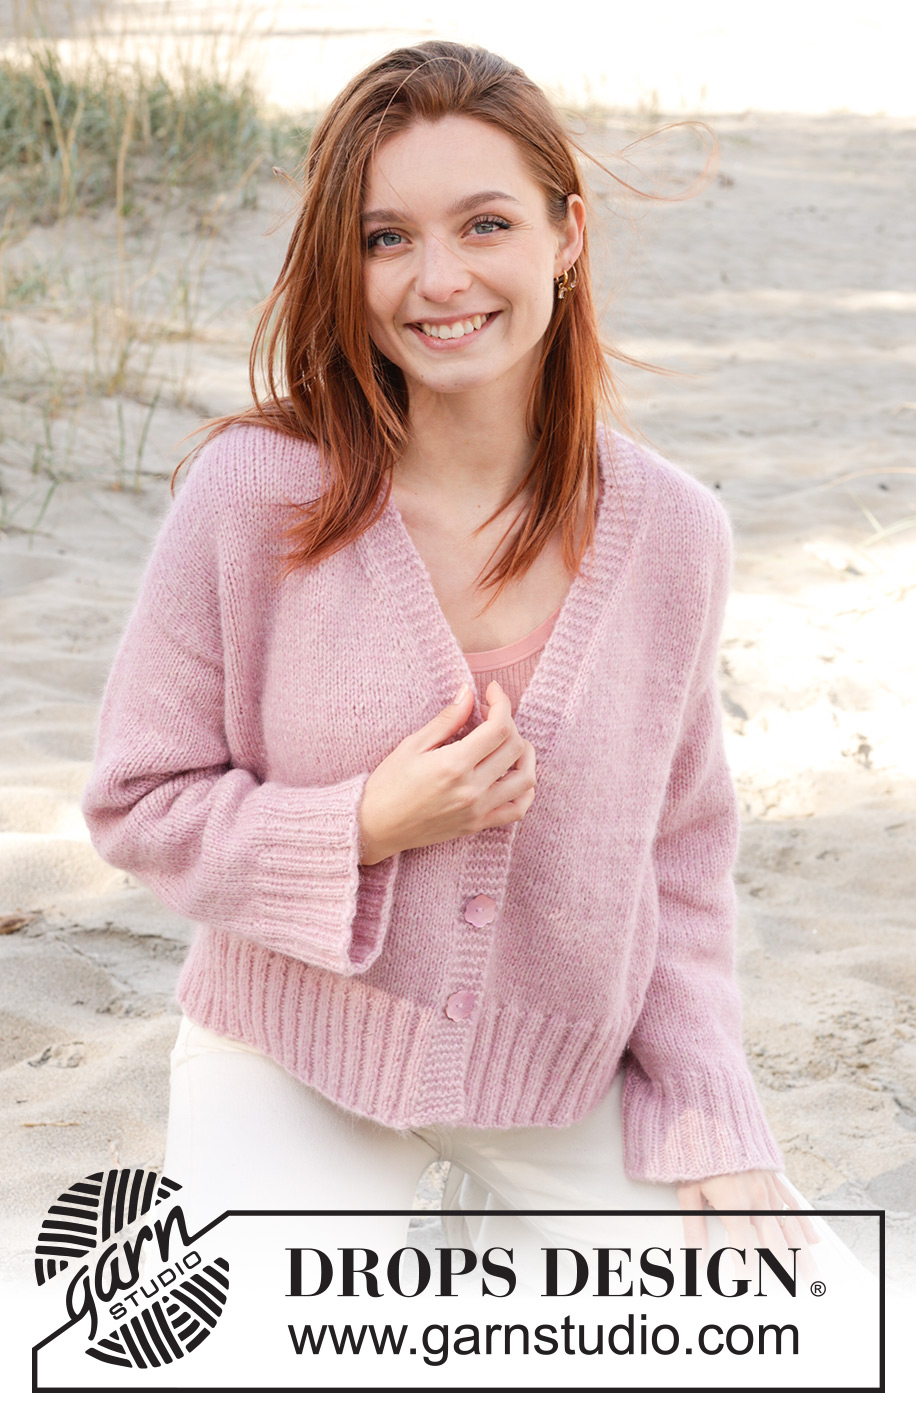
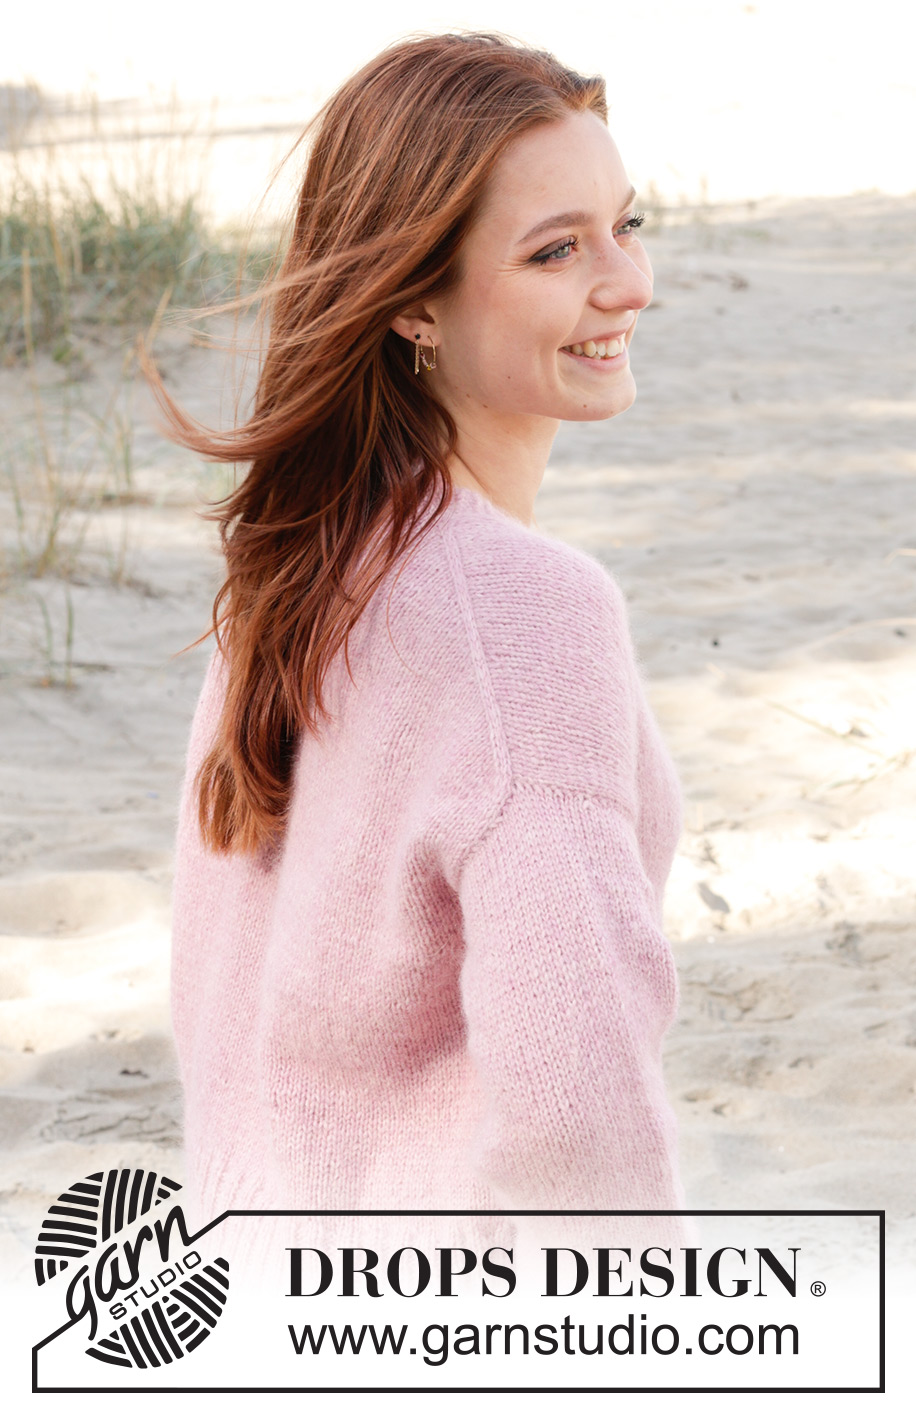
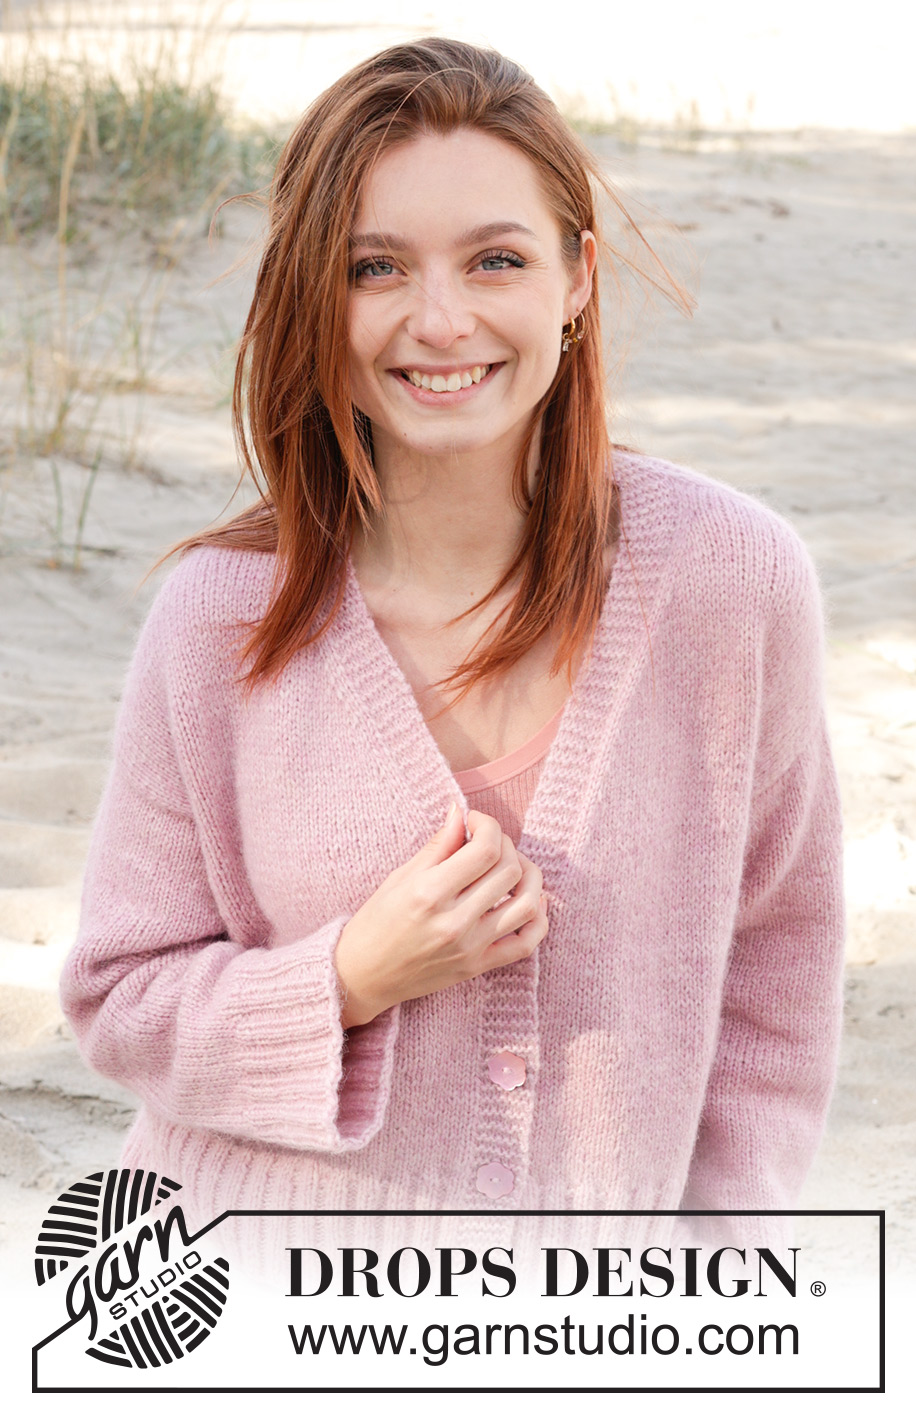
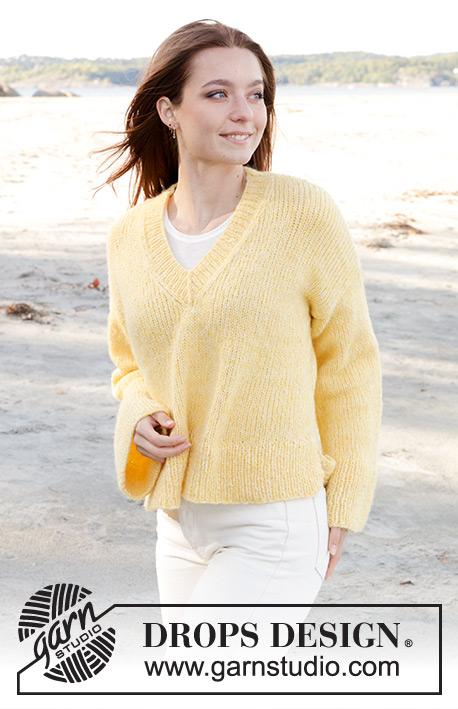
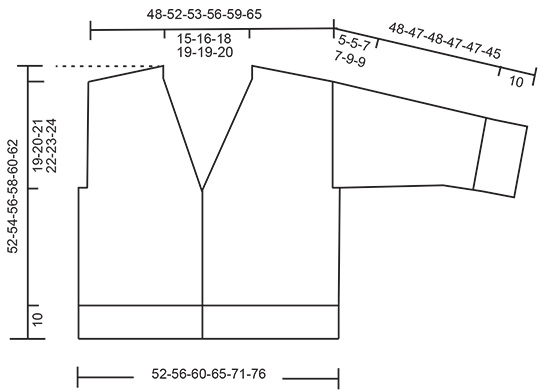
Propínací svetr s V-výstřihem a zešikmenými náramenicemi pletený shora dolů z příze DROPS Air. Velikost S - XXXL.
DROPS 240-29 |
||||||||||
|
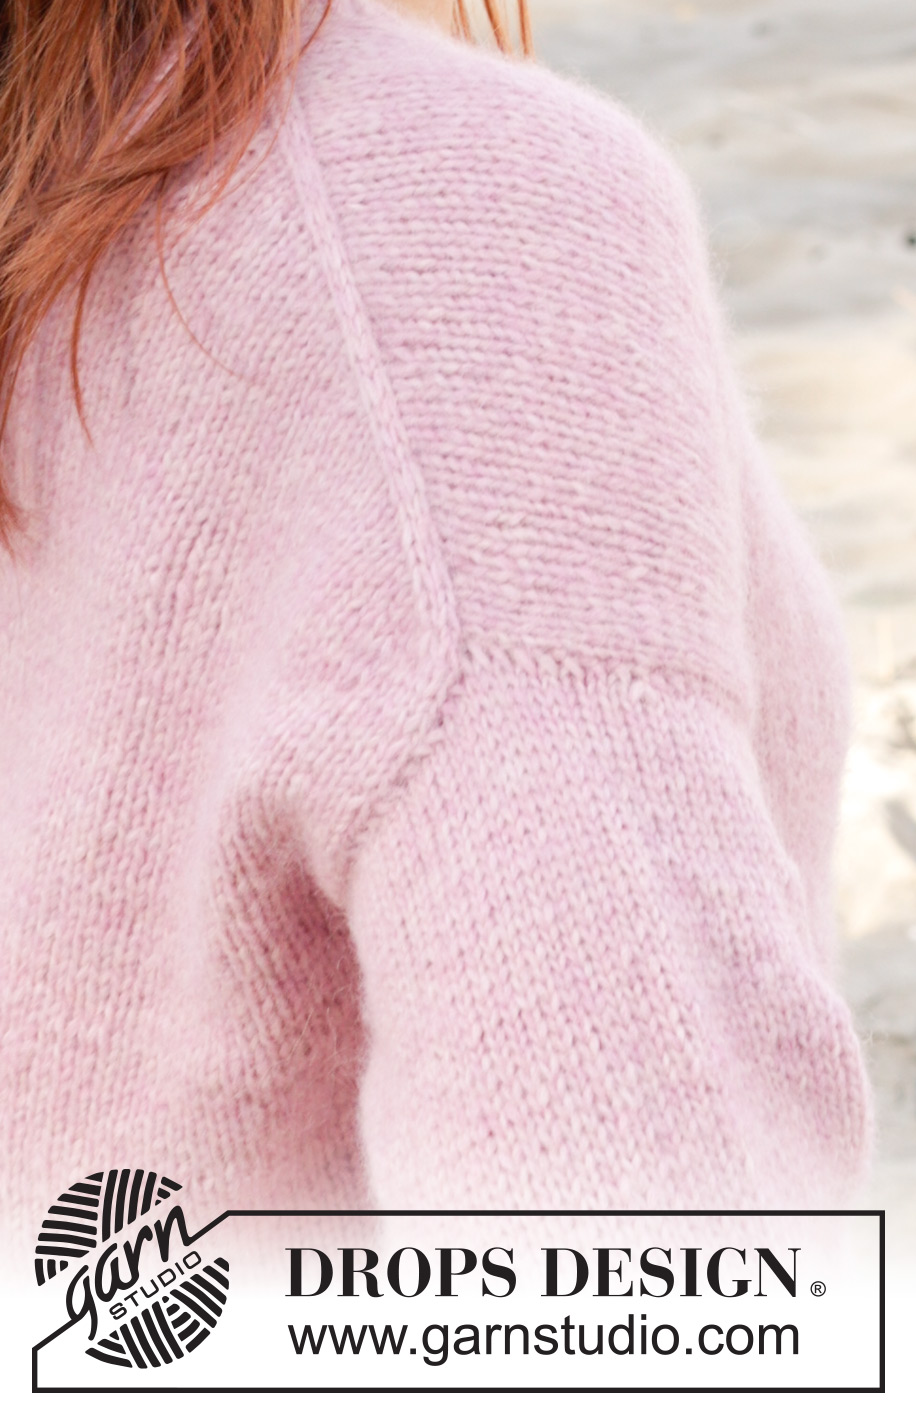
------------------------------------------------------- VYSVĚTLIVKY K NÁVODU: ------------------------------------------------------- VROUBKOVÝ VZOR: Pleteme stále hladce, lícové i rubové řady. 1 vroubek = 2 řady hladce. TIP PŘIDÁVÁNÍ – LÍCOVÁ ŘADA: ZA ZNAČKOU: Nové oko se stočí doleva. Levou jehlicí nabereme ZEPŘEDU přízi mezi 2 oky z předchozí řady a upleteme oko hladce za zadní nit. PŘED ZNAČKOU: Nové oko se stočí doprava. Levou jehlicí nabereme ZEZADU přízi mezi 2 oky z předchozí kruhové řady a upleteme oko hladce. TIP PŘIDÁVÁNÍ – RUBOVÁ ŘADA: ZA ZNAČKOU: Nové oko se stočí doleva. Levou jehlicí nabereme ZEZADU přízi mezi 2 oky z předchozí kruhové řady a upleteme oko obrace. PŘED ZNAČKOU: Nové oko se stočí doprava. Levou jehlicí nabereme ZEPŘEDU přízi mezi 2 oky z předchozí řady a upleteme oko obrace za zadní nit. KNOFLÍKOVÉ DÍRKY: Knoflíkové dírky vyplétáme v léze pravého předního dílu (na svetr se díváme, jako by byl oblečený). Dírky vyplétáme takto: pleteme lícovou řadu až po poslední 4 oka, 1x nahodíme, 2 oka spleteme hladce a poslední 2 oka upleteme hladce. V následující (rubové) řadě pleteme nahození hladce – tím vznikne dírka. Knoflíkové dírky vyplétáme když pletenina měří: S: 27, 34 a 41 cm. M: 27, 35 a 43 cm. L: 29, 37 a 45 cm. XL: 30, 38 a 47 cm. XXL: 32, 40 a 49 cm. XXXL: 33, 42 a 51 cm. TIP – UJÍMÁNÍ (platí pro rukávy): Ujímáme 1 oko na každé straně značky takto: začínáme 3 oka před značkou, spleteme 2 oka hladce, 2 oka upleteme hladce (značka leží mezi nimi), 1 oko sejmeme hladce, 1 upleteme hladce a sejmuté oko přes ně přetáhneme (= ujmuli jsme 2 oka). ------------------------------------------------------- PRÁCE ZAČÍNÁ ZDE: ------------------------------------------------------- SVETR – JAK BUDEME POSTUPOVAT: Zadní díl pleteme v řadách kruhovou jehlicí, shora dolů až po průramky. Pak nabereme oka podél každé náramenice, přidáme nová oka pro průkrčník a pleteme přední díl v řadách až po průramky. Potom přední a zadní díl spojíme a dopleteme trup v řadách. Kolem každého průramku nabereme oka pro rukávy a pleteme shora dolů v kruhových řadách na ponožkových jehlicích / krátké kruhové jehlici. Nakonec dopleteme lem průkrčníku. ZADNÍ DÍL: Na kruhovou jehlici č. 5 nahodíme přízí DROPS Air 30-32-34-36-36-38 ok a upleteme 1 rubovou řadu obrace. Na každou stranu, za první 3 oka a před poslední 3 oka vložíme 1 značku - obě značky snímáme během práce vždy do aktuálně pletené řady, leží vždy vedle 3 krajních ok. Pleteme v řadách lícovým žerzejem; SOUČASNĚ přidáme ZA značkou na začátku řady (nahlíženo z lícové strany) a PŘED značkou na konci řady – viz TIP PŘIDÁVÁNÍ - LÍCOVÁ STRANA. V následující rubové řadě přidáváme stejným způsobem – viz TIP PŘIDÁVÁNÍ - RUBOVÁ STRANA. Tímto způsobem přidáváme z lícové i rubové strany, celkem 26-28-28-30-32-36x. Po posledním přidávání máme na jehlici 82-88-90-96-100-110 ok. NYNÍ MĚŘÍME OD TOHOTO MÍSTA! Pleteme do výše 14-15-16-17-17-18 cm, potom přízi odstřihneme, oka převedeme na pomocnou jehlici a upleteme přední díly. LEVÝ PŘEDNÍ DÍL: Začínáme levou náramenicí (na svetr se díváme, jako by byl oblečený). Nahodíme 7 ok (= légy), podél levé náramenice zadního dílu nabereme 26-28-28-30-32-36 ok (tj. v každé řadě nabereme 1 oko) = 33-35-35-37-39-43 ok. Pleteme lícovým žerzejem a u středu předního dílu 7 ok légy VROUBKOVÝM VZOREM - viz popis výše. Ve výšce 4 cm přidáváme na začátku každé lícové řady oka pro průkrčník. Přidáváme za 7 oky vroubkovým vzorem + 2 oky lícovým žerzejem – viz TIP PŘIDÁVÁNÍ – LÍCOVÁ ŘADA. Přidáváme 1 oko v každé 2. řadě celkem 10-11-12-13-13-14x, pak v každé 4. řadě 3x a nakonec v každé 6. řadě 2x = 48-51-52-55-57-62 ok. Ve výši 24-25-26-27-29-30 cm upleteme lícovou řadu a oka odložíme na pomocnou jehlici. Odstřihneme přízi a pleteme pravý přední díl - viz popis níže. PRAVÝ PŘEDNÍ DÍL: Podél pravé náramenice zadního dílu nabereme 26-28-28-30-32-36 ok, a na konci řady nahodíme 7 ok (= léga) = 33-35-35-37-39-43 ok. Pleteme lícovým žerzejem a u středu předního dílu 7 ok vroubkovým vzorem. Ve výši 4 cm přidáváme na konci každé lícové řady oka pro průkrčník, a to před 2 oky pletených lícovým žerzejem + 7 oky vroubkový vzorem - viz TIP PŘIDÁVÁNÍ – LÍCOVÁ ŘADA. Přidáváme 1 oko v každé 2. řadě celkem 10-11-12-13-13-14x, pak v každé 4. řadě 3x a nakonec v každé 6. řadě 2x = 48-51-52-55-57-62 ok. Ve výši 24-25-26-27-29-30 cm pleteme rubovou řadu takto: Upleteme 48-51-52-55-57-62 ok (= pravý přední díl), nahodíme 6-8-12-14-20-20 ok, upleteme 82-88-90-96-100-110 ok (= zadní díl), nahodíme 6-8-12-14-20-20 ok, upleteme odložených 48-51-52-55-57-62 ok z pomocné jehlice (= levý přední díl). TRUP: = 190-206-218-234-254-274 ok. Pokračujeme v řadách lícovým žerzejem a vroubkovým vzorem dalších 42-44-46-48-50-52 cm výšky - PAMATUJEME TAKÉ NA VYPLÉTÁNÍ KNOFLÍKOVÝCH DÍREK – viz popis výše! Potom upleteme 1 lícovou řadu hladce a SOUČASNĚ rovnoměrně přidáme 62-62-70-74-82-90 ok (oka légy do přidávání nezahrnujeme) = 252-268-288-308-336-364 ok. Převedeme práci na kruhovou jehlici č.4 a pleteme pružný lem - pokračujeme rubovou řadou: 7 ok vroubkovým vzorem, * 2 oka obrace, 2 oka hladce *, mezi *-* opakujeme po posledních 9 ok, upleteme 2 oka obrace a 7 ok vroubkovým vzorem. V tomto rozvržení pleteme lem do výšky 10 cm a potom všechna oka uzavřeme. LEVÝ RUKÁV: Kruhovou jehlicí č.5 nabereme z lícové strany od dolního okraje průramku k náramenici na předním dílu 40-42-45-45-49-51 ok, a potom od náramenice na zadním dílu k dolnímu okraji průramku 24-26-27-29-29-31 ok = 64-68-72-74-78-82 ok. Upleteme v řadách lícovým žerzejem 2-2-4-4-6-6 cm výšky. Nyní spojíme rukáv do kruhové řady a pleteme krátkou kruhovou jehlicí nebo ponožkovými jehlicemi č. 5. Rukáv dokončíme v kruhových řadách. Na začátek kruhové řady vložíme 1 značku (= střed vnitřní strany rukávu, podpaží); značku později využijeme, snímáme ji proto vždy do aktuálně pletené kruhové řady. Začínáme u značky a pokračujeme lícovým žerzejem do výše rukávu 3-3-5-5-7-7 cm. Potom ujmeme 1 oko na každé straně značky – viz TIP - UJÍMÁNÍ. Tímto způsobem ujímáme každých 6-5-4-4-3-2,5 cm výšky, celkem 6-7-8-8-9-10x = 52-54-56-58-60-62 ok. Pak pokračujeme v pletení rukávu do výše 38-37-38-37-37-35 cm - do konce nám zbývá asi 10 cm; svetr můžeme teď vyzkoušet a míry příp. upravit. Upleteme 1 kruhovou řadu hladce a SOUČASNĚ přidáme rovnoměrně 16-18-16-18-20-18 ok = 68-72-72-76-80-80 ok. Převedeme pleteninu na ponožkové jehlice č. 4 a pleteme pružný lem (střídáme 2 oka hladce, 2 oka obrace). Když je lem vysoký 10 cm, všechna oka volně uzavřeme. Rukáv měří asi 48-47-48-47-47-45 cm. PRAVÝ RUKÁV: Druhý rukáv upleteme stejným způsobem, ale oka nabereme v opačném směru, tj. nabereme 24-26-27-29-29-31 ok od dolního okraje průramku k náramenici na zadním dílu, potom 40-42-45-45-49-51 ok od náramenice dolů k dolnímu okraji průramku. Nakonec sešijeme dolní okraje průramků. PRŮKRČNÍK: V horní části pravého předního dílu nabereme po 1 oku z každého ze 7 ok pletených vroubkovým vzorem a upleteme v řadách 8-9-9-10-10-10 cm výšky vroubkový vzorem; průběžně kontrolujeme, zda lem průkrčníku při mírném natažení dosáhne přibližně do poloviny zadní části průkrčníku. Potom všechna oka uzavřeme. Stejným způsobem upleteme légu na levém předním dílu. Na zátylku, uprostřed zadního dílu, sešijeme lem průkrčníku a přišijeme ho k výstřihu. DOKONČENÍ: Na levou légu přišijeme knoflíky. |
||||||||||
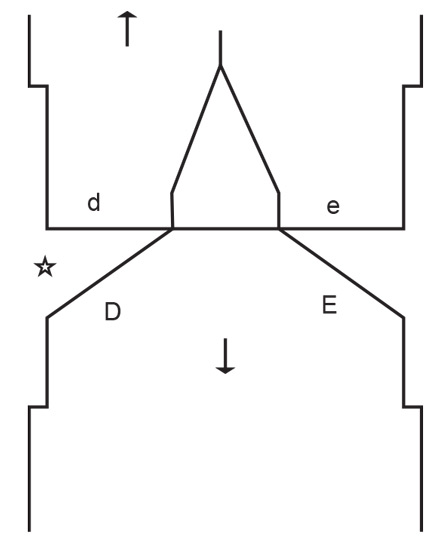
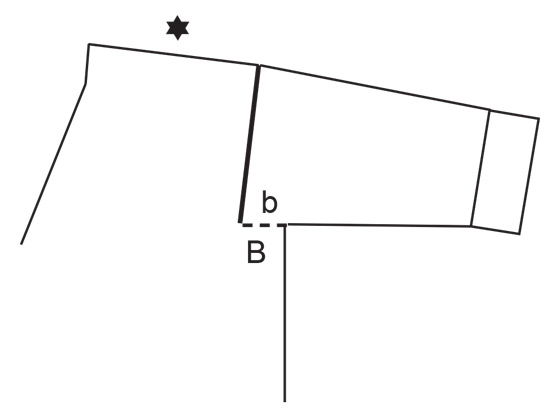
Vysvětlivky ke schématu |
||||||||||
|
||||||||||
|
||||||||||
|
||||||||||
|
||||||||||
Dokončili jste tento model?Pak označte své fotky tagem #dropspattern #elodiecardigan nebo je pošlete do galerie #dropsfan. Potřebujete s tímto návodem poradit?Otevřete-li si návod na stránce garnstudio.com, najdete tam 30 výukových video-ukázek, Komentáře/Dotazy a další užitečné informace. © 1982-2025 DROPS Design A/S. Vyhrazujeme si veškerá práva. Tento dokument, včetně všech jeho dílčích částí, podléhá autorským právům. Podrobnější komentář k možnostem užití našich návodů najdete dole pod každým návodem na našich stránkách. |
||||||||||


V oblasti pletené a háčkované módy působí DROPS Design více než 40 let. Díky tomu vám můžeme nabídnout jednu z nejrozsáhlejších kolekcí modelů s bezplatnými návody dostupnými na internetu - navíc v 17 jazycích. K dnešnímu dni máme na 314 katalogů a 11822 návodů celkem - z nich je už 7048 dostupných v [češtině].
Přidejte komentář k návodu DROPS 240-29
Rádi bychom věděli, co si o tomto modelu myslíte!
Pokud se chcete na něco zeptat, dbejte prosím na to, abyste ve formuláři níže vybrali správnou kategorii - díky tomu se dříve dozvíte, co potřebujete vědět. Povinná pole jsou označena *.