
Popular categories
Looking for a yarn?


Comments / Questions (46)
![]() Christine wrote:
Christine wrote:
I am knitting the 7-8yr size but when starting the daisy pattern I only have 13 repeats not the 15 stated on the pattern - I have 179 stitches on row 18. I have started this twice and stil getting the same result. It's there something I'm doing wrong ? Many thanks
02.03.2023 - 17:31DROPS Design answered:
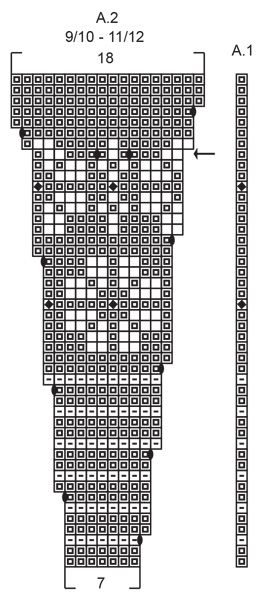
Dear Christine, in size 7/8 years there are 101 sts worked as follows, seen from RS: 5 front band sts, A.1 (= 1 st), then repeat the 6 sts in A.2 until 5 sts remain (= a total of 15 times), finish with 5 front band sts; Row 18 should be worked over 12 sts (6 sts have been increased before as shown in diagram, alternately at the end + at the beg of each A.2), so that you should have: 5 + 1 + (12x15) + 5 = 191 sts. When A.2 is done there are 16 sts in each A.2 and 251 sts in total. Adding marker between each A.2 might help you to check your number of stitches after every round. Happy knitting!
03.03.2023 - 08:52
![]() Hindle Julie wrote:
Hindle Julie wrote:
Please can you tell me how I know how many balls of wool to order for this pattern? Thank you. Julie
03.02.2023 - 08:51DROPS Design answered:
Hi Julie, if you choose for example size 7/8 years that means you will need the 3rd amount of each colour, counting from the left (under MATERIALS). Each ball weighs 50 g. Please see also the lesson DROPS HERE. Happy knitting!
03.02.2023 - 09:23
![]() Varain wrote:
Varain wrote:
Bonjour, Je fais le modèle en 9/10 ans. Je ne comprends pas ce que veut dire dans l’empiècement après 5 mailles de bordure devant au point mousse : A.1 au dessus de la maille suivante. (Que veut dire cette phrase) Comment procéder ? En vous remerciant Bonne journée
12.04.2022 - 17:33DROPS Design answered:
Bonjour Mme Varain, tricotez simplement la maille suivante en suivant le diagramme A.1 , autrement dit, sur l'endroit, terminez par A.1 avant la bordure devant et sur l'envers, commencez par A.1 après la bordure devant. Le motif sera ainsi symétrique. Bon tricot!
19.04.2022 - 08:54
![]() Karin Flodin wrote:
Karin Flodin wrote:
Hej, mina knapphål hamnar inte på mitten av de fem kantmaskorna. Det ser ut som att de ska vara i mitten på bilderna tycker jag. Gör jag fel?
03.02.2022 - 11:25DROPS Design answered:
Hej Karin. Du ska sticka ihop 2:a och 3:e maskan och sedan göra ett omslag och då ska knapphålet hamna i mitten av kantmaskorna. Mvh DROPS Design
04.02.2022 - 12:19
![]() CJ Miller wrote:
CJ Miller wrote:
Working on the child's cardigan, on row 22 of A.2. there is no white, only the yellow centers. Do you recommend I carry the white across row 22 from row 21 so it is in place for row 23, or stop/start the white over again on row 23. I see no other way to carry it up beyond carrying it across or cutting and restarting. Thanks for the advice and wonderful patterns.
15.10.2021 - 01:56DROPS Design answered:
Dear Mrs Miller, that's only 2 sts difference, you can carry the white yarn at the end of row 22 so that it's on the right place at the beg of row 23 or just carry the yarn 1 stitch before the first stitch in white at the beg of first A.2. Your yarn store might have even more tips for you, do not hesitate to ask them, even per mail or telephone. Happy knitting!
15.10.2021 - 08:07
![]() Mira Holler wrote:
Mira Holler wrote:
Die Maße stimmen leider nicht. Ich habe die Passe genau nach Anleitung gestrickt, aber statt der angegebenen cm-Maße erhalte ich fast 10 cm mehr. Nach Maschenprobe sind 28 Reihen = 10 cm; wenn aber A1 und A2 schon über 84 Reihen gehen, können bei der Größe 7/8 keine 16 cm für die Passe entstehen! Das passt meiner Enkelin niemals! Bin sehr enttäuscht, dass ich meine fast fertige Arbeit nun wieder aufribbeln muss.
13.04.2021 - 09:54DROPS Design answered:
Liebe Frau Holler, Diagramme zeigen alle Reihen, dh die Hin- sowie die Rückreihen - siehe MUSTER und hier lesen Sie mehr Über Diagramme. d.h. A.1+A.2= 42 Reihen. Sollte Ihre Maschenprobe stimmen, dann sollte di Passe auch in der Höhe stimmen. Viel Spaß beim stricken!
13.04.2021 - 11:43
![]() Kitty wrote:
Kitty wrote:
Just to check is each line on the chart one row of knitting, or is it 2 rows. As in knit from right side then purl from the wrong side. For example the first 6 stitches on A2 , is that knit one row right side then purl one row on the wrong side?
09.04.2021 - 17:23DROPS Design answered:
Dear Kitty, on the charts each row is represented by one row of small squares, thus each row is shown, however, they are showing the pattern as you would see them from the RS. So if it shows a knit stitch, that stitch should be knitted from the rs and purled from the WS. Happy Knitting!
09.04.2021 - 19:08
![]() Ingrid wrote:
Ingrid wrote:
I’m having trouble understanding the pattern. I love your cardigans and sweaters, but avoid them because the instructions are, in my opinion, poorly written (or translated?) My question here is: Does A 1 mean “increase”? I only got as far as “Work according to diagrams A1 and A2.” Refuse to give up because I normally never have a problem following other patterns. Thanks!
08.04.2021 - 21:04DROPS Design answered:
Dear Ingrid, the patterns are not "poorly written", but written in a different style than most Enlish/American knitters are used to, but most European knitters are familiar with. It is well worth to take your time, study some patterns (maybe start with a simpler one), and we are here to help, if you get stuck. A.1 in that sentence you mention means the pattern diagrams that are below the instructions, which show visually how the patterns should be knitted. Happy Knitting!
08.04.2021 - 21:48
![]() Marian Green wrote:
Marian Green wrote:
I have nearly completed the main piece of this jacket size 5/6 years and am delighted with the pattern so far. However I do have a query regarding the start row of the bottom rib. It states it's worked from the right side , but the previous increase row states to work from the right side. Presumably the first rib row should read work from the left side? Thank you in anticipation.😊
03.03.2021 - 16:30DROPS Design answered:
Dear Mrs Green, work the increase row from the right side, then turn and work the next row from the wrong side as before (= purl with the 5 front bands sts in garter stitch), then start the rib on next row from the right side. Happy knitting!
04.03.2021 - 07:35
![]() Catherine wrote:
Catherine wrote:
Bonjour, je veux tricoter le modèle en en 5/6 ans mais je ne comprends pas le diagramme de l'empiècement. Les mailles du rang 1 sont tricotées à l'endroit et les mailles du rang 2 seraient tricotées à l'envers, donc on obtient un jersey et non plus du point mousse... Je suis perdue. Merci pour votre réponse
22.02.2021 - 19:20DROPS Design answered:
Bonjour Catherine, les premiers rangs de l'empiècement ne sont pas un vrai point mousse tricoté tout à l'endroit mais plutôt un point mousse fantaisie, espacé, autrement dit, en 5/6 ans vous tricotez 2 rangs jersey puis 1 rang envers sur l'endroit, 2 rangs jersey, puis 1 rang endroit sur l'envers (vous avez ainsi les 2 premières "côtes" ou "nervures" de l'empiècement), continuez ainsi, les carrés doivent être tricotés en jersey, les tirets en jersey envers (= à l'envers sur l'endroit et à l'endroit sur l'envers). Bon tricot!
23.02.2021 - 08:33
|
|||||||||||||||||||
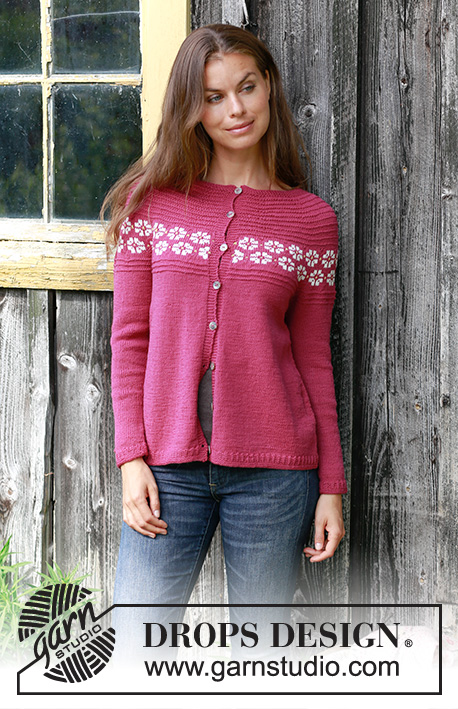
Daisy Delight Cardigan#daisydelightcardigan |
|||||||||||||||||||
 |
 |
||||||||||||||||||
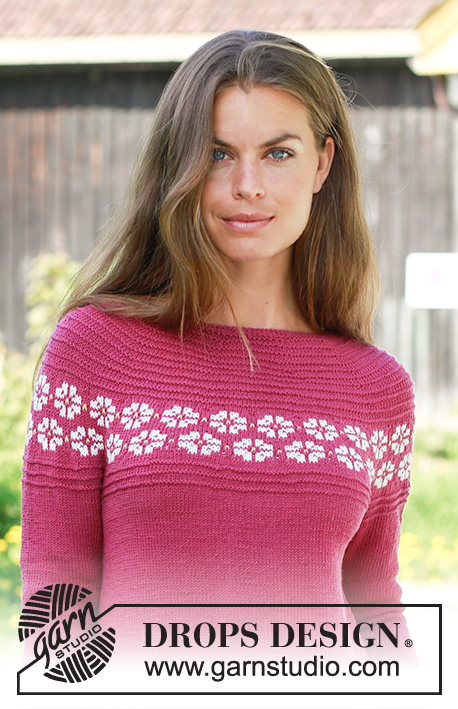
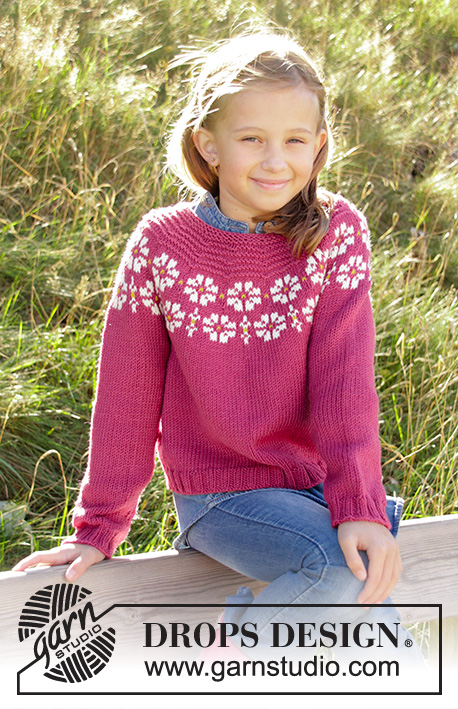
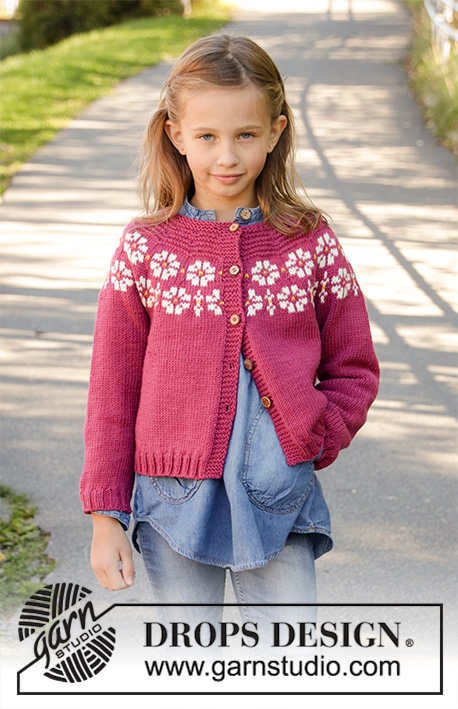
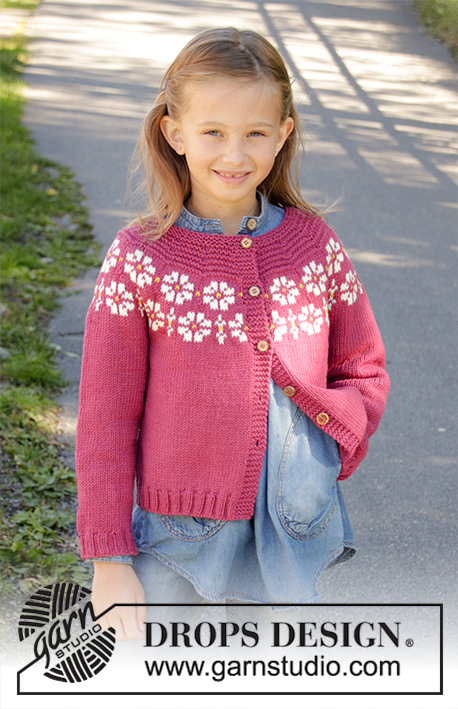
Knitted jacket for children in DROPS Merino Extra Fine. DROPS Lima or DROPS Cotton Light. The piece is worked top down with flowers, coloured pattern, garter stitch and stocking stitch. Sizes 3-12 years.
DROPS Children 34-5 |
|||||||||||||||||||
|
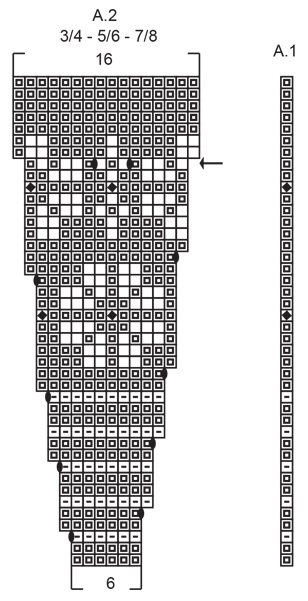
EXPLANATIONS FOR THE PATTERN: ------------------------------------------------------- RIDGE/GARTER STITCH (worked back and forth): 1 ridge = Knit 2 rows. PATTERN: See diagrams A.1 and A.2. Choose diagram for your size. The diagrams show all the rows in the pattern seen from the right side. INCREASE TIP-1 (evenly spaced): To work out how to increase evenly, count the total number of stitches on the needle (e.g. 72 stitches) and divide by the number of increases to be made (e.g. 17) = 4.2. In this example increase by making 1 yarn over after approx. each 4th stitch. On the next row work the yarn overs twisted to avoid holes. INCREASE TIP-2 (for sides of body): Work until there is 1 stitch left before the marker thread, 1 yarn over, knit 2 (marker thread sits in the middle of these 2 stitches), 1 yarn over = 2 stitches increased. On the next row work the yarn overs twisted to avoid holes. Then work the new stitches in stocking stitch. DECREASE TIP (for sleeves): Decrease 1 stitch on each side of the marker thread as follows: Work until there are 3 stitches left before the marker thread, knit 2 together, knit 2 (marker thread sits in the middle of these 2 stitches), slip 1 stitch as if to knit, knit 1 and pass the slipped stitch over the knitted stitch = 2 stitches decreased. BUTTONHOLES: Work buttonholes on the right band (when garment is worn). 1 buttonhole = start from the wrong side and knit together stitches 2 and 3 from the edge, make 1 yarn over. On the next row knit the yarn over to leave a hole. The first buttonhole is worked after 1 cm on the neck and then the other 4-4-5-5-5 buttonholes are worked every 6-6-6-7-7 cm. ------------------------------------------------------- START THE PIECE HERE: ------------------------------------------------------- JACKET - SHORT OVERVIEW OF THE PIECE: The piece is worked back and forth with circular needle, top down, then the front and back pieces are worked back and forth. The sleeves are worked in the round with short circular needle/double pointed needles. YOKE: Cast on 72-76-80-86-92 stitches with circular needle size 4 and heather/cerise/dark red. Work 2 RIDGES – see description above – remember BUTTONHOLES on right band – see description above. Knit 1 row where you increase 17-19-21-23-24 stitches evenly on row - READ INCREASE TIP-1! = 89-95-101-109-116 stitches on needle. Knit 1 row from the wrong side. Insert a marker in this row and measure onwards from here. Work according to diagrams A.1 and A.2 from the right side as follows: Work 5 band stitches in GARTER STITCH, A.1 over 1 stitch, A.2 a total of 13-14-15-14-15 times on the row and 5 band stitches in garter stitch. REMEMBER THE KNITTING TENSION! When diagrams A.1 and A.2 have been completed in height there are 219-235-251-263-281 stitches on the needle. On the next row from the right side increase 3-3-5-1-5 stitches evenly on row = 222-238-256-264-286 stitches. Continue with stocking stitch and 5 band stitches in garter stitch on each side until the piece measures 15-15-16-17-18 cm from the marker. The next row from the right side is worked as follows: Work 5 band stitches in garter stitch, 31-33-36-37-38 stitches in stocking stitch (= front piece), place the next 44-48-51-53-62 stitches on a thread (= sleeve), cast on 6 new stitches under the sleeve, work 62-66-72-74-76 stitches in stocking stitch (= back piece), place the next 44-48-51-53-62 stitches on a new thread (= sleeve), cast on 6 new stitches, work 31-33-36-37-38 stitches (= front piece) and 5 band stitches in garter stitch. BODY: There are 146-154-166-170-174 stitches on the needle. THE PIECE IS NOW MEASURED FROM HERE! Insert 1 marker thread in the middle of the 6 new stitches cast on under each sleeve. Work stocking stitch back and forth, with 5 band stitches in garter stitch on each side. When the piece measures 3 cm increase 1 stitch on each side of each marker (= 4 stitches increased) READ INCREASE TIP–2! Repeat the increase every 3-4-5-6-7 cm a total of 3 times = 158-166-178-182-186 stitches on the needle. Continue working as before until the piece measures 12-16-19-22-25 cm. Work 1 row from the right side where you increase 10-10-10-10-10 stitches evenly on row (do not increase on the bands) = 168-176-188-192-196 stitches. The next row is worked as follows from the right side: Work 5 band stitches in garter stitch, purl 2, * knit 2, purl 2 *. Work from *-* until there are 5 stitches left and work 5 band stitches in garter stitch. Continue this rib for 3 cm. On the next row from the right side cast off with garter stitch over garter stitch, knit over knit and purl over purl. Cut and fasten the strand. SLEEVE: Place the stitches from one thread on short circular needle/double pointed needles size 4 mm (= 44-48-51-53-62 stitches) and knit up 1 stitch in each of the 6 stitches cast on under the sleeve (= 50-54-57-59-68 stitches). Insert 1 marker thread in the middle of these 6 stitches. Work stocking stitch in the round for 2 cm. Now decrease 1 stitch on each side of the marker thread - READ DECREASE TIP. Continue with stocking stitch and repeat the decrease every 4-3½-4-4-3½ cm until you have decreased a total of 5-7-7-8-10 times = 40-40-43-43-48 stitches on the needles. Work stocking stitch until the sleeve measures 22-27-30-34-37 cm. Work 1 round and increase 4-4-5-5-4 stitches evenly on the round = 44-44-48-48-52 stitches. Work rib in the round with knit 2 / purl 2 for 3 cm. Loosely cast off with knit over knit and purl over purl. Cut and fasten strand. Work the other sleeve in the same way. ASSEMBLY: Sew opening under sleeves. Sew buttons onto left band. |
|||||||||||||||||||
Diagram explanations |
|||||||||||||||||||
|
|||||||||||||||||||
 |
|||||||||||||||||||
 |
|||||||||||||||||||
 |
|||||||||||||||||||
Have you finished this pattern?Tag your pictures with #dropspattern #daisydelightcardigan or submit them to the #dropsfan gallery. Do you need help with this pattern?You'll find 29 tutorial videos, a Comments/Questions area and more by visiting the pattern on garnstudio.com. © 1982-2026 DROPS Design A/S. We reserve all rights. This document, including all its sub-sections, has copyrights. Read more about what you can do with our patterns at the bottom of each pattern on our site. |
|||||||||||||||||||


With over 40 years in knitting and crochet design, DROPS Design offers one of the most extensive collections of free patterns on the internet - translated to 17 languages. As of today we count 324 catalogues and 12245 patterns translated into English (UK/cm). 12245
We work hard to bring you the best knitting and crochet have to offer, inspiration and advice as well as great quality yarns at incredible prices! Would you like to use our patterns for other than personal use? You can read what you are allowed to do in the Copyright text at the bottom of all our patterns. Happy crafting!
Post a comment to pattern DROPS Children 34-5
We would love to hear what you have to say about this pattern!
If you want to leave a question, please make sure you select the correct category in the form below, to speed up the answering process. Required fields are marked *.