
Popular categories
Looking for a yarn?


Comments / Questions (91)
![]() Ida wrote:
Ida wrote:
Hej! Jag har svårt att förstå vad som menas med "bottenfärgen i mönsterranden" i förklaringen till symbolerna i diagrammen. Är det så att omslag skall göras med samma färg som maskorna före och efter omslaget? Tacksam för svar!
16.01.2019 - 20:48DROPS Design answered:
Hei Ida. Bunnfargen på hver mønsterrad betyr den fargen som strikkes i bunnen, altså hovedfargen. Feks på 1 omgang i A.1 er bunnfargen oker (fordi hele omgangen strikkes med oker), mens på omgangene 2-8 er bunnfargen natur (du kan se det strikkes mønster i oker på en bakgrunn i natur), på omgang 9 er bunnfargen igjen oker, fordi hele omgangen strikkes oker. God fornøyelse
23.01.2019 - 09:26
![]() Ana wrote:
Ana wrote:
Por que no me coinciden el numero de repeticiones. Elegi la talla 18 mese con agujas rectas.que hago mal'
14.01.2019 - 20:53DROPS Design answered:
Hola Ana. Acude a la tienda especializada de Drops para solucionar tus dudas. Sin ver la labor es difícil saber donde tienes el error.
03.02.2019 - 19:18
![]() Sabrina Vinther wrote:
Sabrina Vinther wrote:
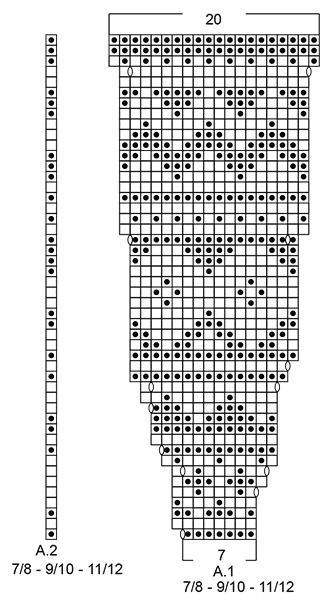
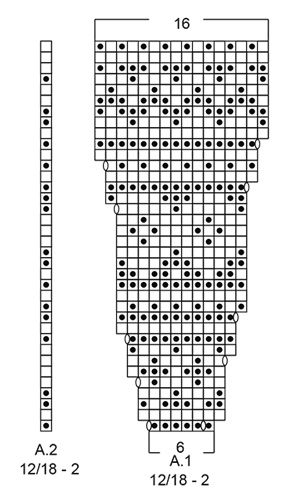
Jeg forstår ikke dette/hvad betyder rapporter? Og hvad gør jeg de 3 ekstra masker i forhold til mønster i str. 12/18 mdr? Vælg diagram for rigtig størrelse (= 11 (12-11-12-12-13-13) rapporter à 6 (6-7-7-7-7-7) masker), strik A.2 over næste maske og afslut med 5 kantmasker retstrik. Fortsæt mønsteret således og tag ud som vist i diagrammet – læs STRIKKETIPS og HUSK PÅ STRIKKEFASTHEDEN! Når A.1 og A.2 er strikket færdig, er der 187 (203-220-239-251-271-271) masker på pinden.
06.01.2019 - 18:17DROPS Design answered:
Hei Sabrina. Rapporter er det antall ganger du skal gjenta diagrammet i bredden/på omgangen. Det er 6 masker i A.1, og disse 6 maskene skal du gjenta 11 ganger. Du har 77 masker på pinnen i størrelse 12/128 mnd, og du strikker slik: 5 kantmasker rettstrikk, gjenta A.1 totalt 11 ganger (=66 masker), A.2 (=1 maske) og 5 kantmasker i rettstrikk = 77 masker strikket. I tillegg har du økt 2 masker i hver rapport av A.1 = 22 masker økt den første omgangen. Masketallet er derfor: 77 + 22 = 99 etter første omgang med A.1 og A.2. God fornøyelse.
09.01.2019 - 09:08
![]() Ana wrote:
Ana wrote:
No me coinciden el número de vueltas con el derecho o el revés de la labor. Pueden aclararmelo por favor. Gracias
05.12.2018 - 11:46
![]() Susanne Zelzer-Neumann wrote:
Susanne Zelzer-Neumann wrote:
Sind auf dem Diagramm nur die Hinreihen angegeben? Wie werden die Rückreihen gestrickt? Der weiße Faden ist ja sonst nach der ersten Hinreihen in weiß und der Rückreihe in Ocker auf der "falschen "Seite.
04.11.2018 - 14:01DROPS Design answered:
Liebe Frau Zelzer-Neumann, alle Reihe sind im Diagram gezeichnet, dh die Hin- sowie die Rückreihen. Viel Spaß beim stricken!
05.11.2018 - 09:38
![]() Irene Fliegauf wrote:
Irene Fliegauf wrote:
Vielen Dank und liebe Grüße.
26.10.2018 - 13:32
![]() Irene Fliegauf wrote:
Irene Fliegauf wrote:
Hallo, stricke Gr. 5/6, Anschlag 96 M. komme leider nicht am Ende A1 und A2 auf 239 Maschen. Habe in R. 5 ,7, 17 jeweils nur 1 M. zugenommen . In einfarbigen Reihen im Rapporte zugenommen. Welchen Fehler mache ich?
26.10.2018 - 12:37DROPS Design answered:
Liebe Frau Fliegauf, am Anfang der Passen nehmen Sie 1 M ab = 95 M. Dann stricken Sie 5 Blendemaschen, 12x A.1 (= 12 x 7 M), A.2 (= 1 M), 5 Blendemaschen. Am Ende A.1 haben Sie 19 M in jedem A.1 = 5 + 12 x 19 + 1 + 5 = 239 M. Bei den 1. 15. und 29. Reihe nehmem Sie jeweils 2 Maschen, bei den 5., 7., 9., 13., 17. Reihe nehmen Sie nur 1 M in jedem A.1. Viel Spaß beim stricken!
26.10.2018 - 13:17
![]() Lena Söderhäll Gille wrote:
Lena Söderhäll Gille wrote:
1. Ska de aviga varven börja med A2 (borträknat de fem kantmaskorna förstås)? 2. För man börjar väl de aviga varven från vänster? 3. Man stickar väl en rad och sen börjar om på samma rad till dess varvet är slut? Tacksam för snabbt svar, så jag hinner sticka! Jag är så ovan att sticka uppifrån och ner. Som många av era mönster är.
08.10.2018 - 23:32DROPS Design answered:
Hej, här svar på dina frågor: 1: Jo, från avigsidan stickar du först 5 kantm, sedan A.2, osv. 2: Alla varv från avigsidan stickas från vänster mot höger. 3: Ja, du upprepar mönsterrapporten tills varvet är färdigt.
09.10.2018 - 18:22
![]() Bärbel Haak wrote:
Bärbel Haak wrote:
Welchen Rapport muß ich bei Größe 128 nehmen? Leider kann ich das nicht erkennen. Vielen Dank
04.10.2018 - 13:13DROPS Design answered:
Liebe Frau Haak, Größe 128 entspricht Größe 7/8 Jahre - siehe Diagramme A.1/A/2 mit 7/8 (1. Diagramme unter Diagram Text). Viel Spaß beim stricken!
04.10.2018 - 13:21
![]() Carolin Triebler wrote:
Carolin Triebler wrote:
Hallo, In der Anleitung steht etwas von einem Diagramm A.2. Leider finde ich keines...
22.09.2018 - 17:08DROPS Design answered:
Liebe Frau Trieble, ein der Diagramme hat die falsche Name, A.1 (Diagram mit Zunahmen) wird wiederholt - und Diagram über nur 1 Masche ist A.2 = diese Masche wird am Ende der Hinreihe/Anfang der Rückreihe vor/nach die Blendemaschen gestrickt. Unser Designteam wird das so bald wie möglich korrigieren. Viel Spaß beim stricken!
24.09.2018 - 08:25
|
||||||||||
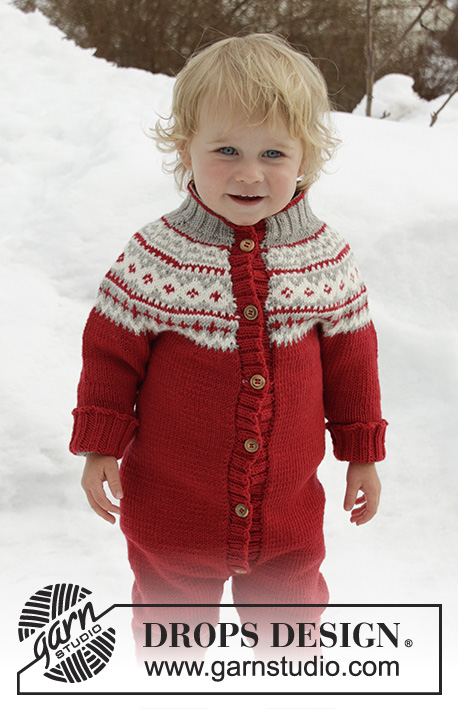
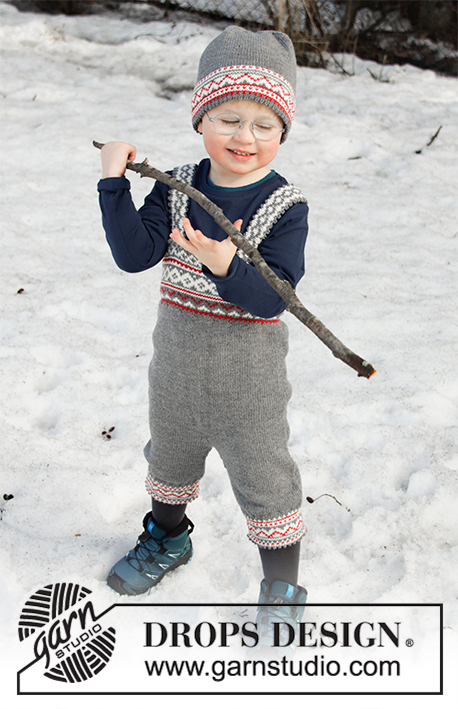
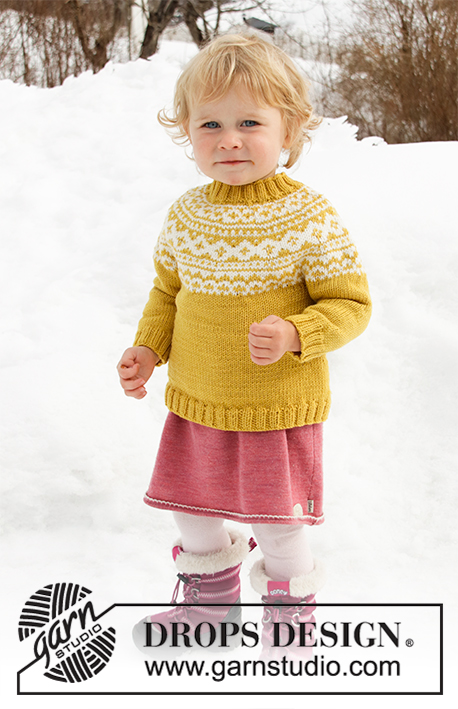
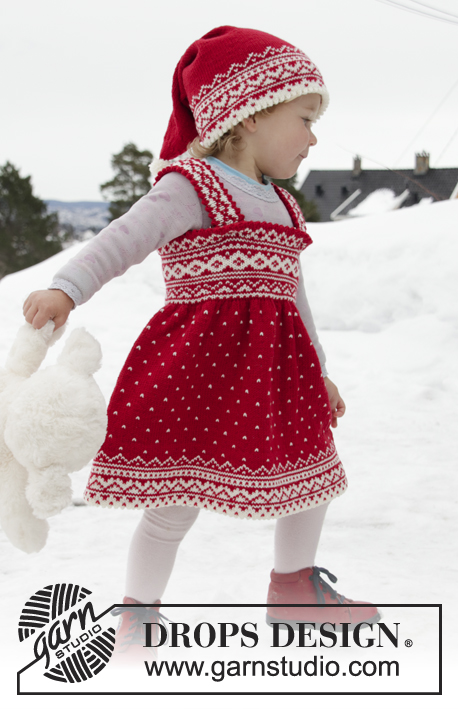
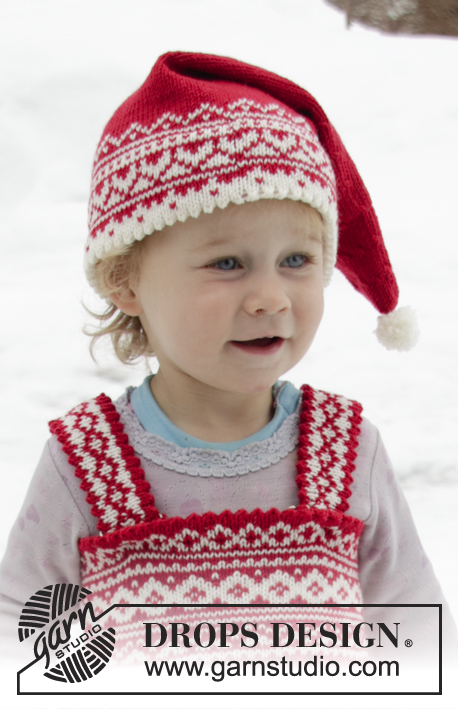
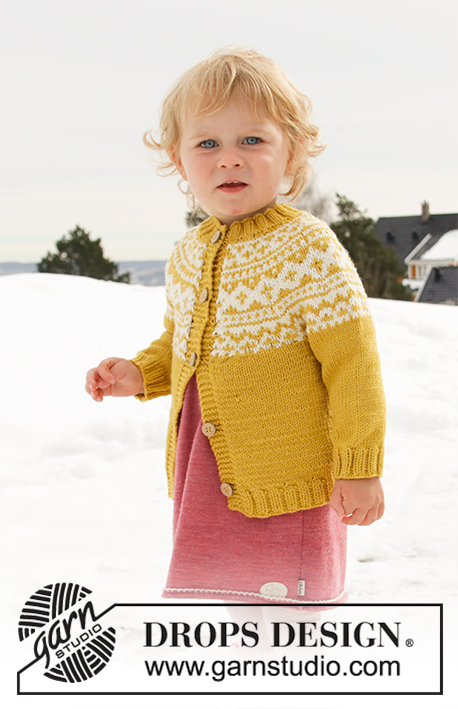
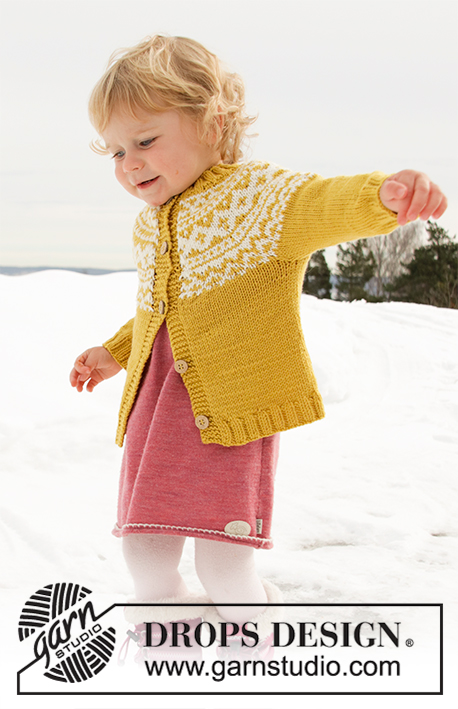
Little Missy Jacket#littlemissyjacket |
||||||||||
 |
 |
|||||||||
Knitted jacket for babies and children with round yoke in DROPS Lima. The piece is worked top down with Nordic pattern. Sizes 12 months – 12 years.
DROPS Children 32-8 |
||||||||||
|
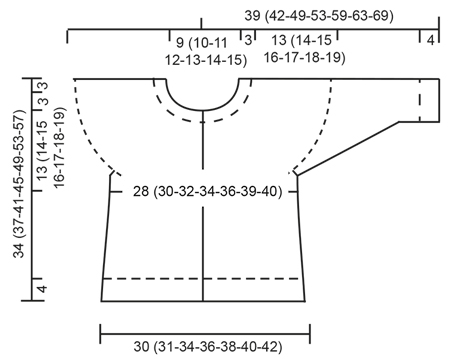
------------------------------------------------------- EXPLANATIONS FOR THE PATTERN: ------------------------------------------------------- RIDGE/GARTER STITCH (worked back and forth): 1 ridge = Knit 2 rows. PATTERN: See diagrams A.1 and A.2. Choose diagram for your size. The whole pattern is worked in stocking stitch. KNITTING TIP (for bands): The whole of the band is worked in goldenrod. In other words, use 1 ball for each band where needed (i.e. on the rows where goldenrod is not used in the pattern). Change strands between band and yoke (to avoid strand-changes on outside of band). When changing strands, twist the two strands together so that the stitches stay together. DECREASE/INCREASE TIP: To work out how to decrease/increase evenly, count the total number of stitches on the needle (e.g. 84 stitches), minus the bands (= 74 stitches) and divide the remaining stitches by the number of decreases/increases to be made (e.g. 7) = 10.57. In this example, decrease by knitting together alternately each 9th and 10th stitch and each 10th and 11th stitch (approx.); increase by making 1 yarn over after alternately each 10th and each 11th stitch (approx.). The yarn overs are worked twisted on the next row to avoid holes – NOTE: Do not decrease/increase over the bands. INCREASE TIP (for sides of body): Increase 1 stitch on each side of the marker thread as follows: Start 2 stitches before the marker thread, make 1 yarn over, knit 4 (the marker thread sits in the middle of these 4 stitches), make 1 yarn over (= 2 stitches increased). Increase like this at both marker threads (= 4 stitches increased). On the next row work the yarn overs twisted to avoid holes. DECREASE TIP (for mid under sleeve): Decrease 1 stitch on each side of the marker thread as follows: Start 3 stitches before the marker thread, knit 2 together, knit 2 (the marker thread sits in the middle of these 2 stitches), slip 1 stitch as if to knit, knit 1 and pass the slipped stitch over the knitted stitch (= 2 stitches decreased). ELEVATION (back of neck): Skip this section if you do not want an elevation. The first row is worked as follows from the right side. Knit until there are 8 (8-8-10-10-12-12) stitches left on row, turn, tighten strand and purl until there are 8 (8-8-10-10-12-12) stitches left in the other side, turn, tighten strand and knit until there are 16 (16-16-18-18-20-20) stitches left on row, turn, tighten strand and purl until there are 16 (16-16-18-18-20-20) stitches left on other side. Continue by working 8 stitches less each time you turn 2 more times in each side, turn, tighten strand and knit to end of row, then purl 1 row from the wrong side (bands worked in garter stitch). BUTTONHOLES: Work buttonholes on right band (when the garment is worn). 1 buttonhole = start from the wrong side and knit together the 2nd and 3rd stitch from the edge, make 1 yarn over. On the next row knit the yarn over to leave a hole. The first buttonhole is worked when the neck measures approx. 1½-2 cm, the next 4 (5-5-5-6-6-7) buttonholes are then worked after approx. every 6 (6-6½-7-6½-7-7) cm. ------------------------------------------------------- START THE PIECE HERE: ------------------------------------------------------- JACKET - SHORT OVERVIEW OF THE PIECE: The piece is worked top down. The yoke is worked first, then it is divided for sleeves and body. The body is continued back and forth. The sleeves are worked in the round with double pointed needles. NECK: Cast on 84 (88-92-96-100-108-112) stitches (including 5 band stitches in each side towards mid front) with circular needle size 3 mm and goldenrod. Purl 1 row from the wrong side with 5 band stitches in GARTER STITCH – read description above, in each side. The next row is worked as follows from the right side: 5 band stitches in garter stitch, * knit 2, purl 2 *, work from *-* until there are 7 stitches left, finish with knit 2 and 5 band stitches in garter stitch. Continue this rib for 3 cm – remember BUTTONHOLES on right band – read description above and finish after 1 row from the right side. YOKE: Change to circular needle size 4 mm. Purl 1 row from the right side with 5 band stitches in garter stitch in each side and decrease 7 (5-4-1-5-6-10) stitches evenly on row – read DECREASE/INCREASE TIP (purl 2 stitches together = 1 stitch decreased) = 77 (83-88-95-95-102-102) stitches. You can now work an elevation in back of neck so that the yoke is slightly higher at the back. This elevation can be left out; the neck will then be the same front and back – work ELEVATION – read description above or continue working. The next row is worked as follows from the right side: 5 band stitches in garter stitch, work pattern according to A.1 until there are 6 stitches left on row – Note: Choose diagram for your size (= 11 (12-11-12-12-13-13) repeats of 6 (6-7-7-7-7-7) stitches), work A.2 over the next stitch and finish with 5 band stitches in garter stitch. Continue this pattern and increase as shown in the diagram – read KNITTING TIP and REMEMBER THE KNITTING TENSION! When A.1 and A.2 have been completed there are 187 (203-220-239-251-271-271) stitches on the row. Continue with stocking stitch with 5 band stitches in garter stitch in each side in golden rod. On the next row from the right side increase 7 (7-10-7-3-0-11) stitches evenly on row (do not increase over bands) = 194 (210-230-246-254-271-282) stitches. When the piece measures 13 (14-15-16-17-18-19) cm mid front (measured without the neck), divide the piece as follows: Work 29 (31-34-36-38-40-42) stitches as before (= front piece), place the next 42 (46-50-54-54-58-60) stitches on 1 thread for sleeve (without working them), cast on 6 new stitches on the needle, work 52 (56-62-66-70-75-78) stitches (= back piece), place the next 42 (46-50-54-54-58-60) stitches on 1 thread for sleeve (without working them), cast on 6 new stitches on the needle and work the remaining 29 (31-34-36-38-40-42) stitches as before (= front piece) = 122 (130-142-150-158-167-174) stitches. BODY: Insert 1 marker thread 32 (34-37-39-41-43-45) stitches in from each side (= 58 (62-68-72-76-81-84) stitches between marker threads on back piece). THE PIECE IS NOW MEASURED FROM HERE! Continue back and forth with stocking stitch and 5 band stitches in garter stitch in each side towards mid front – remember BUTTONHOLES on band. When the piece measures 3 cm from where body and sleeves were divided, increase on each side of both marker threads – read INCREASE TIP. Repeat the increase when the piece measures 8 cm from where body and sleeves were divided = 130 (138-150-158-166-175-182) stitches. When the piece measures 11 (13-16-19-22-25-28) cm from where body and sleeves were divided, increase 14 (14-14-14-14-13-14) stitches on next row from the right side (do not increase over the bands) = 144 (152-164-172-180-188-196) stitches. Change to needle size 3 mm. The next row is worked as follows from the right side: 5 band stitches in garter stitch, * knit 2, purl 2 *, work from *-* until there are 7 stitches left, finish with knit 2 and 5 band stitches in garter stitch. Continue this rib for 4 cm, then cast off with garter stitch over garter stitch, knit over knit and purl over purl. The whole jacket measures approx. 34 (37-41-45-49-53-57) cm, measured from the shoulder. SLEEVE: Place the stitches from the one thread on double pointed needles size 4 mm and knit up 1 stitch in each of the 6 stitches cast on under the sleeve = 48 (52-56-60-60-64-66) stitches. Insert 1 marker thread in the middle of these 6 stitches (= mid under sleeve). THE PIECE IS NOW MEASURED FROM HERE! Work stocking stitch in the round with goldenrod. When the sleeve measures 1 cm from where sleeve and body were divided, decrease 2 stitches mid under sleeve – read DECREASE TIP. Decrease like this every 2 (2½-2½-2½-3½-3½-3½) cm a total of 6 (6-8-8-8-8-9) times = 36 (40-40-44-44-48-48) stitches. When the sleeve measures 14 (16-21-24-28-31-35) cm from where sleeve and body were divided, change to double pointed needles size 3 mm and work rib in the round (= knit 2 / purl 2) for 4 cm or to desired length. Then cast off with knit over knit and purl over purl. The sleeve measures a total of approx. 18 (20-25-28-32-35-39) cm from where sleeve and body were divided. Work the other sleeve in the same way. ASSEMBLY: Sew buttons onto left band. |
||||||||||
Diagram explanations |
||||||||||
|
||||||||||
 |
||||||||||
 |
||||||||||
 |
||||||||||
 |
||||||||||
Have you finished this pattern?Tag your pictures with #dropspattern #littlemissyjacket or submit them to the #dropsfan gallery. Do you need help with this pattern?You'll find 32 tutorial videos, a Comments/Questions area and more by visiting the pattern on garnstudio.com. © 1982-2026 DROPS Design A/S. We reserve all rights. This document, including all its sub-sections, has copyrights. Read more about what you can do with our patterns at the bottom of each pattern on our site. |
||||||||||


With over 40 years in knitting and crochet design, DROPS Design offers one of the most extensive collections of free patterns on the internet - translated to 17 languages. As of today we count 324 catalogues and 12245 patterns translated into English (UK/cm). 12245
We work hard to bring you the best knitting and crochet have to offer, inspiration and advice as well as great quality yarns at incredible prices! Would you like to use our patterns for other than personal use? You can read what you are allowed to do in the Copyright text at the bottom of all our patterns. Happy crafting!
Post a comment to pattern DROPS Children 32-8
We would love to hear what you have to say about this pattern!
If you want to leave a question, please make sure you select the correct category in the form below, to speed up the answering process. Required fields are marked *.