
Popular categories
Looking for a yarn?


Comments / Questions (91)
![]() Marica wrote:
Marica wrote:
Dice di lavorare 3 cm a coste finendo dopo il ferro sul dir del lav, quindi il ferro succ dovrebbe essere sul rov del lavoro, ma..: “Proseguire a coste per 3 cm .... e finire dopo 1 ferro sul diritto del lavoro. SPRONE: Passare ai ferri circolari n° 4. Lavorare 1 ferro a rovescio sul diritto del lavoro
26.11.2019 - 01:26DROPS Design answered:
Buongiorno Marica. Abbiamo corretto il testo: deve lavorare un ferro a rov sul rovescio del lavoro. Buon lavoro!
26.11.2019 - 06:47
![]() Marica wrote:
Marica wrote:
Se inizio il diagramma con il filo ocra al dir del lavoro e il ferro succ sul rov del lav lo devo fate con il panna per poi riprendere a lav lo schema al terzo ferro con entrambi i colori, alla fine del primo ferro taglio il filo?
25.11.2019 - 09:38DROPS Design answered:
Buongiorno Marica, si, può tagliare il filo ocra alla fine del primo ferro. Buon lavoro!
25.11.2019 - 15:12
![]() Marica wrote:
Marica wrote:
Il diagramma si legge da dedtra a sinistra al dir e da sinistra a destra al rovescio? Alla fine del primo ferro colore ocra devo lasciare il filo e cominciare con il bianco?
24.11.2019 - 15:24DROPS Design answered:
Buongiorno Marica, si, il motivo si leggere da destra verso sinistra sui ferri di andata e da sinistra verso destra su quelli di ritorno. Lavora il primo ferro con il colore ocra, poi passa al bianco. Buon lavoro!
24.11.2019 - 17:24
![]() Nina wrote:
Nina wrote:
Hoi! Bij de pas is de eerste tour die gebreid wordt averecht aan de goede kant. Daarna kun je de verhoging breien. Of verder met het patroon. Nu staat er dat je dan weer met een tour aan de goede kant moet beginnen. Hoe dan? Ik heb immers net een tour aan de goede kant gebreid. Moet ik de tour aan de verkeerde kant recht of averecht breien zodat ik dan aan de goede kant met het patroon kan beginnen? Met vriendelijke groet, Nina.
16.11.2019 - 08:48DROPS Design answered:
Dag Nina,
Je kunt de draad afknippen, de steken naar de andere kant van de rondbreinaald schuiven en opnieuw aan de goede kant beginnen.
23.11.2019 - 15:21
![]() Nina wrote:
Nina wrote:
Voor maat 98/104, welk A1 patroon moet ik gebruiken?
15.11.2019 - 21:23DROPS Design answered:
Dag Nina,
Hiervoor gebruik je het middelste patroon van A.1 (waar 3/4 - 5/6 bij staat)
23.11.2019 - 15:18
![]() Jeanne Rood wrote:
Jeanne Rood wrote:
Bij het breien van een verhoging in de nek begrijp ik onderstaande tekst niet. Waar en hoe moet ik 8 steken minderen nadat ik de verhoging heb gebreid? Tekst: (patroon verhoging 32-8) Ga verder met 8 steken te minderen elke keer dat u het werk keert, 2 keer aan elke kant, keer het werk, trek de draad aan en brei recht tot het einde van de naald, brei dan 1 naald averecht aan de verkeerde kant (de biezen worden in ribbelsteek gebreid).
16.10.2019 - 15:26DROPS Design answered:
Dag Jeanne,
Het stond foutief aangegeven, je hoeft namelijk niet te minderen, maar je breit telkens 8 steken minder. Ik heb het nu aangepast naar Ga verder door steeds 8 steken minder te breien elke keer dat u het werk keert
17.10.2019 - 08:49
![]() Renate Schubert wrote:
Renate Schubert wrote:
Ich habe die Jacke in Größe 128 nach ihrer Anleitung gestrickt . Die Beschreibung war verständlich. Nach zwei Wochen war die Jacke fertig.
12.10.2019 - 14:30
![]() Sari wrote:
Sari wrote:
Jos teen esimerkiksi mallin 2-vuotiaalle kuvio rivillä 5 lisäyksen 8. silmukan jälkeen tulee joka toiseen kuvioon 4 ja joka toiseen kolme silmukkaa päävärillä. Seuraavan kerroksen kuvio ei täsmää. Käsitänkö nämä levennykset jotenkin väärin? 5 -rivi menee näin : 0oxoooxoo niin teenkö tuon lisäyksen 0 joka kuviokerrassa vai rivin lopussa ainoastaan?
12.10.2019 - 00:10
![]() Beata wrote:
Beata wrote:
Czy diagram A2 robie na poczatku I na koncu kazdego rzeda ...czyli A2 /A1 /A2 ?
05.10.2019 - 15:27DROPS Design answered:
Witaj Beato! Nie. Przerabiasz 5 oczek obszycia przodu ściegiem francuskim, powtarzasz schemat A.1 aż zostaje 6 oczek, przerabiasz schemat A.2 ponad następnym oczkiem (1) i kończysz przerabiając 5 oczek obszycia przodu ściegiem francuskim. Pozdrawiamy!
07.10.2019 - 08:47
![]() Beata wrote:
Beata wrote:
Witam. Prosze o pomoc. Mam problem z odczytaniem poczatku diagramu. Robie rozmiar 3/4 lata. Na drucie mam 88 oczek. Teraz musze dodawac . Wedlug diagramu...1 prawe, narzut, 6 prawych, narzut. A co dalej ? Co ile oczek dalej robic narzut by na koncu rzeda otrzymac taka sama sytuacje jak na poczatku rzeda. Ile oczek mam miec na drucie po pierwszym rzedzie, 5, 7, 9,13, 15,17 ? Dziekuje.
05.10.2019 - 15:24DROPS Design answered:
Witaj Beatko! Dodajesz oczka zgodnie ze schematem A.1 wykonując narzuty w zaznaczonych miejscach. W twoim rozmiarze będzie 11 powtórzeń schematu A.1 (7 o. ) na szerokość. W pierwszym rzędzie schematu A.1 dodasz 2 o. na schemat (za 1-szym i za 7-mym oczkiem). Powtórzysz to samo w rzędzie 11 razy - będą dodane 22 o. w tym rzędzie, a razem 110 o. Później dodajesz dopiero w 5-tymb rzędzie. Powodzenia!
07.10.2019 - 08:58
|
||||||||||
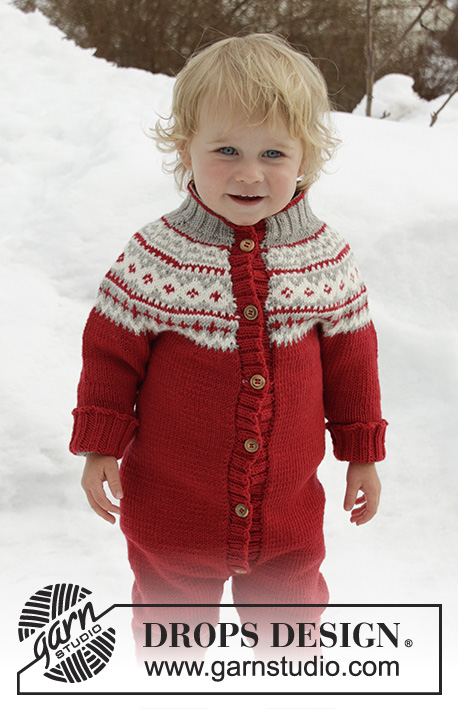
Little Missy Jacket#littlemissyjacket |
||||||||||
 |
 |
|||||||||
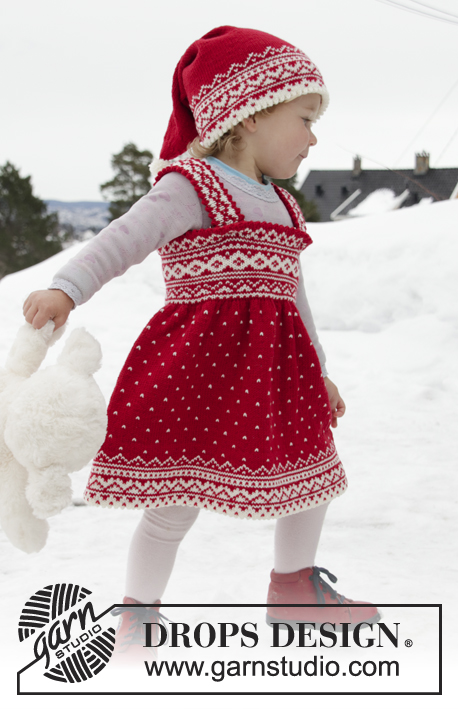
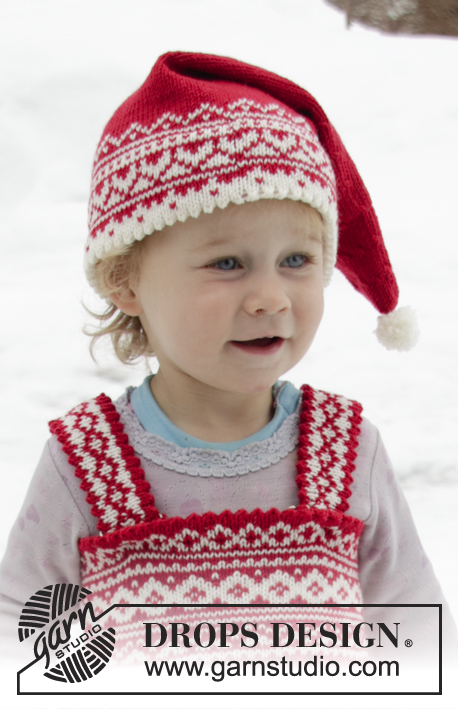
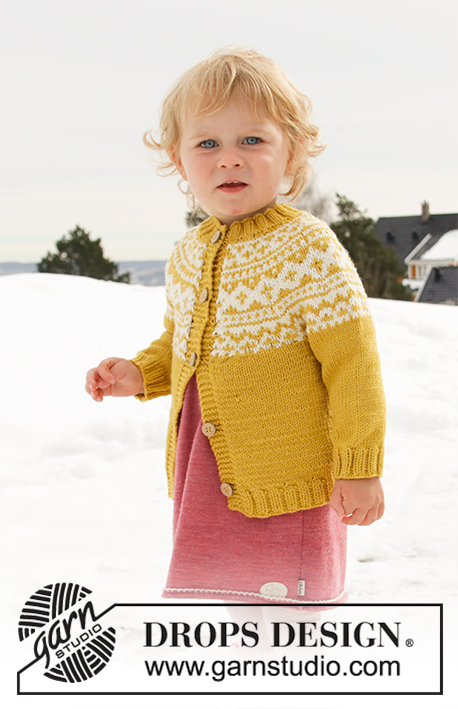
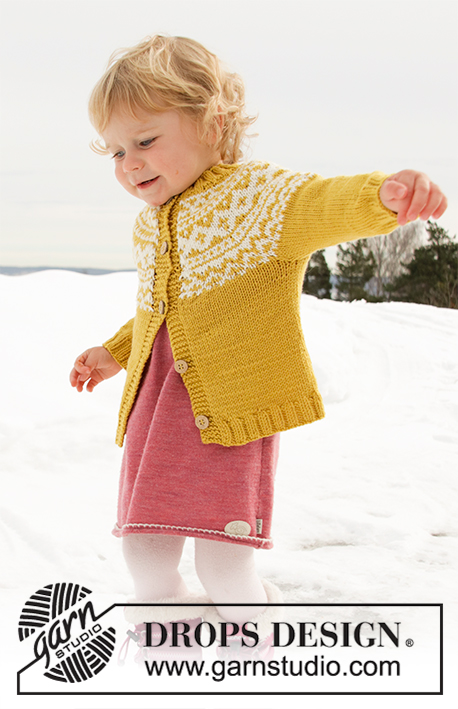
Knitted jacket for babies and children with round yoke in DROPS Lima. The piece is worked top down with Nordic pattern. Sizes 12 months – 12 years.
DROPS Children 32-8 |
||||||||||
|
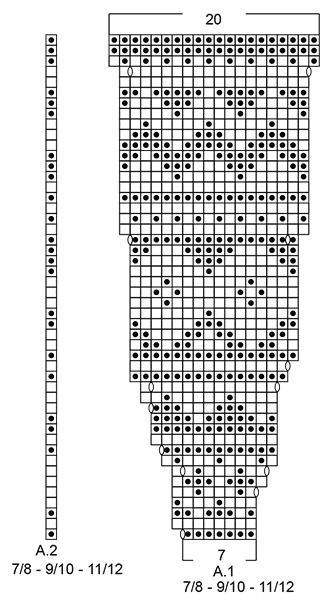
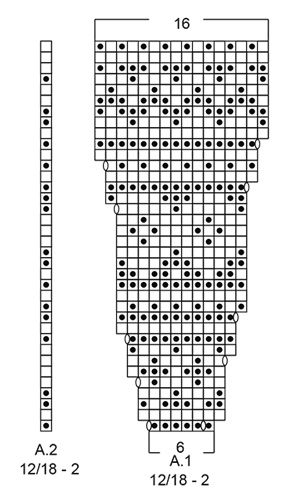
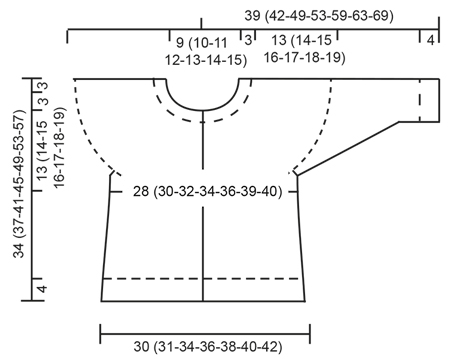
------------------------------------------------------- EXPLANATIONS FOR THE PATTERN: ------------------------------------------------------- RIDGE/GARTER STITCH (worked back and forth): 1 ridge = Knit 2 rows. PATTERN: See diagrams A.1 and A.2. Choose diagram for your size. The whole pattern is worked in stocking stitch. KNITTING TIP (for bands): The whole of the band is worked in goldenrod. In other words, use 1 ball for each band where needed (i.e. on the rows where goldenrod is not used in the pattern). Change strands between band and yoke (to avoid strand-changes on outside of band). When changing strands, twist the two strands together so that the stitches stay together. DECREASE/INCREASE TIP: To work out how to decrease/increase evenly, count the total number of stitches on the needle (e.g. 84 stitches), minus the bands (= 74 stitches) and divide the remaining stitches by the number of decreases/increases to be made (e.g. 7) = 10.57. In this example, decrease by knitting together alternately each 9th and 10th stitch and each 10th and 11th stitch (approx.); increase by making 1 yarn over after alternately each 10th and each 11th stitch (approx.). The yarn overs are worked twisted on the next row to avoid holes – NOTE: Do not decrease/increase over the bands. INCREASE TIP (for sides of body): Increase 1 stitch on each side of the marker thread as follows: Start 2 stitches before the marker thread, make 1 yarn over, knit 4 (the marker thread sits in the middle of these 4 stitches), make 1 yarn over (= 2 stitches increased). Increase like this at both marker threads (= 4 stitches increased). On the next row work the yarn overs twisted to avoid holes. DECREASE TIP (for mid under sleeve): Decrease 1 stitch on each side of the marker thread as follows: Start 3 stitches before the marker thread, knit 2 together, knit 2 (the marker thread sits in the middle of these 2 stitches), slip 1 stitch as if to knit, knit 1 and pass the slipped stitch over the knitted stitch (= 2 stitches decreased). ELEVATION (back of neck): Skip this section if you do not want an elevation. The first row is worked as follows from the right side. Knit until there are 8 (8-8-10-10-12-12) stitches left on row, turn, tighten strand and purl until there are 8 (8-8-10-10-12-12) stitches left in the other side, turn, tighten strand and knit until there are 16 (16-16-18-18-20-20) stitches left on row, turn, tighten strand and purl until there are 16 (16-16-18-18-20-20) stitches left on other side. Continue by working 8 stitches less each time you turn 2 more times in each side, turn, tighten strand and knit to end of row, then purl 1 row from the wrong side (bands worked in garter stitch). BUTTONHOLES: Work buttonholes on right band (when the garment is worn). 1 buttonhole = start from the wrong side and knit together the 2nd and 3rd stitch from the edge, make 1 yarn over. On the next row knit the yarn over to leave a hole. The first buttonhole is worked when the neck measures approx. 1½-2 cm, the next 4 (5-5-5-6-6-7) buttonholes are then worked after approx. every 6 (6-6½-7-6½-7-7) cm. ------------------------------------------------------- START THE PIECE HERE: ------------------------------------------------------- JACKET - SHORT OVERVIEW OF THE PIECE: The piece is worked top down. The yoke is worked first, then it is divided for sleeves and body. The body is continued back and forth. The sleeves are worked in the round with double pointed needles. NECK: Cast on 84 (88-92-96-100-108-112) stitches (including 5 band stitches in each side towards mid front) with circular needle size 3 mm and goldenrod. Purl 1 row from the wrong side with 5 band stitches in GARTER STITCH – read description above, in each side. The next row is worked as follows from the right side: 5 band stitches in garter stitch, * knit 2, purl 2 *, work from *-* until there are 7 stitches left, finish with knit 2 and 5 band stitches in garter stitch. Continue this rib for 3 cm – remember BUTTONHOLES on right band – read description above and finish after 1 row from the right side. YOKE: Change to circular needle size 4 mm. Purl 1 row from the right side with 5 band stitches in garter stitch in each side and decrease 7 (5-4-1-5-6-10) stitches evenly on row – read DECREASE/INCREASE TIP (purl 2 stitches together = 1 stitch decreased) = 77 (83-88-95-95-102-102) stitches. You can now work an elevation in back of neck so that the yoke is slightly higher at the back. This elevation can be left out; the neck will then be the same front and back – work ELEVATION – read description above or continue working. The next row is worked as follows from the right side: 5 band stitches in garter stitch, work pattern according to A.1 until there are 6 stitches left on row – Note: Choose diagram for your size (= 11 (12-11-12-12-13-13) repeats of 6 (6-7-7-7-7-7) stitches), work A.2 over the next stitch and finish with 5 band stitches in garter stitch. Continue this pattern and increase as shown in the diagram – read KNITTING TIP and REMEMBER THE KNITTING TENSION! When A.1 and A.2 have been completed there are 187 (203-220-239-251-271-271) stitches on the row. Continue with stocking stitch with 5 band stitches in garter stitch in each side in golden rod. On the next row from the right side increase 7 (7-10-7-3-0-11) stitches evenly on row (do not increase over bands) = 194 (210-230-246-254-271-282) stitches. When the piece measures 13 (14-15-16-17-18-19) cm mid front (measured without the neck), divide the piece as follows: Work 29 (31-34-36-38-40-42) stitches as before (= front piece), place the next 42 (46-50-54-54-58-60) stitches on 1 thread for sleeve (without working them), cast on 6 new stitches on the needle, work 52 (56-62-66-70-75-78) stitches (= back piece), place the next 42 (46-50-54-54-58-60) stitches on 1 thread for sleeve (without working them), cast on 6 new stitches on the needle and work the remaining 29 (31-34-36-38-40-42) stitches as before (= front piece) = 122 (130-142-150-158-167-174) stitches. BODY: Insert 1 marker thread 32 (34-37-39-41-43-45) stitches in from each side (= 58 (62-68-72-76-81-84) stitches between marker threads on back piece). THE PIECE IS NOW MEASURED FROM HERE! Continue back and forth with stocking stitch and 5 band stitches in garter stitch in each side towards mid front – remember BUTTONHOLES on band. When the piece measures 3 cm from where body and sleeves were divided, increase on each side of both marker threads – read INCREASE TIP. Repeat the increase when the piece measures 8 cm from where body and sleeves were divided = 130 (138-150-158-166-175-182) stitches. When the piece measures 11 (13-16-19-22-25-28) cm from where body and sleeves were divided, increase 14 (14-14-14-14-13-14) stitches on next row from the right side (do not increase over the bands) = 144 (152-164-172-180-188-196) stitches. Change to needle size 3 mm. The next row is worked as follows from the right side: 5 band stitches in garter stitch, * knit 2, purl 2 *, work from *-* until there are 7 stitches left, finish with knit 2 and 5 band stitches in garter stitch. Continue this rib for 4 cm, then cast off with garter stitch over garter stitch, knit over knit and purl over purl. The whole jacket measures approx. 34 (37-41-45-49-53-57) cm, measured from the shoulder. SLEEVE: Place the stitches from the one thread on double pointed needles size 4 mm and knit up 1 stitch in each of the 6 stitches cast on under the sleeve = 48 (52-56-60-60-64-66) stitches. Insert 1 marker thread in the middle of these 6 stitches (= mid under sleeve). THE PIECE IS NOW MEASURED FROM HERE! Work stocking stitch in the round with goldenrod. When the sleeve measures 1 cm from where sleeve and body were divided, decrease 2 stitches mid under sleeve – read DECREASE TIP. Decrease like this every 2 (2½-2½-2½-3½-3½-3½) cm a total of 6 (6-8-8-8-8-9) times = 36 (40-40-44-44-48-48) stitches. When the sleeve measures 14 (16-21-24-28-31-35) cm from where sleeve and body were divided, change to double pointed needles size 3 mm and work rib in the round (= knit 2 / purl 2) for 4 cm or to desired length. Then cast off with knit over knit and purl over purl. The sleeve measures a total of approx. 18 (20-25-28-32-35-39) cm from where sleeve and body were divided. Work the other sleeve in the same way. ASSEMBLY: Sew buttons onto left band. |
||||||||||
Diagram explanations |
||||||||||
|
||||||||||
 |
||||||||||
 |
||||||||||
 |
||||||||||
 |
||||||||||
Have you finished this pattern?Tag your pictures with #dropspattern #littlemissyjacket or submit them to the #dropsfan gallery. Do you need help with this pattern?You'll find 32 tutorial videos, a Comments/Questions area and more by visiting the pattern on garnstudio.com. © 1982-2026 DROPS Design A/S. We reserve all rights. This document, including all its sub-sections, has copyrights. Read more about what you can do with our patterns at the bottom of each pattern on our site. |
||||||||||


With over 40 years in knitting and crochet design, DROPS Design offers one of the most extensive collections of free patterns on the internet - translated to 17 languages. As of today we count 324 catalogues and 12245 patterns translated into English (UK/cm). 12245
We work hard to bring you the best knitting and crochet have to offer, inspiration and advice as well as great quality yarns at incredible prices! Would you like to use our patterns for other than personal use? You can read what you are allowed to do in the Copyright text at the bottom of all our patterns. Happy crafting!
Post a comment to pattern DROPS Children 32-8
We would love to hear what you have to say about this pattern!
If you want to leave a question, please make sure you select the correct category in the form below, to speed up the answering process. Required fields are marked *.