
Popular categories
Looking for a yarn?


Comments / Questions (55)
![]() Christina wrote:
Christina wrote:
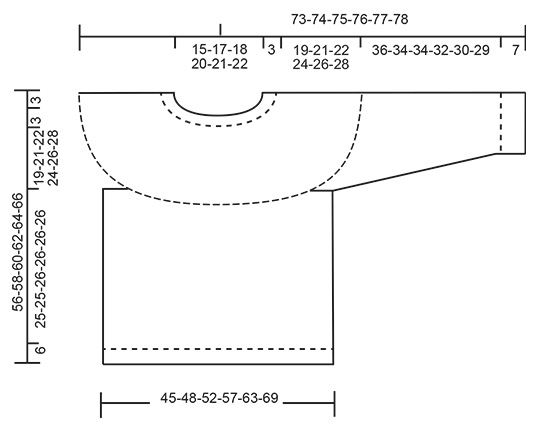
Hvor står brystmålet på opskriften. Det er svært at vælge størrelse hvis man ikke ved færdigmålet på blusen
17.01.2021 - 08:13DROPS Design answered:
Hei Christina. Brystmålet på denne genseren er den sammen som målet nederst. Se målskissen for mål i de forskjellige størrelsene. mvh DROPS design
18.01.2021 - 15:07
![]() Kerstin wrote:
Kerstin wrote:
Kann man diesen Pullover auch mit Nadelstärke 5 wie bei dem DROPS Air Garn vorgesehen ist stricken? Wie viel Garn brauche ich dann und wie ändert sich die Maschenanzahl? In der Anleitung sind nur 250 g angegeben, dies kommt mir sehr wenig vor reicht das aus?
10.01.2021 - 20:03DROPS Design answered:
Liebe Kerstin, leider können wir nicht jedes Modell nach jedem Wunsch umrechnen - hier finden Sie alle Anleitungen, die mit Air gestrickt werden, Resultate können Sie bei der Maschenprobe filtern. Danke für Ihr Verständnis. Viel Spaß beim stricken!
11.01.2021 - 10:06
![]() Lis Majbrit Borksted wrote:
Lis Majbrit Borksted wrote:
Mon jeg kan få forklaret/vist hvordan man dykker ned i tidligere maske og trækker løkke 3 cm op?
20.12.2020 - 17:48DROPS Design answered:
Hej. I denna video ser du hur du ska göra. Mvh DROPS Design
21.12.2020 - 14:00
![]() Lena wrote:
Lena wrote:
Hallo! Kann man am Rückenteil noch weiter in Hin- und Rückreihen bzw. verkürzten Reihen arbeiten, damit der Pulli eine bessere Form hat, oder ist es bei diesem Modell nicht empfohlen? Ich danke!
19.07.2020 - 02:32DROPS Design answered:
Liebe Lena, wenn Sie eine Erhöhung möchten, dann sollen Sie sie kalkulieren, so daß Muster stimmt in Runden - es könnte dann einfacher diese Erhöhung vielleicht in A.1a zu stricken - gerne können Sie sich von einem ählinchen Pullover (= selbe Maschenprobe) mit einer Erhöhung inspirieren lassen. Viel Spaß beim stricken!
20.07.2020 - 09:46
![]() Lena Theresa wrote:
Lena Theresa wrote:
Vielen Dank 😍 ihr seit die besten
14.05.2020 - 19:22
![]() Lena Theresa wrote:
Lena Theresa wrote:
Strickt man dann nach dem wenden nicht anders rum und entsteht dann nicht eine kleine Stufe? Ich finde den Tipp toll und würde das auch echt gerne machen wenn ich es endlich verstehe
13.05.2020 - 19:02DROPS Design answered:
Liebe Theresa, bei der 1. Runde können Sie die 1. Masche wie beim verkürzten Reihen stricken (also entweder mit Doppelmasche (nach deutschen Art) oder mit Umschlag - siehe Video), bei der 2. Runde stricken Sie dann diese Masche rechts und keine Stufe sollte entstehen, weitter glatt rechts stricken. Viel Spaß beim stricken!
14.05.2020 - 07:55
![]() Lena Theresa wrote:
Lena Theresa wrote:
Kann man mir erklären wie der Tipp für glatt links stricken gehen soll ich verstehe das leider nicht
13.05.2020 - 14:13DROPS Design answered:
Liebe Theresa, wenn man in der Runde strickt ist es einfacher rechte Maschen anstatt link Maschen zu stricken, rumpfeil wird glatt links gestrickt, wenn Sie die Arbeit von Innerseite /Rückseite stricken, dann brauchen Sie einfach nur rechte Maschen zu stricken, um am Ende wenden Sie die Arbeit wieder damit die Vorderseite (= linke Maschen) außen liegt. Sie können auch einfach immer von der Vorderseite und linke Maschen stricken. Viel Spaß beim stricken!
13.05.2020 - 15:11
![]() Martha Friisø Søndenaa wrote:
Martha Friisø Søndenaa wrote:
Fant ut av det til slutt.
19.03.2020 - 15:48
![]() Martha Friisø Søndenaa wrote:
Martha Friisø Søndenaa wrote:
Skal begynne med A1b men skjønner ikke helt hva jeg skal gjøre på den første omgangen. Det står noe om å dra tråden 3 cm. Kan jeg få en nærmere forklaring?
19.03.2020 - 12:31DROPS Design answered:
Hei Marthe. Så flott at du fant ut av det :) Ta også titt på hjelpevideoene som ligger til oppskriften. God Fornøyelse!
23.03.2020 - 09:13
![]() Amanda wrote:
Amanda wrote:
Jeg strikker medium og er på første delen av A.1b. Jeg har altså strikket en runde med vrang og rett og skal begynne med kast
17.12.2019 - 13:50DROPS Design answered:
Hej Amanda, pind nr 2 i A.1b strikker du: vrang,ret,kast, vrang - vrang,ret,kast,vrang - osv. God fornøjelse!
17.12.2019 - 14:58
|
||||||||||||||||||||||
Clemence#clemencesweater |
||||||||||||||||||||||
 |
 |
|||||||||||||||||||||
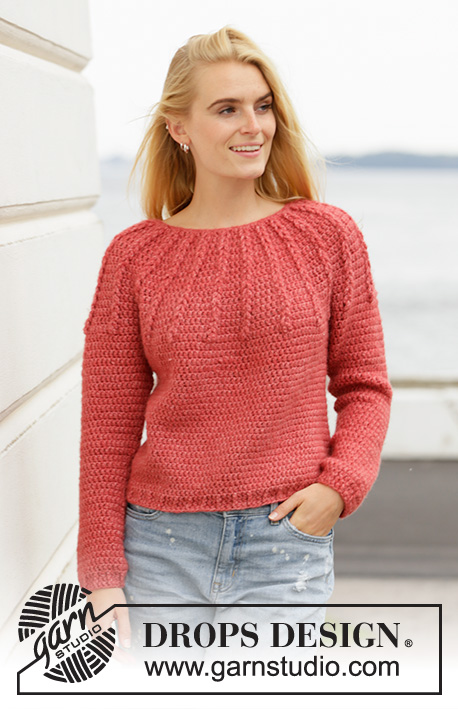
Knitted jumper with round yoke in DROPS Air. The piece is worked top down with textured border. Sizes S - XXXL.
DROPS 197-8 |
||||||||||||||||||||||
|
EXPLANATIONS FOR THE PATTERN: ------------------------------------------------------- PATTERN: See diagram A.1. Choose diagram for your size. DECREASE/INCREASE tip (evenly spaced): To work out how to decrease/increase evenly, count the total number of stitches on the needle (e.g. 180 stitches) and divide by the number of decreases/increases to be made (e.g. 4) = 45. In this example, decrease by knitting each 44th and 45th stitch together. Increase by making 1 yarn over after each 45th stitch. On the next round work the yarn overs twisted to avoid holes. PURLING TIP (for sleeves and body): When purling from the right side, it is possible to turn the piece inside out and knit from the wrong side. Remember to turn the piece back so that you work from the right side when working rib. DECREASE TIP (for sleeves): Decrease 1 stitch on each side of the marker thread as follows: Work until there are 3 stitches left before the marker thread, purl 2 together, purl 2 (the marker thread sits in the middle of these 2 stitches) purl the next 2 stitches together (NOTE! Knit if you have turned the piece inside out). ------------------------------------------------------- START THE PIECE HERE: ------------------------------------------------------- JUMPER: The piece is worked in the round with circular needle, top down. After the yoke the body is worked in the round with circular needle. The sleeves are worked in the round with short circular needle/double pointed needles. YOKE: Cast on 54-60-63-66-69-72 stitches with circular needle size 7 mm and Air. Insert 1 marker thread at the beginning of the round (= mid back). Work A.1a over all stitches – see diagram for your size (= 18-20-21-22-23-24 repeats of 3 stitches). Continue until A.1a has been completed. Change to circular needle size 8 mm and work A.1b over A.1a. REMEMBER THE KNITTING TENSION! When A.1b has been completed there are 180-200-210-242-253-264 stitches on the needle. Then work A.1c over A.1b. Repeat A.1c in height until the piece measures 22-24-25-27-29-31 cm from the cast-on edge – adjust so that you finish after a round worked in the same way as 1st round in A.1c. Purl 1 round where you decrease 4-4-0-12-11-0 stitches evenly on round – read DECREASE/INCREASE TIP = 176-196-210-230-242-264 stitches. The next round is purled as follows: Work the first 26-28-30-33-36-40 stitches (= half back piece), place the next 36-42-45-49-49-52 stitches on a thread for sleeve, cast on 6-6-8-8-10-10 new stitches under the sleeve, work the next 52-56-60-66-72-80 stitches (= front piece), place the next 36-42-45-49-49-52 stitches on a thread for sleeve, cast on 6-6-8-8-10-10 new stitches under the sleeve and work the last 26-28-30-33-36-40 stitches (= half back piece). THE PIECE IS NOW MEASURED FROM HERE! BODY: = 116-124-136-148-164-180 stitches. Insert 1 marker thread in the middle of the 6-6-8-8-10-10 stitches cast on under the one sleeve and start the round by this marker. Continue with purl – read PURLING TIP, until the piece measures 25-25-26-26-26-26 cm from the division. Change to circular needle size 7 mm and work rib (= knit 2 / purl 2) for 6 cm. Loosely cast off with knit over knit and purl over purl – to avoid the cast-off edge being tight, you can cast off with a needle size 8 mm. The jumper measures approx. 56-58-60-62-64-66 cm from the shoulder. SLEEVE: Place the 36-42-45-49-49-52 stitches from the thread on the one side of the piece on short circular needle/double pointed needles size 8 mm and knit up 1 stitch in each of the 6-6-8-8-10-10 stitches cast on under the sleeve = 42-48-53-57-59-62 stitches. Insert 1 marker thread in the middle of the 6-6-8-8-10-10 stitches under the sleeve and start the round here. Continue with purl – remember PURLING TIP. When the piece measures 3 cm from the division, decrease 2 stitches mid under sleeve – read DECREASE TIP. Decrease like this every 5-3-2½-2-2-1½ cm a total of 7-10-12-13-13-14 times = 28-28-29-31-33-34 stitches. Continue until the sleeve measures 36-34-34-32-30-29 cm from the division (shorter measurements in larger sizes due to longer yoke). Knit 1 round where you increase 0-0-3-1-3-2 stitches evenly on round = 28-28-32-32-36-36 stitches. Change to double pointed needles size 7 mm and work rib (= knit 2 / purl 2) for 6 cm. The sleeve measures approx. 43-41-41-39-37-36 cm from the division. Loosely cast off with knit over knit and purl over purl – to avoid the cast-off edge being tight, you can cast off with a needle size 8 mm. Work the other sleeve in the same way. |
||||||||||||||||||||||
Diagram explanations |
||||||||||||||||||||||
|
||||||||||||||||||||||
 |
||||||||||||||||||||||
 |
||||||||||||||||||||||
Have you finished this pattern?Tag your pictures with #dropspattern #clemencesweater or submit them to the #dropsfan gallery. Do you need help with this pattern?You'll find 26 tutorial videos, a Comments/Questions area and more by visiting the pattern on garnstudio.com. © 1982-2026 DROPS Design A/S. We reserve all rights. This document, including all its sub-sections, has copyrights. Read more about what you can do with our patterns at the bottom of each pattern on our site. |
||||||||||||||||||||||


With over 40 years in knitting and crochet design, DROPS Design offers one of the most extensive collections of free patterns on the internet - translated to 17 languages. As of today we count 324 catalogues and 12290 patterns translated into English (UK/cm). 12290
We work hard to bring you the best knitting and crochet have to offer, inspiration and advice as well as great quality yarns at incredible prices! Would you like to use our patterns for other than personal use? You can read what you are allowed to do in the Copyright text at the bottom of all our patterns. Happy crafting!
Post a comment to pattern DROPS 197-8
We would love to hear what you have to say about this pattern!
If you want to leave a question, please make sure you select the correct category in the form below, to speed up the answering process. Required fields are marked *.