DROPS Air
DROPS Air
65% Alpaca, 28% Polyamide, 7% Wool
from 4.80 £ /50g
Get the yarn to make this pattern from 24.00£.

The yarn cost is calculated from the pattern’s smallest size and the yarn’s cheapest product type. Looking for an even better price? You might find it on the DROPS Deals!

DROPS SS24

Clemence

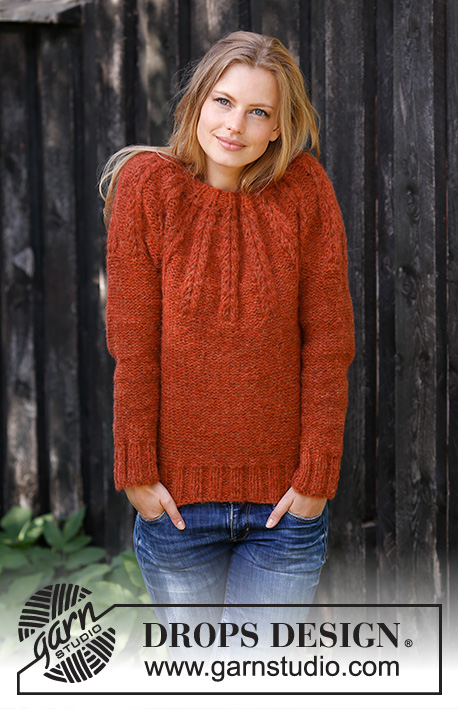
Knitted jumper with round yoke in DROPS Air. The piece is worked top down with textured border. Sizes S - XXXL.

DROPS 197-8
DROPS Design: Pattern no ai-167
Yarn group C or A + A
-----------------------------------------------------------

Sizes: S - M - L - XL - XXL - XXXL
Materials:
DROPS AIR from Garnstudio (belongs to yarn group C)
250-250-250-300-300-350 g colour 13, orange

-------------------------------------------------------
ACCESSORIES FOR THE PIECE:

KNITTING TENSION:
13 stitches in width and 17 rows in height with stocking stitch = 10 x 10 cm.

NEEDLES:
DROPS DOUBLE POINTED NEEDLES SIZE 8 MM.
DROPS CIRCULAR NEEDLE SIZE 8 MM: length 40 cm and 80 cm for stocking stitch.
DROPS DOUBLE POINTED NEEDLES SIZE 7 MM.
DROPS CIRCULAR NEEDLE SIZE 7 MM: length 40 cm and 80 cm for rib.
The needle size is only a guide. If you get too many stitches on 10 cm, change to a larger needle size. If you get too few stitches on 10 cm, change to a smaller needle size.

-----------------------------------------------------

-------------------------------------------------------

Alternative Yarn – See how to change yarns here
Yarn Groups A to F – Use the same pattern and change the yarn here
Yarn usage using an alternative yarn – Use our yarn converter here

-------------------------------------------------------

DROPS Air
DROPS Air
65% Alpaca, 28% Polyamide, 7% Wool
from 4.80 £ /50g
Get the yarn to make this pattern from 24.00£.

The yarn cost is calculated from the pattern’s smallest size and the yarn’s cheapest product type. Looking for an even better price? You might find it on the DROPS Deals!

Pattern instructions

NOTE: This pattern is written in British English. All measurements in charts are in cm. For conversion from cm to inches - click here. There are different terms for crocheting in British and American English. If this pattern includes crochet, click for "crochet terms" here. For this pattern in American English, please click here.
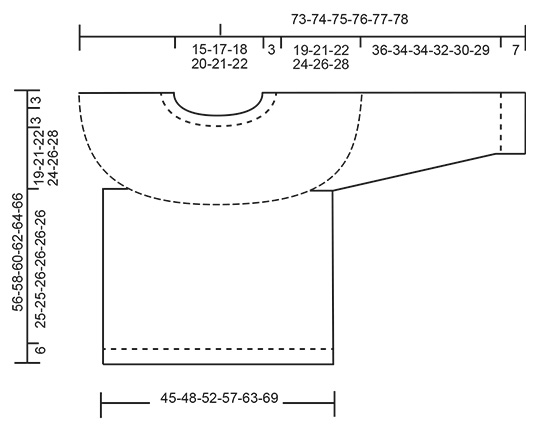
EXPLANATIONS FOR THE PATTERN:

-------------------------------------------------------

PATTERN:
See diagram A.1. Choose diagram for your size.

DECREASE/INCREASE tip (evenly spaced):
To work out how to decrease/increase evenly, count the total number of stitches on the needle (e.g. 180 stitches) and divide by the number of decreases/increases to be made (e.g. 4) = 45.
In this example, decrease by knitting each 44th and 45th stitch together.
Increase by making 1 yarn over after each 45th stitch. On the next round work the yarn overs twisted to avoid holes.

PURLING TIP (for sleeves and body):
When purling from the right side, it is possible to turn the piece inside out and knit from the wrong side. Remember to turn the piece back so that you work from the right side when working rib.

DECREASE TIP (for sleeves):
Decrease 1 stitch on each side of the marker thread as follows: Work until there are 3 stitches left before the marker thread, purl 2 together, purl 2 (the marker thread sits in the middle of these 2 stitches) purl the next 2 stitches together (NOTE! Knit if you have turned the piece inside out).

-------------------------------------------------------
START THE PIECE HERE:

-------------------------------------------------------

JUMPER:
The piece is worked in the round with circular needle, top down. After the yoke the body is worked in the round with circular needle. The sleeves are worked in the round with short circular needle/double pointed needles.

YOKE:
Cast on 54-60-63-66-69-72 stitches with circular needle size 7 mm and Air. Insert 1 marker thread at the beginning of the round (= mid back).
Work A.1a over all stitches – see diagram for your size (= 18-20-21-22-23-24 repeats of 3 stitches). Continue until A.1a has been completed. Change to circular needle size 8 mm and work A.1b over A.1a. REMEMBER THE KNITTING TENSION! When A.1b has been completed there are 180-200-210-242-253-264 stitches on the needle.
Then work A.1c over A.1b. Repeat A.1c in height until the piece measures 22-24-25-27-29-31 cm from the cast-on edge – adjust so that you finish after a round worked in the same way as 1st round in A.1c. Purl 1 round where you decrease 4-4-0-12-11-0 stitches evenly on round – read DECREASE/INCREASE TIP = 176-196-210-230-242-264 stitches.
The next round is purled as follows:
Work the first 26-28-30-33-36-40 stitches (= half back piece), place the next 36-42-45-49-49-52 stitches on a thread for sleeve, cast on 6-6-8-8-10-10 new stitches under the sleeve, work the next 52-56-60-66-72-80 stitches (= front piece), place the next 36-42-45-49-49-52 stitches on a thread for sleeve, cast on 6-6-8-8-10-10 new stitches under the sleeve and work the last 26-28-30-33-36-40 stitches (= half back piece). THE PIECE IS NOW MEASURED FROM HERE!

BODY:
= 116-124-136-148-164-180 stitches. Insert 1 marker thread in the middle of the 6-6-8-8-10-10 stitches cast on under the one sleeve and start the round by this marker. Continue with purl – read PURLING TIP, until the piece measures 25-25-26-26-26-26 cm from the division. Change to circular needle size 7 mm and work rib (= knit 2 / purl 2) for 6 cm. Loosely cast off with knit over knit and purl over purl – to avoid the cast-off edge being tight, you can cast off with a needle size 8 mm. The jumper measures approx. 56-58-60-62-64-66 cm from the shoulder.

SLEEVE:
Place the 36-42-45-49-49-52 stitches from the thread on the one side of the piece on short circular needle/double pointed needles size 8 mm and knit up 1 stitch in each of the 6-6-8-8-10-10 stitches cast on under the sleeve = 42-48-53-57-59-62 stitches. Insert 1 marker thread in the middle of the 6-6-8-8-10-10 stitches under the sleeve and start the round here. Continue with purl – remember PURLING TIP. When the piece measures 3 cm from the division, decrease 2 stitches mid under sleeve – read DECREASE TIP. Decrease like this every 5-3-2½-2-2-1½ cm a total of 7-10-12-13-13-14 times = 28-28-29-31-33-34 stitches. Continue until the sleeve measures 36-34-34-32-30-29 cm from the division (shorter measurements in larger sizes due to longer yoke). Knit 1 round where you increase 0-0-3-1-3-2 stitches evenly on round = 28-28-32-32-36-36 stitches. Change to double pointed needles size 7 mm and work rib (= knit 2 / purl 2) for 6 cm. The sleeve measures approx. 43-41-41-39-37-36 cm from the division. Loosely cast off with knit over knit and purl over purl – to avoid the cast-off edge being tight, you can cast off with a needle size 8 mm. Work the other sleeve in the same way.

Diagram

symbols = knit
symbols = purl
symbols = between 2 stitches make 1 yarn over; the yarn over is worked twisted on the next round to avoid a hole
symbols = knit
symbols = * insert the right needle in the middle of the stitch marked with a circle 4 rounds before this round, pick up the strand and pull the loop 3 cm long *, knit 1, repeat from *-* 1 time (= 3 stitches)
symbols = knit 3 together
symbols = knit 3 twisted together
diagram
diagram

Each of our patterns has specific tutorial videos to help you.

Do you have a question? See a list of frequently asked questions (FAQ)

Knitting tension is what determines the final measurements of your work, and is usually measured per 10 x 10 cm. It is provided like so: number of stitches in width x number of rows in height - eg: 19 stitches x 26 rows = 10 x 10 cm.

The knitting tension is very individual; some people knit/crochet loosely while others work tightly. You adjust the knitting tension with the needle size, which is why the suggested needle size is only meant as a guide! You need to adjust this (up or down) to ensure that YOUR knitting tension matches the knitting tension provided in the pattern. If you work with a different knitting tension than provided you will have a different yarn consumption, and your work will have different measurements than what the pattern suggests.

The knitting tension also determines which yarns can replace each other. As long as you achieve the same knitting tension you can replace one yarn with another.

See DROPS lesson: How to measure your tension/gauge

See DROPS video: How to make a gauge tension swatch

The required amount of yarn is provided in grams, eg: 450 g. To calculate how many balls you’ll need you first need to know how many grams are in 1 ball (25g, 50g or 100g). This information is available if you click on the individual yarn quality on our pages. Divide the amount required with the amount of each ball. For example, if each ball is 50g (the most common amount), the calculation will be as follows: 450 / 50 = 9 balls.

The important thing when changing from one yarn to another is that the knitting/crochet tension remains the same. This is so that the measurements of the finished piece will be the same as on the sketch provided. It is easier to achieve the same knitting tension using yarns from the same yarn group. It is also possible to work with multiple strands of a thinner yarn to achieve the knitting tension of a thicker one. Please try our yarn converter. We recommend you to always work a test swatch.

Please NOTE: when changing yarn the garment might have a different look and feel to the garment in the photo, due to individual properties and qualities of each yarn.

See DROPS lesson: Can I use a different yarn than the one mentioned in the pattern?

All our yarns are categorised into yarn groups (from A to F) according to thickness and knitting tension – group A contains the thinnest yarns and group F the thickest. This makes it easier for you to find alternative yarns to our patterns, should you wish to switch yarn. All yarns within the same group have a similar knitting tension and can easily replace each other. However, different yarn qualities have different structures and properties which will give the finished work a unique look and feel.

Click here for an overview of the yarns in each yarn group

At the top of all our patterns you’ll find a link to our yarn calculator, which is a helpful tool should you wish to use a different yarn than suggested. By filling in the yarn quality you wish to replace, the amount (in your size) and number of strands, the calculator will present good alternative yarns with the same knitting tension. Additionally it will tell you how much you’ll require in the new qualities and whether you’ll need to work with multiple strands. Most skeins are 50g (some are 25g or 100g).

If the pattern is worked with multiple colours, every colour will have to be calculated separately. Similarly, if the pattern is worked with several strands of different yarns (for example 1 strand Alpaca and 1 strand Kid-Silk) you will have to find alternatives for each, individually.

Click here to see our yarn calculator

Since different yarns have different qualities and textures we have chosen to keep the original yarn in our patterns. However, you can easily find options among our available qualities by using our yarn calculator, or simply pick a yarn from the same yarn group.

It is possible that some retailers still have discontinued yarns in stock, or that someone has a few skeins at home that they would like to find patterns for.

The yarn calculator will provide both alternative yarn as well as required amount in the new quality.

If you think it's hard to decide what size to make, it can be a good idea to measure a garment you own already and like the size of. Then you can pick the size by comparing those measures with the ones available in the pattern's size chart.

You'll find the size chart at the bottom of the pattern.

See DROPS lesson: How to read size chart

The needle size provided in the pattern serves only as a guide, the important thing is to follow the knitting tension. And since knitting tension is very individual, you will have to adjust the needle size to ensure that YOUR tension is the same as in the pattern – maybe you’ll have to adjust 1, or even 2 needle sizes, up or down to achieve the correct tension. For this, we recommend that you work test swatches.

Should you work with a different knitting tension than the one provided, the measurements of the finished garment might deviate from the measurement sketch.

See DROPS lesson: How to measure your tension/gauge

See DROPS video: How to make a tension/gauge swatch

Working a garment top-down provides more flexibility and room for personal adjustment. For example it is easier to try the garment on while working, as well as making adjustments to length of yoke and shoulder caps.

The instructions are carefully explaining every step, in the correct order. Diagrams are adjusted to the knitting direction and are worked as usual.

The diagram depicts all rows/rounds, and every stitch seen from the right side. It is read from bottom to top, from right to left. 1 square = 1 stitch.

When working back and forth, every other row is worked from the right side and every other row is worked from the wrong side. When working from the wrong side, the diagram will have to be worked reversed: from left to right, knit stitches are purled, purl stitches are knit etc.

When working in the round every round is worked from the right side and the diagram are worked from right to left on all rounds.

See DROPS lesson: How to read knitting diagrams

The diagram depicts all rows/rounds, and every stitch seen from the right side. It is worked from bottom to top, from right to left.

When working back and forth every other row is worked from the right side: from right to left and every other row is worked from the wrong side: from left to right.

When working in the round, every row in the diagram are worked from the right side, from right to left.

When working a circular diagram you start in the middle and work your way outwards, counter clockwise, row by row.

The rows usually start with a given number of chain stitches (equivalent to the height of the following stitch), this will either be depicted in the diagram or explained in the pattern.

See DROPS lesson: How to read crochet diagrams

Instructions for working several diagrams after each other on the same row/round, will often be written like so: “work A.1, A.2, A.3 a total of 0-0-2-3-4 times". This means you work A.1 once, then A.2 is worked once, and A.3 is repeated (in width) the number of times provided for your size – in this case like so: S = 0 times, M = 0 times, L=2 times, XL= 3 times and XXL = 4 times.

The diagrams are worked as usual: begin with the first row in A.1, then work the first row in A.2 etc.

See DROPS lesson: How to read knitting diagrams

See DROPS lesson: How to read crochet diagrams

The total width of the garment (from wrist-to-wrist) will be larger in the larger sizes, despite the actual sleeves being shorter. The larger sizes have longer sleeve caps and wider shoulders, so there will be a good fit in all sizes.

The measurement sketch/schematic drawing provides information regarding the full length of the garment. If it’s a jumper or a jacket the length is measured from the highest point on the shoulder closest to the neckline, and straight down to the bottom of the garment. It is NOT measured from the tip of shoulder. Similarly, the length of yoke is measured from the highest point on the shoulder and down to where yoke is split into body and sleeves.

On a jacket measures are never taken along bands, unless specifically stated. Always measure inside band stitches when measuring the length.

See DROPS lesson: How to read a schematic drawing

Diagrams are often repeated on the round or in height. 1 repeat is the diagram the way it appears in the pattern. If it says to work 5 repeats of A.1 in the round, then you work A.1 a total of 5 times after/next to each other in the round. If it says to work 2 repeats of A.1 vertically/in height you work the entire diagram once, then begin again at the start and work the entire diagram one more time.

Chain stitches are slightly narrower than other stitches and to avoid working the cast-on edge too tight, we simply chain more stitches to begin with. The stitch count will be adjusted on the following row to fit the pattern and measurement sketch.

The rib edge is more elastic and will contract slightly compared to, for example, stocking stitch. By increasing before the rib edge, you avoid a visible difference in width between the rib edge and the rest of the body.

It’s very easy to cast off too tightly, and by making yarn overs while casting off (and simultaneously casting these off) you avoid a too tight cast off edge.

See DROPS video: How to bind off with yarn overs (yo)

To achieve an even increase (or decrease) you can increase on, for example: every 3rd and 4th row alternately, like so: work 2 rows and increase on the 3rd row, work 3 rows and increase on the 4th. Repeat this until the increase is complete.

See DROPS lesson: Increase or decrease 1 st on every 3rd and 4th row alternately

Should you prefer to work in the round instead of back and forth, you may of course adjust the pattern. You’ll need to add steeks mid-front (usually 5 stitches), and follow the instructions. When you would normally turn and work from the wrong side, simply work across the steek and continue in the round. At the end you’ll cut the piece open, pick up stitches to work bands, and cover the cut edges.

See DROPS video: How to knit steeks and cut open

Should you prefer to work back and forth instead of in the round, you may of course adjust the pattern so you work the pieces separately and then assemble them at the end. Divide the stitches for the body in 2, add 1 edge stitch in each side (for sewing) and work the front and back pieces separately.

See DROPS lesson: Can I adapt a pattern for circular needles into straight needles?

Pattern repeats can vary slightly in the different sizes, in order to get the correct proportions. If you’re not working the exact same size as the garment in the photo, yours might deviate slightly. This has been carefully developed and adjusted so that the complete impression of the garment is the same in all sizes.

Make sure to follow instructions and diagrams for your size!

If you have found a pattern you like which is available in women’s size it’s not very difficult to convert it to men’s size. The biggest difference will be the length of sleeves and body. Start working on the women size that you think would fit across the chest. The additional length will be worked right before you cast off for the armhole/sleeve cap. If the pattern is worked top-down you can add the length right after the armhole or before the first decrease on sleeve.

Regarding additional yarn amount, this will depend on how much length you add, but it is better with a skein too many than too few.

All yarns will have excess fibres (from production) that might come off as lint or shedding. Brushed yarns (ie hairier yarns) have more of these loose, excess fibres, causing more shedding.

Shedding also depends on what is worn under or over the garment, and whether this pulls at the yarn fibres. It’s therefore not possible to guarantee that there will be no shedding

Below are some tips on how to get the best result when working with hairier yarns:

1. When the garment is finished (before you wash it) shake it vigorously so the looser hairs come off. NOTE: do NOT use a lint roller, brush or any method that pulls at the yarn.

2. Place the garment in a plastic bag and put it in your freezer - the temperature will cause the fibres to become less attached to each other, and excess fibres will come off easier.

3. Leave in the freezer for a few hours before taking it out and shaking it again.

4. Wash the garment according to the instructions on the yarn label.

Pilling is a natural process that happens to even the most exclusive of fibers. It's a natural sign of wear and tear that is hard to avoid, and that is most visible in high friction areas of your garment like a sweater's arms and cuffs.

You can make your garment look as new by removing the pilling, using a fabric comb or a pill/lint remover.

Still can't find the answer you need? Then scroll down and leave your question so one of our experts can try to help you. This will be done normally within 5 to 10 working days.
In the meantime, you can read the questions and answers that others have left to this pattern or join the DROPS Workshop on Facebook to get help from fellow knitters/crocheters!

You might also like...

Clemence

Ene-Ly

Clemence

Svetlana, United States

Post a comment to pattern DROPS 197-8

We would love to hear what you have to say about this pattern!

If you want to leave a question, please make sure you select the correct category in the form below, to speed up the answering process. Required fields are marked *.

Comments / Questions (60)

country flag Cathy Brunet wrote:

Bonjour pourriez vous me donner les explications du rand 14 car je ne sais pas ou piquer mon aiguille pour faire le point strukture merci

04.10.2023 - 14:54

DROPS Design answered:

Bonjour Mme Brunet, peut-être que cette vidéo devrait alors pouvoir vous aider? Bon tricot!

04.10.2023 - 15:49

country flag Estela wrote:

Hola, del modelo drops 197-8 puedo ver en un vídeo como insertar la aguja en el centro del punto 4 vueltas antes coger el hilo y tejer al derecho, gracias

21.05.2023 - 07:10

DROPS Design answered:

Hola Estela, puedes consultar el siguiente vídeo, que es específico para este diagrama y este patrón: https://www.garnstudio.com/video.php?id=1338&lang=es

21.05.2023 - 19:17

country flag Kristin Holtmon wrote:

På diagrammet til Clemens genser,197-8 er det i rutene 2 for rett. Den ene er hvit firkant,den andre har sirkel. Hvordan skal det forståes, Se 1b og tegnforklaring. Hvordan strikkes det?

07.03.2023 - 11:13

DROPS Design answered:

Hej Kristin, den ret med cirkel hører til diagramforklaringen med x :)

08.03.2023 - 09:45

country flag Julia Mesplay wrote:

I have difficulty following diagrams, likely due to mono vision. Your patterns are so pretty, but is it possible to find written directions for each row instead of diagrams?

09.01.2023 - 16:21

country flag Doris wrote:

Hallo, wird dieses Modell einfädig mit Air gestrickt oder zweifädig? Air wird doch normalerweise mit 5 gestrickt. Hier in der Anleitung ist 7 bzw. 8 angegeben. Wenn man sich den Pulli betrachtet, kommt er schön dicht und füllig und nicht zu locker rüber. Was ist richtig? Viele Grüße und vielen Dank! Doris

05.11.2022 - 12:31

DROPS Design answered:

Liebe Doris, dieser Pullover wird - etwas locker als üblig - mit nur 1 Faden Air gestrickt - beachten Sie, daß Ihre Maschenprobe stimmt, so stimmen auch die Maßnahmen in der Skizze. Viel Spaß beim stricken!

07.11.2022 - 08:18

country flag Maureen Stewart wrote:

Under the diagram explanations, it shows two different characters for knit stitch. One is the empty square and the other is the square with a circle in it. What is the difference?

24.07.2022 - 00:23

DROPS Design answered:

Dear Maureen, both are normal knitted stitches. However, the knit stitches with a circle are highlighted to later work the x symbols: you can see the explanation above the charts. Happy knitting!

24.07.2022 - 18:11

country flag Maria wrote:

Hej. Jeg synes opskriften er så smuk, og tænkte om man mon kan opnå samme effekt hvis den ikke strikkes i vrang? Altså, hvis mønsteret med løkkerne er som skrevet, men vrang i mellem mønster og i kroppen strikkes som ret? Måske I har erfaringer hermed? Mvh Maria

13.04.2021 - 09:34

country flag Claudia wrote:

Buongiorno. Ho acquistato il filato DropsAir per realizzare questo stupendo maglione. Purtroppo lavorandolo con i ferri 7 ed 8 il campione viene troppo sottile. Considerando che nell\'etichetta è consigliato l\'uso dei ferri numero 5, mi è venuto il dubbio che il filato debba essere usato doppio. Potete verificare per cortesia?

09.03.2021 - 19:04

DROPS Design answered:

Buonasera Claudia, il maglione è lavorato con una tensione molto morbida: deve trovare il n° di ferri adeguato ad ottenere la tensione indicata. Buon lavoro!

09.03.2021 - 23:29

country flag Christina wrote:

Hvor står brystmålet på opskriften. Det er svært at vælge størrelse hvis man ikke ved færdigmålet på blusen

17.01.2021 - 08:13

DROPS Design answered:

Hei Christina. Brystmålet på denne genseren er den sammen som målet nederst. Se målskissen for mål i de forskjellige størrelsene. mvh DROPS design

18.01.2021 - 15:07

country flag Kerstin wrote:

Kann man diesen Pullover auch mit Nadelstärke 5 wie bei dem DROPS Air Garn vorgesehen ist stricken? Wie viel Garn brauche ich dann und wie ändert sich die Maschenanzahl? In der Anleitung sind nur 250 g angegeben, dies kommt mir sehr wenig vor reicht das aus?

10.01.2021 - 20:03

DROPS Design answered:

Liebe Kerstin, leider können wir nicht jedes Modell nach jedem Wunsch umrechnen - hier finden Sie alle Anleitungen, die mit Air gestrickt werden, Resultate können Sie bei der Maschenprobe filtern. Danke für Ihr Verständnis. Viel Spaß beim stricken!

11.01.2021 - 10:06