
Popular categories
Looking for a yarn?


Comments / Questions (19)
![]() Marjo wrote:
Marjo wrote:
Hej når jeg strikker venstre vott og begynner fellingen skal jeg sette et merk i maske 1 og 23 som i höyre vott eller ?
13.04.2026 - 14:34
![]() Dominique wrote:
Dominique wrote:
Bonjour J'entreprends ce projet de moufles avec jacquard pour une très grande frileuse. J'envisageais de faire courir le fil sur tout le rang, voir de continuer le "tissage" jusqu'à la fin. Savez vous comment la surépaisseur va réagir au feutrage ? Une alternative serait peut être de continuer le "tissage" uniquement sur le dessus. Qu'en pensez vous ? Merci d'avance pour votre réponse Dominique
28.03.2026 - 07:29DROPS Design answered:
Bonjour Dominique, vous pouvez tricoter un échantillon de cette façon et le feutrer pour voir si le résultat vous convient, vous serez ainsi plus sûre de vous. Bon tricot!
07.04.2026 - 08:37
![]() Ingunn J Skogtun Nilsen wrote:
Ingunn J Skogtun Nilsen wrote:
Har strikket denne modellen Icy Paws. Har tovet på 40 grader med frotehånkle, men vottene ble ikke tovet. Har dere råd?
25.03.2025 - 09:27DROPS Design answered:
Hej Ingunn, prøv at klikke på Lektioner øverst i opskriften, hver finder du en som beskriver hvordan man tover :)
27.03.2025 - 12:21
![]() Ricard Sophie wrote:
Ricard Sophie wrote:
Merci pour votre réponse et votre réactivité. c'est effectivement ce que je pensais , par contre pour la deuxième solution je ne vois pas comment diviser l'ouvrage juste au moment du jacquard si je décide de le faire malgré tout en aiguille circulaire pour éviter la surépaisseur merci
03.03.2025 - 17:13DROPS Design answered:
Bonjour Mme Ricard, c'est une idée qui m'est venue en vous répondant: au 1er rang du diagramme, tricotez comme indiqué, mais, au lieu de continuer en rond comme avant, tournez et tricotez sur l'envers - montez éventuellement 1 maille de chaque côté pour la couture et, tricotez ainsi tout le diagramme alternativement sur l'endroit et sur l'envers (n'oubliez pas les augmentations du pouce si besoin), et, quand le diagramme est terminé, joignez à nouveau l'ouvrage pour tricoter de nouveau en rond. Bon tricot!
04.03.2025 - 09:35
![]() Ricard Sophie wrote:
Ricard Sophie wrote:
Bonjour avec des aiguilles circulaires si on décide de faire le motif de l'étoile que sur le dos de la main, doit on malgré tout faire suivre le fil inutilisé sur tout le rang . merci
03.03.2025 - 12:09DROPS Design answered:
Bonjour Mme Ricard, probablement, en général ce type de motif "unique" se tricote en allers et retours pour éviter d'avoir à faire suivre le fil tout du long. Vous pouvez peut-être également diviser l'ouvrage juste au moment du jacquard et reprendre en rond après. Si vous choisissez de tricoter en rond en faisant suivre les fils, pensez à bien conserver la bonne tension, et à ne pas trop serrer le fil sur l'envers sur les mailles non tricotées, mais notez que vous aurez une surépaisseur inexistante dans le modèle, je recommanderai ici de tricoter en allers et retours. Bon tricot!
03.03.2025 - 16:07
![]() Sigríður Rebekka Sigurðardóttir wrote:
Sigríður Rebekka Sigurðardóttir wrote:
Skil ekki alveg í sambandi við þæfinguna,ef snúa á vettlingum við og setja plastpoka í þumlana en samt að þæfa á réttinni. Þá er plastið utan á og næla nælann. Er ég að misskilja þetta? Með von um skjót svör, kveðja Sigríður
04.11.2024 - 16:00DROPS Design answered:
Blessuð Sigríður. Þú snýrð vettlingnum við (ranga) og setur lítinn plastpoka inn í þumalinn til að koma í veg fyrir að hann þæfist saman. Festir pokann með nælu. Snýrð vettlingnum til baka (rétta) og þæfir vettlinginn. Eftir þæfingu þá tekur þú næluna úr vettlingnum sem heldur pokanum og tekur pokann úr þumlinum. Formar svo vettlinginn til á meðan hann er enn rakur. Gangi þér vel.
05.11.2024 - 10:14
![]() Tanja wrote:
Tanja wrote:
Hej, jeg har strikket et par vanter i Nepal, som skulle filtes efterfølgende. Jeg har valgt 40 grader, 1000 omdrejninger og 58 min. Det var er forkert valg, da jeg fik mini vanter. De kan bruges som pynt til juletræ, men det var jo ikke meningen :). Skal man vælge et almindeligt program til bomuld der kører 2,5-3 timer? Og hvad med omdrejninger? Er 1600 ikke for meget?
30.12.2023 - 13:00DROPS Design answered:
Hej Tanja, det er forskelligt fra kvalitet til kvaltiet og fra vaskemaskine til vaskemaskine... men du bør kunne gøre dem våde igen med en anelse balsam eller skyllemiddel og så trække dem forsigtigt ud i den rigtige størrelse :)
03.01.2024 - 08:03
![]() Eva Flataunet wrote:
Eva Flataunet wrote:
Hej Kan jag tova Vikinggarn Alpaca Storm
12.01.2023 - 06:07DROPS Design answered:
Hej Eva, du kan tova DROPS Lima som passer til opskriften :)
12.01.2023 - 15:15
![]() Peggy wrote:
Peggy wrote:
Hi, I'm a novice knitter and am struggling with how to proceed on the thumb increases. Is my understanding correct in that I am increasing every 4th row, which means there would be 5 increases as A.1 is worked and then two more increases over the last two rows of A.1 and first 6 rows of pearl grey? In other words, increase in rows 4, 8, 12, 16, and 20 of A.1 and then rows 2 and 6 once I switch back to all pearl grey? Thank you in advance for you help!
10.11.2022 - 01:44DROPS Design answered:
Dear Peggy, when you increase on every 4th row work like this: *1 row with increases, 3 rows without increases*, repeat these 4 rows until all increases are done - at the same time continue working A.1 and after A.1 is done, continue back and forth -y ou will join in the round only after the stitches on thumb are put aside. Happy knitting!
10.11.2022 - 11:02
![]() Kita wrote:
Kita wrote:
I have made two pairs of these mittens now and they are lovely. I felt they did run a little small, and made large pairs for what are probably medium hands. Now I plan to knit a pair for a guy with XXL hands and there is just no way the large could be blocked to fit (I tried). Would adding the difference between small and large to the large size be a way to get a decent XXL mitten? So, if it says 56 for small and 62 for large, would 68 give XXL (continuing the pattern adjustments in this vain)?
21.11.2021 - 18:38DROPS Design answered:
Dear Kita, please understand that we cannot modify our patterns to each individual request. Having said that, if I would want to do this in a bigger size, i would probably try to do it with a bigger needle and thicker yarn generally bigger gauge, like Nepal instead of Lima. Happy Stitching!
21.11.2021 - 19:43
|
|||||||
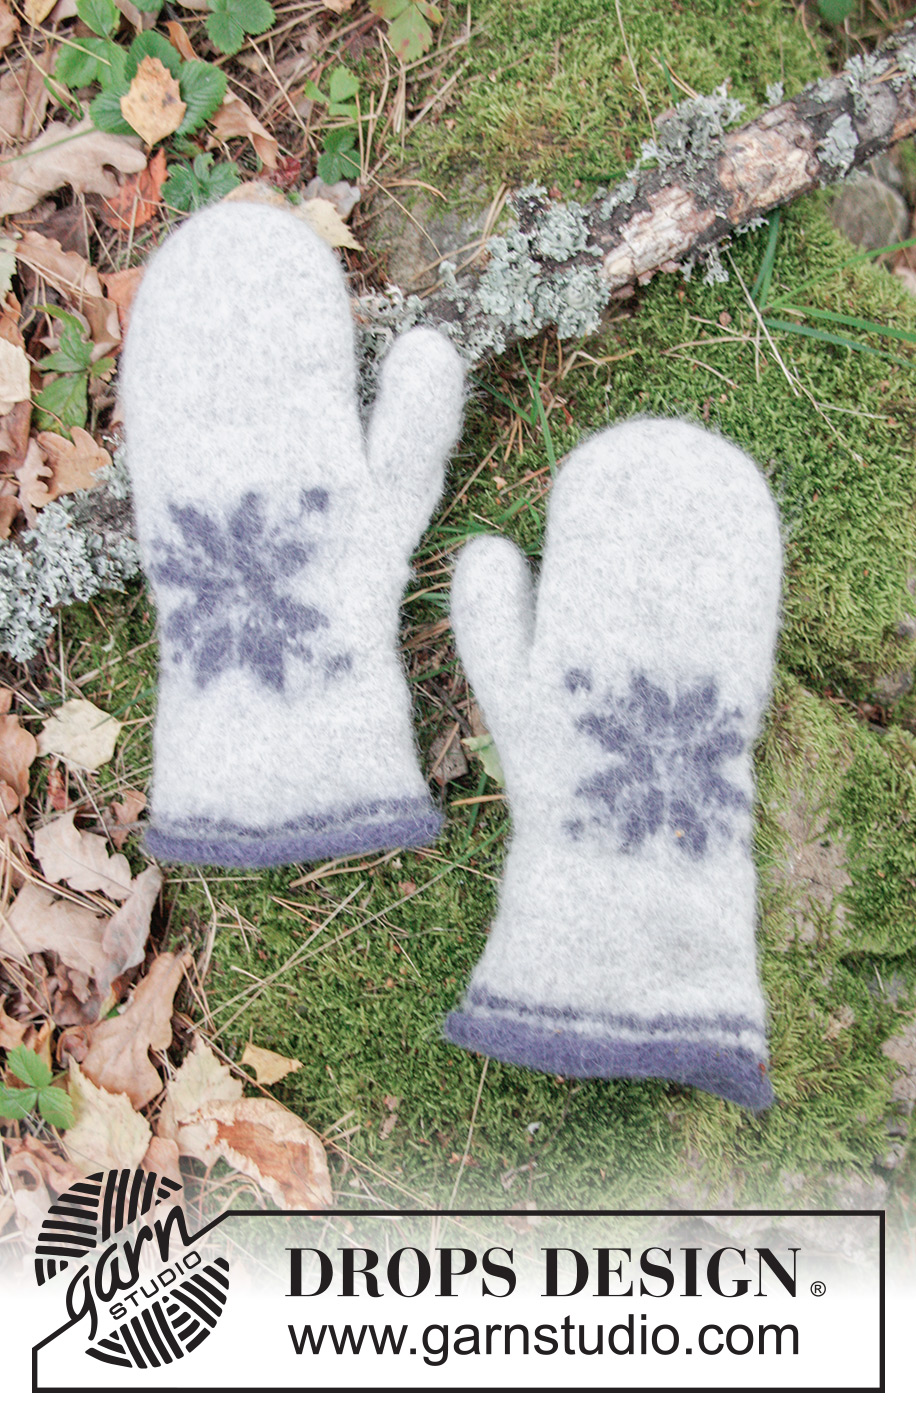
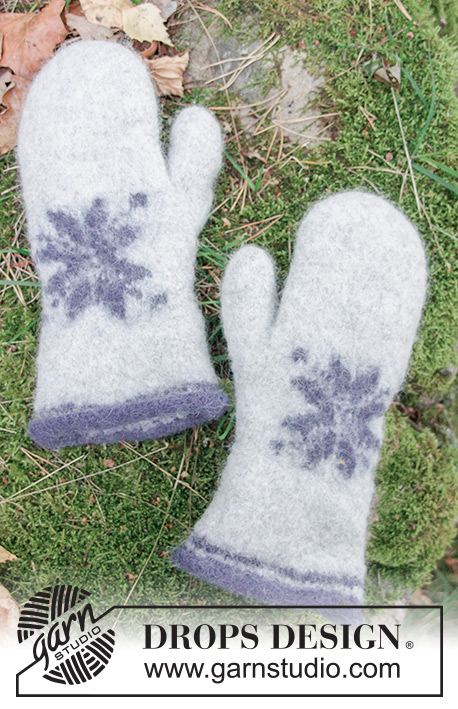
Icy Paws#icypawsmittens |
|||||||
 |
 |
||||||
Felted mittens with star for Christmas. Piece is knitted in DROPS Lima.
DROPS Extra 0-1413 |
|||||||
|
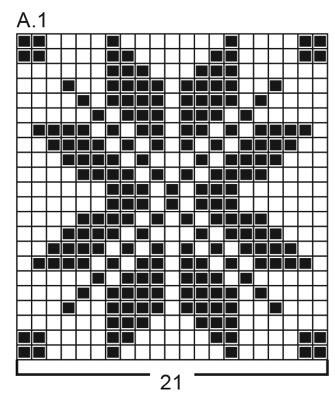
INFORMATION FOR PATTERN: DECREASE TIP-1: To calculate how to decrease evenly, use the total number of stitches on row (e.g. 56 stitches) and divide stitches by number of decreases to be done (e.g. 4) = 14. In this example decrease by knitting every 13th and 14th stitch together. PATTERN: See diagram A.1. Work the entire pattern in stocking stitch. INCREASE TIP: Increase 1 stitch by working 2 stitches in same stitch. DECREASE TIP-2: Begin 2 stitches before stitch with marker, knit 2 together, knit stitch with marker, slip 1 stitch knitwise, knit 1, pass slipped stitch over stitch worked (= 2 stitches decreased). ---------------------------------------------------------- RIGHT MITTEN: Worked back and forth on circular needle until A.1 is done, then work the rest of mitten in the round in stocking stitch on double pointed needles. Cast on 56-56-62 stitches on circular needle size 4.5 mm with dark blue. Work 4 rows in stocking stitch back and forth. Switch to pearl grey and work 2 rows in stocking stitch while decreasing 4 stitches evenly on first row - read DECREASE TIP-1 = 52-52-58 stitches. Switch back to dark blue and work 2 rows in stocking stitch. Then work in stocking stitch and pearl grey - on first row decrease 4 stitch evenly = 48-48-54 stitches. REMEMBER THE KNITTING TENSION! When piece measures 10-11-12 cm in all sizes, decrease 4-0-2 stitches evenly = 44-48-52 stitches. READ ALL OF THE FOLLOWING SECTION BEFORE CONTINUING! Insert 1 marker in 25th-27th-29th stitch on needle (= marks thumb increase). Work a star mid on top of hand as follows: Work 0-1-2 stitches with pearl grey, work A.1 (= 21 stitches), and work with pearl grey the rest of row. Continue A.1 like this. AT THE SAME TIME increase 1 stitch on each side of stitch with marker - read INCREASE TIP (= 2 stitches increased). Increase like this outside the increased stitches every 4th row (i.e. on every other row from right side) 6-7-8 times in total = 56-62-68 stitches. After last increase slip the increased stitches + stitch with marker + 1 stitch on each side of these stitches on a stitch holder for thumb (A.1 should now be done) = 15-17-19 thumb stitches on stitch holder. Piece measures approx. 20-22-23 cm. Switch to double pointed needles size 4.5 mm. Then work mitten in the round on double pointed needles with stocking stitch and pearl grey until finished measurements. AT THE SAME TIME on first round when working in the round, cast on 3 new stitches on needle over stitches on stitch holder (= behind thumb) = 44-48-52 stitches. When piece measures 13-13-12 cm from stitches cast on behind thumb, insert 2 markers as follows: Insert 1 marker in first stitch on round and 1 marker in 23rd-25th-27th stitch on round. On next round decrease 1 stitch on both each side of both markers – read DECREASE TIP-2 (= 4 stitches decreased). Decrease like this every other round a total of 4-5-6 times and then on every round a total of 4 times in all sizes = 12 stitches remain in all sizes. Cut the yarn and pull it through the remaining stitches, tighten together and fasten. THUMB: Work the thumb with pearl grey. Slip the 15-17-19 thumb stitches on double pointed needles size 4.5 mm, pick in addition up 1 stitch in each of the 3 stitches cast on behind thumb = 18-20-22 stitches. Work in stocking stitch in the round. When thumb measures approx. 6-6½-7 cm decrease 2 stitches evenly = 16-18-20 stitches. Knit 3 rounds. On next round decrease 6-8-8 stitches evenly = 10-10-12 stitches. When thumb measures 7½-8-8½ cm, knit all stitches together two by two = 5-5-6 stitches. Cut the yarn and pull it through the remaining stitches, tighten together and fasten. LEFT MITTEN: Cast on and work as right mitten but reversed. I.e. increase for thumb on each side of the 20th-22nd-24th stitch on round and when working star mid on top of hand, work as follows: Work 22-24-26 stitches with pearl grey, work A.1 (= 21 stitches), and work 0-1-2 stitches with pearl grey. THUMB: Work thumb the same way as on right mitten. ASSEMBLY: Sew the opening along the edge of mittens - sew edge to edge in outer loop of edge stitch so that the seam is flat (sew with pearl grey). FELTING: To avoid the thumb being felted to the mitten, turn it inside out and fasten a small plastic bag/silk ribbon over the top of the thumb with a safety pin. The opening of the safety pin should point towards the tip of the thumb so it is easy to remove after felting. Turn the mitten back to the right side, with the bag/ribbon inside the thumb. The piece can be felted either in the washing machine or the tumble dryer – read description below. Remember: Subsequent washes are as for a normal wool garment. IN WASHING MACHINE: Washing machines will vary when felting. If the piece is not felted enough, it can be felted again. If it is felted too much, it can be stretched to the correct size while still wet. DO THE FOLLOWING: Lay the piece in the washing machine and use a programme of approx. 40 minutes (not a wool programme). Wash at 40 degrees without pre-wash, detergent is optional. After washing, shape the piece while it is still wet. IN TUMBLE DRYER: Felting in a tumble dryer gives good control over the degree of felting. The tumble dryer can be opened during drying to check the size of the piece. If it is not felted enough it can be thoroughly wetted and felted again. If it is felted too much it can be stretched to the correct size while still wet. DO THE FOLLOWING: Lay the piece in water so it becomes completely wet, then place it in the tumble dryer and begin the drying process. Dry to the desired size, checking regularly. |
|||||||
Diagram explanations |
|||||||
|
|||||||
 |
|||||||
Have you finished this pattern?Tag your pictures with #dropspattern #icypawsmittens or submit them to the #dropsfan gallery. Do you need help with this pattern?You'll find 24 tutorial videos, a Comments/Questions area and more by visiting the pattern on garnstudio.com. © 1982-2026 DROPS Design A/S. We reserve all rights. This document, including all its sub-sections, has copyrights. Read more about what you can do with our patterns at the bottom of each pattern on our site. |
|||||||


With over 40 years in knitting and crochet design, DROPS Design offers one of the most extensive collections of free patterns on the internet - translated to 17 languages. As of today we count 324 catalogues and 12290 patterns translated into English (UK/cm). 12290
We work hard to bring you the best knitting and crochet have to offer, inspiration and advice as well as great quality yarns at incredible prices! Would you like to use our patterns for other than personal use? You can read what you are allowed to do in the Copyright text at the bottom of all our patterns. Happy crafting!
Post a comment to pattern DROPS Extra 0-1413
We would love to hear what you have to say about this pattern!
If you want to leave a question, please make sure you select the correct category in the form below, to speed up the answering process. Required fields are marked *.