Comments / Questions (14)
Isabel wrote:
Hi...I know that this garment fits loosley, but what are the finished measurements so I can decide if I should make a Small or Medium. Thanks, Isabel :)
06.10.2017 - 10:38DROPS Design answered:
Dear Isabel, you will find at the bottom of the pattern a measurement chart with all finished measurements for each size. Compare these to a similar garment you have and like the shape to find out the matching size - read more here. Happy knitting!
06.10.2017 - 11:46
![]() Ina Isendam wrote:
Ina Isendam wrote:
I love this too :-)
02.07.2017 - 19:53
![]() Diana wrote:
Diana wrote:
Dit is echt mijn favoriet
06.06.2017 - 13:31
![]() Heather Hicks wrote:
Heather Hicks wrote:
This one gives me the same OMG I want to make it RIGHT NOW feeling as Sunny Date did for the Spring Summer collection. I sure hope this makes it. I want to make it so bad.
01.06.2017 - 20:20
Norfolk#norfolkcardigan |
||||||||||||||||||||||||||||
 |
 |
|||||||||||||||||||||||||||
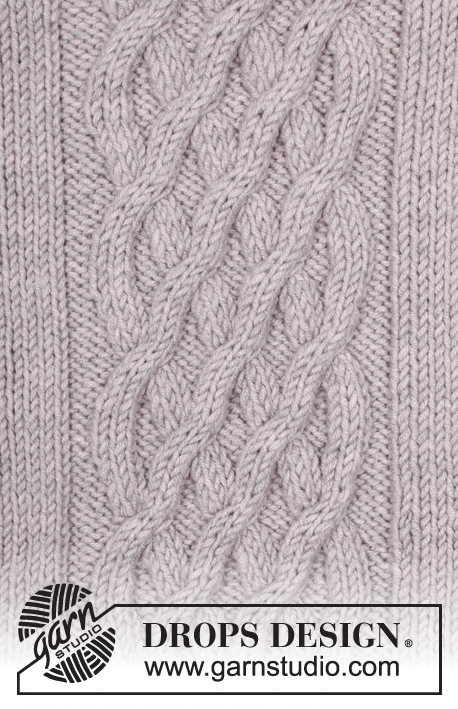
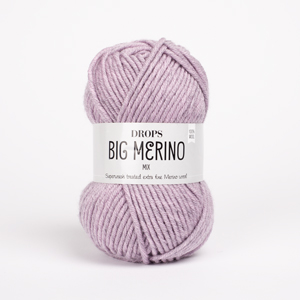
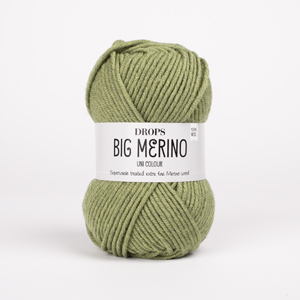
Jacket, knitted sideways with cables. Sizes S - XXXL. The piece is worked in DROPS Big Merino.
DROPS 179-24 |
||||||||||||||||||||||||||||
|
INFORMATION FOR THE PATTERN: RIDGE/GARTER STITCH (worked back and forth): 1 ridge = Knit 2 rows. RIDGE/GARTER STITCH (worked in the round): 1 ridge = 2 rounds. Knit 1 round and purl 1 round. PATTERN: See diagrams A.1 to A.9. Choose diagram for your size. The diagrams show all the rows in the pattern seen from the right side. MEASUREMENT TIP: All length measurements for the front and back pieces are taken with the pieces lying flat. Due to the weight of the garment, the piece will stretch a little when worn in relation to the measurements given in the pattern – see description below under Sizes. All lengths for the sleeves are taken whilst the piece is held up to prevent the sleeve becoming too long (you can try the sleeve on as you go and adjust to the required length). DECREASE/INCREASE TIP (for the armhole): To prevent the armhole being too large when decreasing in a cable section, you must decrease some stitches evenly on row before casting off for the armhole. In the same way, you will need to increase some stitches evenly on row after you have cast on new stitches for the armhole. To work out how to decrease/increase evenly for the armhole, count the total number of stitches you are decreasing/increasing over (e.g. 39 stitches) and divide by the number of decreases/increases to be made (e.g. 9) = 4.3. In this example, work approx. every 3th and 4th stitch together when decreasing. If you are increasing, make 1 yarn over after approx. every 4th stitch. On the next row, work the yarn overs twisted to prevent holes. DECREASE TIP (for mid under the sleeve): Start 3 stitches before the marker thread, knit 2 together, knit 2 (the marker thread sits in the middle of these 2 stitches), slip 1 stitch as if to knit, knit 1, pass the slipped stitch over the knitted stitch (= 2 stitches decreased). ---------------------------------------------------------- JACKET: Front and back pieces are worked in 2 parts which are sewn together mid back. They are worked back and forth with circular needle from mid front to mid back. LEFT FRONT AND BACK PIECE: Cast on 140-144-148-152-154-158 stitches with circular needle 4.5 mm and Big Merino. Work 4 RIDGES – see description above. Change to circular needle 5.5 mm. The next row is worked as follows from the right side: A.1 (= 5 stitches), A.2 (= 19-19-19-21-21-21 stitches), 40-44-48-44-46-50 stitches stocking stitch, A.3 (= 19-19-19-21-21-21 stitches), A.4 (= 33-33-33-35-35-35 stitches), A.3 (= 19-19-19-21-21-21 stitches) and A.1 (= 5 stitches). Work back from the wrong side in the same way = 158-162-166-170-172-176 stitches. The next row is worked as follows from the right side: Continue A.1 (= 5 stitches), work A.5 (= 22-22-22-24-24-24 stitches), 40-44-48-44-46-50 stitches stocking stitch, A.6 (= 22-22-22-24-24-24 stitches), A.7 (= 42-42-42-44-44-44 stitches), A.6 (= 22-22-22-24-24-24 stitches) and finish with A.1 (= 5 stitches). Continue in this way and repeat the pattern in height upwards. REMEMBER THE KNITTING TENSION! When the piece measures 48-49-50-51-52-53 cm – read MEASUREMENT TIP, decrease for the armhole as follows: The first row is worked as follows from the wrong side: Continue the pattern as before over the first 40 stitches, purl the next 39-41-43-45-46-47 stitches and at the same time decrease 9 stitches evenly over these 39-41-43-45-46-47 stitches – read DECREASE/INCREASE TIP, then continue the pattern as before over the remaining 79-81-83-85-86-89 stitches. On the next row cast off for the armhole as follows from the right side: Work as before over the first 79-81-83-85-86-89 stitches, cast off the next 30-32-34-36-37-38 stitches for armhole and work as before over the last 40 stitches. Turn the piece and work back as follows from the wrong side: Work 40 stitches as before, cast on 30-32-34-36-37-38 new stitches on the needle and continue the pattern as before to end of row. The next row is worked as follows from the right side: Work the first 79-81-83-85-86-89 stitches as before, knit 30-32-34-36-37-38 stitches and increase, at the same time, 9 stitches evenly over these 30-32-34-36-37-38 stitches – read DECREASE/INCREASE TIP, then work the remaining 40 stitches as before. Continue the pattern back and forth as before over all 158-162-166-170-172-176 stitches (make sure you continue with the correct row in the diagram over the armhole in regard to the rest of the pattern). When the piece measures 65-67-69-71-73-75 cm from the cast-on edge, change to circular needle size 4.5 mm. Knit 1 row from the wrong side and knit 1 row from the right side. Now work garter stitch back and forth in the neck with short rows as follows: Start from the wrong side, up by the neck and knit from the wrong side over the first 40 stitches. Insert 1 marker. Turn the piece, tighten the strand and knit back. Turn the piece, tighten the strand and knit until there are 5 stitches left before the marker, turn the piece, tighten the strand and knit back. Turn the piece, tighten the strand and knit until there are 10 stitches left before the marker, turn the piece, tighten the strand and knit back. Continue in this way, by knitting over 5 less stitches, until you have worked back and forth over the last 5 stitches. Turn the piece, tighten the strand and knit 1 row from the wrong side over all 158-162-166-170-172-176 stitches. Then loosely cast off with knit from the right side – NOTE: To prevent the cast-off edge being tight, you can make 1 yarn over after each 8th stitch at the same time as you cast off (the yarn overs are cast off as normal stitches). RIGHT FRONT AND BACK PIECE: Cast on 140-144-148-152-154-158 stitches with circular needle size 4.5 mm. Work 4 ridges. Change to circular needle 5.5 mm. The next row is worked as follows from the right side: A.1 (= 5 stitches), A.2 (= 19-19-19-21-21-21 stitches), A.8 (= 33-33-33-35-35-35 stitches), A.2 (= 19-19-19-21-21-21 stitches), 40-44-48-44-46-50 stitches stocking stitch, A.3 (= 19-19-19-21-21-21 stitches) and A.1 (= 5 stitches). Work back from the wrong side in the same way = 158-162-166-170-172-176 stitches. The next row is worked as follows from the right side: Continue A.1 (= 5 stitches), work A.5 (= 22-22-22-24-24-24 stitches), A.9 (= 42-42-42-44-44-44 stitches), A.5 (22-22-22-24-24-24 stitches), 40-44-48-44-46-50 stitches stocking stitch, A.6 (= 22-22-22-24-24-24 stitches) and finish with A.1 (= 5 stitches). Continue in this way and repeat the pattern in height upwards. When the piece measures 48-49-50-51-52-53 cm - read MEASUREMENT TIP, decrease for the armhole as follows: The first row is worked as follows from the right side: Continue the pattern as before over the first 40 stitches, knit the next 39-41-43-45-46-47 stitches and at the same time decrease 9 stitches evenly over these 39-41-43-45-46-47 stitches– read DECREASE/INCREASE TIP, then continue the pattern as before over the remaining 79-81-83-85-86-89 stitches. On the next row cast off for the armhole as follows from the wrong side: Work as before over the first 79-81-83-85-86-89 stitches, cast off the next 30-32-34-36-37-38 stitches for armhole and work as before over the last 40 stitches. Turn the piece and work back as follows from the right side: Work 40 stitches as before, cast on 30-32-34-36-37-38 new stitches on the needle and continue the pattern to the end of the row as before. The next row is worked as follows from the wrong side: Work the first 79-81-83-85-86-89 stitches as before, purl 30-32-34-36-37-38 stitches and at the same time increase 9 stitches evenly over these 30-32-34-36-37-38 stitches – read DECREASE/INCREASE TIP, then work the remaining 40 stitches as before. Continue the pattern back and forth as before over all 158-162-166-170-172-176 stitches (make sure you continue with the correct row in the diagram over the armhole in regard to the rest of the pattern). When the piece measures 65-67-69-71-73-75 cm from the cast-on edge, change to circular needle size 4.5 mm. Knit 1 row from the right side and knit 1 row from the wrong side. Now work garter stitch back and forth in the neck with short rows as follows: Start from the right side up by the neck and knit from the right side over the first 40 stitches. Insert 1 marker. Turn the piece, tighten the strand and knit back. Turn the piece, tighten the strand and knit until there are 5 stitches left before the marker, turn the piece, tighten the strand and knit back. Turn the piece, tighten the strand and knit until there are 10 stitches left before the marker, turn the piece, tighten the strand and knit back. Continue in this way by knitting 5 stitches less, until you have worked back and forth over the last 5 stitches. Turn the piece, tighten the strand and knit 1 row from the right side and knit 1 row from the wrong side over all 158-162-166-170-172-176 stitches. Then loosely cast off with knit from the right side – NOTE: To prevent the cast-off edge being tight, you can make 1 yarn over after each 8th stitch at the same time as you cast off (the yarn overs are cast off as normal stitches). SLEEVE: The sleeve is worked top down. It is worked back and forth on short circular needle until the sleeve cap has been completed. Then the sleeve is worked in the round with short circular needle, but change to double pointed needles when you have decreased enough stitches. Cast on 18-20-24-28-30-34 stitches with short circular needle size 5.5 mm. Work stocking stitch and AT THE SAME TIME cast on 5 stitches at the end of each row a total of 4 times in each side = 58-60-64-68-70-74 stitches. The piece now measures approx. 4 cm from the cast on edge. Insert 1 marker thread at the beginning of the row. Work stocking stitch in the round and allow the marker thread to follow your work – remember MEASURING TIP. When the piece measures 2½ cm in all sizes from where the marker thread was inserted, decrease 2 stitches mid under the sleeve – read DECREASE TIP. Decrease in this way every 3½-3½-3-3-3-2½ cm a total of 12-12-14-15-15-16 times = 34-36-36-38-40-42 stitches. Continue working until the piece measures 49 cm from the marker thread. Change to double pointed needles size 4.5 mm. Work 2 RIDGES – see description above, change back to double pointed needles size 5.5 mm and loosely cast off. The sleeve measures approx. 55 cm in all sizes. Work another sleeve in the same way. ASSEMBLY: Sew the back pieces together mid back – sew in the outermost loop of the outermost stitch so that you get a flat seam. Sew in the sleeves. |
||||||||||||||||||||||||||||
Diagram explanations |
||||||||||||||||||||||||||||
|
||||||||||||||||||||||||||||
 |
||||||||||||||||||||||||||||
 |
||||||||||||||||||||||||||||
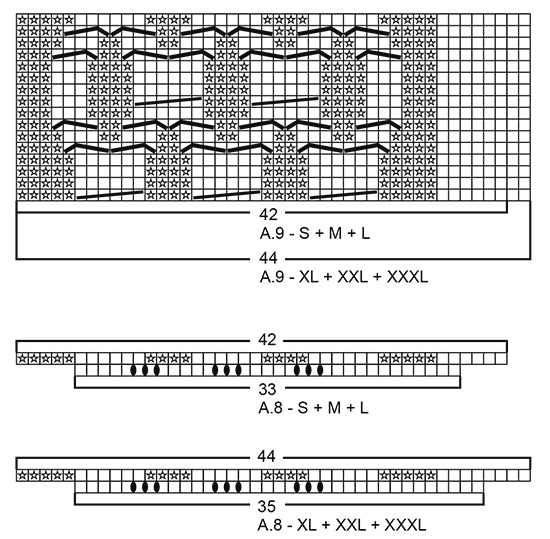 |
||||||||||||||||||||||||||||
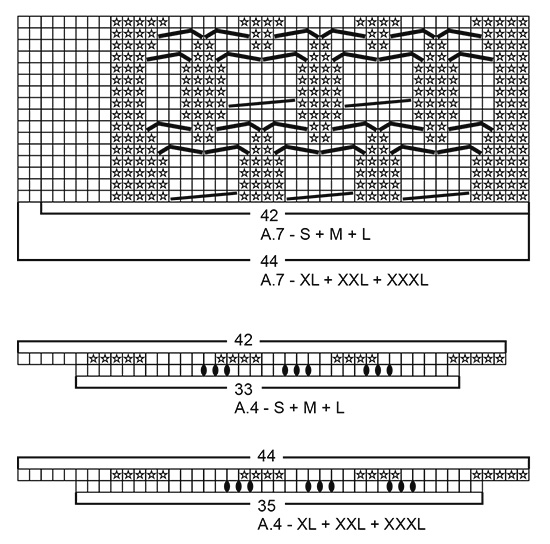 |
||||||||||||||||||||||||||||
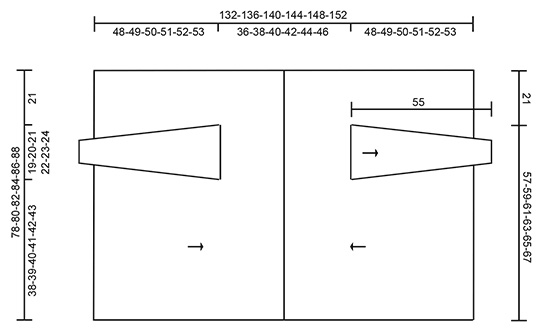 |
||||||||||||||||||||||||||||
Have you finished this pattern?Tag your pictures with #dropspattern #norfolkcardigan or submit them to the #dropsfan gallery. Do you need help with this pattern?You'll find 29 tutorial videos, a Comments/Questions area and more by visiting the pattern on garnstudio.com. © 1982-2026 DROPS Design A/S. We reserve all rights. This document, including all its sub-sections, has copyrights. Read more about what you can do with our patterns at the bottom of each pattern on our site. |
||||||||||||||||||||||||||||






Post a comment to pattern DROPS 179-24
We would love to hear what you have to say about this pattern!
If you want to leave a question, please make sure you select the correct category in the form below, to speed up the answering process. Required fields are marked *.