
Popular categories
Looking for a yarn?


Comments / Questions (14)
![]() Megan wrote:
Megan wrote:
I'm lost. I really want to make this sweater. I compared the size diagram to a similar sweater, and it says I need to make an XXXL. But I am a very small human being! The sweater I compared to is 54 cm from side seam to side seam, and fits loosely. Could you please give me some advice?
10.10.2023 - 18:43DROPS Design answered:
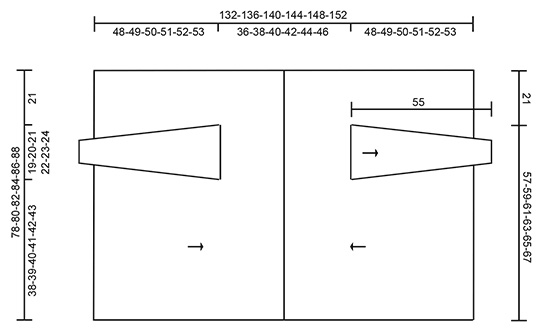
Dear Megan, to find out your size here you can compare the back width on a similar garment, from armhole to armhole, you will have here 36-38-40-42-44-46 cm depending on the size. Happy knitting!
11.10.2023 - 08:26
![]() Megan wrote:
Megan wrote:
I'm lost. I really want to make this sweater. I compared the size diagram to a similar sweater, and it says I need to make an XXXL. But I am a very small human being! The sweater I compared to is 54 cm from side seam to side seam, and fits loosely. Could you please give me some advice?
10.10.2023 - 18:38
![]() Ina wrote:
Ina wrote:
Hallo ihr Lieben, ich würde diese Jacke gerne mit Garngruppe B stricken (Merino extra fine). Um auf die gleiche Größe zu kommen, würde ich die Maschenanzahl sowie die glatt rechts Bereiche entsprechend erweitern., das kriege ich hin. Mir fällt es jedoch schwer, die benötigte Garnmenge auszurechnen. Habt ihr vielleicht einen Tipp für mich? Vielen Dank!
30.03.2023 - 08:10DROPS Design answered:
Liebe Ina, wenn Sie die Maschenzahl ändern, wird es mit der Berechnung der Garnmenge schwierig, da ja zwei Aspekte zu berücksichtigen sind: Die Lauflänge und der Mehrverbrauch durch die dünnere Nadelstärke. Leider können wir Ihnen hier keine Empfehlung für die Garnmenge geben, die passend wäre.
05.04.2023 - 10:48
![]() Linda wrote:
Linda wrote:
Je suis pas sur d'avoir mis les deux coté comme il faut.pourriez vous me montré comment vous les assemblés les deux morceaux,ainsi que les manches.Merci.
25.09.2021 - 00:30DROPS Design answered:
Bonjour Linda, assemblez les mailles rabattues des 2 grandes pièces devant droit & demi-dos et devant gauche & demi dos (ligne noire dans le schéma, les flèches indiquant le sens du tricot) et 2ème photo où on voit le milieu du dos; placez les manches le long de l'emmanchure, le milieu des mailles montées doit se trouver en haut, côté col, épinglez si besoin les mailles tout autour de l'emmanchure, le milieu sous la manche doit être en bas de l'ouverture de l'emmanchure. Bon assemblage!
27.09.2021 - 07:56
![]() Linda wrote:
Linda wrote:
Je tricote depuis un bon moment et je trouve que c'est un peu compliqué de suivre ce shéma de patron.Les manches je ne trouve pas le début des explication? Et j'aimerais savoir comment ont fait pour savoir que nous sommes bien rendu a la deuxieme ligne du shémas pour la veste?Merci beaucoup de m'aidée dans mon tricot.
04.02.2021 - 11:57DROPS Design answered:
Bonjour Linda, Vous trouverez les explications des manches sous le paragraphe MANCHES - par "2ème ligne du schéma", entendez-vous le 2ème rang des diagrammes? je ne suis pas bien sûre de comprendre, désolée, pouvez-vous reformuler cette partie de votre question? Merci pour votre compréhension.
04.02.2021 - 13:14
![]() Dawn wrote:
Dawn wrote:
I need help getting started. After the initial A1, A2,... when working back from the wrong side in the same way is it going from A1 to A2 or A1 to A3?
04.05.2019 - 23:31DROPS Design answered:
Hello Dawn. The return row (on left front and back piece) is worked: A.1, A.3, A.4, A.3, A.2, A.1. Enjoy your knitting!
05.05.2019 - 09:08Susanne Thompson wrote:
Thank you for the response. And to clarify after I increase in row 1/2 the first time I do not increase again through out the pattern, when I have to repeat rows 1 and 2 otherwise I cannot end with 158 *size s* at the end. Correct? So it is actually row 1 row 2 row 3 row 4 and then it is only row 3 and 4 that are repeated? or repeat row 1 2 3 and 4 with no increases? Would be easier if your pattern could number the rows and indicate clearly which rows are to be repeated in the pattern.
04.01.2019 - 15:14DROPS Design answered:
Dear Mrs Thompson, you won't repeat the 2 rows in A.2/A.3/A.4, they are just worked once, after you have worked these 2 rows in these diagram, you work A.5 over A.2, A.6 over A.3, A.7 over A.4 and A.6 over last A.3 on row. So that on 3rd row in A.1, you work row 1 in A.5, A.6, A.7, on row 4 in A.4 you work row 2 in A.5, A.6, A.7 and so on. When A.1 has been worked 1 time in height, repeat the 8 rows from row 1. When A.5-A.7 have been worked 1 time in height, repeat them from row 1. Happy knitting!
04.01.2019 - 15:17Susanne Thompson wrote:
I am trying to get this project started and am not clear on the pattern. Starting with left side, the way I read it is you do row 1,2,3,4 and then repeat 1,2,3,4 over and over until measurement reaches 48 cm. But row 1 has sections A.2,A.3 and A.4 that all increase stitches. But when dec for armhole only deals with 158 stitches. Also to clarify. When I read the row does first stitch start on left side of the pattern read back to the left? Thank you for the help. Susanne
03.01.2019 - 22:03DROPS Design answered:
Dear Mrs Thompson, you first work row 1 diagrams A.1, A.2, A.3 and A.4 increasing in A.2, A.3 and A.4 - then work ws row = row 2 = you have increased sts in the diagrams and should have now 158-176 sts (see size). On next row, continue A.1 (= row 3 in A.1) and work A.5, A.6, A.7 starting them on row 1 as shown in diagram. When diagrams have been worked one time in height, repeat them in height from row 1. Happy knitting!
04.01.2019 - 12:24
![]() Marielle wrote:
Marielle wrote:
Worden de omslagen in telpatroon A3 meteen als steken meegeteld? (In het telpatroon staan 19 steken en 3 omslagen getekend.)
15.11.2017 - 22:47DROPS Design answered:
Hoi Marielle, In de eerste naald worden in de 19 steken die aangegeven zijn niet de omslagen meegerekend. Het zijn dus inderdaad 19 steken én 3 omslagen. In de tweede naald zijn deze 3 omslagen wel steken geworden.
17.11.2017 - 12:01
![]() Angeline Van Loopik wrote:
Angeline Van Loopik wrote:
Klopt het dat de tel patroon ook de terug gaande naald laat zien of is het alleen de heen gaande naald
30.10.2017 - 21:40DROPS Design answered:
Hoi Angeline, Dat klopt inderdaad, het telpatroon laat alle naalden in het telpatroon zien, dus zowel de heengaande als de teruggaande naalden.
30.10.2017 - 22:37
|
||||||||||||||||||||||||||||
Norfolk#norfolkcardigan |
||||||||||||||||||||||||||||
 |
 |
|||||||||||||||||||||||||||
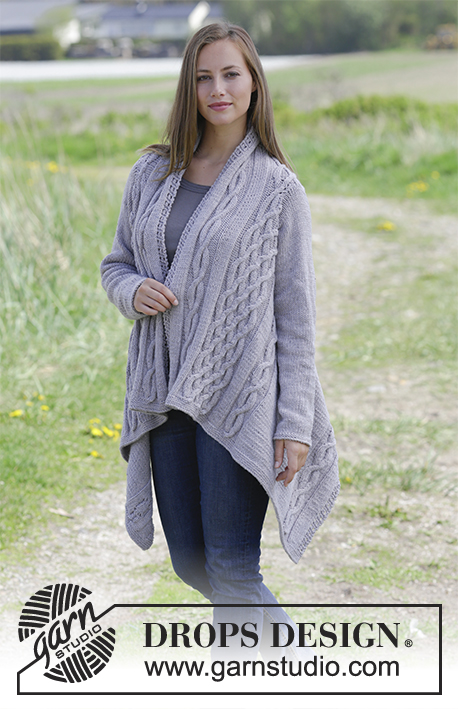
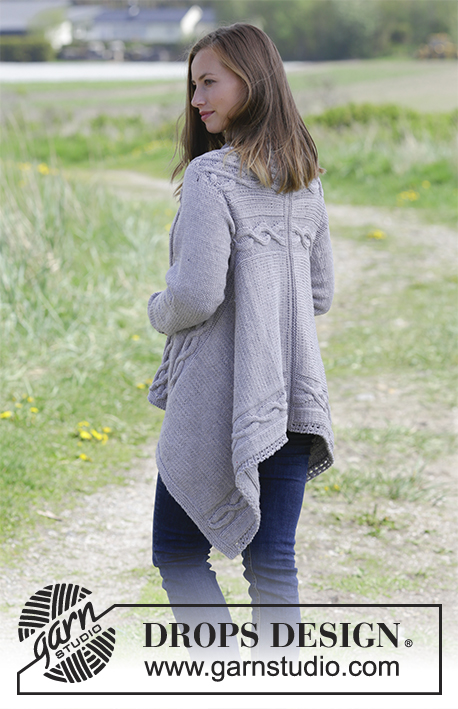
Jacket, knitted sideways with cables. Sizes S - XXXL. The piece is worked in DROPS Big Merino.
DROPS 179-24 |
||||||||||||||||||||||||||||
|
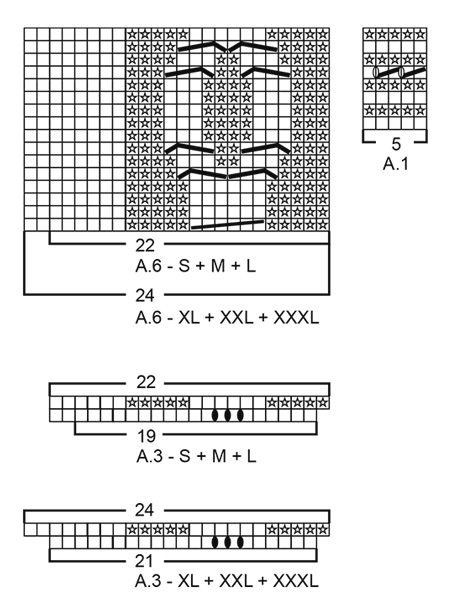
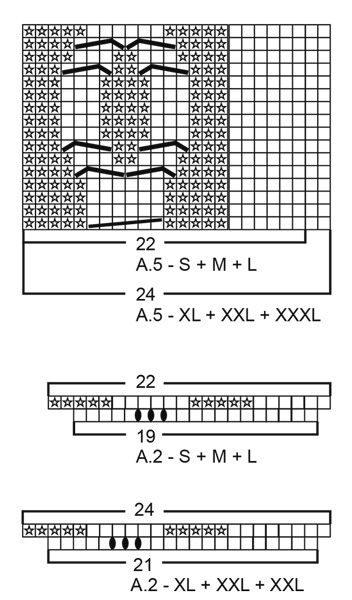
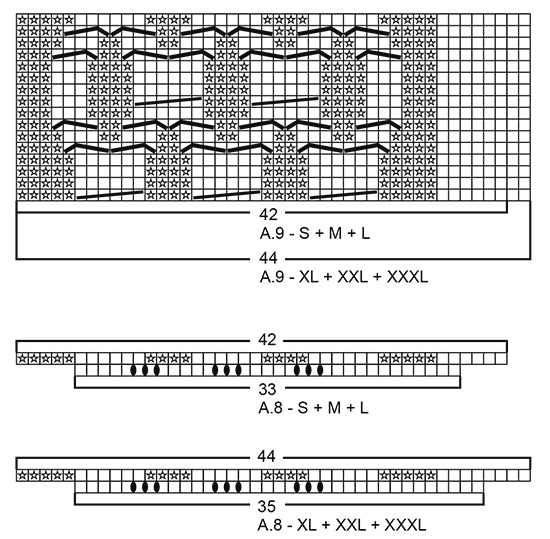
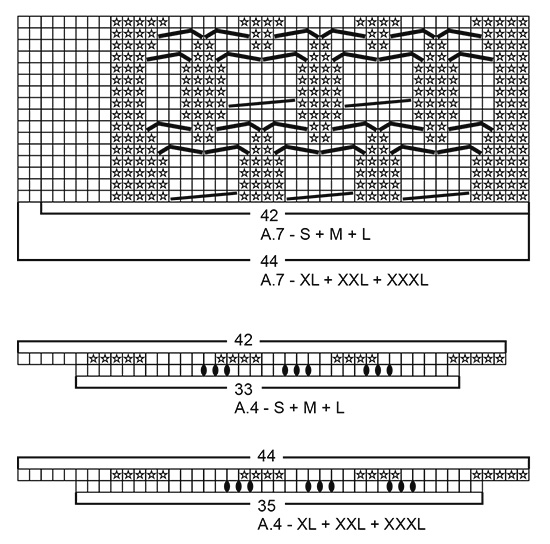
INFORMATION FOR THE PATTERN: RIDGE/GARTER STITCH (worked back and forth): 1 ridge = Knit 2 rows. RIDGE/GARTER STITCH (worked in the round): 1 ridge = 2 rounds. Knit 1 round and purl 1 round. PATTERN: See diagrams A.1 to A.9. Choose diagram for your size. The diagrams show all the rows in the pattern seen from the right side. MEASUREMENT TIP: All length measurements for the front and back pieces are taken with the pieces lying flat. Due to the weight of the garment, the piece will stretch a little when worn in relation to the measurements given in the pattern – see description below under Sizes. All lengths for the sleeves are taken whilst the piece is held up to prevent the sleeve becoming too long (you can try the sleeve on as you go and adjust to the required length). DECREASE/INCREASE TIP (for the armhole): To prevent the armhole being too large when decreasing in a cable section, you must decrease some stitches evenly on row before casting off for the armhole. In the same way, you will need to increase some stitches evenly on row after you have cast on new stitches for the armhole. To work out how to decrease/increase evenly for the armhole, count the total number of stitches you are decreasing/increasing over (e.g. 39 stitches) and divide by the number of decreases/increases to be made (e.g. 9) = 4.3. In this example, work approx. every 3th and 4th stitch together when decreasing. If you are increasing, make 1 yarn over after approx. every 4th stitch. On the next row, work the yarn overs twisted to prevent holes. DECREASE TIP (for mid under the sleeve): Start 3 stitches before the marker thread, knit 2 together, knit 2 (the marker thread sits in the middle of these 2 stitches), slip 1 stitch as if to knit, knit 1, pass the slipped stitch over the knitted stitch (= 2 stitches decreased). ---------------------------------------------------------- JACKET: Front and back pieces are worked in 2 parts which are sewn together mid back. They are worked back and forth with circular needle from mid front to mid back. LEFT FRONT AND BACK PIECE: Cast on 140-144-148-152-154-158 stitches with circular needle 4.5 mm and Big Merino. Work 4 RIDGES – see description above. Change to circular needle 5.5 mm. The next row is worked as follows from the right side: A.1 (= 5 stitches), A.2 (= 19-19-19-21-21-21 stitches), 40-44-48-44-46-50 stitches stocking stitch, A.3 (= 19-19-19-21-21-21 stitches), A.4 (= 33-33-33-35-35-35 stitches), A.3 (= 19-19-19-21-21-21 stitches) and A.1 (= 5 stitches). Work back from the wrong side in the same way = 158-162-166-170-172-176 stitches. The next row is worked as follows from the right side: Continue A.1 (= 5 stitches), work A.5 (= 22-22-22-24-24-24 stitches), 40-44-48-44-46-50 stitches stocking stitch, A.6 (= 22-22-22-24-24-24 stitches), A.7 (= 42-42-42-44-44-44 stitches), A.6 (= 22-22-22-24-24-24 stitches) and finish with A.1 (= 5 stitches). Continue in this way and repeat the pattern in height upwards. REMEMBER THE KNITTING TENSION! When the piece measures 48-49-50-51-52-53 cm – read MEASUREMENT TIP, decrease for the armhole as follows: The first row is worked as follows from the wrong side: Continue the pattern as before over the first 40 stitches, purl the next 39-41-43-45-46-47 stitches and at the same time decrease 9 stitches evenly over these 39-41-43-45-46-47 stitches – read DECREASE/INCREASE TIP, then continue the pattern as before over the remaining 79-81-83-85-86-89 stitches. On the next row cast off for the armhole as follows from the right side: Work as before over the first 79-81-83-85-86-89 stitches, cast off the next 30-32-34-36-37-38 stitches for armhole and work as before over the last 40 stitches. Turn the piece and work back as follows from the wrong side: Work 40 stitches as before, cast on 30-32-34-36-37-38 new stitches on the needle and continue the pattern as before to end of row. The next row is worked as follows from the right side: Work the first 79-81-83-85-86-89 stitches as before, knit 30-32-34-36-37-38 stitches and increase, at the same time, 9 stitches evenly over these 30-32-34-36-37-38 stitches – read DECREASE/INCREASE TIP, then work the remaining 40 stitches as before. Continue the pattern back and forth as before over all 158-162-166-170-172-176 stitches (make sure you continue with the correct row in the diagram over the armhole in regard to the rest of the pattern). When the piece measures 65-67-69-71-73-75 cm from the cast-on edge, change to circular needle size 4.5 mm. Knit 1 row from the wrong side and knit 1 row from the right side. Now work garter stitch back and forth in the neck with short rows as follows: Start from the wrong side, up by the neck and knit from the wrong side over the first 40 stitches. Insert 1 marker. Turn the piece, tighten the strand and knit back. Turn the piece, tighten the strand and knit until there are 5 stitches left before the marker, turn the piece, tighten the strand and knit back. Turn the piece, tighten the strand and knit until there are 10 stitches left before the marker, turn the piece, tighten the strand and knit back. Continue in this way, by knitting over 5 less stitches, until you have worked back and forth over the last 5 stitches. Turn the piece, tighten the strand and knit 1 row from the wrong side over all 158-162-166-170-172-176 stitches. Then loosely cast off with knit from the right side – NOTE: To prevent the cast-off edge being tight, you can make 1 yarn over after each 8th stitch at the same time as you cast off (the yarn overs are cast off as normal stitches). RIGHT FRONT AND BACK PIECE: Cast on 140-144-148-152-154-158 stitches with circular needle size 4.5 mm. Work 4 ridges. Change to circular needle 5.5 mm. The next row is worked as follows from the right side: A.1 (= 5 stitches), A.2 (= 19-19-19-21-21-21 stitches), A.8 (= 33-33-33-35-35-35 stitches), A.2 (= 19-19-19-21-21-21 stitches), 40-44-48-44-46-50 stitches stocking stitch, A.3 (= 19-19-19-21-21-21 stitches) and A.1 (= 5 stitches). Work back from the wrong side in the same way = 158-162-166-170-172-176 stitches. The next row is worked as follows from the right side: Continue A.1 (= 5 stitches), work A.5 (= 22-22-22-24-24-24 stitches), A.9 (= 42-42-42-44-44-44 stitches), A.5 (22-22-22-24-24-24 stitches), 40-44-48-44-46-50 stitches stocking stitch, A.6 (= 22-22-22-24-24-24 stitches) and finish with A.1 (= 5 stitches). Continue in this way and repeat the pattern in height upwards. When the piece measures 48-49-50-51-52-53 cm - read MEASUREMENT TIP, decrease for the armhole as follows: The first row is worked as follows from the right side: Continue the pattern as before over the first 40 stitches, knit the next 39-41-43-45-46-47 stitches and at the same time decrease 9 stitches evenly over these 39-41-43-45-46-47 stitches– read DECREASE/INCREASE TIP, then continue the pattern as before over the remaining 79-81-83-85-86-89 stitches. On the next row cast off for the armhole as follows from the wrong side: Work as before over the first 79-81-83-85-86-89 stitches, cast off the next 30-32-34-36-37-38 stitches for armhole and work as before over the last 40 stitches. Turn the piece and work back as follows from the right side: Work 40 stitches as before, cast on 30-32-34-36-37-38 new stitches on the needle and continue the pattern to the end of the row as before. The next row is worked as follows from the wrong side: Work the first 79-81-83-85-86-89 stitches as before, purl 30-32-34-36-37-38 stitches and at the same time increase 9 stitches evenly over these 30-32-34-36-37-38 stitches – read DECREASE/INCREASE TIP, then work the remaining 40 stitches as before. Continue the pattern back and forth as before over all 158-162-166-170-172-176 stitches (make sure you continue with the correct row in the diagram over the armhole in regard to the rest of the pattern). When the piece measures 65-67-69-71-73-75 cm from the cast-on edge, change to circular needle size 4.5 mm. Knit 1 row from the right side and knit 1 row from the wrong side. Now work garter stitch back and forth in the neck with short rows as follows: Start from the right side up by the neck and knit from the right side over the first 40 stitches. Insert 1 marker. Turn the piece, tighten the strand and knit back. Turn the piece, tighten the strand and knit until there are 5 stitches left before the marker, turn the piece, tighten the strand and knit back. Turn the piece, tighten the strand and knit until there are 10 stitches left before the marker, turn the piece, tighten the strand and knit back. Continue in this way by knitting 5 stitches less, until you have worked back and forth over the last 5 stitches. Turn the piece, tighten the strand and knit 1 row from the right side and knit 1 row from the wrong side over all 158-162-166-170-172-176 stitches. Then loosely cast off with knit from the right side – NOTE: To prevent the cast-off edge being tight, you can make 1 yarn over after each 8th stitch at the same time as you cast off (the yarn overs are cast off as normal stitches). SLEEVE: The sleeve is worked top down. It is worked back and forth on short circular needle until the sleeve cap has been completed. Then the sleeve is worked in the round with short circular needle, but change to double pointed needles when you have decreased enough stitches. Cast on 18-20-24-28-30-34 stitches with short circular needle size 5.5 mm. Work stocking stitch and AT THE SAME TIME cast on 5 stitches at the end of each row a total of 4 times in each side = 58-60-64-68-70-74 stitches. The piece now measures approx. 4 cm from the cast on edge. Insert 1 marker thread at the beginning of the row. Work stocking stitch in the round and allow the marker thread to follow your work – remember MEASURING TIP. When the piece measures 2½ cm in all sizes from where the marker thread was inserted, decrease 2 stitches mid under the sleeve – read DECREASE TIP. Decrease in this way every 3½-3½-3-3-3-2½ cm a total of 12-12-14-15-15-16 times = 34-36-36-38-40-42 stitches. Continue working until the piece measures 49 cm from the marker thread. Change to double pointed needles size 4.5 mm. Work 2 RIDGES – see description above, change back to double pointed needles size 5.5 mm and loosely cast off. The sleeve measures approx. 55 cm in all sizes. Work another sleeve in the same way. ASSEMBLY: Sew the back pieces together mid back – sew in the outermost loop of the outermost stitch so that you get a flat seam. Sew in the sleeves. |
||||||||||||||||||||||||||||
Diagram explanations |
||||||||||||||||||||||||||||
|
||||||||||||||||||||||||||||
 |
||||||||||||||||||||||||||||
 |
||||||||||||||||||||||||||||
 |
||||||||||||||||||||||||||||
 |
||||||||||||||||||||||||||||
 |
||||||||||||||||||||||||||||
Have you finished this pattern?Tag your pictures with #dropspattern #norfolkcardigan or submit them to the #dropsfan gallery. Do you need help with this pattern?You'll find 29 tutorial videos, a Comments/Questions area and more by visiting the pattern on garnstudio.com. © 1982-2026 DROPS Design A/S. We reserve all rights. This document, including all its sub-sections, has copyrights. Read more about what you can do with our patterns at the bottom of each pattern on our site. |
||||||||||||||||||||||||||||


With over 40 years in knitting and crochet design, DROPS Design offers one of the most extensive collections of free patterns on the internet - translated to 17 languages. As of today we count 324 catalogues and 12290 patterns translated into English (UK/cm). 12290
We work hard to bring you the best knitting and crochet have to offer, inspiration and advice as well as great quality yarns at incredible prices! Would you like to use our patterns for other than personal use? You can read what you are allowed to do in the Copyright text at the bottom of all our patterns. Happy crafting!
Post a comment to pattern DROPS 179-24
We would love to hear what you have to say about this pattern!
If you want to leave a question, please make sure you select the correct category in the form below, to speed up the answering process. Required fields are marked *.