
Popular categories
Looking for a yarn?


Comments / Questions (99)
![]() Mai wrote:
Mai wrote:
Liebe Drops-Team, bitte überprüfe/ ändere den Wollverbrauch (zumindest für die Größe 98/104) - ich habe nun 300g bestellt/ verstrickt und die reichen nicht aus, geschweige denn mit 250g sowie in der Angabe!
28.12.2014 - 23:15
![]() Mai wrote:
Mai wrote:
Ich bin dabei dieses Kleid in Größe 98/104 nach zustricken und meine Erfahrungen sind: - der Wollverbrauch stimmt nicht - mit 250g schaffte ich das Kleid nur ohne Ärmel und Häkelkante zu stricken (ich stricke eher fest). 50g nachbestellt aber die reichte leider auch nicht für 2 Ärmel. Habe das Knäuel nachgewogen und es wog nur 45g anstatt 50g (irgendwie enttäuschend!!). Jetzt heißt es noch mehr Porto zahlen oder doch die Ärmel kürzer stricken?!
28.12.2014 - 23:11
![]() Agnieszka wrote:
Agnieszka wrote:
Entschuldigen Sie bitte die mehrfachen Beiträge und danke für die Antwort. Eine Frage noch - stimmt es tatsächlich, dass ich beim Vorderteil sofort die ersten 10 M Abkette? Das erscheint mir merkwürdig
22.12.2014 - 20:45DROPS Design answered:
Ja, es stimmt aber so, Sie ketten direkt die ersten 10 M ab. Danach dann einige Male 2 M und dann nur noch 1 M. Gutes Gelingen weiterhin!
29.12.2014 - 10:13
![]() Agnieszka wrote:
Agnieszka wrote:
Bitte helfen Sie mir, ich komme mit M1 nicht zurecht. Die Umschläge NACH dem Zusammenstricken sehen total unsauber aus und scheinen mir alle vorhergehenden und nachfolgenden Maschen aufzuziehen, so das ich einfach in der kompletten senkrechten Reihe Löcher habe. Ich hole bei dem Umschlag den Faden nach vorne, lege ihn dann von vorne um die Nadel und mache dann die nächste linke Masche. Ich mache also einen linken Umschlag. Vielen Dank
17.12.2014 - 09:18DROPS Design answered:
Antwort siehe unten! :-)
21.12.2014 - 22:54
![]() Agnieszka wrote:
Agnieszka wrote:
Bitte helfen Sie mir, ich komme mit M1 nicht zurecht. Die Umschläge NACH dem Zusammenstricken sehen total unsauber aus und scheinen mir alle vorhergehenden und nachfolgenden Maschen aufzuziehen, so das ich einfach in der kompletten senkrechten Reihe Löcher habe. Ich hole bei dem Umschlag den Faden nach vorne, lege ihn dann von vorne um die Nadel und mache dann die nächste linke Masche. Ich mache also einen linken Umschlag. Vielen Dank
17.12.2014 - 09:17DROPS Design answered:
Antwort siehe unten! :-)
21.12.2014 - 22:54
![]() Agnieszka wrote:
Agnieszka wrote:
Bitte helfen Sie mir, ich komme mit M1 nicht zurecht. Die Umschläge NACH dem Zusammenstricken sehen total unsauber aus und scheinen mir alle vorhergehenden und nachfolgenden Maschen aufzuziehen, so das ich einfach in der kompletten senkrechten Reihe Löcher habe. Ich hole bei dem Umschlag den Faden nach vorne, lege ihn dann von vorne um die Nadel und mache dann die nächste linke Masche. Ich mache also einen linken Umschlag. Vielen Dank
17.12.2014 - 08:57DROPS Design answered:
Sie können sich unter "Tipps & Hilfe" bei den Strickvideos das Video "Umschlag beim Linksstricken" anschauen, vielleicht hilft Ihnen das weiter. Sie können auch versuchen, die folgende Linksmasche anders als gewohnt zu stricken - verschiedene Methoden finden Sie ebenfalls bei den Strickvideos mit dem Titel "Linke Maschen".
21.12.2014 - 22:54
![]() Jocelyne wrote:
Jocelyne wrote:
Ik heb een vraag van een hele andere orde: het lukt mij telkens maar één keer om het opmerkingen scherm te openen. Als ik het een maal weg klik moet ik jullie site via een andere browser openen wil ik weer een opmerking/vraag kunnen plaatsen of van anderen lezen. Hoe kan dat? Vriendelijke groeten,
25.09.2014 - 11:57DROPS Design answered:
Hoi. Ik denk dat dit ligt bij jouw browserinstellingen of zo, ik heb geen idee. Wij hebben geen foutmeldingen of van soortgelijke problemen gehoord van andere gebruikers. Ik kan je hier helaas niet mee helpen.
25.09.2014 - 16:24
![]() Jocelyne wrote:
Jocelyne wrote:
O dat is wel eenheel stuk korter dan een webwinkel mij adviseerde. Die schreef 100 cm draad. Blij dat ik het nog even bij jullie na vroeg. Dan heb ik nog een vraag: Mijn dochter is bijna twee maar niet zo groot. Ze zit tussenj maat 80 en 86 in. Welke maat kan ik dan het beste aanhouden?
25.09.2014 - 11:56DROPS Design answered:
Hoi Jocelyne. Kijk onderaan het patroon op de maattekening. Hier staan de afmetingen in cm per maat. Kies wat je denkt het best uitvalt voor haar. Maar als je wilt dat je dochter misschien wat langer plezier van de jurk moet hebben is een maatje groter (86) wellicht het beste.
25.09.2014 - 16:21
![]() Jocelyne Assink wrote:
Jocelyne Assink wrote:
Hallo, Hoe lang moet de draad van de rondbreinaald zijn bij dit partoon? ik wil graag de maat 86 breien. Vallen deze partonen groot, klein of gewoon uit? Mijn dochter zit nu tussen 80 en 86 in. Ik wil het jurkje van baby merino maken, dus wel voor deze winter. ALs het groot uitvalt kan ze het pas in de lente aan. Vriendelijke groeten, Jocelyne
23.09.2014 - 23:41DROPS Design answered:
Hoi Jocelyne. Je breit heen en weer op de rondbreinaald, maar met een 80 cm kom je goed uit - ik denk ook een 60 cm genoeg moet zijn. Onderaan het patroon vind je een maattekeningen met de cm per maat. Je kan hier kijken welke maat het beste bij jouw dochter zou passen. Veel breiplezier.
24.09.2014 - 16:44Sheela wrote:
How can we make this = knit from RS, purl from WS = purl from RS, knit from WS
15.08.2014 - 13:31DROPS Design answered:
Dear Sheela, K from RS, P from WS refers to stocking st and P from RS, K from WS refers to reverse stocking st. Happy knitting!
18.08.2014 - 12:22
|
||||||||||||||||
Sunday Stroll#sundaystrollset |
||||||||||||||||
 |
 |
|||||||||||||||
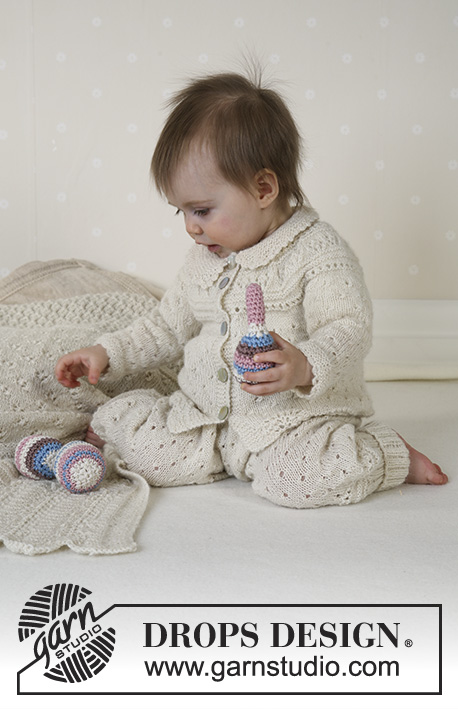
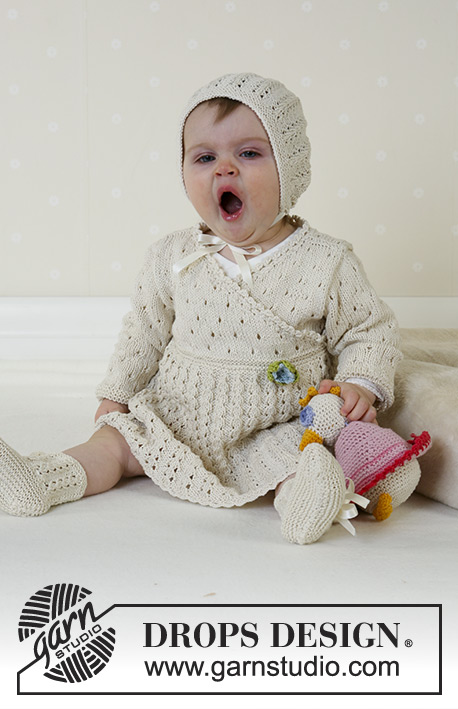
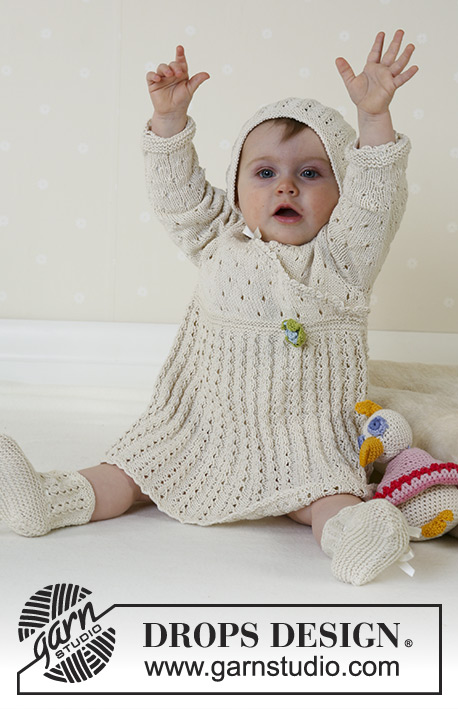
The DROPS set comprises: Dress, bonnet, socks and duck.
DROPS Baby 13-17 |
||||||||||||||||
|
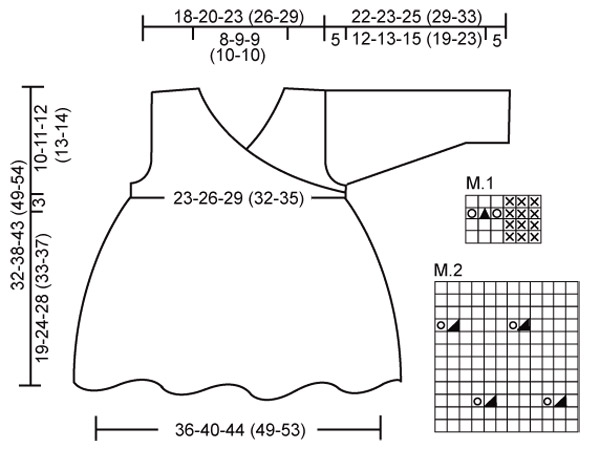
Knitting tension: 24 sts x 32 rows on needles size 3 mm in stocking sts = 10 x 10 cm and 27 sts x 32 rows in M.1 = 10 x 10 cm. Garter sts (circular needles): Knit 1 round, Purl 1 round. Garter sts (back and forth on needle): Knit all sts. Pattern: See diagram M.1 and M.2. The diagram is seen from the right side. DRESS: Dress: The piece is knitted on circular needles from the bottom and up. Cast on 192-216-240 (264-288) sts loosely on circular needles size 3 mm and knit 2 rounds of garter sts. Continue in M.1. When the piece measures 17-22-26 (31-35) cm – adjust to a whole repeat –bind off to 112-126-140 (154-168) sts as follows: K the 3 K’s tog to 1K. In addition reduce every other P-repeat from 3P to 2P as follows: P2 tog. Insert a marking thread at the beginning of next round and again after 56-63-70 (77-84) sts. Knit 8 round of garter sts. Split the piece at the marking threads and continue each part separately. Back piece: = 56-63-70 (77-84) sts. Knit in M.2 – sts not fitting into pattern are knitted in stocking sts. At the same time when the piece measures 22-27-31 (36-40) cm bind off for armhole each side on every other row: 3 sts 1 time, 2 sts 1 time and 1 st 2 times = 42-49-56 (63-70) sts. When the piece measures 31-37-42 (48-53) cm bind off the middle 18-19-20 (21-22) sts for the neck. Continue to bind off 1 st at the neck side = 11-14-17(20-23) sts left for shoulder. Bind off remaining sts when the piece measures 32-38-43 (49-54) cm. Right front: = 56-63-70 (77-84) sts. Knit in M.2 at the same time bind off for the slanting front edge as follows: Bind off the first 10 sts. Continue to bind off towards mid front on every other row as follows: 2 sts 8-10-13 (15-18) times and 1 st 12-12-10 (10-8) times. At the same time when the piece measures 22-27-31-(36-40) cm bind off for the armhole as done on the back piece. After all bind off’s for the front edge and the armhole = 11-14-17 (20-23) sts left for the shoulder. Bind off remaining sts when the piece measures 32-38-43 (49-54) cm. Left front: Pick up 56-63-70 (77-84) sts on the backside of the right front piece on needles size 3 mm – pick up from side to side in the top purl row). Continue to knit M.2 at the same time bind off for the slanting edge and the armhole as done for the right front piece but opposite. Sleeve: Cast on 36-36-36 (42-42) sts on double pointed needles size 3 mm and knit 8 rounds of garter sts, continue in M.2. When the piece measures 5 cm inc 2 sts mid under arm on every 6.-5.-4. (6.-6.) round a total of 6-8-11 (10-12) times = 48-52-58 (62-66) sts – knit new sts into M.2 as you go along. When the piece measures 17-18-20 (24-28) bind off 6 sts mid under arm and now knit back and forth on row. Continue to bind off for the sleeve cap 2 sts on every other row until the piece measures 21-22-24 (28-32) cm. Then 3 sts each side 1 time and bind off remaining sts when the piece measures approx. 22-23-25 (29-33) cm. Put the piece aside and knit the other sleeve. Assembly: Sew the shoulder seams. Sew the side seams in the outer most part of the outer st so the seam cannot be seen. Sew in the sleeves. Crochet edge: Crochet an edge around booth sleeves and the bottom part of the dress on hook size 3 as follows: 1 dc in the first st, *4 ch, skip 2 sts, 1 dc in the next st*, repeat from *-* and finish with 4 ch and a sl st in the first dc from beginning of round. Crochet around the slanting edge and the neck on hook size 3 as follows: crochet 1 row of dc and the next row as follows: 1 dc in the first st, *4 ch, 1 tr in the first of these ch, skip 1 st, 1 dc in the next dc*, repeat from *-*. Crochet flower: Crochet 3 ch with hook size 3 and light blue and make a loop with a sl st. 1. round: Crochet 5 dc around the loop and finish with a sl st in the dc from beginning of round. 2. round: *4 ch, 1 tr in the 1st of the 4 ch, 1 dc in the next st*, repeat from *-* = 5 leaves, cut the thread. Crochet 3 ch with hook size 3 and green and make a loop with a sl st. 1. round: Crochet 5 dc around the loop and finish with a sl st in the dc from beginning of round. 2. round: *4 ch, 3 tr in the 1st of the 4 ch, 1 dc in the next st*, repeat from *-* = 5 leaves, cut the thread. Sew the light blue flower on to the green flower and sew it onto the dress. _________________________________________ BONNET: To fit head circumference: approx 40/42 – 42/44 – 44/46 (48/50 – 50/52) cm Bonnet: The bonnet is knitted back and forth on circular needle. Cast on loosely 77-83-89 (95-101) sts (inclusive of 1 edge st each side) on circular needle size 3 mm. Knit 8 rows of garter sts. Knit the next row as follows from the right side: 1 edge st, M.1 over the following 72-78-84 (90-96) sts, P3 and 1 edge st. Continue this way until the piece measures 11-12-13 (14-15) cm. Adjust to 1 repeat and knit 2 rows of stocking sts over all sts. Bind off 26-28-30 (32-34) sts each side = 25-27-29 (31-33) sts left on row (= the middle section on the back of the bonnet). Measure the piece from here for now on! Knit in garter sts and bind off when the middle piece measures 10-11-12(13-14) cm Sew the middle piece to the side pieces. Pick up 78-82-90 (94-102) sts from the right side on circular needle size 3 mm at the bottom edge of the bonnet. K 1 row, and continue as follows: *K2 tog, make a yo* repeat from *-*, finish with K2. Continue to knit 2 rows of garter sts and bind off loosely. Pull silk ribbon, approx 80 cm, through the row of holes. _________________________________________ SOCKS: To fit foot length: 10-11-12 (14-15) cm Socks:The sock is knitted back and forth from mid back. Fold a circular needle size 3 mm and cast on with Safran on both needles (this is done to make the edge more stretchy) 47-53-53 (59-59) sts. Pull out one of the needles and knit 4 rows of garter sts. Knit the next row as follows from the right side: K1, M.1 over the following 42-48-48 (54-54) sts, P3 and K1. Continue this way until the piece measures 5-6-6 (7-8) cm. Purl 1 row from the wrong side at the same time bind off 9-11-7 (9-9) sts evenly distributed on row = 38-42-46 (50-50) sts. Knit the following row as follows from the right side: K1, *K2 tog, make a yo*, repeat from *-*, and finish with K1. Purl 1 row from the wrong side. Now put the outermost 13-15-17 (18-18) sts each side on a thread. Knit 3-4-5 (6-7) cm garter sts over the middle 12-12-12 (14-14) sts. Put sts from thread back on needle and pick up 8-10-12 (14-16) sts on each side of middle piece = 54-62-70(78-82) sts. Knit 3.5-4-4.5 (5-5.5) cm garter sts over all sts, at the same time after 2-2-2 (3-3) cm dec on every other row until finished measurements as follows: Dec 1 st at the beginning and at the end of row and K2 tog on each side of the 2 middle sts. Cast off when foot measures 10-11-12 (14-15) cm and sew seam under foot and mid back. Pull a silk ribbon approx. 50 cm through the row of holes. |
||||||||||||||||
Diagram explanations |
||||||||||||||||
|
||||||||||||||||
 |
||||||||||||||||
Have you finished this pattern?Tag your pictures with #dropspattern #sundaystrollset or submit them to the #dropsfan gallery. Do you need help with this pattern?You'll find 30 tutorial videos, a Comments/Questions area and more by visiting the pattern on garnstudio.com. © 1982-2026 DROPS Design A/S. We reserve all rights. This document, including all its sub-sections, has copyrights. Read more about what you can do with our patterns at the bottom of each pattern on our site. |
||||||||||||||||


With over 40 years in knitting and crochet design, DROPS Design offers one of the most extensive collections of free patterns on the internet - translated to 17 languages. As of today we count 324 catalogues and 12290 patterns translated into English (UK/cm). 12290
We work hard to bring you the best knitting and crochet have to offer, inspiration and advice as well as great quality yarns at incredible prices! Would you like to use our patterns for other than personal use? You can read what you are allowed to do in the Copyright text at the bottom of all our patterns. Happy crafting!
Post a comment to pattern DROPS Baby 13-17
We would love to hear what you have to say about this pattern!
If you want to leave a question, please make sure you select the correct category in the form below, to speed up the answering process. Required fields are marked *.