DROPS Air
DROPS Air
65% Alpaca, 28% Polyamide, 7% Wool
from 5.70 € /50g
Get the yarn to make this pattern from 17.10€.

The yarn cost is calculated from the pattern’s smallest size and the yarn’s cheapest product type. Looking for an even better price? You might find it on the DROPS Deals!

DROPS SS24

Clover

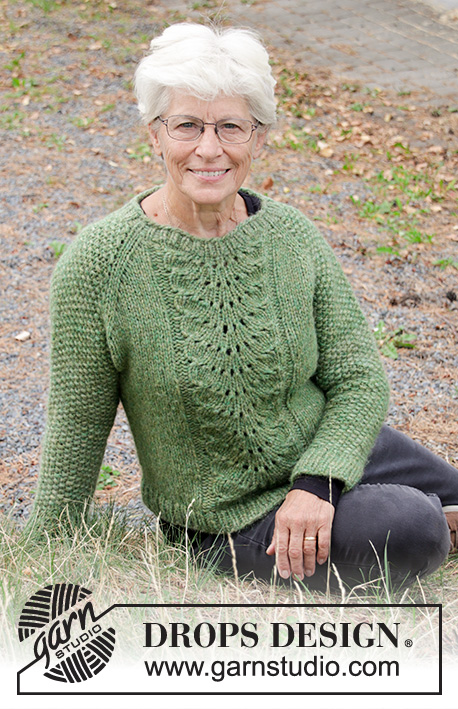
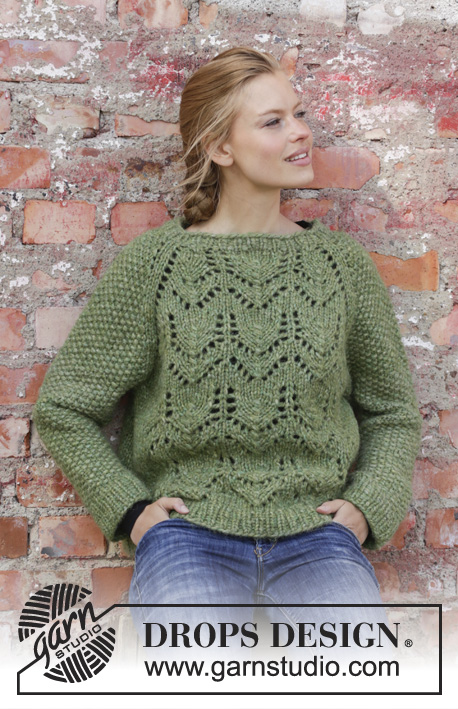
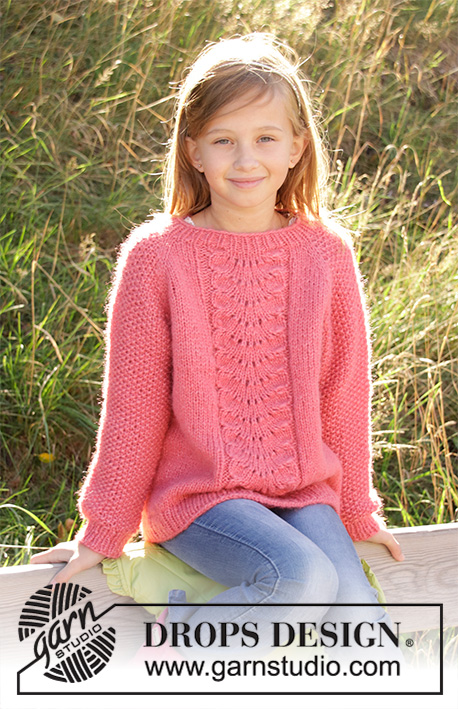
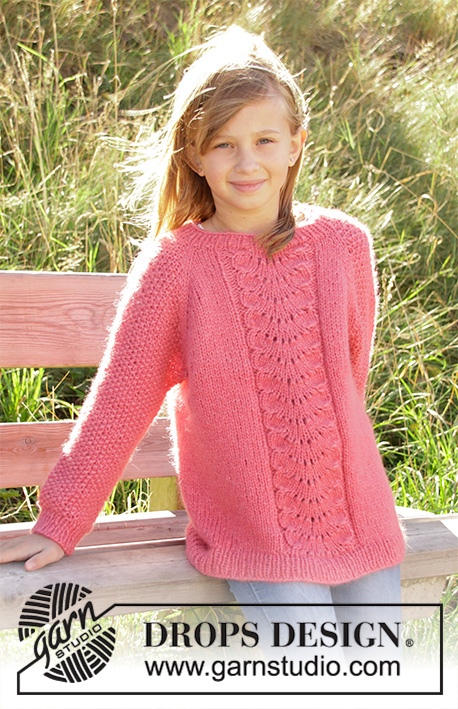
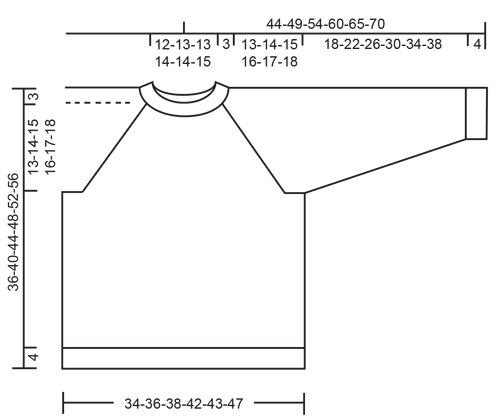
Knitted jumper for children in DROPS Air or DROPS Paris. The piece is worked top down with lace pattern and raglan. Sizes 2-12 years.

DROPS Children 34-4
DROPS Design: Pattern no ai-014-bn
Yarn group C or A + A
-------------------------------------------------------

SIZES:
2 – 3/4 - 5/6 - 7/8 - 9/10 - 11/12 years
Sizes equivalent to approx. height of child in cm:
92 - 98/104 - 110/116 - 122/128 - 134/140 - 146/152 

MATERIALS:
DROPS AIR from Garnstudio (belongs to yarn group C)
150-150-200-200-200-250 g colour 20, rose

Or use:
DROPS PARIS from Garnstudio (belongs to yarn group C)
300-300-400-400-400-500 g colour 01, apricot

KNITTING TENSION:
16 stitches in width and 20 rows in height with stocking stitch = 10 x 10 cm.

NEEDLES:
DROPS DOUBLE POINTED NEEDLES SIZE 5.5 MM.
DROPS CIRCULAR NEEDLE SIZE 5.5 MM: length 40 cm and 60 or 80 cm.
DROPS DOUBLE POINTED NEEDLES SIZE 4.5 MM.
DROPS CIRCULAR NEEDLE SIZE 4.5 MM: length 40 and 60 cm or 80 cm for rib.
Needle size is only a guide. If you have too many stitches on 10 cm, change to a larger needle size. If you have too few stitches on 10 cm, change to a smaller needle size.

-------------------------------------------------------

-------------------------------------------------------

Alternative Yarn – See how to change yarns here
Yarn Groups A to F – Use the same pattern and change the yarn here
Yarn usage using an alternative yarn – Use our yarn converter here

-------------------------------------------------------

DROPS Air
DROPS Air
65% Alpaca, 28% Polyamide, 7% Wool
from 5.70 € /50g
Get the yarn to make this pattern from 17.10€.

The yarn cost is calculated from the pattern’s smallest size and the yarn’s cheapest product type. Looking for an even better price? You might find it on the DROPS Deals!

Pattern instructions

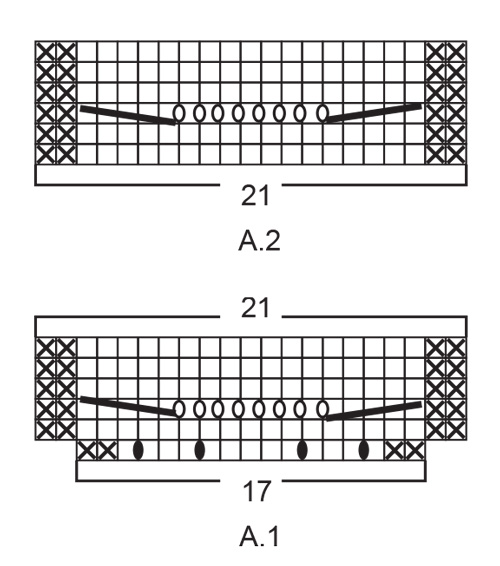
EXPLANATIONS FOR THE PATTERN:

-------------------------------------------------------

PATTERN: 
See diagrams A.1 and A.2. The diagrams show all the rows in the pattern seen from the right side.

INCREASE/DECREASE TIP (evenly spaced):
To work out how to increase/decrease evenly, count the total number of stitches on the needle (e.g. 54 stitches) and divide by the number of increases/decreases to be made (e.g. 6) = 9. 
In this example, increase by making 1 yarn over after each 9th stitch. On the next round work the yarn overs twisted to avoid holes.
When decreasing, knit together each 8th and 9th stitch (in this example).

MOSS STITCH:
ROUND 1: * Knit 1, Purl 1 *, work from *-*.
ROUND 2: Knit over purl and purl over knit. Repeat round 2 onwards.

RAGLAN:
Increase 1 stitch on each side of the 2 knitted stitches in each transition between body and sleeves (= 8 stitches increased on the round). Increase 1 stitch by making 1 yarn over.
On the next round work the yarn overs twisted to avoid holes.
Then work the new stitches in moss stitch on the sleeves and stocking stitch on the front and back pieces.

DECREASE TIP (for sleeves): 
Decrease 1 stitch on each side of the marker thread as follows: Work until there is 1 stitch left before the marker thread, purl 3 together. In this way, 3 stitches become 1 stitch; then move the marker thread to the stitch before this stitch.

-------------------------------------------------------

START THE PIECE HERE:

-------------------------------------------------------

JUMPER - SHORT OVERVIEW OF THE PIECE:
The piece is worked in the round with circular needle, top down. After the yoke the body is continued in the round with circular needle. The sleeves are worked in the round with short circular needle/double pointed needles.

YOKE
Cast on 54-54-58-62-64-68 stitches with circular needle size 4.5 mm and Air or Paris. Knit 1 round. Then work rib in the round (= knit 1 / purl 1) for 3 cm. Knit 1 round where you increase 6-6-6-6-8-16 stitches evenly – read INCREASE/DECREASE TIP = 60-60-64-68-72-84 stitches. Change to circular needle size 5.5 mm.
Insert 1 marker here - THE PIECE IS NOW MEASURED FROM HERE!
Now insert 4 marker threads (without working the stitches) as follows: Insert 1 marker thread at the beginning of the round (= in transition between sleeve and back piece), 1 marker thread after 21-21-23-25-25-31 stitches (= back piece), 1 marker thread after 9-9-9-9-11-11 more stitches (= sleeve), 1 marker thread after 21-21-23-25-25-31 more stitches (= front piece). There are 9-9-9-9-11-11 stitches left to the first marker thread (= sleeve).

The next round is worked as follows: 
The round starts at the first marker thread, in the transition between sleeve and back piece. Knit 1, make 1 yarn over, work 19-19-21-23-23-29 stitches in stocking stitch (= back piece), 1 yarn over, knit 2 (marker thread sits in the middle of these 2 stitches), 1 yarn over, work 7-7-7-7-9-9 stitches in MOSS STITCH – see description above (= sleeve), 1 yarn over, knit 2 (marker thread sits in the middle of these 2 stitches), 1 yarn over, work 1-1-2-3-3-6 stitches in stocking stitch, work A.1 (= 17 stitches = front piece), 1-1-2-3-3-6 stitches in stocking stitch, 1 yarn over, knit 2 (marker thread sits in the middle of these 2 stitches), 1 yarn over, work 7-7-7-7-9-9 stitches in moss stitch (= sleeve), 1 yarn over and knit 1. REMEMBER THE KNITTING TENSION!
The first increase to RAGLAN – read description above, is now finished (= 8 stitches increased on the round). Continue with this pattern and increase to raglan every 2nd round a total of 13-14-15-16-17-17 times (including the first increase described above). NOTE: When A.1 has been completed in height, work A.2 (= 21 stitches) over A.1. Repeat A.2 in height to finished length.
After the last increase to raglan there are 168-176-188-200-212-224 stitches on the needle. Continue with pattern as before, but without increasing, until the piece measures 13-14-15-16-17-18 cm from the marker at the beginning of the yoke.
The next round is worked in pattern and stocking stitch as before, but start the round 1 stitch earlier (before the 2 stitches in stocking stitch between sleeve and back piece). Work stocking stitch over 49-51-55-59-61-67 stitches (= back piece), place the next 33-35-37-39-43-43 stitches on a thread (= sleeve), cast on 4-4-4-6-6-6 new stitches on the needle (= in side under sleeve), continue with stocking stitch and pattern over the next 53-55-59-63-65-71 stitches (= front piece), place the next 33-35-37-39-43-43 stitches on a thread (= the other sleeve), cast on 4-4-4-6-6-6 new stitches on the needle (= in side under sleeve). Body and sleeves are finished separately. THE PIECE IS NOW MEASURED FROM HERE!

BODY:
There are now 110-114-122-134-138-150 stitches on the needle. Continue with stocking stitch and pattern A.2 in the round as before. When the piece measures 16-19-22-25-28-31 cm from the division knit 1 round where you increase 10-12-14-16-18-20 stitches evenly on round = 120-126-136-150-156-170 stitches.
Change to circular needle size 4.5 mm and work rib (= knit 1 / purl 1) for 4 cm. Loosely cast off with knit over knit and purl over purl – to avoid the cast-off edge being tight, you can cast off with a needle size 5.5 mm. Cut and fasten the strand.

SLEEVE:
Place the stitches from the thread on one side of the piece onto short circular needle/double pointed needle size 5.5 mm (= 33-35-37-39-43-43 stitches). Knit up 1 stitch in each of the 4-4-4-6-6-6 stitches cast on under the sleeve = 37-39-41-45-49-49 stitches.
Insert 1 marker thread in the middle of these 4-4-4-6-6-6 stitches and start the round here. Work moss stitch. When the piece measures 2 cm from the division decrease 2 stitches mid under sleeve – read DECREASE TIP. Decrease like this every 2½-3-3½-4-4½-5½ cm a total of 6-6-7-7-7-7 times = 25-27-27-31-35-35 stitches. Continue working until the sleeve measures 18-22-26-30-34-38 cm from the division. Knit 1 round where you increase 3-3-3-3-3-3 stitches in all sizes = 28-30-30-34-38-38 stitches. Change to double pointed needles size 4.5 mm and work rib (knit 1 / purl 1) for 4 cm. Loosely cast off with knit over knit and purl over purl – to avoid the cast-off edge being tight, you can cast off with a needle size 5.5 mm. Cut and fasten the strand.

Work the other sleeve in the same way. 

This pattern has been corrected.

Updated online: 23.10.2020
Correction:
SLEEVE:
... Knit 1 round where you increase 3-3-3-3-3-3 stitches in all sizes = 28-30-30-34-38-38 stitches...

Diagram

symbols = knit
symbols = purl
symbols = between 2 stitches make 1 yarn over; on the next round knit the yarn over twisted to avoid a hole.
symbols = between 2 stitches make 1 yarn over; on the next round knit the yarn over to leave a hole.
symbols = KNIT 5 STITCHES TOGETHER AS FOLLOWS: Knit 5, pass them back to the left needle, pass the next outermost stitch over the outermost stitch so that it lies around this stitch, repeat until all 4 stitches have been passed over (= 4 stitches decreased), move the last knitted stitch back onto the right needle.
symbols = KNIT 5 STITCHES TWISTED TOGETHER AS FOLLOWS: Knit 5, pass the next to last stitch over the last stitch so that it lies around this stitch, repeat until all 4 stitches have been passed over (= 4 stitches decreased).
diagram
diagram

Each of our patterns has specific tutorial videos to help you.

Do you have a question? See a list of frequently asked questions (FAQ)

Knitting tension is what determines the final measurements of your work, and is usually measured per 10 x 10 cm. It is provided like so: number of stitches in width x number of rows in height - eg: 19 stitches x 26 rows = 10 x 10 cm.

The knitting tension is very individual; some people knit/crochet loosely while others work tightly. You adjust the knitting tension with the needle size, which is why the suggested needle size is only meant as a guide! You need to adjust this (up or down) to ensure that YOUR knitting tension matches the knitting tension provided in the pattern. If you work with a different knitting tension than provided you will have a different yarn consumption, and your work will have different measurements than what the pattern suggests.

The knitting tension also determines which yarns can replace each other. As long as you achieve the same knitting tension you can replace one yarn with another.

See DROPS lesson: How to measure your tension/gauge

See DROPS video: How to make a gauge tension swatch

The required amount of yarn is provided in grams, eg: 450 g. To calculate how many balls you’ll need you first need to know how many grams are in 1 ball (25g, 50g or 100g). This information is available if you click on the individual yarn quality on our pages. Divide the amount required with the amount of each ball. For example, if each ball is 50g (the most common amount), the calculation will be as follows: 450 / 50 = 9 balls.

The important thing when changing from one yarn to another is that the knitting/crochet tension remains the same. This is so that the measurements of the finished piece will be the same as on the sketch provided. It is easier to achieve the same knitting tension using yarns from the same yarn group. It is also possible to work with multiple strands of a thinner yarn to achieve the knitting tension of a thicker one. Please try our yarn converter. We recommend you to always work a test swatch.

Please NOTE: when changing yarn the garment might have a different look and feel to the garment in the photo, due to individual properties and qualities of each yarn.

See DROPS lesson: Can I use a different yarn than the one mentioned in the pattern?

All our yarns are categorised into yarn groups (from A to F) according to thickness and knitting tension – group A contains the thinnest yarns and group F the thickest. This makes it easier for you to find alternative yarns to our patterns, should you wish to switch yarn. All yarns within the same group have a similar knitting tension and can easily replace each other. However, different yarn qualities have different structures and properties which will give the finished work a unique look and feel.

Click here for an overview of the yarns in each yarn group

At the top of all our patterns you’ll find a link to our yarn calculator, which is a helpful tool should you wish to use a different yarn than suggested. By filling in the yarn quality you wish to replace, the amount (in your size) and number of strands, the calculator will present good alternative yarns with the same knitting tension. Additionally it will tell you how much you’ll require in the new qualities and whether you’ll need to work with multiple strands. Most skeins are 50g (some are 25g or 100g).

If the pattern is worked with multiple colours, every colour will have to be calculated separately. Similarly, if the pattern is worked with several strands of different yarns (for example 1 strand Alpaca and 1 strand Kid-Silk) you will have to find alternatives for each, individually.

Click here to see our yarn calculator

Since different yarns have different qualities and textures we have chosen to keep the original yarn in our patterns. However, you can easily find options among our available qualities by using our yarn calculator, or simply pick a yarn from the same yarn group.

It is possible that some retailers still have discontinued yarns in stock, or that someone has a few skeins at home that they would like to find patterns for.

The yarn calculator will provide both alternative yarn as well as required amount in the new quality.

If you think it's hard to decide what size to make, it can be a good idea to measure a garment you own already and like the size of. Then you can pick the size by comparing those measures with the ones available in the pattern's size chart.

You'll find the size chart at the bottom of the pattern.

See DROPS lesson: How to read size chart

The needle size provided in the pattern serves only as a guide, the important thing is to follow the knitting tension. And since knitting tension is very individual, you will have to adjust the needle size to ensure that YOUR tension is the same as in the pattern – maybe you’ll have to adjust 1, or even 2 needle sizes, up or down to achieve the correct tension. For this, we recommend that you work test swatches.

Should you work with a different knitting tension than the one provided, the measurements of the finished garment might deviate from the measurement sketch.

See DROPS lesson: How to measure your tension/gauge

See DROPS video: How to make a tension/gauge swatch

Working a garment top-down provides more flexibility and room for personal adjustment. For example it is easier to try the garment on while working, as well as making adjustments to length of yoke and shoulder caps.

The instructions are carefully explaining every step, in the correct order. Diagrams are adjusted to the knitting direction and are worked as usual.

The diagram depicts all rows/rounds, and every stitch seen from the right side. It is read from bottom to top, from right to left. 1 square = 1 stitch.

When working back and forth, every other row is worked from the right side and every other row is worked from the wrong side. When working from the wrong side, the diagram will have to be worked reversed: from left to right, knit stitches are purled, purl stitches are knit etc.

When working in the round every round is worked from the right side and the diagram are worked from right to left on all rounds.

See DROPS lesson: How to read knitting diagrams

The diagram depicts all rows/rounds, and every stitch seen from the right side. It is worked from bottom to top, from right to left.

When working back and forth every other row is worked from the right side: from right to left and every other row is worked from the wrong side: from left to right.

When working in the round, every row in the diagram are worked from the right side, from right to left.

When working a circular diagram you start in the middle and work your way outwards, counter clockwise, row by row.

The rows usually start with a given number of chain stitches (equivalent to the height of the following stitch), this will either be depicted in the diagram or explained in the pattern.

See DROPS lesson: How to read crochet diagrams

Instructions for working several diagrams after each other on the same row/round, will often be written like so: “work A.1, A.2, A.3 a total of 0-0-2-3-4 times". This means you work A.1 once, then A.2 is worked once, and A.3 is repeated (in width) the number of times provided for your size – in this case like so: S = 0 times, M = 0 times, L=2 times, XL= 3 times and XXL = 4 times.

The diagrams are worked as usual: begin with the first row in A.1, then work the first row in A.2 etc.

See DROPS lesson: How to read knitting diagrams

See DROPS lesson: How to read crochet diagrams

The total width of the garment (from wrist-to-wrist) will be larger in the larger sizes, despite the actual sleeves being shorter. The larger sizes have longer sleeve caps and wider shoulders, so there will be a good fit in all sizes.

The measurement sketch/schematic drawing provides information regarding the full length of the garment. If it’s a jumper or a jacket the length is measured from the highest point on the shoulder closest to the neckline, and straight down to the bottom of the garment. It is NOT measured from the tip of shoulder. Similarly, the length of yoke is measured from the highest point on the shoulder and down to where yoke is split into body and sleeves.

On a jacket measures are never taken along bands, unless specifically stated. Always measure inside band stitches when measuring the length.

See DROPS lesson: How to read a schematic drawing

Diagrams are often repeated on the round or in height. 1 repeat is the diagram the way it appears in the pattern. If it says to work 5 repeats of A.1 in the round, then you work A.1 a total of 5 times after/next to each other in the round. If it says to work 2 repeats of A.1 vertically/in height you work the entire diagram once, then begin again at the start and work the entire diagram one more time.

Chain stitches are slightly narrower than other stitches and to avoid working the cast-on edge too tight, we simply chain more stitches to begin with. The stitch count will be adjusted on the following row to fit the pattern and measurement sketch.

The rib edge is more elastic and will contract slightly compared to, for example, stocking stitch. By increasing before the rib edge, you avoid a visible difference in width between the rib edge and the rest of the body.

It’s very easy to cast off too tightly, and by making yarn overs while casting off (and simultaneously casting these off) you avoid a too tight cast off edge.

See DROPS video: How to bind off with yarn overs (yo)

To achieve an even increase (or decrease) you can increase on, for example: every 3rd and 4th row alternately, like so: work 2 rows and increase on the 3rd row, work 3 rows and increase on the 4th. Repeat this until the increase is complete.

See DROPS lesson: Increase or decrease 1 st on every 3rd and 4th row alternately

Should you prefer to work in the round instead of back and forth, you may of course adjust the pattern. You’ll need to add steeks mid-front (usually 5 stitches), and follow the instructions. When you would normally turn and work from the wrong side, simply work across the steek and continue in the round. At the end you’ll cut the piece open, pick up stitches to work bands, and cover the cut edges.

See DROPS video: How to knit steeks and cut open

Should you prefer to work back and forth instead of in the round, you may of course adjust the pattern so you work the pieces separately and then assemble them at the end. Divide the stitches for the body in 2, add 1 edge stitch in each side (for sewing) and work the front and back pieces separately.

See DROPS lesson: Can I adapt a pattern for circular needles into straight needles?

Pattern repeats can vary slightly in the different sizes, in order to get the correct proportions. If you’re not working the exact same size as the garment in the photo, yours might deviate slightly. This has been carefully developed and adjusted so that the complete impression of the garment is the same in all sizes.

Make sure to follow instructions and diagrams for your size!

If you have found a pattern you like which is available in women’s size it’s not very difficult to convert it to men’s size. The biggest difference will be the length of sleeves and body. Start working on the women size that you think would fit across the chest. The additional length will be worked right before you cast off for the armhole/sleeve cap. If the pattern is worked top-down you can add the length right after the armhole or before the first decrease on sleeve.

Regarding additional yarn amount, this will depend on how much length you add, but it is better with a skein too many than too few.

All yarns will have excess fibres (from production) that might come off as lint or shedding. Brushed yarns (ie hairier yarns) have more of these loose, excess fibres, causing more shedding.

Shedding also depends on what is worn under or over the garment, and whether this pulls at the yarn fibres. It’s therefore not possible to guarantee that there will be no shedding

Below are some tips on how to get the best result when working with hairier yarns:

1. When the garment is finished (before you wash it) shake it vigorously so the looser hairs come off. NOTE: do NOT use a lint roller, brush or any method that pulls at the yarn.

2. Place the garment in a plastic bag and put it in your freezer - the temperature will cause the fibres to become less attached to each other, and excess fibres will come off easier.

3. Leave in the freezer for a few hours before taking it out and shaking it again.

4. Wash the garment according to the instructions on the yarn label.

Pilling is a natural process that happens to even the most exclusive of fibers. It's a natural sign of wear and tear that is hard to avoid, and that is most visible in high friction areas of your garment like a sweater's arms and cuffs.

You can make your garment look as new by removing the pilling, using a fabric comb or a pill/lint remover.

Still can't find the answer you need? Then scroll down and leave your question so one of our experts can try to help you. This will be done normally within 5 to 10 working days.
In the meantime, you can read the questions and answers that others have left to this pattern or join the DROPS Workshop on Facebook to get help from fellow knitters/crocheters!

You might also like...

Clover

Emma Hassan, France

Clover

Anne, France

Minnas Clover

Tina, Germany

Clover

Seija, Finland

Clover

Salleriini, Finland

s34-4 Clover

Karen, Denmark

Clover bringebær

Katrine, Norway

Clover

Sofia, Finland

Post a comment to pattern DROPS Children 34-4

We would love to hear what you have to say about this pattern!

If you want to leave a question, please make sure you select the correct category in the form below, to speed up the answering process. Required fields are marked *.

Comments / Questions (58)

country flag Hege Berg wrote:

Hei. Jeg er på første omg etter vrangbordenbi halsen. Har strikket 3 cm, så økt til 64 masker. Strikker str 5/6 år. På første omgang med mønster på forstykket får jeg ikke til å gå opp, jeg har 23 masker, må da strikke først 1 m rett, 1 kast, 3 rett, 17 mønster, 2 rett kast og 1 rett før neste merke til arm. 1+3+17+2+1= 24. For det står jo at det skal være 2 rett med merke midt i mellom... Er det noe jeg har misforstått eller er det feil en plass?

03.03.2022 - 04:40

DROPS Design answered:

Hei Hege. Ja, du har 23 masker på forstykket, men i oppskriften er det forklart hvordan du strikker forstykket inkl raglanøkningene. Der det står "Lag 1 kast om pinnen, 2 masker rett (merketråden sitter mellom disse 2 maskene)", så "tilhører" kastet og 1 maske rett raglanlinjen, slik at når du skal strikke forstykket er det: 1 maske etter 3. merke, 1 kast, 2 rett, lag 1 kast strikk A.1 (= 17 masker = forstykke), strikk 2 masker glattstrikk, lag 1 kast om pinnen, strikk 1 (før 4. merke) = 23 masker + 2 kast (raglanøkninger). mvh DROPS Design

07.03.2022 - 13:34

country flag Robinet wrote:

Bonjour Pour les manches (point de riz), suite à chaque l’augmentation de raglan, je dois augmenter aussi les mailles pour le point de riz (il ne reste pas toujours à 7 mailles (7-8ans) comme annoncé au 1er rang? Merci

27.01.2022 - 07:38

DROPS Design answered:

Bonjour Mme Robinet, lorsque l'on augmente pour le raglan, on augmente 2 mailles sur chaque pièce: 2 sur le devant, 2 sur le dos (= on les tricote en jersey), et 2 sur chacune des manches; les augmentations des manches vont se tricoter au point de riz autrement dit, le nombre de mailles tricotées au point de riz pour les manches va augmenter de 2 mailles tous les 2 tours/tours d'augmentations. Bon tricot!

27.01.2022 - 08:58

country flag AMANDA BONECHI wrote:

Buon giorno ho comprato lana per fare questo maglione. Non capisco cosa vuole dire questa scritta nel testo dello sotto lo spron e"iniziare il giro 1 maglia prima (prima delle 2 maglie a maglia rasata tra le maniche e il dietro). Lavorare a maglia rasata su 49-51-55-59-61-67 maglie (= dietro), mettere le 33-35-37-39" . Non ho chiaro cosa dobbiamo fare. Ho già acquistata tramite voi lana e ferri.

08.11.2021 - 11:57

DROPS Design answered:

Buonasera Amanda, in quel punto deve iniziare il lavoro 1 maglia prima e lavorare la separazione delle maniche dal corpo come indicato. Buon lavoro!

10.11.2021 - 23:23

country flag Marita wrote:

I mönster skal det strikkes "5 masker vridd rett sammen" slik: strikk 5 masker rett, löft den nest siste ...osv.. Skal disse 5 maskene strikkes rett eller skal de strikkes vridd rett?

14.10.2021 - 13:21

DROPS Design answered:

Hej Marita. De ska stickas rett. I denna video kan du se hur du ska göra. Mvh DROPS Design

15.10.2021 - 07:48

country flag Anne wrote:

Bonjour, pour les diminutions de manches, je ne comprends pas pourquoi la fréquence de diminutions est indiquée en nombre de mailles. Ce ne serait pas plutôt en nombre de rangs? Merci.

11.10.2021 - 16:21

DROPS Design answered:

Bonjour Anne, la fréquence des diminutions sous la manche est bien indiquée en cm, en fonction de la taille vous diminuerez 6 ou 7 fois tous les 2½-3-3½-4-4½-5½ cm - ajustez votre nombre de rangs en fonction de la hauteur indiquée pour la taille tricotée. Bon tricot!

12.10.2021 - 08:25

country flag Anne wrote:

Bonjour Ma question porte sur le motif. Pour faire une maille endroit torse, je pique dans le brin arrière de la maille. Mais sur votre vidéo, je ne vois aucune différence entre maille endroit torse et maille endroit normale. ?? Avec ma méthode, qui ne doit pas être bonne, un trou important se forme à l’emplacement des 5 mailles endroit torses. Et à l’emplacement des 5 m.endroit, la maille qui contient les 4 m. diminuées est trop voyante! Que se passe t il ?

06.10.2021 - 20:45

DROPS Design answered:

Bonjour Anne, pour les 5 m ens à l'end tricotez ces 5 m et remettez-les sur l'aiguille gauche, passez la dernière des m tricotées par-dessus les 4 autres et ainsi de suite jusqu'à ce qu'il n'en reste qu'une = la 1ère des 5 m tricotées; pour les 5 m ens torse à l'end, tricotez 5 m et laissez-les sur l'aiguille droite, passez la 1ère de ces 5m par-dessus les 4 autres et ainsi de suite jusqu'à ce qu'il n'en reste qu'1= la dernière de ces 5 m. Serrez le fil si besoin pour éviter que le trou ne soit trop grand. Bon tricot!

07.10.2021 - 08:27

country flag Astrid wrote:

Hej! Jag stickar DROPS CHILDREN / 34 / 4. I beskrivningen ser det ut som att man ska ha ett ojämnt antal maskor för varje ärm (37-39-41-45-49-49). Såg att en annan (danska) frågat om detta tidigare men då svarade ni att man ska ta bort en maska. Är inte det ett fel i beskrivningen? För mosstickning måste det väl vara jämnt antal för att inte bli fult under ärmen?

20.09.2021 - 10:24

DROPS Design answered:

Hej Astrid. Den danska frågan gällde resåren och där har det nu kommit en rättelse. Gällande mosstickning så ska det vara ett ojämnt antal maskor, sista maskan på varet blir då rät och då blir första maskan på varv 2 avig och hamnar då över den räta maskan på varv 1. Mvh DROPS Design

22.09.2021 - 09:58

country flag Christina Christensen wrote:

Jeg har lavet strikkeprøve i Air (pinde 5,5) og vasket denne. Det giver 17,5 masker i bredden og 26 pinde i højden i glatstrik. Før vask var tallene 16 gange 26. Det virker noget skævt i forhold til opskriftens 16 masker gange 20 pinde og bliver vel næppe løst ved at gå op i pinde 6?

10.09.2021 - 18:19

DROPS Design answered:

Hei Christina. Ville ha strikket med med pinne 5,5 som er opplyst i oppskriften og ville ha prøvd å strikket en nye strikkeprøve der du får riktig pinne i høyden. Når du vasker, la den tørke i fasong/den strikkefastheten som er oppgitt. mvh DROPS design

20.09.2021 - 11:33

country flag Monika wrote:

Jag försökte lägga upp 64 maskor på rundsticka men det fungerar inte då maskantalet är för litet för 40 cm rundsticka ska halsringmungen verkligen vara så liten? Har visserligen ett annat garn, ett acrylgarn "we love yarn" men verkar ju vara samma tjocklek? Mvh Minika

16.08.2021 - 12:15

DROPS Design answered:

Hei Monika. Om du ser på målskissen nederst på oppskriften ser du målene på halsen. Om du strikker med DROPS LOVE YOU #8 er dette 100 Bomull, ikke akryl, og det garnet kan du erstatte DROPS Air med. Om det er et garn som ikke er fra oss, kan jeg ikke utale meg om den er like tykk som DROPS Air eller DROPS LOVE YOU #8 og kan brukes på denne oppskriften. mvh DROPS design

16.08.2021 - 14:48

country flag Dagny Rasmussen wrote:

Er de meget små i størrelser, synes at str 7-8år har en meget lille åbning også selv om det hele stemmer

22.07.2021 - 13:16

DROPS Design answered:

Hej Dagny, Nej, men du kan se målene til de forskellige størrelser i måleskitsen nederst i opskriften :)

04.08.2021 - 08:46