
Popular categories
Looking for a yarn?


Comments / Questions (141)
![]() Brigitte wrote:
Brigitte wrote:
C’est la seconde fois que je réalise ce gilet, une fois en 2ans puis en 3/4ans.Il a toujours autant de succès. J’ai seulement simplifié le col en le remplaçant par 8 rangs de point mousse : tout aussi joli et plus facile à mettre sous un blouson d’hiver. Dommage qu’il n’y ait pas les explications pour de plus grandes tailles....
15.01.2019 - 14:53Davina wrote:
Its OK I've worked out my error, off to undo my work :(
03.12.2018 - 12:59Davina wrote:
Hi on size 6/12 as you join all pieces together it says you have 222 stiches and to reduce this to 218. Stitch count of 35-56-60-56-35 = 242 What should i reduce my stitch count to to start the yoke? Thanks
03.12.2018 - 12:21DROPS Design answered:
Dear Davina, you should have 35 sts for front piece + 46 stitches for sleeve + 60 sts for back piece + 46 stitches for sleeve + 35 sts for front piece = 35+ 46 + 60 + 46 + 35 = 222 stitches. Happy knitting!
03.12.2018 - 13:35
![]() Sue wrote:
Sue wrote:
I’m sorry I’m not sure I understand, I have just finished the rib and have the knitting on a circular needle in two halves. Do I knit 12 stitches and turn and knit back and do I also knit in garter stitch
25.09.2018 - 20:04DROPS Design answered:
Dear Sue, the short rows for the elevation are worked following diagram M.2, (= stocking stitch with eyelet pattern = K from RS and P from WS). Work the short rows as explained: K12 from mid back from RS, turn and P 24 sts from WS, turn and work 12 sts more from RS, turn and work 12 sts more from WS and so on until you have worked the number of rows, then work to mid back again and continue in the round as explained. See here how to knit an elevation. Happy knitting!
26.09.2018 - 07:46
![]() Sue wrote:
Sue wrote:
Hi, I’m knitting the trousers and at the beginning I’m not sure I understand the pattern where you knit 12 stitches and turn and to also knit in the m1 pattern at the same time, are they also knit and purl rows, I’m knitting on a circulator needle
24.09.2018 - 22:32DROPS Design answered:
Dear Sue, those rows will be short rows, knitted back and forth, to raise the waistline at the back. For this you should knit the pattern for RS, and WS rows. When finished the short rows, continue on the round. Happy Knitting!
24.09.2018 - 22:50
![]() Sue wrote:
Sue wrote:
Thanks so much for your help with this pattern 😃
20.09.2018 - 10:53
![]() Sue wrote:
Sue wrote:
Hi, sorry to ask yet another question but I’m now on Row 20 on the yoke M3, is the pattern as follows k2tog k1 yo s1 k2 tog psso yo k3 yo s1 k2tog psso yo k2 that makes the pattern repeat 13 stitches though and not 14, hope you can help
19.09.2018 - 22:11DROPS Design answered:
Dear Sue, yes that's correct, on row 20 you are decreasing 1 stitch in each repeat in M.3 = 13 sts in each repeat. Then on row 22 you will decrease with K2 tog at the end of each repeat = 12 sts in M.3. Happy knitting!
20.09.2018 - 09:25
![]() Sue wrote:
Sue wrote:
Sorry I see what you mean now, Thankyou for your help. 😃
19.09.2018 - 11:34
![]() Sue wrote:
Sue wrote:
On the 2nd k2tog you say psso but I haven’t got a slip st to psso with not sure I know what you mean sorry
19.09.2018 - 11:14DROPS Design answered:
oops my mistake, in the middle of repeat you work YO, slip 1, k2 tog, psso, YO (= still 3 sts) = 14 sts in total.
19.09.2018 - 12:48
![]() Sue wrote:
Sue wrote:
Hi Thanks for your help, I’m still struggling with the pattern, on Row 18 the repeat pattern consists of 15 stitches unless I am reading the pattern wrong. ( K1 K2tog yo K3 yo s1 k1 psso k2tog yo k3 yo s1 k1 psso) is this correct?
18.09.2018 - 21:16DROPS Design answered:
Dear Sue, on row 18 work: K1, K2 tog, YO, K3, YO, slip 1, K2 tog, psso, YO, K3, YO, slip 1, K1, psso = 14 sts. Happy knitting!
19.09.2018 - 09:55
|
|||||||||||||||||||
Snow Baby#snowbabyset |
|||||||||||||||||||
 |
 |
||||||||||||||||||
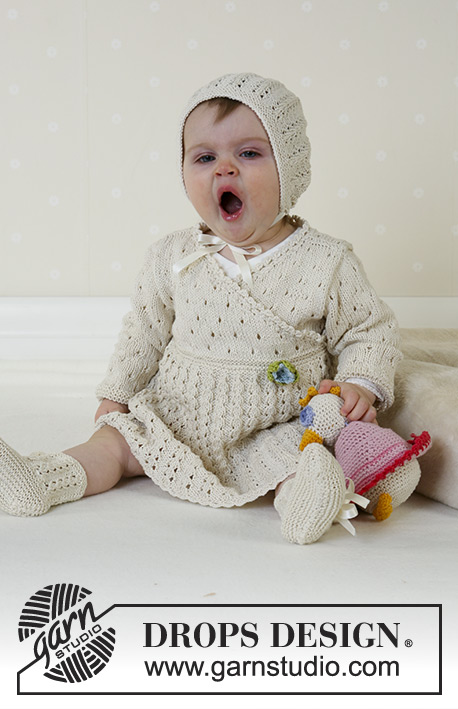
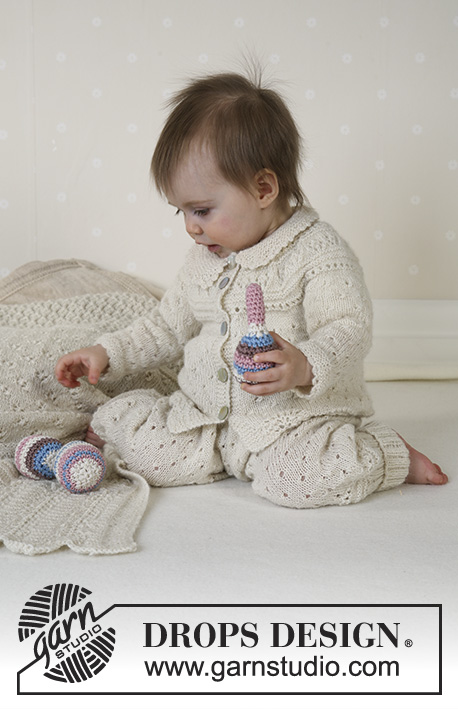
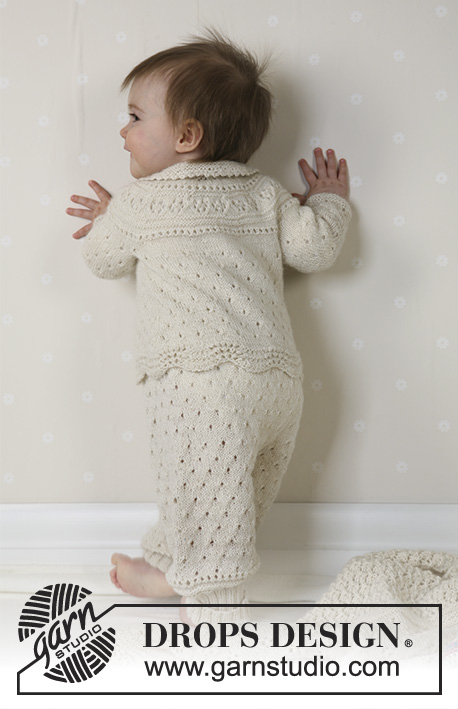
DROPS Jacket, trousers, bonnet, socks, blanket, ball and rattle in Alpaca
DROPS Baby 13-18 |
|||||||||||||||||||
|
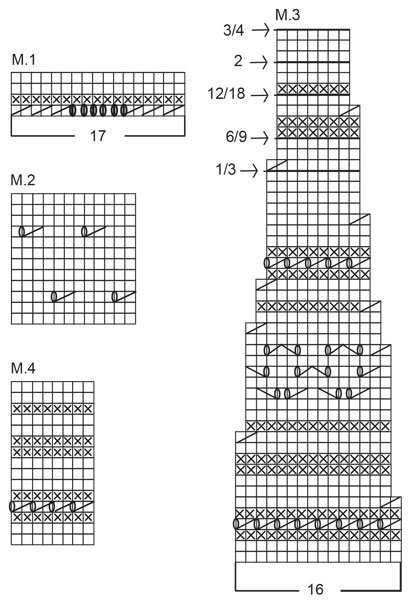
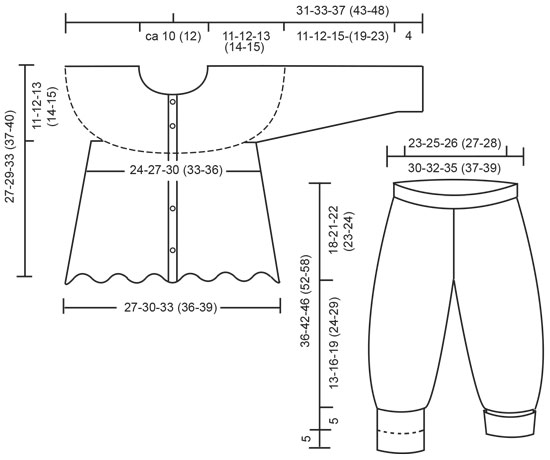
Knitting tension: 26 sts x 34 rows on needle size 2.5mm in stocking sts = 10 x 10 cm JACKET: Garter sts, back and forth on needle: Knit all rows Garter sts, on circular needle: knit 1 round, purl 1 round Pattern: See diagrams M.1 to M.3. The diagram shows the pattern from the right side. Button hole: Make button holes on right front band from the right side as follows: cast off 3rd and 4th st from the edge and cast on 2 new sts on next row. Make buttonholes as follows: Size 1/3 months: 4, 10, 16, 22 and 26 cm Size 6/9 months: 5, 11, 17, 23 and 28 cm Size 12/18 months: 6, 13, 20, 27 and 32 cm Size 2 years: 9, 16, 23, 30 and 36 cm Size 3/4 years: 9, 17, 25, 33 and 39 cm Decreasing tips 1(applies to collar on jacket): All decreases are done at the beg of every row. Dec 1 st as follows at beginning of row: slip 1 st as if to knit, K1, psso Increasing tips (applies to collar on jacket): Inc 1 st by picking up the thread between 2 sts from previous row and knit this into back of st. Front and back piece: Knit the jacket back and forth on circular needle from mid front. Using both ends of the circular needle size 2.5mm (to make sure the edge becomes elastic) cast on 163-180-197 (214-231) sts (incl 5 edge sts each side towards mid front) with Alpaca. Remove 1 needle and knit 2 rows garter sts. Now knit 3 repeats of M.1 with 5 edge sts each side in garter sts. After M.1 knit 2 rows stocking sts (continue in garter sts over the 5 edge sts until finished measurements), at the same time adjusting number of sts evenly on 1st row to 148-166-184 (196-214) (do not dec over the 5 edge sts each side). Insert a marking thread 39-44-49 (51-56) sts in from each side = 70-78-86 (94-102) sts between marking threads on back piece. Now knit M.2 with 5 edge sts each side. At the same time, when piece measures 5 cm dec 1 st each side of both marking threads on every 3-3-4 (4-5) cm a total of 4 times = 132-150-168 (180-198) sts – knit sts not fitting into pattern in stocking sts. Remember buttonholes on right front edge – see explanation above. When piece measures approx 16-17-20 (23-25) cm – adjust after 2 or 3 rows in stocking sts after a row with pattern in diagram – cast off 10 sts each side for armhole (i.e. 5 sts each side of marking threads) = 52-60-68 (76-84) sts on back piece and 30-35-40 (42-47) sts on each front piece. Put piece aside and knit the sleeves. Sleeve: Knit round on double pointed needles size 2.5mm. Cast on 36-36-42 (42-42) sts with Alpaca. Knit 8 rounds garter sts and continue in M.2. At the same time, when sleeve measures 4 cm inc 2 sts mid under arm a total of 8-10-10 (13-15) times on every 4-4-5 (5-5) round = 52-56-62 (68-72) sts – incorporate the new sts in pattern as you go along. When sleeve measures 15-16-19 (23-27) cm - adjust as for back and front pieces – cast off 10 sts mid under arm = 42-46-52 (58-62) sts. Put the piece aside and knit the other sleeve. Yoke: Put sleeves in on the same needle as back and front pieces where you cast off for armholes = 196-222-252 (276-302) sts. Purl 1 row from the wrong side. Knit 1 row from the right side, at the same time adjusting number of sts evenly on row to 186-218-250 (266-298) (do not dec over the 5 edge sts each side). Now knit and dec following M.3 (continue over the 5 edge sts as before) – finish pattern in diagram at the arrow for appropriate size. After M.3 there are 109-114-115 (122-136) sts left. Knit 1 row from the right side, at the same time adjusting number of sts to 72-76-82 (86-92). Collar: Cast off the outermost 3 sts each side = 66-70-76 (80-86) sts. Continue in garter sts, at the same time inc 1 st each side – see Increasing tips – on the 3rd row. Inc between the first 2 and the last 2 sts on every other row a total of 3 times. At the same time, when collar measures 2 cm, insert 3 marking threads in piece, 1 by each shoulder and 1 mid back. Now inc 1 st on each side of all marking threads – see Increasing tips. Repeat the inc after 4 rows = 84-88-94 (98-104) sts. When collar measures 5 cm dec each side on every row – see Decreasing tips: 1 st 3 times = 78-82-88 (92-98) sts. Loosely cast off remaining sts. Assembly: Sew the openings under the arms. Sew on buttons. Crochet border: Using crochet hook size 2.5 crochet round the collar as follows: 1 dc in 1st st, *3 ch, 1 tr in the 1st ch, skip 2 sts, 1 dc in next st*, repeat from *-* Crochet round sleeve edges as follows: 1 dc in 1st st, *5 ch, skip 2 sts, 1 dc in next st*, repeat from *-*. _________________________________________ TROUSERS: Rib: *K2, P2*, repeat from *-* Pattern: see diagrams M.2 and M.4. Decreasing tips (applies to inner side of leg: Dec as follows 1 st after the marking thread: K2 tog Decrease as follows 1 st before marking thread: K2 tog into back of st. Start at the top and knit downwards. Cast on 120-128-136 (140-144) sts with circular needle size 2.5mm. Knit 4 cm Rib. Continue in stocking sts, at the same time inc evenly on round to 156-168-180 (192-204) sts. Insert a marking thread at the beginning of round = mid back and after 78-84-90 (96-102) sts = mid front. Knit M.2, at the same time, knitting elevation at the back as follows: knit 12 sts, turn the piece (to avoid a hole slip the first st as if to knit and tighten thread when knitting back), knit 24 sts, turn the piece. Continue like this by knitting 12 sts more before each turn another 8-10-10 (12-12) times. Now knit round over all sts. When piece measures 15-18-19 (20-21) cm (measured from mid front) inc 1 st on each side of the middle 2 sts mid front and mid back on every other row a total of 5 times (inc by picking up st from previous row and knit this) = 176-188-200 (212-224) sts. After the last inc the piece measures approx 18-21-22 (23-24) cm mid front. Knit next round as follows from mid back: Cast off 3 sts, knit 82-88-94 (100-106) sts, cast off 6 sts, 82-88-94 (100-106) sts, cast off 3 sts. Now finish each leg separately. Legs: Put sts from one leg on a thread and sts from the other leg on double pointed needles size 2.5mm = 82-88-94 (100-106) sts. Knit round (continue pattern as before) and insert a marking thread at beginning of round = inner side of leg. When leg measures 2 cm dec 1 st on both sides of marking thread – see Decreasing tips – on every 2-2-2.5 (2.5-3) cm a total of 4-5-6 (7-8) times = 74-78-82 (86-90) sts. When leg measures 10-13-16 (21-26) cm knit M.4 – start at the bottom of diagram. After M.4 knit 1 round, at the same time dec evenly to 60-64-68 (72-76) sts. Knit 10 cm Rib and cast off loosely. Knit the other leg in the same way. Assembly: Sew opening between legs. Fold the rib at bottom of legs. _________________________________________ BONNET: Size: 1/3 – 6/9 months –12/18 months To fit head circumference: 40/42 – 42/44 – 44/46 cm Garter sts: knit all rows Pattern: see diagrams M.2 and M.3. Knit back and forth on circular needle. Cast on 82-88-100 sts on needle size 2.5mm. Knit garter sts, at the same time making a hole each side on every 6th row by casting off the 3rd st from edge and making a yo over the cast off st. Read all of the following section before knitting it! When piece measures 6 cm knit M.2 with 5 sts in garter sts each side (continue holes on every 6th row as before) until piece measures 14-15-16 cm. Adjust after 2 rows stocking sts after 1 pattern row. At the same time, on the last row from the wrong side, cast off the 5 outermost sts each side and adjust number of sts to 70-80-90. Insert 5 marking threads in piece as follows: 1st after 1 st, and thereafter 14-16-18 sts between each (= 13-15-17 sts after the last marking thread). Knit garter sts, at the same time dec 1 st after each marking thread on every other row a total of 12-14-16 times = 10 sts left. Cut the thread, pull through remaining sts and attach. Assembly: Sew seam mid back. Crochet a border along the cast-on row with Alpaca and crochet hook size 2.5 as follows: 1 dc in 1st st, *5 ch, skip 2 sts, 1 dc in next st*, repeat from *-*. Crochet along garter sts at back of bonnet in the same way. Fold the front edge double against the right side and attach with a couple of neat sts to lower edge. Pull silk ribbon through the row of holes. _________________________________________ SOCKS: Size: 1/3 – 6/9 – 12/18 months To fit foot length: 10-11-12 cm Rib: *K2, P2*, repeat from *-* Pattern: See diagram M.1. The diagram shows the pattern from the right side. Garter sts: Knit all rows. The sock is knitted back and forth from mid back. Cast on 68-68-68 using 2 needles size 2.5mm. Remove 1 needle knit 2 rows garter sts. Now knit 5-6-7 repeats of M.1 – piece measures approx 5-6-7 cm. Knit 1 row from the right side, at the same time adjusting number of sts to 34-38-42. Knit 1 row from the wrong side and knit next row as follows from the right side: K1, *K2 tog, yo*, repeat from *-* and finish with K1. Knit 1 row from wrong side. Now put the outermost 12-13-15 sts each side on a thread. = 10-12-12 sts left. Knit 4-4.5-5 cm garter sts over these sts. Put sts from thread back on needle and pick up 10-11-13 sts on each side of middle piece = 54-60-68 sts. Knit 3-4-5 cm garter sts over all sts, at the same time after 1.5-2-2.5 dec on every other row until finished measurements as follows: Dec 1 st at the beginning and at the end of row and K2 tog on each side of the 2 middle sts. Cast off and sew seam under foot and mid back. Pull a silk ribbon or similar through holes. |
|||||||||||||||||||
Diagram explanations |
|||||||||||||||||||
|
|||||||||||||||||||
 |
|||||||||||||||||||
 |
|||||||||||||||||||
Have you finished this pattern?Tag your pictures with #dropspattern #snowbabyset or submit them to the #dropsfan gallery. Do you need help with this pattern?You'll find 34 tutorial videos, a Comments/Questions area and more by visiting the pattern on garnstudio.com. © 1982-2026 DROPS Design A/S. We reserve all rights. This document, including all its sub-sections, has copyrights. Read more about what you can do with our patterns at the bottom of each pattern on our site. |
|||||||||||||||||||


With over 40 years in knitting and crochet design, DROPS Design offers one of the most extensive collections of free patterns on the internet - translated to 17 languages. As of today we count 324 catalogues and 12290 patterns translated into English (UK/cm). 12290
We work hard to bring you the best knitting and crochet have to offer, inspiration and advice as well as great quality yarns at incredible prices! Would you like to use our patterns for other than personal use? You can read what you are allowed to do in the Copyright text at the bottom of all our patterns. Happy crafting!
Post a comment to pattern DROPS Baby 13-18
We would love to hear what you have to say about this pattern!
If you want to leave a question, please make sure you select the correct category in the form below, to speed up the answering process. Required fields are marked *.