
Popular categories
Looking for a yarn?


Comments / Questions (144)
![]() Heike wrote:
Heike wrote:
Beiden Erklärungen zum Diagramm steht : li von rechts , re von links oder re von rechts , li von links ich versteh das nicht ganz was soll ich darunter verstehen
05.06.2025 - 02:18DROPS Design answered:
Liebe Heike, ein leeres Kästchen wird rechts bei den Hinreihen und links bei den Rückreihen gestrickt, und ein Kreuzchen wird links bei den Hinreihen und rechts bei den Rückreihen gestrickt - hier lesen Sie auch mehr über die Diagramme. Viel Spaß beim Stricken!
05.06.2025 - 08:59
![]() Anne wrote:
Anne wrote:
Hej jeg forstår ikke helt fra diagrammerne hvornår jeg skal ‘slå om, tag 1 m løs av p som om den skulle strikkes ret, 2 ret sm, løft den løse m over, slå om’ - jeg synes ikke symbolet for dette fremgår af nogle af diagrammerne? Jeg strikker jakken. Tak for hjælpen!
19.04.2025 - 13:38DROPS Design answered:
Hej Anne det gør du på pind 18 og 20 i M.3. Husk at du starter med diagrammet nede i nederste højre hjørne og strikker opad :)
30.04.2025 - 11:29
![]() Corina Jantzen wrote:
Corina Jantzen wrote:
Na het patroon M3, de pas voor het vestje, hou ik 190 steken over. Wat doe ik verkeerd. Ik start met het juiste aantal steken als de mouwen en de panden worden samengevoegd.
09.04.2025 - 00:07
![]() Elisabeth wrote:
Elisabeth wrote:
Das mit der Hose hab ich geschafft aber jetzt habe ich Probleme mit dem Satz .. 1 M auf jeder Seite der 2 mittleren Maschen vorne alle 2 Runden aufnehmen danke für eine Antwort
23.03.2025 - 13:12DROPS Design answered:
Liebe Elisabeth, Sie haben 2 Markierer eingesetzt: 1 am Anfang der Runde = Mitte Rückenteil und 1 nach 78-102 M (siehe Größe) = Mitte Vorderteil. So wird es dann zugenommen: Am Anfang der Runde stricken Sie 1 Masche, 1 Masche zunehmen, dann stricken Sie bis 1 Masche vor dem Markierer (Mitte Vorderteil) übrig ist, 1 Masche zunehmen, 2 Maschen rechts stricken (der Markierer liegt zwischen diesen 2 Maschen), 1 Masche zunehmen, stricken Sie bis noch 1 Masche vor dem Ende der Runde übrig ist, 1 Masche zunehmen, die letze Masche stricken. So nehmen Sie 10 Mal in jeder 2. Runde zu = es sind immer 2 Maschen zwischen den Zunahmen. Viel Spaß beim Stricken!
24.03.2025 - 09:27
![]() Elisabeth wrote:
Elisabeth wrote:
Wird die Hose rund gestrickt oder hin und zurück. Ich kann es nirgends lesen . Danke für die Antwort lg
22.03.2025 - 09:06DROPS Design answered:
Liebe Elisabeth, die Hose wird in der Runde gestrickt. viel Spaß beim Stricken!
24.03.2025 - 08:07
![]() Monika wrote:
Monika wrote:
Ich habe eine Frage beim Kragen. Wie weiss ich nach wievielen Maschen ich die 3 Markierungsfäden einziehen soll. Da steht nur bei jeder Schulter und hinten in der Mitte aber nicht die Anzahl der Maschen. Danke
20.03.2025 - 10:59DROPS Design answered:
Liebe Monika, um die Schulter zu finden, legen Sie die Jacke flach auf einem Tisch and setzen Sie eine Markierung oben an jede Schulter dann noch ein für die Mitte vom Rückenteil. Viel Spaß beim Stricken!
20.03.2025 - 15:51
![]() Monique Taurelle wrote:
Monique Taurelle wrote:
Pantalon se tricote t-il en rond ou aller retour ? Merci pour votre réponse
14.02.2025 - 14:52DROPS Design answered:
Bonjour Mme Taurelle, le pantalon se tricote en rond d'abord sur aiguille circulaire puis on tricote chaque jambe séparément sur les aiguilles doubles pointes. Bon tricot!
14.02.2025 - 16:23
![]() Gracia wrote:
Gracia wrote:
Ik begin nu aan de ronde pas van het vestje. In M3 staat dat ik 2 toeren moet doen, 1 recht en 1 averecht. Maar, na het meebreien van de mouwen en het volgen van het patroon, zou ik uitkomen op 1 averecht en 1 recht aan het begin van M3, maar kom ik dan niet in de war met de rest van M3? Kan ik dan niet beter alleen 1 averecht doen en dan verdergaan met M3?
21.06.2024 - 08:00DROPS Design answered:
Dag Gracia,
Het is de bedoeling om, nadat je de steken van de panden en mouwen bij elkaar op de naald hebt gezet, 1 ribbel te breien. Dus je breit om die reden een volledige naald averecht en daarna een volledige naald recht. In de naald recht minder je gelijkmatig steken, zodat je op het juiste aantal komt om M.3 te kunnen breien. Als de ribbel klaar is dan begin je dus met M.3.
25.06.2024 - 19:26
![]() Quratulain Qamar wrote:
Quratulain Qamar wrote:
Thank you so much for answering the earlier question. I love this pattern. I am almost finished with the sweater. I have 2 questions 1 Where can I post he picture 2. My bottom border curls over no matter what, what did I do wrong? how is your border loking so straight? Much appreciate your beautiful designs
16.11.2023 - 13:28DROPS Design answered:
Dear Mrs Qamar, you can just block the jacket: wet it or wash it (always follow washing instructions) and let it dry flat, using pins if necessary. You can send us a link to add your project to our #dropsfangallery - read more here. Happy knitting!
17.11.2023 - 08:03
![]() Quratulain Qamar wrote:
Quratulain Qamar wrote:
Collar. "At the same time, when collar measures 2 cm / 3/4'', insert 3 markers in piece, 1 by each shoulder and 1 mid back." this is so vague. Can you please say after how many stitches . The sleeves and back and front are all on the same needle plus this is the yoke so where are the shoulders?
15.11.2023 - 11:29DROPS Design answered:
Dar Mrs Qamar, lay the piece flat and just follow the shoulders on your piece and insert a marker there (make sure there is the same number of sts before 1st marker at the beg of the round and after 2nd marker at the end of the round), then count the number of stitches between shoulders and insert a 3rd marker here for mid back. Happy knitting!
16.11.2023 - 09:15
|
|||||||||||||||||||
Snow Baby#snowbabyset |
|||||||||||||||||||
 |
 |
||||||||||||||||||
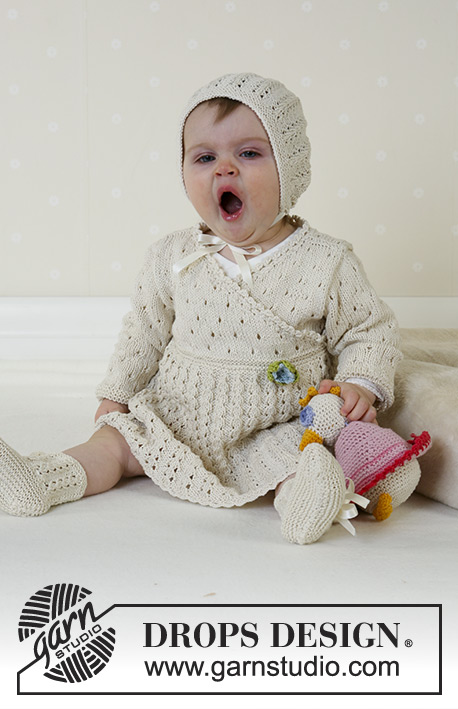
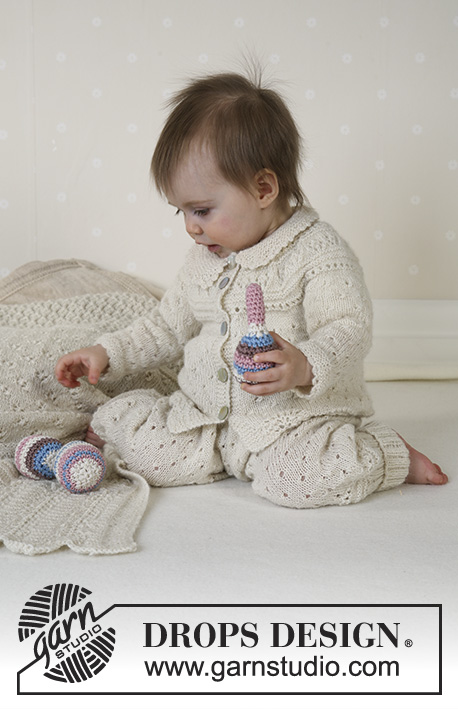
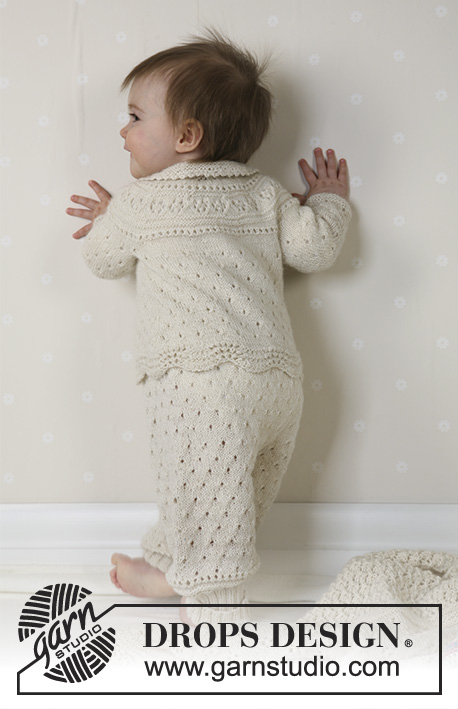
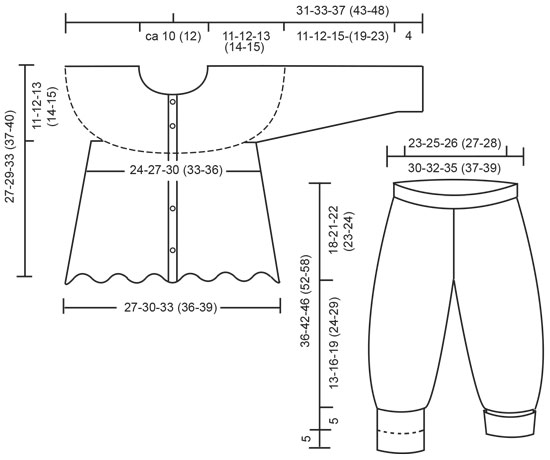
DROPS Jacket, trousers, bonnet, socks, blanket, ball and rattle in Alpaca
DROPS Baby 13-18 |
|||||||||||||||||||
|
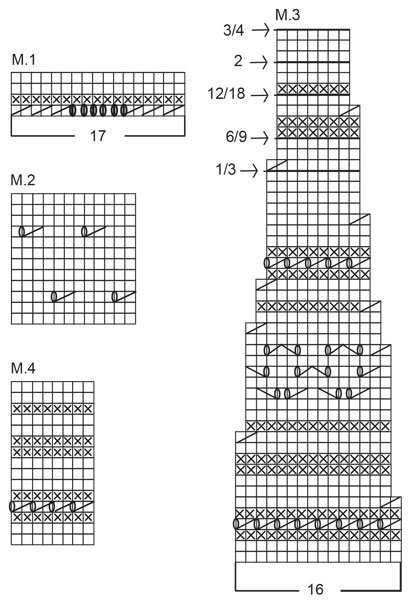
Knitting tension: 26 sts x 34 rows on needle size 2.5mm in stocking sts = 10 x 10 cm JACKET: Garter sts, back and forth on needle: Knit all rows Garter sts, on circular needle: knit 1 round, purl 1 round Pattern: See diagrams M.1 to M.3. The diagram shows the pattern from the right side. Button hole: Make button holes on right front band from the right side as follows: cast off 3rd and 4th st from the edge and cast on 2 new sts on next row. Make buttonholes as follows: Size 1/3 months: 4, 10, 16, 22 and 26 cm Size 6/9 months: 5, 11, 17, 23 and 28 cm Size 12/18 months: 6, 13, 20, 27 and 32 cm Size 2 years: 9, 16, 23, 30 and 36 cm Size 3/4 years: 9, 17, 25, 33 and 39 cm Decreasing tips 1(applies to collar on jacket): All decreases are done at the beg of every row. Dec 1 st as follows at beginning of row: slip 1 st as if to knit, K1, psso Increasing tips (applies to collar on jacket): Inc 1 st by picking up the thread between 2 sts from previous row and knit this into back of st. Front and back piece: Knit the jacket back and forth on circular needle from mid front. Using both ends of the circular needle size 2.5mm (to make sure the edge becomes elastic) cast on 163-180-197 (214-231) sts (incl 5 edge sts each side towards mid front) with Alpaca. Remove 1 needle and knit 2 rows garter sts. Now knit 3 repeats of M.1 with 5 edge sts each side in garter sts. After M.1 knit 2 rows stocking sts (continue in garter sts over the 5 edge sts until finished measurements), at the same time adjusting number of sts evenly on 1st row to 148-166-184 (196-214) (do not dec over the 5 edge sts each side). Insert a marking thread 39-44-49 (51-56) sts in from each side = 70-78-86 (94-102) sts between marking threads on back piece. Now knit M.2 with 5 edge sts each side. At the same time, when piece measures 5 cm dec 1 st each side of both marking threads on every 3-3-4 (4-5) cm a total of 4 times = 132-150-168 (180-198) sts – knit sts not fitting into pattern in stocking sts. Remember buttonholes on right front edge – see explanation above. When piece measures approx 16-17-20 (23-25) cm – adjust after 2 or 3 rows in stocking sts after a row with pattern in diagram – cast off 10 sts each side for armhole (i.e. 5 sts each side of marking threads) = 52-60-68 (76-84) sts on back piece and 30-35-40 (42-47) sts on each front piece. Put piece aside and knit the sleeves. Sleeve: Knit round on double pointed needles size 2.5mm. Cast on 36-36-42 (42-42) sts with Alpaca. Knit 8 rounds garter sts and continue in M.2. At the same time, when sleeve measures 4 cm inc 2 sts mid under arm a total of 8-10-10 (13-15) times on every 4-4-5 (5-5) round = 52-56-62 (68-72) sts – incorporate the new sts in pattern as you go along. When sleeve measures 15-16-19 (23-27) cm - adjust as for back and front pieces – cast off 10 sts mid under arm = 42-46-52 (58-62) sts. Put the piece aside and knit the other sleeve. Yoke: Put sleeves in on the same needle as back and front pieces where you cast off for armholes = 196-222-252 (276-302) sts. Purl 1 row from the wrong side. Knit 1 row from the right side, at the same time adjusting number of sts evenly on row to 186-218-250 (266-298) (do not dec over the 5 edge sts each side). Now knit and dec following M.3 (continue over the 5 edge sts as before) – finish pattern in diagram at the arrow for appropriate size. After M.3 there are 109-114-115 (122-136) sts left. Knit 1 row from the right side, at the same time adjusting number of sts to 72-76-82 (86-92). Collar: Cast off the outermost 3 sts each side = 66-70-76 (80-86) sts. Continue in garter sts, at the same time inc 1 st each side – see Increasing tips – on the 3rd row. Inc between the first 2 and the last 2 sts on every other row a total of 3 times. At the same time, when collar measures 2 cm, insert 3 marking threads in piece, 1 by each shoulder and 1 mid back. Now inc 1 st on each side of all marking threads – see Increasing tips. Repeat the inc after 4 rows = 84-88-94 (98-104) sts. When collar measures 5 cm dec each side on every row – see Decreasing tips: 1 st 3 times = 78-82-88 (92-98) sts. Loosely cast off remaining sts. Assembly: Sew the openings under the arms. Sew on buttons. Crochet border: Using crochet hook size 2.5 crochet round the collar as follows: 1 dc in 1st st, *3 ch, 1 tr in the 1st ch, skip 2 sts, 1 dc in next st*, repeat from *-* Crochet round sleeve edges as follows: 1 dc in 1st st, *5 ch, skip 2 sts, 1 dc in next st*, repeat from *-*. _________________________________________ TROUSERS: Rib: *K2, P2*, repeat from *-* Pattern: see diagrams M.2 and M.4. Decreasing tips (applies to inner side of leg: Dec as follows 1 st after the marking thread: K2 tog Decrease as follows 1 st before marking thread: K2 tog into back of st. Start at the top and knit downwards. Cast on 120-128-136 (140-144) sts with circular needle size 2.5mm. Knit 4 cm Rib. Continue in stocking sts, at the same time inc evenly on round to 156-168-180 (192-204) sts. Insert a marking thread at the beginning of round = mid back and after 78-84-90 (96-102) sts = mid front. Knit M.2, at the same time, knitting elevation at the back as follows: knit 12 sts, turn the piece (to avoid a hole slip the first st as if to knit and tighten thread when knitting back), knit 24 sts, turn the piece. Continue like this by knitting 12 sts more before each turn another 8-10-10 (12-12) times. Now knit round over all sts. When piece measures 12-15-16 (17-18) cm (measured from mid front) inc 1 st on each side of the middle 2 sts mid front on every other row a total of 10 times (inc by picking up st from previous row and knit this) = 176-188-200 (212-224) sts. After the last inc the piece measures approx 18-21-22 (23-24) cm mid front. Knit next round as follows from mid back: Cast off 3 sts, knit 82-88-94 (100-106) sts, cast off 6 sts, 82-88-94 (100-106) sts, cast off 3 sts. Now finish each leg separately. Legs: Put sts from one leg on a thread and sts from the other leg on double pointed needles size 2.5mm = 82-88-94 (100-106) sts. Knit round (continue pattern as before) and insert a marking thread at beginning of round = inner side of leg. When leg measures 2 cm dec 1 st on both sides of marking thread – see Decreasing tips – on every 2-2-2.5 (2.5-3) cm a total of 4-5-6 (7-8) times = 74-78-82 (86-90) sts. When leg measures 10-13-16 (21-26) cm knit M.4 – start at the bottom of diagram. After M.4 knit 1 round, at the same time dec evenly to 60-64-68 (72-76) sts. Knit 10 cm Rib and cast off loosely. Knit the other leg in the same way. Assembly: Sew opening between legs. Fold the rib at bottom of legs. _________________________________________ BONNET: Size: 1/3 – 6/9 months –12/18 months To fit head circumference: 40/42 – 42/44 – 44/46 cm Garter sts: knit all rows Pattern: see diagrams M.2 and M.3. Knit back and forth on circular needle. Cast on 82-88-100 sts on needle size 2.5mm. Knit garter sts, at the same time making a hole each side on every 6th row by casting off the 3rd st from edge and making a yo over the cast off st. Read all of the following section before knitting it! When piece measures 6 cm knit M.2 with 5 sts in garter sts each side (continue holes on every 6th row as before) until piece measures 14-15-16 cm. Adjust after 2 rows stocking sts after 1 pattern row. At the same time, on the last row from the wrong side, cast off the 5 outermost sts each side and adjust number of sts to 70-80-90. Insert 5 marking threads in piece as follows: 1st after 1 st, and thereafter 14-16-18 sts between each (= 13-15-17 sts after the last marking thread). Knit garter sts, at the same time dec 1 st after each marking thread on every other row a total of 12-14-16 times = 10 sts left. Cut the thread, pull through remaining sts and attach. Assembly: Sew seam mid back. Crochet a border along the cast-on row with Alpaca and crochet hook size 2.5 as follows: 1 dc in 1st st, *5 ch, skip 2 sts, 1 dc in next st*, repeat from *-*. Crochet along garter sts at back of bonnet in the same way. Fold the front edge double against the right side and attach with a couple of neat sts to lower edge. Pull silk ribbon through the row of holes. _________________________________________ SOCKS: Size: 1/3 – 6/9 – 12/18 months To fit foot length: 10-11-12 cm Rib: *K2, P2*, repeat from *-* Pattern: See diagram M.1. The diagram shows the pattern from the right side. Garter sts: Knit all rows. The sock is knitted back and forth from mid back. Cast on 68-68-68 using 2 needles size 2.5mm. Remove 1 needle knit 2 rows garter sts. Now knit 5-6-7 repeats of M.1 – piece measures approx 5-6-7 cm. Knit 1 row from the right side, at the same time adjusting number of sts to 34-38-42. Knit 1 row from the wrong side and knit next row as follows from the right side: K1, *K2 tog, yo*, repeat from *-* and finish with K1. Knit 1 row from wrong side. Now put the outermost 12-13-15 sts each side on a thread. = 10-12-12 sts left. Knit 4-4.5-5 cm garter sts over these sts. Put sts from thread back on needle and pick up 10-11-13 sts on each side of middle piece = 54-60-68 sts. Knit 3-4-5 cm garter sts over all sts, at the same time after 1.5-2-2.5 dec on every other row until finished measurements as follows: Dec 1 st at the beginning and at the end of row and K2 tog on each side of the 2 middle sts. Cast off and sew seam under foot and mid back. Pull a silk ribbon or similar through holes. BALL AND RATTLE: see pattern no 13-32 BLANKET: SEE PATTERN 13-22 |
|||||||||||||||||||
Diagram explanations |
|||||||||||||||||||
|
|||||||||||||||||||
|
|||||||||||||||||||
|
|||||||||||||||||||
Have you finished this pattern?Tag your pictures with #dropspattern #snowbabyset or submit them to the #dropsfan gallery. Do you need help with this pattern?You'll find 33 tutorial videos, a Comments/Questions area and more by visiting the pattern on garnstudio.com. © 1982-2025 DROPS Design A/S. We reserve all rights. This document, including all its sub-sections, has copyrights. Read more about what you can do with our patterns at the bottom of each pattern on our site. |
|||||||||||||||||||


With over 40 years in knitting and crochet design, DROPS Design offers one of the most extensive collections of free patterns on the internet - translated to 17 languages. As of today we count 314 catalogues and 11821 patterns translated into English (UK/cm).
We work hard to bring you the best knitting and crochet have to offer, inspiration and advice as well as great quality yarns at incredible prices! Would you like to use our patterns for other than personal use? You can read what you are allowed to do in the Copyright text at the bottom of all our patterns. Happy crafting!
Post a comment to pattern DROPS Baby 13-18
We would love to hear what you have to say about this pattern!
If you want to leave a question, please make sure you select the correct category in the form below, to speed up the answering process. Required fields are marked *.