


Komentáře / Otázky (144)
![]() Heike napsala:
Heike napsala:
Beiden Erklärungen zum Diagramm steht : li von rechts , re von links oder re von rechts , li von links ich versteh das nicht ganz was soll ich darunter verstehen
05.06.2025 - 02:18Odpověď DROPS Design :
Liebe Heike, ein leeres Kästchen wird rechts bei den Hinreihen und links bei den Rückreihen gestrickt, und ein Kreuzchen wird links bei den Hinreihen und rechts bei den Rückreihen gestrickt - hier lesen Sie auch mehr über die Diagramme. Viel Spaß beim Stricken!
05.06.2025 - 08:59
![]() Anne napsala:
Anne napsala:
Hej jeg forstår ikke helt fra diagrammerne hvornår jeg skal ‘slå om, tag 1 m løs av p som om den skulle strikkes ret, 2 ret sm, løft den løse m over, slå om’ - jeg synes ikke symbolet for dette fremgår af nogle af diagrammerne? Jeg strikker jakken. Tak for hjælpen!
19.04.2025 - 13:38Odpověď DROPS Design :
Hej Anne det gør du på pind 18 og 20 i M.3. Husk at du starter med diagrammet nede i nederste højre hjørne og strikker opad :)
30.04.2025 - 11:29
![]() Corina Jantzen napsala:
Corina Jantzen napsala:
Na het patroon M3, de pas voor het vestje, hou ik 190 steken over. Wat doe ik verkeerd. Ik start met het juiste aantal steken als de mouwen en de panden worden samengevoegd.
09.04.2025 - 00:07
![]() Elisabeth napsala:
Elisabeth napsala:
Das mit der Hose hab ich geschafft aber jetzt habe ich Probleme mit dem Satz .. 1 M auf jeder Seite der 2 mittleren Maschen vorne alle 2 Runden aufnehmen danke für eine Antwort
23.03.2025 - 13:12Odpověď DROPS Design :
Liebe Elisabeth, Sie haben 2 Markierer eingesetzt: 1 am Anfang der Runde = Mitte Rückenteil und 1 nach 78-102 M (siehe Größe) = Mitte Vorderteil. So wird es dann zugenommen: Am Anfang der Runde stricken Sie 1 Masche, 1 Masche zunehmen, dann stricken Sie bis 1 Masche vor dem Markierer (Mitte Vorderteil) übrig ist, 1 Masche zunehmen, 2 Maschen rechts stricken (der Markierer liegt zwischen diesen 2 Maschen), 1 Masche zunehmen, stricken Sie bis noch 1 Masche vor dem Ende der Runde übrig ist, 1 Masche zunehmen, die letze Masche stricken. So nehmen Sie 10 Mal in jeder 2. Runde zu = es sind immer 2 Maschen zwischen den Zunahmen. Viel Spaß beim Stricken!
24.03.2025 - 09:27
![]() Elisabeth napsala:
Elisabeth napsala:
Wird die Hose rund gestrickt oder hin und zurück. Ich kann es nirgends lesen . Danke für die Antwort lg
22.03.2025 - 09:06Odpověď DROPS Design :
Liebe Elisabeth, die Hose wird in der Runde gestrickt. viel Spaß beim Stricken!
24.03.2025 - 08:07
![]() Monika napsala:
Monika napsala:
Ich habe eine Frage beim Kragen. Wie weiss ich nach wievielen Maschen ich die 3 Markierungsfäden einziehen soll. Da steht nur bei jeder Schulter und hinten in der Mitte aber nicht die Anzahl der Maschen. Danke
20.03.2025 - 10:59Odpověď DROPS Design :
Liebe Monika, um die Schulter zu finden, legen Sie die Jacke flach auf einem Tisch and setzen Sie eine Markierung oben an jede Schulter dann noch ein für die Mitte vom Rückenteil. Viel Spaß beim Stricken!
20.03.2025 - 15:51
![]() Monique Taurelle napsala:
Monique Taurelle napsala:
Pantalon se tricote t-il en rond ou aller retour ? Merci pour votre réponse
14.02.2025 - 14:52Odpověď DROPS Design :
Bonjour Mme Taurelle, le pantalon se tricote en rond d'abord sur aiguille circulaire puis on tricote chaque jambe séparément sur les aiguilles doubles pointes. Bon tricot!
14.02.2025 - 16:23
![]() Gracia napsala:
Gracia napsala:
Ik begin nu aan de ronde pas van het vestje. In M3 staat dat ik 2 toeren moet doen, 1 recht en 1 averecht. Maar, na het meebreien van de mouwen en het volgen van het patroon, zou ik uitkomen op 1 averecht en 1 recht aan het begin van M3, maar kom ik dan niet in de war met de rest van M3? Kan ik dan niet beter alleen 1 averecht doen en dan verdergaan met M3?
21.06.2024 - 08:00Odpověď DROPS Design :
Dag Gracia,
Het is de bedoeling om, nadat je de steken van de panden en mouwen bij elkaar op de naald hebt gezet, 1 ribbel te breien. Dus je breit om die reden een volledige naald averecht en daarna een volledige naald recht. In de naald recht minder je gelijkmatig steken, zodat je op het juiste aantal komt om M.3 te kunnen breien. Als de ribbel klaar is dan begin je dus met M.3.
25.06.2024 - 19:26
![]() Quratulain Qamar napsala:
Quratulain Qamar napsala:
Thank you so much for answering the earlier question. I love this pattern. I am almost finished with the sweater. I have 2 questions 1 Where can I post he picture 2. My bottom border curls over no matter what, what did I do wrong? how is your border loking so straight? Much appreciate your beautiful designs
16.11.2023 - 13:28Odpověď DROPS Design :
Dear Mrs Qamar, you can just block the jacket: wet it or wash it (always follow washing instructions) and let it dry flat, using pins if necessary. You can send us a link to add your project to our #dropsfangallery - read more here. Happy knitting!
17.11.2023 - 08:03
![]() Quratulain Qamar napsala:
Quratulain Qamar napsala:
Collar. "At the same time, when collar measures 2 cm / 3/4'', insert 3 markers in piece, 1 by each shoulder and 1 mid back." this is so vague. Can you please say after how many stitches . The sleeves and back and front are all on the same needle plus this is the yoke so where are the shoulders?
15.11.2023 - 11:29Odpověď DROPS Design :
Dar Mrs Qamar, lay the piece flat and just follow the shoulders on your piece and insert a marker there (make sure there is the same number of sts before 1st marker at the beg of the round and after 2nd marker at the end of the round), then count the number of stitches between shoulders and insert a 3rd marker here for mid back. Happy knitting!
16.11.2023 - 09:15
|
|||||||||||||||||||
Snow Baby#snowbabyset |
|||||||||||||||||||
 |
 |
||||||||||||||||||
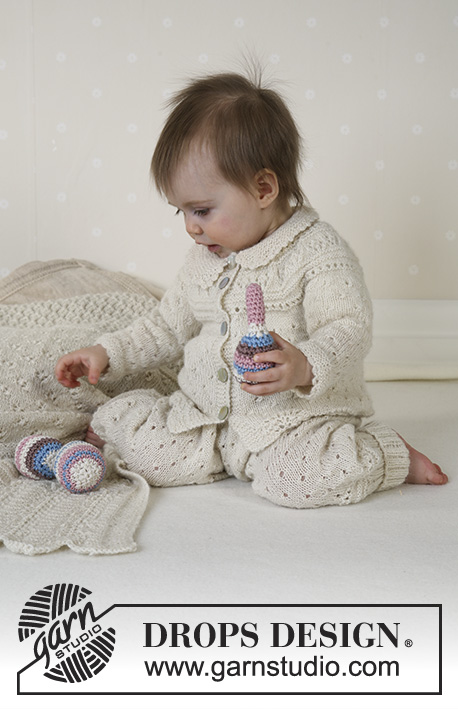
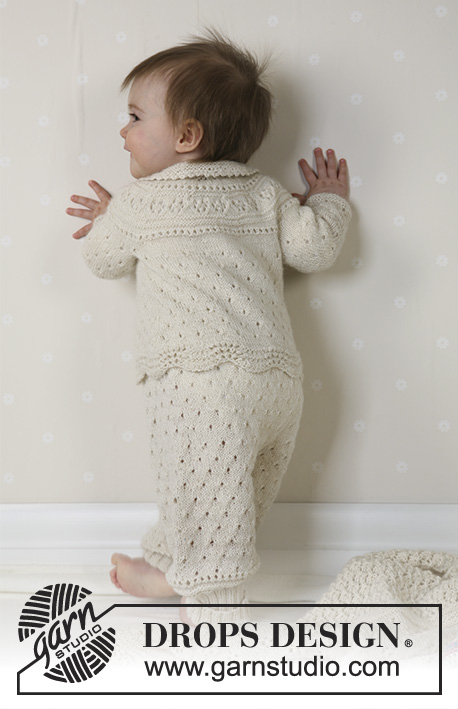
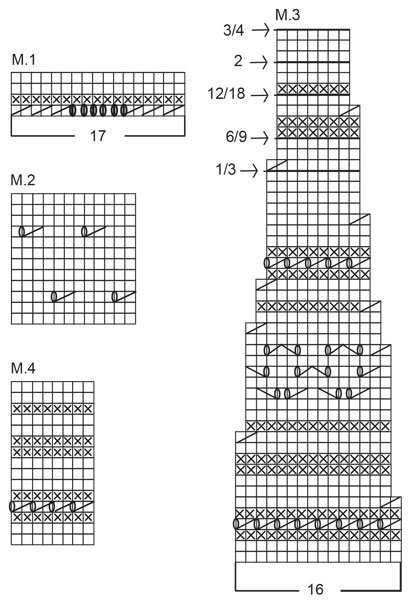
Dětský kabátek, kalhoty, čepice, ponožky, deka, míček a chrastítko - hrkáček pletené a háčkované z příze DROPS Alpaca.
DROPS Baby 13-18 |
|||||||||||||||||||
|
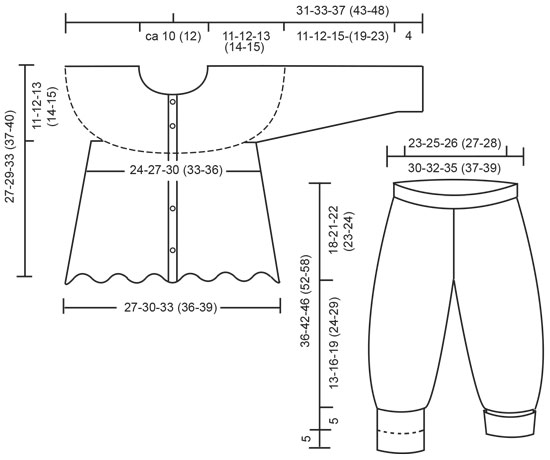
KABÁTEK: VROUBKOVÝ VZOR (lícové a rubové řady): stále hladce VROUBKOVÝ VZOR (v řadách dokola): 1 řada hladce, 1 řada obrace VZOR: viz schéma M. 1 až M. 3. Na schéma nahlížíme z lícové strany. KNOFLÍKOVÉ DÍRKY: Dírky pleteme na pravém předním díle: uzavřeme 3. a 4. oko od kraje, v následující řadě nad uzavřenými oky nahodíme 2 nová oka. Knoflíkové dírky pleteme: Velikost 3/4 měsíce: 4, 10, 16, 22 a 26 cm Velikost 6/9 měsíců: 5, 11, 17, 23 a 28 cm Velikost 12/18 měsíců: 6, 13, 20, 27 a 32 cm Velikost 2 roky: 9. 16, 23, 30 a 36 cm Velikost 3/4 roky: 9. 17, 25, 33 a 39 TIP NA UJÍMÁNÍ (aplikujeme na límec kabátku): Všechna ujímání pleteme z lícové strany Na začátku řady ujímání: 1 oko sejmout hladce, 1 oko hladce, sejmuté přes něho přetáhneme TIP NA PŘIDÁVÁNÍ (aplikujeme na límec kabátku): Přidáváme tak, že mezi dvěma oky předchozí řady nabereme oko z příčné nitě. Oko upleteme anglicky, tj. za zadní nit. ---------------------------------------------------------------------- PŘEDNÍ A ZADNÍ DÍL: Pleteme na kruhové jehlici jako jeden díl od středu předního dílu. Pro nahození ok použijeme obě části kruhové jehlice č. 2, 5 (okraj tak bude elastický). Nahodíme 163-180-197 (214-231) ok (celkový počet zahrnuje 5 krajních ok z obou stran předních dílů). Jednu jehlici vytáhneme a pleteme 2 řady vroubkovým vzorem. Dále pleteme 3x opakování vzoru M. 1, krajních 5 ok pleteme na obou předních dílech vroubkovým vzorem. Po dokončení vzoru M. 1 upleteme 2 řady lícovým žerzejem ( nad 5 krajními oky pleteme z obou stran předních dílů stále vroubkovým vzorem), SOUČASNĚ v první řadě upravíme rovnoměrně oka na celkový počet 148-166-184 (196-214) ok (neujímáme nad 5 krajními oky). Do pleteniny vložíme dvě značky-z každé strany do 39-44-49 (51-56) oka = 70-78-86 (94-102) ok mezi značkami – vymezuje zadní díl. Pleteme vzorem M. 2, krajních 5 ok vroubkovým vzorem. SOUČASNĚ ve výšce 5 cm ujmeme z každé strany bočních švů každé 3-3-4 (4-5) cm 1 oko celkem 4 krát = 132-150-168 (180-198) ok – přidávaná oka zapracováváme do vzoru. Na pravém předním díle nezapomeneme vyplétat KNOFLÍKOVÉ DÍRKY – viz popis výše. Ve výšce asi 16-17-20 (23-25) cm – přidáme po dokončení vzoru 2 nebo 3 řady lícovým žerzejem – začneme tvarovat průramky a to tak, že na každé straně uzavřeme 10 ok (tj. 5 ok na každou stranu značky) = 52-60-68 (76-84) ok v zadním díle a 30-35-40 (42-47) ok v pravém a levém předním díle. Práci odložíme a upleteme rukávy. RUKÁV: Pleteme v řadách dokola na ponožkových jehlicích velikosti č. 2,5. Přízí Alpaka nahodíme 36-36-42 (42-42) ok. Upleteme 8 kruhových řad vroubkovým vzorem a pokračujeme vzorem M. 2. SOUČASNĚ ve výšce 4 cm přidáme ve středu rukávu na každé stranu 2 oka, přidávání opakujeme celkem 8-10-10 (13-15) krát v každé 4-4-5 (5-5) kruhové řadě = 52-56-62 (68-72) ok – nově přidávaná oka zapracováváme do vzoru. Ve výšce 15-16-19 (23-27) cm – přidáme řady jako na předním a zadním díle – uzavřeme pro průramky středových 10 ok = 42-46-52 (58-62) ok. Díl odložíme na pomocnou jehlici a stejně upleteme druhý rukáv. SEDLO: Oka rukávů převedeme na pracovní jehlici mezi přední a zadní díly = 196-222-252 (276-302) ok. Rubovou řadu upleteme obrace. Lícovou řadu pleteme hladce, SOUČASNĚ rovnoměrně v řadě ujmeme oka na celkový počet 186-218-250 (266-298) ok (nepřidáváme nad 5 krajními oky pletenými vroubkovým vzorem). Dále pleteme vzorem M. 3 (5 krajních ok pleteme z každé strany vroubkovým vzorem) – vzor končí v místě označeném šipkou – liší se pro jednotlivé velikosti. Po dokončení vzoru M. 3 máme 109-114-115 (122-136) ok. Lícovou řadu upleteme hladce, SOUČASNĚ ujmeme oka na 72-76-82 (86-92) ok. LÍMEC: Z každé strany uzavřeme 3 krajní oka = 66-70-76 (80-86) ok. Pleteme vroubkovým vzorem a SOUČASNĚ z každé strany přidáme ve 3. řadě 1 oko – viz TIP NA PŘIDÁVÁNÍ. Dále pokračujeme v přidávání 1 oka z každé strany mezi první dvě a poslední dvě oka v každé druhé řadě celkem 3 krát. SOUČASNĚ ve výšce límce 2 cm, vložíme do dílu 3 značky, po jedné do každé náramenice a jednu do středu zadního dílu. Nyní z každé strany značky budeme přidávat vždy 1 oko – viz TIP NA PŘIDÁVÁNÍ. Přidávání opakujeme v každé 4. řadě = 84-88-94 (98-104) ok. Ve výšce límce 5 cm ujmeme z každé strany v každé řadě – viz TIP NA UJÍMÁNÍ: 3x 1 oko = 78-82-88 (92-98) ok. Volně uzavřeme zbývající oka. DOKONČENÍ: Sešijeme průramky, přišijeme knoflíky. HÁČKOVANÝ LEM: Háčkem č. 2, 5 háčkujeme kolem límce: do prvního oka 1 KS, * 3 řo, do prvního řo háčkujeme 1 DS, vynecháme 2 oka, do následujícího oka háčkujeme KS*, mezi *-* opakujeme. Kolem lemů rukávů háčkujeme: do prvního oka 1 KS, * 5 řo, vynecháme 2 oka, do následujícího oka háčkujeme KS*, mezi *-* opakujeme. ---------------------------------------------------------------------- KALHOTY: ŽEBROVÝ VZOR: * 2 hladce, 2 obrace*, mezi *-* opakujeme. VZOR: viz schéma M. 2 a M. 4 TIP NA UJÍMÁNÍ (aplikujeme ve vnitřní části nohavice): 1 oko ZA značkou ujímáme: 2 splést hladce 1 oko PŘED značkou ujímáme: 2 splést anglicky ---------------------------------------------------------------------- KALHOTY: Pleteme v řadách dokola od pasu dolů. Na kruhovou jehlici č. 2,5 nahodíme velbloudí barvou 120-128-136 (140-144)ok. Žebrovým vzorem pleteme do výšky 4 cm. Dále pleteme lícovým žerzejem a SOUČASNĚ rovnoměrně v řadě přidáme na 156-168-180 (192-204) ok. Značkou si označíme začátek řady = střed zadního dílu a za 78-84-90 (96-102) oko vložíme druhou značku = střed předního dílu. Pleteme vzorem M. 2, SOUČASNĚ, přidáváme do zadního dílu: upleteme 12 ok, práci otočíme (abychom zabránili vzniku dírky, pořádně před pletením řady zpět utáhneme pracovní nit), pleteme 24 ok, práci otočíme, takto pleteme dál, při každém otočení upleteme o 12 ok více ještě 8-10-10 (12-12) krát. Další řadu pleteme přes všechna oka. Ve výšce 12-15-16 (17-18) cm (měříme středem předního dílu) přidáme z každé strany dvou středových ok vždy 1 oko. Přidáváme v každé druhé řadě celkem 10 krát (přidáváme nabráním oka z předchozí řady a rovnou oko upleteme hladce) = 176-188-200 (212-224) ok. Po dokončení posledního přidávání díl měří asi 18-21-22 (23-24) cm, měříme středem předního dílu. Následující řadu pleteme od středu zadního dílu: uzavřeme 3 oka, upleteme 82-88-94 (100-106) ok, uzavřeme 6 ok, upleteme 82-88-94 (100-106) ok a uzavřeme 3 oka. Nohavice dokončíme samostatně. NOHAVICE: Oka první nohavice odložíme na pomocnou jehlici a druhou pleteme v řadách dokola na ponožkových jehlicích č. 2, 5 = 82-88-94 (100-106) ok. Označíme si začátek kruhové řady = vnitřní šev nohavice. Pleteme vzorem, ve výšce 2 cm ujmeme z každé strany značky 1 oko – viz TIP NA UJÍMÁNÍ – ujímání opakujeme každé 2-2-2.5 (2.5-3) cm celkem 4-5-6 (7-8) krát = 74-78-82 (86-90) ok. Ve výšce asi 10-13-16 (21-26) cm pleteme vzorem M. 4 – začínáme ve spodní části schématu. Po dokončení M. 4 upleteme 1 řadu hladce, SOUČASNĚ rovnoměrně ujmeme oka na celkový počet 60-64-68 (72-76) ok. Upleteme 10 cm žebrovým vzorem a oka volně uzavřeme. Druhou nohavice pleteme stejně. DOKONČNÍ: Sešijeme sed mezi nohavicemi. Ohrneme spodní lem nohavic. ---------------------------------------------------------------------- ČEPICE: Velikost: 1/3 – 6/9 měsíců – 12/18 měsíců Obvod hlavy: 40/42 – 42/44 – 44/46 cm VROUBKOVÝ VZOR: stále hladce VZOR: viz schéma M. 2 a M. 3 Pleteme lícové a rubové řady na kruhové jehlici. Na kruhovou jehlici č. 2,5 nahodíme 82-88-100 ok. Pleteme vroubkovým vzorem, SOUČASNĚ vypleteme v každé 6. řadě dírky – z každé strany uzavřeme 3. oko od kraje, 1 oko nahodíme. PŘED POKRAČOVÁNÍM SI PROSÍM PŘEČTĚTE CELÝ POSTUP! Ve výšce 6 cm pleteme vzorem M. 2, 5 krajních ok pleteme VROUBKOVÝM VZOREM (vyplétáme dírky – v každé 6. řadě dle popisu výše) až díl měří 14-15-16 cm. Přidáme 2 řady lícovým žerzejem a 1 řadu vzorem. Současně v poslední řadě na rubové straně uzavřeme z každé strany 5 krajních ok a rovnoměrně ujmeme oka na celkový počet 70-80-90 ok. Do dílu vložíme 5. značek takto: první za první oko, ostatní vždy za 14-16-18 oko (=13-15-17 ok za poslední značkou). Pleteme vroubkovým vzorem, SOUČASNĚ za každou značkou ujmeme v každé druhé řadě 1 oko celkem 12-14-16 krát = 10 ok zbývá. Přízi ustřihneme, protáhneme zbylými oky a zapošijeme. DOKONČENÍ: Sešijeme zadní šev. Kolem první řady uháčkujeme přízí Alpaka, háčkem č. 2,5 lem: do prvního oka 1 KS, * 5 řo, vynecháme 2 oka, do následujícího oka KS*, mezi *-* opakujeme. Stejně háčkujeme i kolem spodního kraje čepičky. Přední kraj přehneme proti právě straně a krytým stehem přišijeme ke spodnímu okraji. Hedvábnou stužku protáhneme řadou dírek. ---------------------------------------------------------------------- PONOŽKY: Velikost: 1/3 – 6/9 – 12/18 měsíců Délka chodidla: 10-11-12 cm ŽEBROVÝ VZOR: * 2 hladce, 2 obrace*, mezi *-* opakujeme VZOR: viz schéma M. 1. Na schéma nahlížíme z lícové strany. VROUBKOVÝ VZOR: stále hladce Ponožky pleteme v lícových a rubových řadách od středového švu na patě. Na dvě jehlice č. 2?5 nahodíme 68-68-68 ok. Jednu jehlici vytáhneme a upleteme 2 řady vroubkovým vzorem. Dále pleteme 5-6-7 opakování vzoru M. 1 – díl měří asi 5-6-7 cm. Lícovou řadu upleteme hladce, SOUČASNĚ rovnoměrně ujmeme oka na celkový počet 34-38-42 ok. Rubovou řadu upleteme hladce a následující lícovou řadu pleteme: 1 hladce, * 2 splést hladce, nahodit*, mezi *-*opakujeme a řadu končíme jedním okem hladce. Rubovou řadu pleteme hladce. Na pomocnou jehlici odložíme krajních 12-13-15 ok = 10-12-12 ok zbývá na jehlici. Nad těmito oky upleteme 4-4.5-5 cm vroubkovým vzorem. Odložená oka z pomocné jehlice vrátíme zpět na pracovní jehlici a z každé strany středového dílu nabereme vždy 10-11-13 ok = 54-60-68 ok. Vroubkovým vzorem upleteme 3 -4-5 cm a SOUČASNĚ po 1.5-2-2.5 cm uzavřeme v každé druhé řadě: na začátku a na konci řady ujmeme 1 oko, kolem dvou středových ok spleteme vždy 2 oka hladce. Oka uzavřeme, když chodidlo měří 10-11-12 cm, sešijeme spodní a zadní šev. Hedvábnou stužku protáhneme skrz dírky. Míček a Hrkáček: viz návod č. 13-32 Deka: viz návod č. 13-22 |
|||||||||||||||||||
Vysvětlivky ke schématu |
|||||||||||||||||||
|
|||||||||||||||||||
|
|||||||||||||||||||
|
|||||||||||||||||||
Dokončili jste tento model?Pak označte své fotky tagem #dropspattern #snowbabyset nebo je pošlete do galerie #dropsfan. Potřebujete s tímto návodem poradit?Otevřete-li si návod na stránce garnstudio.com, najdete tam 32 výukových video-ukázek, Komentáře/Dotazy a další užitečné informace. © 1982-2025 DROPS Design A/S. Vyhrazujeme si veškerá práva. Tento dokument, včetně všech jeho dílčích částí, podléhá autorským právům. Podrobnější komentář k možnostem užití našich návodů najdete dole pod každým návodem na našich stránkách. |
|||||||||||||||||||


V oblasti pletené a háčkované módy působí DROPS Design více než 40 let. Díky tomu vám můžeme nabídnout jednu z nejrozsáhlejších kolekcí modelů s bezplatnými návody dostupnými na internetu - navíc v 17 jazycích. K dnešnímu dni máme na 314 katalogů a 11822 návodů celkem - z nich je už 7048 dostupných v [češtině].
We work hard to bring you the best knitting and crochet have to offer, inspiration and advice as well as great quality yarns at incredible prices! Would you like to use our patterns for other than personal use? You can read what you are allowed to do in the Copyright text at the bottom of all our patterns. Happy crafting!
Přidejte komentář k návodu DROPS Baby 13-18
Rádi bychom věděli, co si o tomto modelu myslíte!
Pokud se chcete na něco zeptat, dbejte prosím na to, abyste ve formuláři níže vybrali správnou kategorii - díky tomu se dříve dozvíte, co potřebujete vědět. Povinná pole jsou označena *.