
Popular categories
Looking for a yarn?


Comments / Questions (55)
![]() Birgit wrote:
Birgit wrote:
Liebes Drops-Team! Ich hätte eine Frage zum TIPP FÜR GLATT LINKS. Wie kann das ohne ein Loch zu ergeben ausgeführt werden? Wenn ich die Außenseite nach innen umdrehe, hab ich das Problem, dass die erste Masche und somit der Faden auf der "falschen" Nadel ist. Wird diese einfach auf die andere Nadel gegeben? Dann hab ich aber beim Ende der Reihe ein "Loch". Danke schon jetzt für eure Rückmeldung. LG, Birgit
25.10.2018 - 09:57DROPS Design answered:
Liebe Birgit, dieser Loch wird dann nur am Anfang der 1. Runde entsehen, den können Sie dann später mit dem Faden vom Ärmel vernähen. Viel Spaß beim stricken!
25.10.2018 - 10:15
![]() Jennifer Douglas wrote:
Jennifer Douglas wrote:
In the 6th section A1.b, there are 5 rows beneath to the knit stitch where the loops are pulled through. Is this correct, as in all other sections are only 4 rows? Thank you
21.10.2018 - 16:47DROPS Design answered:
Dear Mrs Douglas, thanks for your feedback, our designteam will have a look - thanks in advance for your patience.
22.10.2018 - 09:43
![]() Jennifer Douglas wrote:
Jennifer Douglas wrote:
May I make a suggestion. The "yarn over", especially the ones prior to the purl stitches, are changed to a "make 1" on the next row. (Pick up bar between stitches on previous row). Even after working by twisting on the next row, it is difficult not to leave a hole, as it is impossible to get enough tension on the "yo" after picking up the loop.
20.10.2018 - 15:01
![]() Johanneke wrote:
Johanneke wrote:
Bij deel A1b staat op gegeven moment een rij extra. Hierdoor wordt het patroon in regelmaat onderbroken en de lussen bij de x langer. Is dit de bedoeling? Staat wel bij alle maten zo.
20.10.2018 - 11:01DROPS Design answered:
Dag Johanneke,
Dit heb ik even doorgegeven aan de ontwerpafdeling ter controle. De extra rij(en) verstoort inderdaad het kabelpatroon en dat lijkt me niet de bedoeling. Zodra er duidelijkheid is, zal ik bericht doen via deze post.
20.10.2018 - 16:44
![]() Mie wrote:
Mie wrote:
Hej Jeg synes garnmængden virker lille når garnet kun har en løbelængde på 150 meter. Kan det så passe med 250-300 g? Hilsen Mie
04.10.2018 - 08:16DROPS Design answered:
Hei Mie. Denne genseren er strikket ganske løst (hvis du ser på strikkefastheten), og da går det med litt mindre garn. God fornøyelse.
04.10.2018 - 09:13
![]() Dominguez wrote:
Dominguez wrote:
Bonjour, pour le dos et le devant, je ne comprends pas, vous dites tricoter tout envers, astuce tricoter envers ? C'est du jersey ? On tricote tous rangs à l'envers ? Merci d'avance pour votre aide.
03.10.2018 - 06:17DROPS Design answered:
Bonjour Mme Dominguez, le bas du dos/du devant et des manches se tricote en jersey envers (= envers sur l'endroit), mais certaines tricoteuses préfèrent tricoter en mailles endroit, vous pouvez alors simplement tricoter à l'endroit sur l'envers jusqu'à la fin = le jersey envers sera le côté visible. Bon tricot!
03.10.2018 - 08:07
![]() Erna Urff wrote:
Erna Urff wrote:
Ik kom echt niet uit het telpatroon, 6e en 10e naald! Met o en x symbool. Graag duidelijke uitleg. Alvast hartelijk dank.
29.09.2018 - 16:48DROPS Design answered:
Dag Erna, Bij de steek met het kruisje steek je de naald in de steek die 3 naalden eronder is gebreid, dan maak je aan de achterkant een omslag en haal de draad door die steek en je haalt de draad naar boven. Dan brei je 1 steek recht en daarna steek je nogmaals de naald in de steek 3 naalden eronder en haal je de draad naar boven. Nu heb je er dus 2 steken bij op de naald aan beide kanten van de steek met het kruisje. De steek met het rondje brei je gewoon recht en daarna heb je nog een steek met een kruisje die je op dezelfde manier als hierboven beschreven breit.
30.09.2018 - 21:09
![]() Germana wrote:
Germana wrote:
Yes, you have explained me marvellously. Thank you very much. Your sincerely, Germana
27.09.2018 - 08:01
![]() Germana wrote:
Germana wrote:
Goodmorning, I need more information regard the crossed symbol, I have understood not so much about it. Could you give me further explanations? Thank you very much, your sincerely Germana
27.09.2018 - 05:32DROPS Design answered:
Hi Germana, The cross represents the following: You first work in the stitch 4 rounds below the stitch you are on - insert the right needle in this stitch and pull the strand through to 3 cm in length (keep it on the needle), knit the next stitch and then repeat the long stitch in the same stitch 4 rounds below, which gives you 3 stitches on the needle. I hope this helps and happy knitting!
27.09.2018 - 07:54
![]() Merete wrote:
Merete wrote:
Skal det strikkast rett både i ruter med blank innhald og dei med ein runding?
21.09.2018 - 19:48DROPS Design answered:
Hei Merete. Ja det stemmer, den masken med sirkel refereres til i symbolet rett under (kryss), så det er gjort slik for at det skal være lett å se hvilken rettmaske det er snakk om der. Men ja, både blanke ruter og ruter med hul sirkler skal strikkes rett. God fornøyelse.
24.09.2018 - 13:26
|
||||||||||||||||||||||
Clemence#clemencesweater |
||||||||||||||||||||||
 |
 |
|||||||||||||||||||||
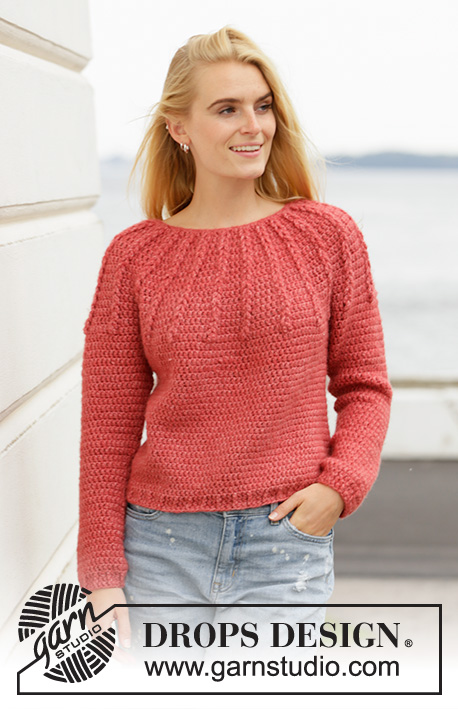
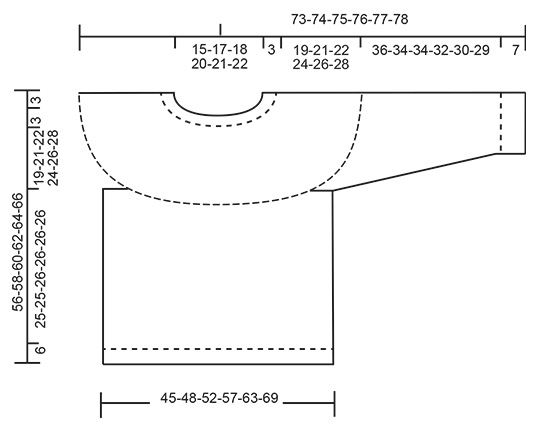
Knitted jumper with round yoke in DROPS Air. The piece is worked top down with textured border. Sizes S - XXXL.
DROPS 197-8 |
||||||||||||||||||||||
|
EXPLANATIONS FOR THE PATTERN: ------------------------------------------------------- PATTERN: See diagram A.1. Choose diagram for your size. DECREASE/INCREASE tip (evenly spaced): To work out how to decrease/increase evenly, count the total number of stitches on the needle (e.g. 180 stitches) and divide by the number of decreases/increases to be made (e.g. 4) = 45. In this example, decrease by knitting each 44th and 45th stitch together. Increase by making 1 yarn over after each 45th stitch. On the next round work the yarn overs twisted to avoid holes. PURLING TIP (for sleeves and body): When purling from the right side, it is possible to turn the piece inside out and knit from the wrong side. Remember to turn the piece back so that you work from the right side when working rib. DECREASE TIP (for sleeves): Decrease 1 stitch on each side of the marker thread as follows: Work until there are 3 stitches left before the marker thread, purl 2 together, purl 2 (the marker thread sits in the middle of these 2 stitches) purl the next 2 stitches together (NOTE! Knit if you have turned the piece inside out). ------------------------------------------------------- START THE PIECE HERE: ------------------------------------------------------- JUMPER: The piece is worked in the round with circular needle, top down. After the yoke the body is worked in the round with circular needle. The sleeves are worked in the round with short circular needle/double pointed needles. YOKE: Cast on 54-60-63-66-69-72 stitches with circular needle size 7 mm and Air. Insert 1 marker thread at the beginning of the round (= mid back). Work A.1a over all stitches – see diagram for your size (= 18-20-21-22-23-24 repeats of 3 stitches). Continue until A.1a has been completed. Change to circular needle size 8 mm and work A.1b over A.1a. REMEMBER THE KNITTING TENSION! When A.1b has been completed there are 180-200-210-242-253-264 stitches on the needle. Then work A.1c over A.1b. Repeat A.1c in height until the piece measures 22-24-25-27-29-31 cm from the cast-on edge – adjust so that you finish after a round worked in the same way as 1st round in A.1c. Purl 1 round where you decrease 4-4-0-12-11-0 stitches evenly on round – read DECREASE/INCREASE TIP = 176-196-210-230-242-264 stitches. The next round is purled as follows: Work the first 26-28-30-33-36-40 stitches (= half back piece), place the next 36-42-45-49-49-52 stitches on a thread for sleeve, cast on 6-6-8-8-10-10 new stitches under the sleeve, work the next 52-56-60-66-72-80 stitches (= front piece), place the next 36-42-45-49-49-52 stitches on a thread for sleeve, cast on 6-6-8-8-10-10 new stitches under the sleeve and work the last 26-28-30-33-36-40 stitches (= half back piece). THE PIECE IS NOW MEASURED FROM HERE! BODY: = 116-124-136-148-164-180 stitches. Insert 1 marker thread in the middle of the 6-6-8-8-10-10 stitches cast on under the one sleeve and start the round by this marker. Continue with purl – read PURLING TIP, until the piece measures 25-25-26-26-26-26 cm from the division. Change to circular needle size 7 mm and work rib (= knit 2 / purl 2) for 6 cm. Loosely cast off with knit over knit and purl over purl – to avoid the cast-off edge being tight, you can cast off with a needle size 8 mm. The jumper measures approx. 56-58-60-62-64-66 cm from the shoulder. SLEEVE: Place the 36-42-45-49-49-52 stitches from the thread on the one side of the piece on short circular needle/double pointed needles size 8 mm and knit up 1 stitch in each of the 6-6-8-8-10-10 stitches cast on under the sleeve = 42-48-53-57-59-62 stitches. Insert 1 marker thread in the middle of the 6-6-8-8-10-10 stitches under the sleeve and start the round here. Continue with purl – remember PURLING TIP. When the piece measures 3 cm from the division, decrease 2 stitches mid under sleeve – read DECREASE TIP. Decrease like this every 5-3-2½-2-2-1½ cm a total of 7-10-12-13-13-14 times = 28-28-29-31-33-34 stitches. Continue until the sleeve measures 36-34-34-32-30-29 cm from the division (shorter measurements in larger sizes due to longer yoke). Knit 1 round where you increase 0-0-3-1-3-2 stitches evenly on round = 28-28-32-32-36-36 stitches. Change to double pointed needles size 7 mm and work rib (= knit 2 / purl 2) for 6 cm. The sleeve measures approx. 43-41-41-39-37-36 cm from the division. Loosely cast off with knit over knit and purl over purl – to avoid the cast-off edge being tight, you can cast off with a needle size 8 mm. Work the other sleeve in the same way. |
||||||||||||||||||||||
Diagram explanations |
||||||||||||||||||||||
|
||||||||||||||||||||||
 |
||||||||||||||||||||||
 |
||||||||||||||||||||||
Have you finished this pattern?Tag your pictures with #dropspattern #clemencesweater or submit them to the #dropsfan gallery. Do you need help with this pattern?You'll find 26 tutorial videos, a Comments/Questions area and more by visiting the pattern on garnstudio.com. © 1982-2026 DROPS Design A/S. We reserve all rights. This document, including all its sub-sections, has copyrights. Read more about what you can do with our patterns at the bottom of each pattern on our site. |
||||||||||||||||||||||


With over 40 years in knitting and crochet design, DROPS Design offers one of the most extensive collections of free patterns on the internet - translated to 17 languages. As of today we count 324 catalogues and 12290 patterns translated into English (UK/cm). 12290
We work hard to bring you the best knitting and crochet have to offer, inspiration and advice as well as great quality yarns at incredible prices! Would you like to use our patterns for other than personal use? You can read what you are allowed to do in the Copyright text at the bottom of all our patterns. Happy crafting!
Post a comment to pattern DROPS 197-8
We would love to hear what you have to say about this pattern!
If you want to leave a question, please make sure you select the correct category in the form below, to speed up the answering process. Required fields are marked *.