
Popular categories
Looking for a yarn?


Comments / Questions (141)
![]() Anette Lage wrote:
Anette Lage wrote:
Jeg har strikket str 6/9 mdr uden problemer. Men har prøvet at strikke 3/4 år uden held. Den bliver alt for bred, faktisk passer ryggen næsten mig der er str 36???? Strikke fasthed og maskeantal passer, men trøjen bliver alt, alt for bred. Min drops garn forhandler mener der er fejl i opskriften. Vil I checke det. Jeg vil gerne igang med mit indkøbte garn ... Igen igen. Venlig hilsen Anette Lage
06.09.2013 - 13:50DROPS Design answered:
Hej Anette. Det lyder da ikke godt - men ogsaa lidt underligt? Du strikker 3/4 aar og har 231 m paa pinden (for baade forstykkerne og bagstykket). Med den rette strikkefasthed i glat er det 88 cm, men du starter med at strikke M.1 (bölgemotiv) og det traekker sig sammen og skulle derfor ende paa ca 80-82 cm i alt. Hvor bredt er dit stykke med en strikkefasthed paa 26 m per 10 cm?
10.09.2013 - 17:03
![]() Ilse Ter Haar wrote:
Ilse Ter Haar wrote:
Bij het telpatroon staat een fout volgens mij. Bij het onderste symbool staat wel een omslag maar wordt in de omschrijving niet genoemd. In de engelse vertaling staat wel een omslag erbij. Er moet wel een omslag bij!
04.09.2013 - 16:45DROPS Design answered:
Hoi Ilse. Je hebt helemaal gelijk, die omslag is in de vertaling verdwenen. Ik heb het aangepast. Bedankt voor het melden!
05.09.2013 - 17:06Nella Nullo wrote:
Buongiorno. Complimenti, questo modello è molto grazioso. Sarebbe possibile avere le spiegazioni in italiano? Grazie. Nella Nullo Vercelli - Italia
29.08.2013 - 16:19DROPS Design answered:
Buonasera. Tradurremo il modello prossimamente. La ringraziamo della richiesta. Buon lavoro!
29.08.2013 - 19:02
![]() Bente Mikkelborg wrote:
Bente Mikkelborg wrote:
Jeg har strikket trøje og bukser uden problemer på denne dejlig model men kan ikke få mønster til at passe på sokker hvor man slår 68 m op hvad gør jeg forkert
17.08.2013 - 12:12
![]() Lisbeth wrote:
Lisbeth wrote:
Takk! Da skjønner jeg litt mer. Men for å være helt sikker på at jeg skjønner rett: skal jeg strikke 2 m sammen på slutten på pinne 13 da?
27.03.2013 - 12:28DROPS Design answered:
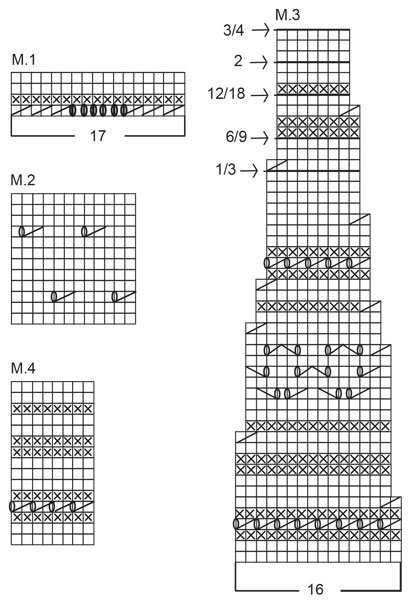
Den förste pind i M.3 kommer paa vrangsiden (laeses da fra venstre mod höjre). Det betyder at 2 r sammen kommer fra retten, saa i pind 6 begynder du med 2 r sammen, og i pind 12 slutter du med 2 r sammen per gentagelse af mönstret.
28.03.2013 - 11:57
![]() Lisbeth wrote:
Lisbeth wrote:
Skjønner ikke M3. Det begynner med 16 m men på 7.linje er det 15 m. Videre oppover er det en mindre m på slutten. ????? Prøver og skjønne, men nei. Kan det forklares enkelt?
25.03.2013 - 21:35DROPS Design answered:
I pinne 6, 20, 24, 32 strikker du 2 m rett sammen i begyndelsen af M3. Paa denne maade faar du 1 m mindre per gentagelse af mönstret.
27.03.2013 - 09:36
![]() Patti Karns wrote:
Patti Karns wrote:
I would like to know how the last foot measurement is applied for the socks. Is it from when you start the garter rows after making the ribbon allowance row or is is when the foot actually measures 11cm from the toe back under the foot along the bottom seam?
02.03.2013 - 20:58DROPS Design answered:
Dear Mrs Karns, the measurements works when socks is finished. Pattern has been edited, please check the end. Thank you. Happy knitting!
04.03.2013 - 20:27Jessy Noël wrote:
Je crois qu'il y a un erreur dans le M.1 il y a 18 mailles mais il est indiqué 17 mailles. De plus, le modèle représente 6 jetées de suite, mais selon le modèle ce n'est pas exactement pareille. Je crois qu'au lieu d'indiqué 1 jetée...il devrait être inscrit 1 jeté suivie d'une maille end. s'il n'y a pas d'erreur je ne comprends pas comment réaliser ce projet au niveau de M.1 rang 1. pouvez-vous m'aider?
07.02.2013 - 20:41DROPS Design answered:
Bonjour Madame Noël, M.1 se tricote bien sur 17 mailles, le 1er rang se réalise ainsi : *3 fois (2 m ens à l'end), 5 fois (1 jeté, 1 m end), 1 jeté, 3 fois (2 m ens à l'end)*, répétez de *-* sur les mailles indiquées. Bon tricot !
08.02.2013 - 08:49Judith wrote:
This is my first time trying charts and I'm a little nervous. It says the chart shows trhe stiches from the right side. does that mean that the wrong side rows are not in the chart? Like by M1 do I do the pattern, then a purl(WS) then a purl (RS) and knit from the wrong side? Is the chart a total of 4 rows or just 4 rows from the right side meaning 8 rows? Please help!
05.01.2013 - 20:05
![]() Wanda Prince wrote:
Wanda Prince wrote:
I dont know how to use a chart for the patten Could I get the written instructions?
14.12.2012 - 04:04
|
|||||||||||||||||||
Snow Baby#snowbabyset |
|||||||||||||||||||
 |
 |
||||||||||||||||||
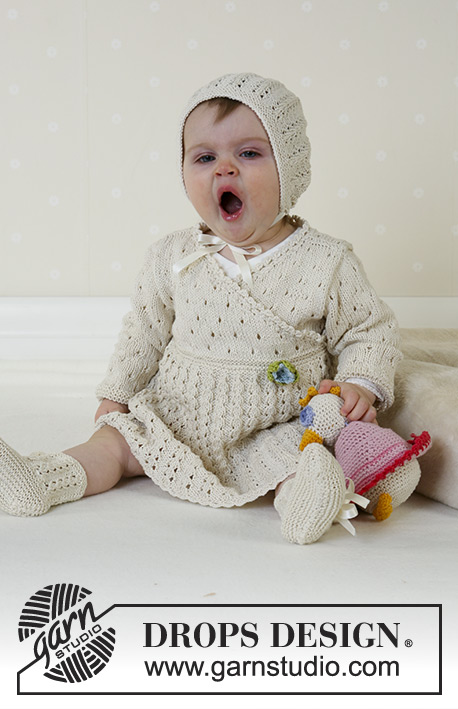
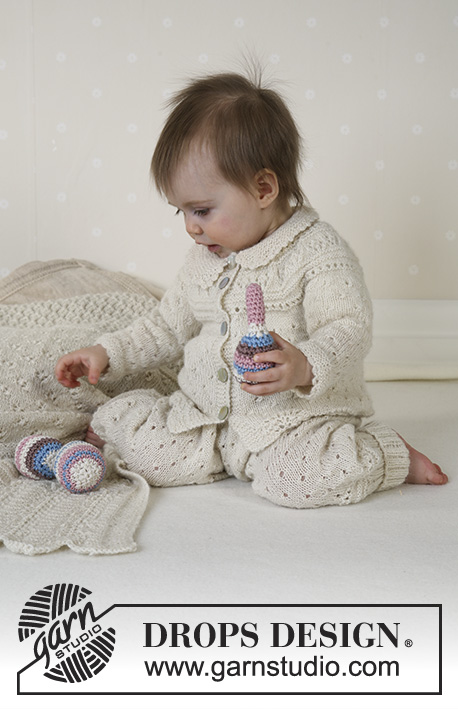
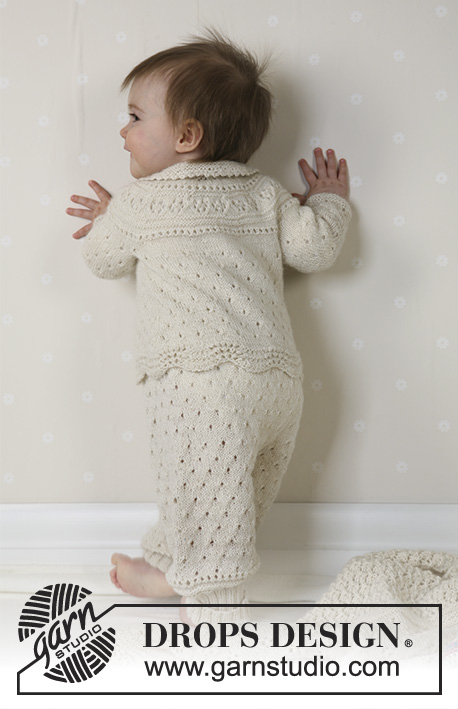
DROPS Jacket, trousers, bonnet, socks, blanket, ball and rattle in Alpaca
DROPS Baby 13-18 |
|||||||||||||||||||
|
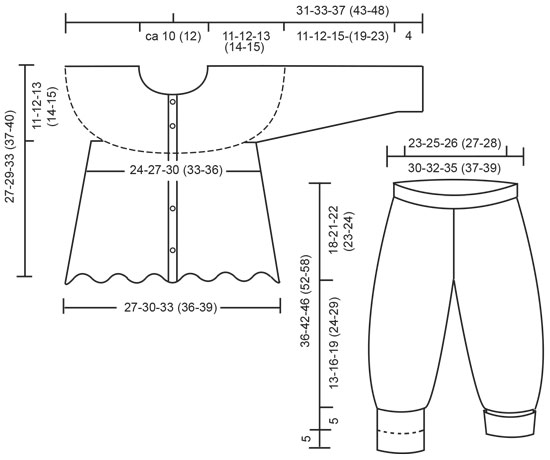
Knitting tension: 26 sts x 34 rows on needle size 2.5mm in stocking sts = 10 x 10 cm JACKET: Garter sts, back and forth on needle: Knit all rows Garter sts, on circular needle: knit 1 round, purl 1 round Pattern: See diagrams M.1 to M.3. The diagram shows the pattern from the right side. Button hole: Make button holes on right front band from the right side as follows: cast off 3rd and 4th st from the edge and cast on 2 new sts on next row. Make buttonholes as follows: Size 1/3 months: 4, 10, 16, 22 and 26 cm Size 6/9 months: 5, 11, 17, 23 and 28 cm Size 12/18 months: 6, 13, 20, 27 and 32 cm Size 2 years: 9, 16, 23, 30 and 36 cm Size 3/4 years: 9, 17, 25, 33 and 39 cm Decreasing tips 1(applies to collar on jacket): All decreases are done at the beg of every row. Dec 1 st as follows at beginning of row: slip 1 st as if to knit, K1, psso Increasing tips (applies to collar on jacket): Inc 1 st by picking up the thread between 2 sts from previous row and knit this into back of st. Front and back piece: Knit the jacket back and forth on circular needle from mid front. Using both ends of the circular needle size 2.5mm (to make sure the edge becomes elastic) cast on 163-180-197 (214-231) sts (incl 5 edge sts each side towards mid front) with Alpaca. Remove 1 needle and knit 2 rows garter sts. Now knit 3 repeats of M.1 with 5 edge sts each side in garter sts. After M.1 knit 2 rows stocking sts (continue in garter sts over the 5 edge sts until finished measurements), at the same time adjusting number of sts evenly on 1st row to 148-166-184 (196-214) (do not dec over the 5 edge sts each side). Insert a marking thread 39-44-49 (51-56) sts in from each side = 70-78-86 (94-102) sts between marking threads on back piece. Now knit M.2 with 5 edge sts each side. At the same time, when piece measures 5 cm dec 1 st each side of both marking threads on every 3-3-4 (4-5) cm a total of 4 times = 132-150-168 (180-198) sts – knit sts not fitting into pattern in stocking sts. Remember buttonholes on right front edge – see explanation above. When piece measures approx 16-17-20 (23-25) cm – adjust after 2 or 3 rows in stocking sts after a row with pattern in diagram – cast off 10 sts each side for armhole (i.e. 5 sts each side of marking threads) = 52-60-68 (76-84) sts on back piece and 30-35-40 (42-47) sts on each front piece. Put piece aside and knit the sleeves. Sleeve: Knit round on double pointed needles size 2.5mm. Cast on 36-36-42 (42-42) sts with Alpaca. Knit 8 rounds garter sts and continue in M.2. At the same time, when sleeve measures 4 cm inc 2 sts mid under arm a total of 8-10-10 (13-15) times on every 4-4-5 (5-5) round = 52-56-62 (68-72) sts – incorporate the new sts in pattern as you go along. When sleeve measures 15-16-19 (23-27) cm - adjust as for back and front pieces – cast off 10 sts mid under arm = 42-46-52 (58-62) sts. Put the piece aside and knit the other sleeve. Yoke: Put sleeves in on the same needle as back and front pieces where you cast off for armholes = 196-222-252 (276-302) sts. Purl 1 row from the wrong side. Knit 1 row from the right side, at the same time adjusting number of sts evenly on row to 186-218-250 (266-298) (do not dec over the 5 edge sts each side). Now knit and dec following M.3 (continue over the 5 edge sts as before) – finish pattern in diagram at the arrow for appropriate size. After M.3 there are 109-114-115 (122-136) sts left. Knit 1 row from the right side, at the same time adjusting number of sts to 72-76-82 (86-92). Collar: Cast off the outermost 3 sts each side = 66-70-76 (80-86) sts. Continue in garter sts, at the same time inc 1 st each side – see Increasing tips – on the 3rd row. Inc between the first 2 and the last 2 sts on every other row a total of 3 times. At the same time, when collar measures 2 cm, insert 3 marking threads in piece, 1 by each shoulder and 1 mid back. Now inc 1 st on each side of all marking threads – see Increasing tips. Repeat the inc after 4 rows = 84-88-94 (98-104) sts. When collar measures 5 cm dec each side on every row – see Decreasing tips: 1 st 3 times = 78-82-88 (92-98) sts. Loosely cast off remaining sts. Assembly: Sew the openings under the arms. Sew on buttons. Crochet border: Using crochet hook size 2.5 crochet round the collar as follows: 1 dc in 1st st, *3 ch, 1 tr in the 1st ch, skip 2 sts, 1 dc in next st*, repeat from *-* Crochet round sleeve edges as follows: 1 dc in 1st st, *5 ch, skip 2 sts, 1 dc in next st*, repeat from *-*. _________________________________________ TROUSERS: Rib: *K2, P2*, repeat from *-* Pattern: see diagrams M.2 and M.4. Decreasing tips (applies to inner side of leg: Dec as follows 1 st after the marking thread: K2 tog Decrease as follows 1 st before marking thread: K2 tog into back of st. Start at the top and knit downwards. Cast on 120-128-136 (140-144) sts with circular needle size 2.5mm. Knit 4 cm Rib. Continue in stocking sts, at the same time inc evenly on round to 156-168-180 (192-204) sts. Insert a marking thread at the beginning of round = mid back and after 78-84-90 (96-102) sts = mid front. Knit M.2, at the same time, knitting elevation at the back as follows: knit 12 sts, turn the piece (to avoid a hole slip the first st as if to knit and tighten thread when knitting back), knit 24 sts, turn the piece. Continue like this by knitting 12 sts more before each turn another 8-10-10 (12-12) times. Now knit round over all sts. When piece measures 15-18-19 (20-21) cm (measured from mid front) inc 1 st on each side of the middle 2 sts mid front and mid back on every other row a total of 5 times (inc by picking up st from previous row and knit this) = 176-188-200 (212-224) sts. After the last inc the piece measures approx 18-21-22 (23-24) cm mid front. Knit next round as follows from mid back: Cast off 3 sts, knit 82-88-94 (100-106) sts, cast off 6 sts, 82-88-94 (100-106) sts, cast off 3 sts. Now finish each leg separately. Legs: Put sts from one leg on a thread and sts from the other leg on double pointed needles size 2.5mm = 82-88-94 (100-106) sts. Knit round (continue pattern as before) and insert a marking thread at beginning of round = inner side of leg. When leg measures 2 cm dec 1 st on both sides of marking thread – see Decreasing tips – on every 2-2-2.5 (2.5-3) cm a total of 4-5-6 (7-8) times = 74-78-82 (86-90) sts. When leg measures 10-13-16 (21-26) cm knit M.4 – start at the bottom of diagram. After M.4 knit 1 round, at the same time dec evenly to 60-64-68 (72-76) sts. Knit 10 cm Rib and cast off loosely. Knit the other leg in the same way. Assembly: Sew opening between legs. Fold the rib at bottom of legs. _________________________________________ BONNET: Size: 1/3 – 6/9 months –12/18 months To fit head circumference: 40/42 – 42/44 – 44/46 cm Garter sts: knit all rows Pattern: see diagrams M.2 and M.3. Knit back and forth on circular needle. Cast on 82-88-100 sts on needle size 2.5mm. Knit garter sts, at the same time making a hole each side on every 6th row by casting off the 3rd st from edge and making a yo over the cast off st. Read all of the following section before knitting it! When piece measures 6 cm knit M.2 with 5 sts in garter sts each side (continue holes on every 6th row as before) until piece measures 14-15-16 cm. Adjust after 2 rows stocking sts after 1 pattern row. At the same time, on the last row from the wrong side, cast off the 5 outermost sts each side and adjust number of sts to 70-80-90. Insert 5 marking threads in piece as follows: 1st after 1 st, and thereafter 14-16-18 sts between each (= 13-15-17 sts after the last marking thread). Knit garter sts, at the same time dec 1 st after each marking thread on every other row a total of 12-14-16 times = 10 sts left. Cut the thread, pull through remaining sts and attach. Assembly: Sew seam mid back. Crochet a border along the cast-on row with Alpaca and crochet hook size 2.5 as follows: 1 dc in 1st st, *5 ch, skip 2 sts, 1 dc in next st*, repeat from *-*. Crochet along garter sts at back of bonnet in the same way. Fold the front edge double against the right side and attach with a couple of neat sts to lower edge. Pull silk ribbon through the row of holes. _________________________________________ SOCKS: Size: 1/3 – 6/9 – 12/18 months To fit foot length: 10-11-12 cm Rib: *K2, P2*, repeat from *-* Pattern: See diagram M.1. The diagram shows the pattern from the right side. Garter sts: Knit all rows. The sock is knitted back and forth from mid back. Cast on 68-68-68 using 2 needles size 2.5mm. Remove 1 needle knit 2 rows garter sts. Now knit 5-6-7 repeats of M.1 – piece measures approx 5-6-7 cm. Knit 1 row from the right side, at the same time adjusting number of sts to 34-38-42. Knit 1 row from the wrong side and knit next row as follows from the right side: K1, *K2 tog, yo*, repeat from *-* and finish with K1. Knit 1 row from wrong side. Now put the outermost 12-13-15 sts each side on a thread. = 10-12-12 sts left. Knit 4-4.5-5 cm garter sts over these sts. Put sts from thread back on needle and pick up 10-11-13 sts on each side of middle piece = 54-60-68 sts. Knit 3-4-5 cm garter sts over all sts, at the same time after 1.5-2-2.5 dec on every other row until finished measurements as follows: Dec 1 st at the beginning and at the end of row and K2 tog on each side of the 2 middle sts. Cast off and sew seam under foot and mid back. Pull a silk ribbon or similar through holes. |
|||||||||||||||||||
Diagram explanations |
|||||||||||||||||||
|
|||||||||||||||||||
 |
|||||||||||||||||||
 |
|||||||||||||||||||
Have you finished this pattern?Tag your pictures with #dropspattern #snowbabyset or submit them to the #dropsfan gallery. Do you need help with this pattern?You'll find 34 tutorial videos, a Comments/Questions area and more by visiting the pattern on garnstudio.com. © 1982-2026 DROPS Design A/S. We reserve all rights. This document, including all its sub-sections, has copyrights. Read more about what you can do with our patterns at the bottom of each pattern on our site. |
|||||||||||||||||||


With over 40 years in knitting and crochet design, DROPS Design offers one of the most extensive collections of free patterns on the internet - translated to 17 languages. As of today we count 325 catalogues and 12298 patterns translated into English (UK/cm). 12298
We work hard to bring you the best knitting and crochet have to offer, inspiration and advice as well as great quality yarns at incredible prices! Would you like to use our patterns for other than personal use? You can read what you are allowed to do in the Copyright text at the bottom of all our patterns. Happy crafting!
Post a comment to pattern DROPS Baby 13-18
We would love to hear what you have to say about this pattern!
If you want to leave a question, please make sure you select the correct category in the form below, to speed up the answering process. Required fields are marked *.