
Popular categories
Looking for a yarn?


Comments / Questions (34)
![]() Jeanette wrote:
Jeanette wrote:
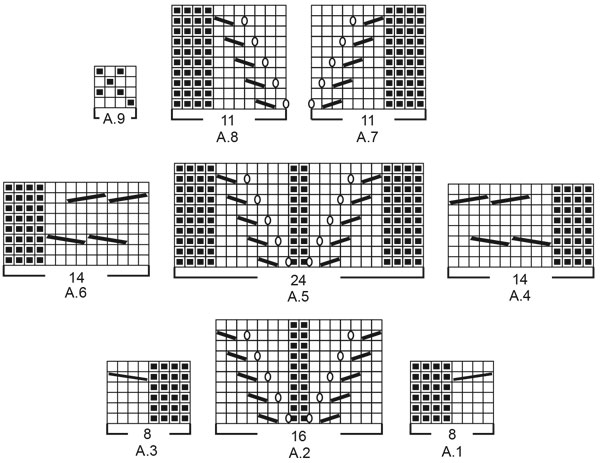
What in A1 through A6 indicates we are doing a cable?
03.02.2026 - 02:47DROPS Design answered:
Dear Jeanette, just follow the legend of the symbols, ie 6th and 7th symbol, that's how you will cross stitches in A.1, A.3, A.4 and A.6. Read more about diagrams here. Happy knitting!
27.02.2026 - 14:47
![]() Jeanette wrote:
Jeanette wrote:
Sorry another question, as I look at the picture it looks like we should be doing cable in the back but I don't see anything in the A pattern instructions that address doing cable.
31.01.2026 - 21:58DROPS Design answered:
Hi Jeanette, Yes there are cables on the back piece as well as the front pieces. A.1, A.3, A.4 and A.6 all have cabling drawn into the diagrams (the diagonal lines across 4 squares). Regards, Drops Team.
02.02.2026 - 07:14
![]() Jeanette wrote:
Jeanette wrote:
I have started this beautiful sweater and at a stand still. I don't really understand your instructions, I get 1 row after 2 3/8" Using the A1, A2 etc becomes confusing. You only address row 1 for 24 3/8 inches, surely we don't do just the first row of the A patterns each row. I have knitted 64 years but the way modern patterns are written I become confused. I am attempting to type it out in language I understand but stuck for now.
31.01.2026 - 21:46
![]() Marcia wrote:
Marcia wrote:
Further to my question about the pattern for the back: for the WS rows, is the order A3, A2, A1, A6, A5, A4, A3, A2, A1?
09.04.2025 - 20:55DROPS Design answered:
Dear Marcia, correct this is how the diagrams will be read from the wrong side, remember to read the diagrams from the left towards the right. Happy knitting!
10.04.2025 - 09:45
![]() Marcia wrote:
Marcia wrote:
For the back piece, the pattern says to work A1, A2, A3, A4, A5, A6, and that works. But then it says to work A1, A2, A3. Shouldn’t it be A3, A2, and end with A1? I tried several times to knit it as written, but it doesn’t work.
08.04.2025 - 22:22DROPS Design answered:
Hi Marcia, You work the pattern, first with diagrams A.1 - A.6, then finish the row by repeating A.1- A.3 (as you do not want 8 purled stitches straight after each other you work A.1 first rather than A.3, and the end of the pattern will be 4 knitted stitches which are symmetrical to the 4 knitted stitches at the beginning of the row). Hope this helps. Happy knitting!
09.04.2025 - 06:47
![]() Catherine Streit wrote:
Catherine Streit wrote:
Bonjour, le diagramme A9 me pose un problème. Lorsqu'on fait l'augmentation, est-ce qu'on maintient le dessin pour compenser l'augmentation ou est-ce que le dessin de décale. Difficile d'expliquer mon problème !
09.01.2025 - 19:23DROPS Design answered:
Bonjour Mme Streit, la maille sous la manche avec le marqueur doit être une maille envers (cf AUGMENTATIONS-1, tricotez les augmentations en suivant A.9 autrement dit, en fin de tour, tricotez-la comme la maille suivante du diagramme, et tricotez la en début de tour comme la maille précédente (lisez le diagramme de gauche à droite). Le motif ne tombera plus juste sous la manche, mais il va s'élargir en restant juste sur toutes les mailles de la manche. Bon tricot!
10.01.2025 - 08:18
![]() Elke Naussed wrote:
Elke Naussed wrote:
Ich Stelle mir die Frage kann ich wenn ein Ärmel rundgestrickt werden soll, diesen auch in Reihen stricken ? Liebe Grüße
13.11.2024 - 19:33DROPS Design answered:
Liebe Frau Naussed, ja sicher, in diese Lektion erklären wir, wie man sowas anpassen kann. Viel Spaß beim Stricken!
14.11.2024 - 09:48
![]() Cardinal wrote:
Cardinal wrote:
Comment relever les mailles pour le col et une autre petite question a quel endroit du col faire des augmentation ,? merci d'avances de vos réponses
15.07.2024 - 18:35DROPS Design answered:
Bonjour Mme Cardinal, ces vidéos devraient pouvoir vous aider à relever les mailles: le long du côté et celle-ci nous montrons comment augmenter dans les sections envers des côtes, mais n'augmentez d'abord que dans 1 section envers sur 2 (le long de l'encolure V) puis dans les dernières sections 2 m envers de cette même partie (côtes 3/3 en haut et 2/2 le long des bordures devant). Bon tricot!
29.07.2024 - 10:17
![]() Doris Belz wrote:
Doris Belz wrote:
Ich brauche Hilfe beim Diagramm sind das nur die hinreihen ich verstehe das sonst nicht bitte Hilfe. MfG.Doris Belz
09.12.2023 - 08:01DROPS Design answered:
Liebe Frau Belz, alle Reihen sind im Diagram gezeichnet, die Hin-Reihen lesen Sie rechts nach links und die Rückreihen links nach rechts; die leere Kästchen werden glatt rechts gestrickt und die schwarze Quadraten werden glatt links gestrickt. Viel Spaß beim stricken!
11.12.2023 - 07:52
![]() Josee wrote:
Josee wrote:
Hallo, ik ben net begonnen met dit patroon maat M. Na de ribbelsteek begint het patroon als volgens: 2 kantsteken, 4 averecht, A1, A2, ….., 4 averecht, 2 kantsteken. De 4 averecht steken moeten ook averecht gebreid worden op de retour naald? (Dus het wordt een soort ribbel steek van af een averecht steek) Of het is de bedoeling om ze recht te breien op de retour naald? Al vast bedankt
12.11.2023 - 10:35DROPS Design answered:
Dag Josee,
Het staat inderdaad niet goed aangegeven, maar die 4 steken brei je recht aan de verkeerde kant.
12.11.2023 - 17:30
|
|||||||||||||||||||||||||
Cabled Concerto#cabledconcertocardigan |
|||||||||||||||||||||||||
 |
 |
||||||||||||||||||||||||
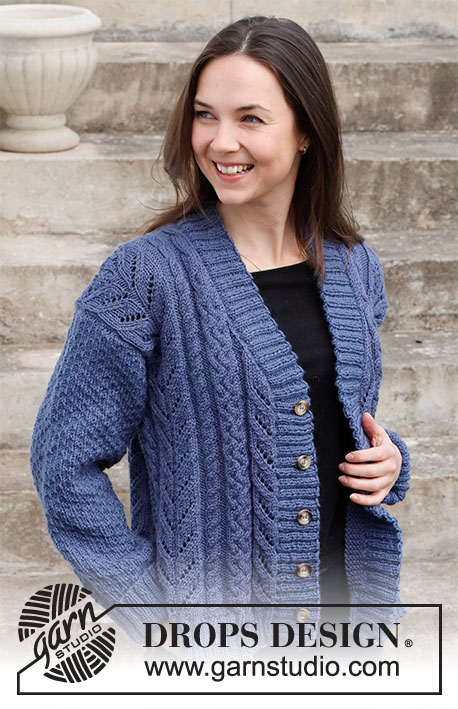
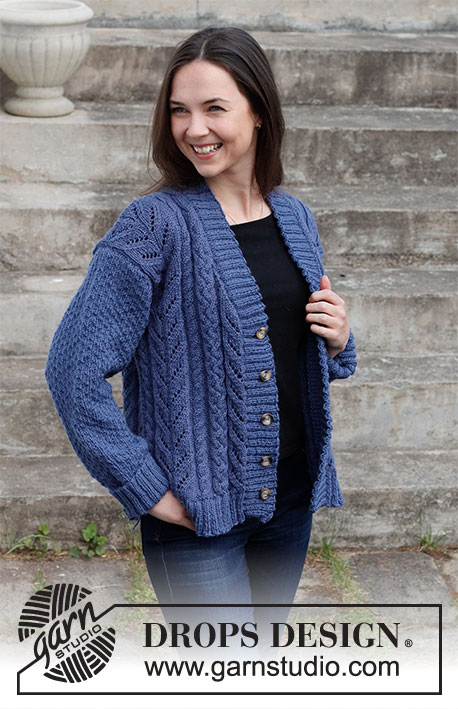
Knitted jacket in DROPS Karisma. Piece is knitted with cables, lace pattern, textured pattern and V-neck. Size: S - XXXL
DROPS 216-38 |
|||||||||||||||||||||||||
|
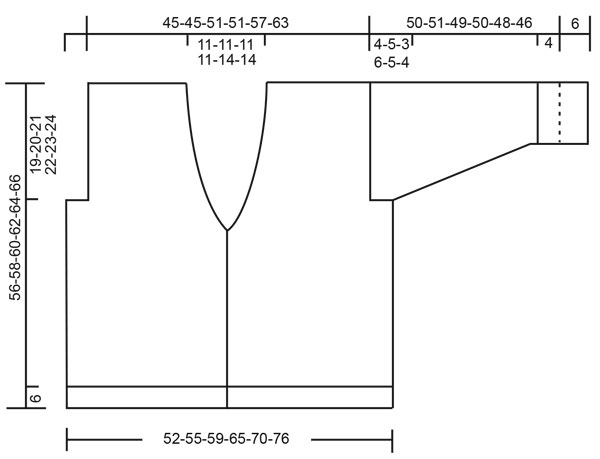
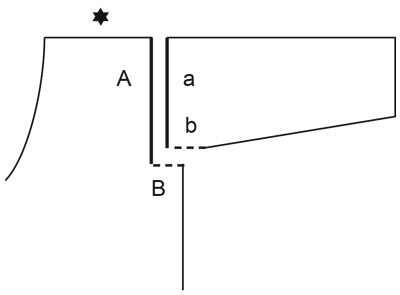
------------------------------------------------------- EXPLANATION FOR THE PATTERN: ------------------------------------------------------- GARTER STITCH (back and forth): Knit all rows. 1 ridge vertically = knit 2 rows. PATTERN: See diagrams A.1 to A.9. Diagrams show all rows in pattern seen from the right side. DECREASE TIP (applies to V-neck): All decreases are done from the right side, and decreases are done inside 1 edge stitch in garter stitch towards mid front! DECREASE AS FOLLOWS AFTER 1 EDGE STITCH IN GARTER STITCH: Slip 1 stitch knitwise, knit 1, pass slipped stitch over stitch worked (= 1 stitch decreased). DECREASE AS FOLLOWS BEFORE 1 EDGE STITCH IN GARTER STITCH: Begin 2 stitches before edge stitch and knit these 2 together (= 1 stitch decreased). INCREASE TIP-1 (applies to mid under sleeves): Increase 1 stitch on each side of marker as follows: Work until stitch with marker mid under sleeve, make 1 yarn over, purl stitch with marker as before, make 1 yarn over (= 2 stitches increased). On next round work yarn over twisted to avoid holes. Then work the new stitches in A.9. INCREASE TIP-2 (applies to increase on collar): Increase 1 stitch by making 1 yarn over between 2 purl stitches (seen from right side). On next row work yarn over twisted to avoid holes BIND-OFF TIP: To avoid a tight bind-off edge you may use a larger needle size. If this also is too tight, work a 1 yarn over after approx. every 8th stitch while binding off (bind off yarn overs as regular stitches). ------------------------------------------------------- START THE PIECE HERE: ------------------------------------------------------- JACKET - SHORT OVERVIEW OF THE PIECE: Work front pieces and back piece back and forth on circular needle in parts, bottom up. Work sleeves in the round on double pointed needles / a short circular needle, from the bottom and up to sleeve cap, then work the rest of sleeve back and forth on circular needle. Sew garment together. Then pick up stitches for band and collar - Work these in rib. BACK PIECE: Cast on 122-130-142-158-170-186 stitches on circular needle size 3.5 MM = US 4 with Karisma. Purl 1 row (= wrong side). Work next row as follows from right side: 2 edge stitches in GARTER STITCH - read explanation above - * knit 2, purl 2 *, repeat from *-* until 4 stitches remain on needle, knit 2, and finish with 2 edge stitches in garter stitch. Continue rib like this for 6 cm = 2⅜". Purl 1 row from wrong side while decreasing 0-2-2-2-0-0 stitches evenly (work edge stitches in garter stitch) = 122-128-140-156-170-186 stitches. Switch to circular needle size 4.5 MM = US 7. Work next row as follows from right side: 2 edge stitches in garter stitch, purl 1-4-2-2-1-1, work A.1 over the next 8-8-16-24-32-40 stitches (= 1-1-2-3-4-5 repetitions of 8 stitches), work A.2 (= 16 stitches), work A.3 (= 8 stitches), work A.4 (= 14 stitches), work A.5 (= 24 stitches), work A.6 (= 14 stitches), work A.1 (= 8 stitches), work A.2 (= 16 stitches), work A.3 over the next 8-8-16-24-32-40 stitches (= 1-1-2-3-4-5 repetitions of 8 stitches), purl 1-4-2-2-1-1 and finish with 2 edge stitches in garter stitch. Continue pattern like this. REMEMBER THE KNITTING GAUGE! When 1 row remains before piece measures 37-38-39-40-41-42 cm = 14½"-15"-15¼"-15¾"-16⅛"-16½" (and next row is worked from right side), decrease 2-2-2-4-4-4 stitches in each side by working the 4 stitches in each of the outermost 1-1-1-2-2-2 cables in each side knit together 2 by 2 = 118-124-136-148-162-178 stitches remain. On the next 2 rows bind off for armholes by binding off 7-10-8-14-13-13 stitches at the beginning of the next 2 rows = 104-104-120-120-136-152 stitches remain. Continue the pattern as before with 1 purl stitch (sees from right side) and 1 edge stitch in garter stitch in each side. When piece measures 54-56-58-60-62-64 cm = 21¼"-22"-22¾"-23⅝"-24⅜"-25¼", bind off the middle 20-20-20-20-26-26 stitches for neck and finish each shoulder separately. Work and bind off 1 stitch on next row from the neck = 41-41-49-49-54-62 stitches remain. When 2 rows remain before piece measures 56-58-60-62-64-66 cm = 22"-22¾"-23⅝"-24⅜"-25¼"-26" (and next row is worked from right side), decrease 7-7-9-9-10-12 stitches on shoulder by knitting stitches in each of the cables in A.1/A.3 and A.4/A.6 together 2 by 2 = 34-34-40-40-44-50 stitches remain. Knit 1 row from wrong side. Bind off by knitting from right side - read BIND-OFF TIP! Back piece measures approx. 56-58-60-62-64-66 cm = 22"-22¾"-23⅝"-24⅜"-25¼"-26" from shoulder and down. Work the other shoulder the same way. LEFT FRONT PIECE (when garment is worn): Cast on 61-65-73-81-89-97 stitches on circular needle size 3.5 MM = US 4 with Karisma. Purl 1 row (= wrong side). Work next row as follows from the right side (i.e. from the side): 2 edge stitches in garter stitch, * knit 2, purl 2 *, repeat from *-* until 3 stitches remain on needle, knit 2, and finish with 1 edge stitch in garter stitch edge towards mid front. Continue rib like this for 6 cm = 2⅜". Purl 1 row from wrong side while decreasing 0-1-3-3-4-4 stitches evenly (work edge stitches in garter stitch) = 61-64-70-78-85-93 stitches. Switch to circular needle size 4.5 MM = US 7. Work next row as follows from the right side (i.e. from the side): 2 edge stitches in garter stitch, purl 1-4-2-2-1-1, work A.1 over the next 8-8-16-24-32-40 stitches (= 1-1-2-3-4-5 repetitions of 8 stitches), work A.2 (= 16 stitches), work A.3 (= 8 stitches), work A.4 (= 14 stitches), work A.7 (= 11 stitches) and finish with 1 edge stitch in garter stitch towards mid front. Continue pattern like this. AT THE SAME TIME decrease for V-neck and armholes as explained below. V-NECK: When piece measures 33-34-35-36-37-38 cm = 13"-13⅜"-13¾"-14¼"-14½"-15", decrease for V-neck towards mid front - read DECREASE TIP. Decrease for V-neck every 4th row 9-9-9-9-11-11 times in total, and then every 6th row 2-2-2-2-3-3 times in total. ARMHOLE: AT THE SAME TIME when 2 rows before remain piece measures 37-38-39-40-41-42 cm = 14½"-15"-15¼"-15¾"-16⅛"-16½" (and next row is worked from right side), decrease 2-2-2-4-4-4 stitches in the side by knitting the 4 stitches in each of the outermost 1-1-1-2-2-2 cables towards the side together 2 by 2. On next row from the side, bind off for armholes by binding off the first 7-10-8-14-13-13 stitches on needle. After all decreases for V-neck and armholes, 41-41-49-49-54-62 stitches remain on needle. Continue the pattern as before with 1 purl stitch (seen from right side) and 1 edge stitch in garter stitch in each side. When 2 rows remain before piece measures 56-58-60-62-64-66 cm = 22"-22¾"-23⅝"-24⅜"-25¼"-26" (and next row is worked from right side), decrease 7-7-9-9-10-12 stitches on shoulder by knitting stitches in each of the cables in A.1/A.3 and A.4 together 2 by 2 = 34-34-40-40-44-50 stitches remain. Knit 1 row from wrong side. Bind off by knitting from right side - remember BIND-OFF TIP! Front piece measures approx. 56-58-60-62-64-66 cm = 22"-22¾"-23⅝"-24⅜"-25¼"-26" from shoulder and down. RIGHT FRONT PIECE (when garment is worn): Cast on 61-65-73-81-89-97 stitches on circular needle size 3.5 MM = US 4 with Karisma. Purl 1 row (= wrong side). Work next row as follows from the right side (i.e. from mid front): 1 edge stitch in garter stitch, * knit 2, purl 2 *, work from *-* until 4 stitches remain on needle, knit 2 and finish with 2 edge stitches in garter stitch. Continue rib like this for 6 cm = 2⅜". Purl 1 row from wrong side while decreasing 0-1-3-3-4-4 stitches evenly (work edge stitches in garter stitch) = 61-64-70-78-85-93 stitches. Switch to circular needle size 4.5 MM = US 7. Work next row as follows from the right side (i.e. from mid front): 1 edge stitch in garter stitch, work A.8 (= 11 stitches), work A.6 (= 14 stitches), work A.1 (= 8 stitches), work A.2 (= 16 stitches), work A.3 over the next 8-8-16-24-32-40 stitches (= 1-1-2-3-4-5 repetitions of 8 stitches), purl 1-4-2-2-1-1, and finish with 2 edge stitches in garter stitch towards the side. Continue pattern like this. AT THE SAME TIME decrease for V-neck and armholes as explained below. V-NECK: When piece measures 33-34-35-36-37-38 cm = 13"-13⅜"-13¾"-14¼"-14½"-15", decrease for V-neck towards mid front - read DECREASE TIP. Decrease for V-neck every 4th row 9-9-9-9-11-11 times in total, and then every 6th row 2-2-2-2-3-3 times in total. ARMHOLE: AT THE SAME TIME when 2 rows before remain piece measures 37-38-39-40-41-42 cm = 14½"-15"-15¼"-15¾"-16⅛"-16½" (and next row is worked from right side), decrease 2-2-2-4-4-4 stitches in the side by knitting the 4 stitches in each of the outermost 1-1-1-2-2-2 cables towards the side together 2 by 2. On next row from the side, bind off for armholes by binding off the first 7-10-8-14-13-13 stitches on needle. After all decreases for V-neck and armholes, 41-41-49-49-54-62 stitches remain on needle. Continue the pattern as before with 1 purl stitch (seen from right side) and 1 edge stitch in garter stitch in each side. When 2 rows remain before piece measures 56-58-60-62-64-66 cm = 22"-22¾"-23⅝"-24⅜"-25¼"-26" (and next row is worked from right side), decrease 7-7-9-9-10-12 stitches on shoulder by knitting stitches in each of the cables in A.1/A.3 and A.6 together 2 by 2 = 34-34-40-40-44-50 stitches remain. Knit 1 row from wrong side. Bind off knitting from right side. SLEEVES: Cast on 40-44-44-48-48-52 stitches on double pointed needles size 3.5 MM = US 4 with Karisma. Work rib in the round (= knit 2/purl 2). When rib measures 6 cm = 2⅜", insert 1 marker on round. This marks where sleeve should be folded up and measure sleeve from this marker later. When rib measures 10 cm = 4" from cast-on edge, knit 1 round while increasing 2 stitches evenly = 42-46-46-50-50-54 stitches. Insert 1 new marker in piece, in the first stitch on round. This marker marks mid under sleeve, and purl stitch with marker on every round onwards. Switch to double pointed needles size 4.5 MM = US 7 and work first round as follows: Purl stitch with marker, work A.9 until 1 stitch remains on round, and work last stitch as first stitch in A.9 (so that pattern begins and ends the same way on each side of stitch with marker). Continue pattern like this. AT THE SAME TIME when sleeve measures 10-10-8-6-10-10 cm = 4"-4"-3⅛"-2⅜"-4"-4" from first marker inserted, increase 2 stitches mid under sleeve – read INCREASE TIP-1. Increase like this every 2-2-2-2-1½-1½ cm = ¾"-¾"-¾"-¾"-½"-½" 17-17-19-19-21-21 times in total = 76-80-84-88-92-96 stitches. When sleeve measures 46-46-46-44-43-42 cm = 18"-18"-18"-17¼"-17"-16½" from first marker, work sleeve cap back and forth on circular needle from mid under sleeve – continue A.9 as before with 1 edge stitch in garter stitch in each side until finished measurements (i.e. work stitch with marker and last stitch on round in garter stitch). Work until sleeve measures 50-51-49-50-48-46 cm = 19¾"-20"-19¼"-19¾"-19"-18" from first marker (and approx. 56-57-55-56-54-52 cm = 22"-22½"-21⅝"-22"-21¼"-20½" from cast-on edge), i.e. There is a vent of approx. 4-5-3-6-5-4 cm = 1½"-2"-1⅛"-2⅜"-2"-1½" at the top of sleeve. Bind off knitting from right side. NOTE! Shorter measurements in the larger sizes because of wider shoulders. Work the other sleeve the same way. ASSEMBLY: Sew shoulder seams inside bind-off edge. Sew side seam on front pieces and back piece from armholes and down to where rib begins, so that there is a vent of approx. 6 cm = 2⅜" at the bottom in each side - sew side seams in outer loops of edge stitches , to get a flat seam. Sew sleeve cap to armhole inside 1 edge stitch in garter stitch along armhole. Then sew vent at the top of sleeve to the bottom of armhole – see chart. BAND AND COLLAR ON LEFT FRONT PIECE: Use circular needle size 3.5 MM = US 4 and Karisma, begin from right side mid back of neck, and pick up approx. 152-156-160-168-172-180 stitches inside 1 edge stitch along neck line in the back of neck and then down along front piece (number of stitches should be divisible by 4). Work first row as follows from wrong side: 1 edge stitch in garter stitch, * purl 2, knit 2 *, repeat from *-* until 3 stitches remain on needle, purl 2, and finish with 1 edge stitch in garter stitch. Continue rib back and forth like with knit over knit, purl over purl and garter stitch over garter stitch. When rib measures 3 cm = 1⅛", insert 1 marker after the first 33-33-33-41-41-41 stitches from mid back. On next row from right side increase every other purl 2 to purl 3 from mid back of neck and down to marker – read INCREASE TIP-2 = 4-4-4-5-5-5 stitches increased. When rib measures 5 cm = 2", increase the remaining purl 2 to purl 3 from mid back and down to marker = 4-4-4-5-5-5 stitches increased. When rib measures 6 cm = 2⅜", bind off with knit over knit and purl over purl - remember BIND-OFF TIP! BAND AND COLLAR ON RIGHT FRONT PIECE: Begin from right side at the bottom of right front piece and pick up the same number of stitches as on left band and collar, from bottom edge to mid back of neck. Work rib the same way as on left front piece, and increase on collar part the same way as on left front piece. AT THE SAME TIME when rib measures 4 cm = 1½", decrease for 5-5-5-6-6-6 buttonholes evenly. Place top buttonhole approx. 1 cm = ⅜" below decrease for V-neck began, and bottom buttonhole approx. 6 cm = 2⅜" from bottom edge. 1 buttonhole = make 1 yarn over and knit 2 together. NOTE! It will look best if decrease is done in a purl section (seen from right side). When rib is done, bind off with knit over knit and purl over purl. Sew the buttons on to the left band and sew the collar together mid back. |
|||||||||||||||||||||||||
Diagram explanations |
|||||||||||||||||||||||||
|
|||||||||||||||||||||||||
 |
|||||||||||||||||||||||||
 |
|||||||||||||||||||||||||
 |
|||||||||||||||||||||||||
Have you finished this pattern?Tag your pictures with #dropspattern #cabledconcertocardigan or submit them to the #dropsfan gallery. Do you need help with this pattern?You'll find 25 tutorial videos, a Comments/Questions area and more by visiting the pattern on garnstudio.com. © 1982-2026 DROPS Design A/S. We reserve all rights. This document, including all its sub-sections, has copyrights. Read more about what you can do with our patterns at the bottom of each pattern on our site. |
|||||||||||||||||||||||||


With over 40 years in knitting and crochet design, DROPS Design offers one of the most extensive collections of free patterns on the internet - translated to 17 languages. As of today we count 324 catalogs and 12267 patterns - 12257 of which are translated into English (US/in).
We work hard to bring you the best knitting and crochet have to offer, inspiration and advice as well as great quality yarns at incredible prices! Would you like to use our patterns for other than personal use? You can read what you are allowed to do in the Copyright text at the bottom of all our patterns. Happy crafting!
Post a comment to pattern DROPS 216-38
We would love to hear what you have to say about this pattern!
If you want to leave a question, please make sure you select the correct category in the form below, to speed up the answering process. Required fields are marked *.