
Popular categories
Looking for a yarn?


Comments / Questions (18)
![]() Sarah Van Driessche wrote:
Sarah Van Driessche wrote:
Ik zie niet hoeveel bollen ik moet bestellen voor dit vestje in drops snow
22.02.2026 - 14:03DROPS Design answered:
Dag Sarah,
Bovenaan bij de materialenlijst staat per maat aangegeven hoeveel gram je nodig hebt. (Het eerste getal geldt voor maat S, het tweede getal voor maat M, enzovoort). 1 bol weegt meestal 50 gram, maar let erop dat dit per garensoort verschillend kan zijn. Dus als er bijvoorbeeld 400 gram staat dan zou je 8 bollen nodig hebben als 1 bol 50 gram weegt.
22.02.2026 - 15:48
![]() Jeanie Weinrich wrote:
Jeanie Weinrich wrote:
Beautif
01.01.2026 - 14:45
![]() Helen Hooson wrote:
Helen Hooson wrote:
Hi I am looking at the size chart - the picture I assume . I don’t understand it If I look at the bottom for medium . 47. Is this cm so the width would be 94 cm over all , or is it inches and all the way round on circular needles ? I don’t understand the size chart sorry
05.11.2025 - 15:49DROPS Design answered:
Hi Helen, If you are using the UK English pattern, the sizes are in cm. If you are using US English, then you have both cms and inches. And, yes, the total width in this size will be 94 cm (measuring both the front and back of the vest). Regards, Drops Team.
06.11.2025 - 06:51
![]() Helen Hooson wrote:
Helen Hooson wrote:
Can you please tell me the sizing for this item . How big are the medium and the large and what is the tension ?
02.11.2025 - 20:09DROPS Design answered:
Hi Helen, There is a size chart at the bottom of the pattern, with all the measurements for the different sizes. The knitting tension is 11 stitches in width and 15 rows in height when working stocking stitch on needle size 8 mm = 10 x 10 cm. Regards, Drops Team.
03.11.2025 - 06:24
![]() Maryse wrote:
Maryse wrote:
Ce modèle est très beau ! Mais j’aimerais pouvoir le faire avec des aiguilles droites.
29.09.2025 - 08:19DROPS Design answered:
Bonjour Maryse, vous pouvez tricoter chaque partie separement avec des aiguilles droites et les coudre apres. Regardez la lecon DROPS ICI. Bon tricot!
29.09.2025 - 08:29
![]() Maryse wrote:
Maryse wrote:
Pourquoi tout ou presque vos modèles sont tricotés avec une aiguille circulaire ??? Ce n’est pas toujours facile pour tous… Pourquoi ne pas expliquer avec des aiguilles droites Merci
29.09.2025 - 08:17DROPS Design answered:
Bonjour Maryse, actuellement les aiguilles circulaires sont tres souvent utilisees grace a leur versatilite, vous pouvez faire le pull en rond et en aller retour en utilisant une aiguille circulaire. La plupart de nos modeles peuvent etre tricotes sur les aiguilles droites. Comment le faire vous trouverez ICI. Bon tricot!
29.09.2025 - 08:33
![]() Eva wrote:
Eva wrote:
Jeg strikker vesten i str. M og i gang med indtagninger på venstre forstykke. Jeg kan dog ikke få maskeantallet og antallet af indtagninger til at gå op. I opskriften står der, jeg skal have 14 masker tilbage på pinden efter ærmegab og indtagninger, men jeg har kun 10 masker. Er der noget, jeg kan have misforstået i opskriften, siden jeg ender med færre masker end angivet?
26.03.2025 - 09:45DROPS Design answered:
Hej Eva, du har 30 masker, tager 9 masker ind til V-hals, lukker 3 + 2 + 1 + 1 masker af til ærmegab = 14 masker tilbage :)
27.03.2025 - 13:55
![]() Marie-Francoise Kiesel-Mayerus wrote:
Marie-Francoise Kiesel-Mayerus wrote:
Wo wird eine \"Krausrippe\" benötigt? Für den vorderen Rand?
16.11.2024 - 19:54DROPS Design answered:
Liebe Frau Kiesel-Mayerus, die Blenden-Maschen werden ja Krausrechts gestrickt. Viel Spaß beim Stricken!
18.11.2024 - 07:58
![]() Tine Lammerts Van Bueren wrote:
Tine Lammerts Van Bueren wrote:
Goedenavond, Welke naald dikte wordt hiervoor gebruikt? Met vr groet, Tine
17.03.2024 - 19:05DROPS Design answered:
Dag Tine,
Voor het vest wordt naald 8 en 7 gebruikt. Naald 7 voor de boorden, naald 8 voor de rest van het werk. Het proeflapje maak je met naald 8 in tricotsteek.
20.03.2024 - 12:30
![]() Lydia wrote:
Lydia wrote:
Bonjour, Je souhaite réaliser ce modèle, cependant, comme je débute, je ne comprend pas tout très bien, est-ce que ce modèle se tricote en un seul morceau avec les aiguilles circulaires ? Merci.
04.03.2024 - 15:04DROPS Design answered:
Bonjour Lydia, ce gilet se tricote de bas en haut, on tricote d'abord le bas en une seule pièce (devant droit, dos, devant gauche, vu sur l'endroit), jusqu'aux emmanchures, puis on rabat les mailles des emmanchures et on continue chaque partie séparément en allers et retours , on fait la couture des épaules et on relève les mailles autour des emmanchures pour tricoter la bordure, en rond. Bon tricot!
04.03.2024 - 15:42
|
|
Vermillion Lake Vest#vermillionlakevest |
|
 |
 |
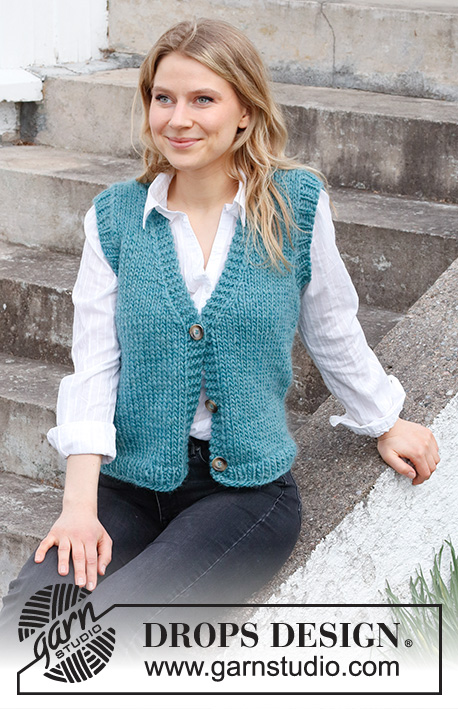
Knitted vest with V-neck in DROPS Snow or DROPS Wish. Size: S - XXXL
DROPS 215-38 |
|
|
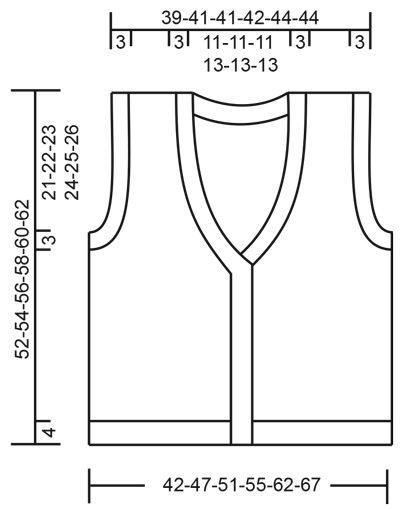
------------------------------------------------------- EXPLANATION FOR THE PATTERN: ------------------------------------------------------- GARTER STITCH (back and forth): Knit all rows. 1 ridge vertically = knit 2 rows. DECREASE TIP-1 (evenly): To calculate how to decrease evenly, use the total number of stitches on row (e.g. 113 stitches), minus bands (e.g. 8 stitches) and divide the remaining 105 stitches by number of decreases to be done (e.g. 13) = 8.1. In this example decrease by knitting approx. every 7th and 8th stitch together. DECREASE TIP-2 (applies to V-neck): All decreases are done from the right side! DECREASE AS FOLLOWS AFTER 4 BAND STITCHES: Slip 1 stitch knitwise, knit 1, pass slipped stitch over stitch worked (= 1 stitch decreased). DECREASE AS FOLLOWS BEFORE 4 BAND STITCHES: Begin 2 stitches before the 4 band stitches and knit 2 together (= 1 stitch decreased). BUTTONHOLES: Decrease for buttonholes on right band (when garment is worn). 1 BUTTONHOLE = knit second and third stitch from edge together (seen from right side), and make 1 yarn over. On next row (wrong side) knit the yarn over to make a hole. Decrease for buttonholes when piece measures: S: 4, 14 and 24 cm = 1½", 5½" and 9½" M: 5, 15 and 25 cm = 2", 6" and 9¾" L: 4, 15 and 26 cm = 1½", 6" and 10¼" XL: 3, 11, 19 and 27 cm = 1⅛", 4⅜", 7½" and 10⅝" XXL: 4, 12, 20 and 28 cm = 1½", 4¾", 8" and 11" XXXL: 5, 13, 21 and 29 cm = 2", 5⅛", 8¼" and 11⅜". ------------------------------------------------------- START THE PIECE HERE: ------------------------------------------------------- VEST - SHORT OVERVIEW OF THE PIECE: Work body back and forth on circular needle from mid front, bottom up to armholes. Then finish front pieces and back piece back and forth separately on circular needle until finished measurements. Fasten neck edge to the back of neck. Then work a rib edge around both armholes. BODY: Cast on 113-127-137-147-165-179 stitches (including 4 band stitches in each side towards mid front) on circular needle size 7 mm = US 10,75 with Snow or Wish. Purl 1 row (= wrong side). Work next row as follows from right side: 4 band stitches in GARTER STITCH - read explanation above, * knit 1, purl 1 *, repeat from *-* until 5 stitches remain, knit 1 and finish with 4 band stitches in garter stitch. Continue rib like this for 4 cm = 1½" – remember BUTTONHOLES on right band – read explanation above (applies to S, L, XL and XXL). When rib is done, knit 1 row from right side while at the same time decreasing 13-15-17-19-21-23 stitches evenly - read DECREASE TIP-1= 100-112-120-128-144-156 stitches. Insert 1 marker thread after 27-30-32-34-38-41 stitches in from each side (= in the side of body). There are 46-52-56-60-68-74 stitches between marker threads on back piece. Move the marker threads upwards when working; they are used to bind off for armholes later. Switch to circular needle size 8 mm = US 11 and work in stockinette stitch back and forth with 4 band stitches in garter stitch in each side towards mid front - remember BUTTONHOLES on right band and REMEMBER KNITTING GAUGE! When piece measures 25-26-27-28-29-30 cm = 9¾"-10¼"-10⅝"-11"-11⅜"-11¾", begin decrease for V-neck (i.e. approx. 1 cm = ⅜" after last buttonhole) – read DECREASE TIP-2. Decrease for V-neck every other row (i.e. every row from right side) 3 times in total in each side and then every 4th row (i.e. every other row from right side) 6-6-6-7-7-7 times in total in each side. AT THE SAME TIME when piece measures 28-29-30-31-32-33 cm = 11"-11⅜"-11¾"-12¼"-12½"-13", bind off for armholes. I.e. work next row from right side as follows: Work as before (and decrease for V-neck) until 3 stitches remain before first marker thread, bind off 6 stitches for armhole, work in stockinette stitch on back piece until 3 stitches remain before next marker thread, bind off 6 stitches for armhole and work as before the rest of row (decrease for V-neck if needed). Finish front pieces and back piece separately. LEFT FRONT PIECE: Work in stockinette stitch back and forth with 4 band stitches in garter stitch towards mid front. Continue decrease for V-neck as before. Cast in addition off for armhole at the beginning of every row from the side as follows: Bind off 3 stitches 0-0-0-0-0-1 time, 2 stitches 0-1-2-2-3-3 times and 1 stitch 2-2-2-3-4-4 times. After all decreases for V-neck and armholes 13-14-14-14-15-15 stitches remain on shoulder. Continue to work until front piece measures 52-54-56-58-60-62 cm = 20½"-21¼"-22"-22¾"-23⅝"-24⅜". Work next row as follows from right side: Bind off the outermost 9-10-10-10-11-11 stitches on shoulder = 4 stitches in garter stitch remain on needle. Work in garter stitch back and forth over these 4 stitches until edge in garter stitch measures approx. 9-9-9-10-10-10 cm = 3½"-3½"-3½"-4"-4"-4" from shoulder, bind off by knitting from right side. RIGHT FRONT PIECE: Work in stockinette stitch back and forth with 4 band stitches in garter stitch towards mid front. Continue decrease for V-neck as before. Bind in addition off for armhole at the beginning of every row from the side as follows: Bind off 3 stitches 0-0-0-0-0-1 time, 2 stitches 0-1-2-2-3-3 times and 1 stitch 2-2-2-3-4-4 times. After all decreases for V-neck and armholes 13-14-14-14-15-15 stitches remain on shoulder. Continue to work until front piece measures 52-54-56-58-60-62 cm = 20½"-21¼"-22"-22¾"-23⅝"-24⅜". Work next row as follows from wrong side: Bind off the outermost 9-10-10-10-11-11 stitches on shoulder = 4 stitches in garter stitch remain on needle. Work in garter stitch back and forth over these 4 stitches until edge in garter stitch measures approx. 10-10-10-11-11-11 cm = 4"-4"-4"-4⅜"-4⅜"-4⅜" from shoulder, bind off by knitting from right side. BACK PIECE: = 40-46-50-54-62-68 stitches. Work in stockinette stitch back and forth and bind off for armholes at the beginning of every row in each side as follows: Bind off 3 stitches 0-0-0-0-0-1 time, 2 stitches 0-1-2-2-3-3 times and 1 stitch 2-2-2-3-4-4 times in each side = 36-38-38-40-42-42 stitches remain. When piece measures 50-52-54-56-58-60 cm = 19¾"-20½"-21¼"-22"-22¾"-23⅝", bind off the middle 16-16-16-18-18-18 stitches for neck and finish each shoulder separately. Work in stockinette stitch and bind off 1 stitch on next row from the neck = 9-10-10-10-11-11 stitches remain on shoulder. Continue until back piece measures 52-54-56-58-60-62 cm = 20½"-21¼"-22"-22¾"-23⅝"-24⅜", and loosely bind off by knitting from right side. Work the other shoulder the same way. ASSEMBLY: Sew shoulder seams inside bind-off edge. Sew edge in garter stitch together mid back - make sure that seam is facing inwards towards wrong side. Sew edge in garter stitch towards neck line at the back of neck - edge in garter stitch should be lightly pulled when sewn. ARM HOLE EDGE: Begin in the side at the bottom of armhole and pick up from right side inside 1 edge stitch, approx. 52-56-58-60-62-64 stitches around the armhole on a short circular needle size 7 mm = US 10,75 with Snow or Wish (number of stitches should be divisible by 2). Work rib in the round = knit 1/purl 1 for 3 cm = 1⅛". Loosely bind off stitches with knit over knit and purl over purl. Work an edge around the other armhole the same way. |
|
 |
|
Have you finished this pattern?Tag your pictures with #dropspattern #vermillionlakevest or submit them to the #dropsfan gallery. Do you need help with this pattern?You'll find 22 tutorial videos, a Comments/Questions area and more by visiting the pattern on garnstudio.com. © 1982-2026 DROPS Design A/S. We reserve all rights. This document, including all its sub-sections, has copyrights. Read more about what you can do with our patterns at the bottom of each pattern on our site. |
|


With over 40 years in knitting and crochet design, DROPS Design offers one of the most extensive collections of free patterns on the internet - translated to 17 languages. As of today we count 324 catalogs and 12290 patterns - 12280 of which are translated into English (US/in).
We work hard to bring you the best knitting and crochet have to offer, inspiration and advice as well as great quality yarns at incredible prices! Would you like to use our patterns for other than personal use? You can read what you are allowed to do in the Copyright text at the bottom of all our patterns. Happy crafting!
Post a comment to pattern DROPS 215-38
We would love to hear what you have to say about this pattern!
If you want to leave a question, please make sure you select the correct category in the form below, to speed up the answering process. Required fields are marked *.