
Popular categories
Looking for a yarn?


|
|
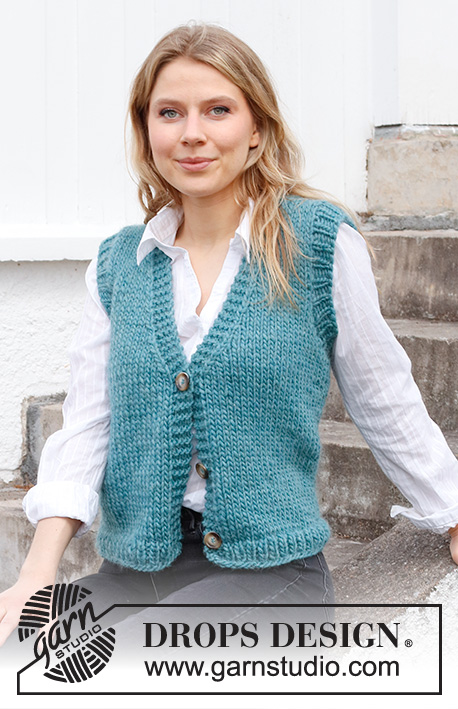
Vested Interest |
|
 |
 |
Knitted vest in DROPS Snow or DROPS Wish. Size: S - XXXL
DROPS 215-37 |
|
|
------------------------------------------------------- EXPLANATION FOR THE PATTERN: ------------------------------------------------------- DECREASE TIP-1 (evenly): To calculate how to decrease evenly, use the total number of stitches on row (e.g. 106 stitches) and divide stitches by number of decreases to be done (e.g. 14) = 7.6. In this example decrease by knitting alternately approx. every 6th and 7th stitch and every 7th and 8th stitch together. ------------------------------------------------------- START THE PIECE HERE: ------------------------------------------------------- VEST - SHORT OVERVIEW OF THE PIECE: Work body in the round on circular needle, from the bottom and up to armholes. Then finish front and back piece back and forth separately on circular needle until finished measurements. Work a rib edge around both armholes and the neck at the end. BODY: Cast on 106-120-128-138-156-170 stitches on circular needle size 7 mm = US 10,75 with Snow or Wish. Knit 1 round. Then work rib in the round (= knit 1 / purl 1) for 14-14-14-16-16-16 cm = 5½"-5½"-5½"-6¼"-6¼"-6¼". When rib is done, knit 1 round while decreasing 14-16-16-18-20-22 stitches evenly - read DECREASE TIP = 92-104-112-120-136-148 stitches. Switch to circular needle size 8 mm = US 11 and work in stockinette stitch in the round. REMEMBER THE KNITTING GAUGE! When piece measures 30-31-32-33-34-35 cm = 11¾"-12¼"-12½"-13"-13⅜"-13¾", bind off for armholes. I.e. work next round as follows: Bind off 3 stitches, work 40-46-50-54-62-68 stitches in stockinette stitch, bind off 6 stitches, work 40- 46-50-54-62-68 stitches in stockinette stitch and bind off the remaining 3 stitches. Cut the yarn. Finish front and back piece separately. BACK PIECE: = 40-46-50-54-62-68 stitches. Work in stockinette stitch back and forth work and bind off for armholes at the beginning of every row in each side as follows: Bind off 3 stitches 0-0-0-0-0-1 time, 2 stitches 0-1-2-2-3-3 times and 1 stitch 2-2-2-3-4-4 times in each side = 36-38-38-40-42-42 stitches. When piece measures 49-51-53-55-57-59 cm = 19¼"-20"-21"-21⅝"-22½"-23¼", bind off the middle 20-20-20-22-22-22 stitches for neck and finish each shoulder separately. Work in stockinette stitch and bind off 1 stitch on next row from the neck = 7-8-8-8-9-9 stitches remain on shoulder. Continue until back piece measures 52-54-56-58-60-62 cm = 20½"-21¼"-22"-22¾"-23⅝"-24⅜", and loosely bind off by knitting from right side. Work the other shoulder the same way. FRONT PIECE: = 40-46-50-54-62-68 stitches. Work in stockinette stitch back and forth work and bind off for armholes at the beginning of every row in each side as follows: Bind off 3 stitches 0-0-0-0-0-1 time, 2 stitches 0-1-2-2-3-3 times and 1 stitch 2-2-2-3-4-4 times in each side = 36-38-38-40-42-42 stitches. When piece measures 41-42-44-45-47-48 cm = 16⅛"-16½"-17¼"-17¾"-18½"-19", slip the middle 8-8-8-10-10-10 stitches on 1 stitch holder for neck and finish each shoulder separately. Work in stockinette stitch and bind off for neck at the beginning of every row from the neck as follows: Bind off 2 stitches 2 times and 1 stitch 3 times = 7-8-8-8-9-9 stitches remain on shoulder. Continue until front piece measures 52-54-56-58-60-62 cm = 20½"-21¼"-22"-22¾"-23⅝"-24⅜", and loosely bind off by knitting from right side. Work the other shoulder the same way. ASSEMBLY: Sew shoulder seams inside bind-off edge. ARM HOLE EDGE: Begin in the side at the bottom of armhole and pick up from right side inside 1 edge stitch, approx. 48-50-52-56-58-60 stitches around the armhole on a short circular needle size 7 mm = US 10,75 with Snow or Wish (number of stitches should be divisible by 2). Work rib in the round = knit 1/purl 1 for 3 cm = 1⅛". Loosely bind off stitches with knit over knit and purl over purl. Work an edge around the other armhole the same way. NECK EDGE: Begin mid on top of one shoulder and pick up from right side inside 1 edge stitch, approx. 56-58-58-62-62-64 stitches around the neck (including stitches on stitch holder at the front) on a short circular needle size 7 mm = US 10,75 with Snow or Wish (number of stitches should be divisible by 2). Work rib in the round = knit 1/purl 1 for 3 cm = 1⅛". Loosely bind off stitches with knit over knit and purl over purl. |
|

|
|
|
Have you made this or any other of our designs? Tag your pictures in social media with #dropsdesign so we can see them! Do you need help with this pattern?You'll find tutorial videos, a Comments/Questions area and more by visiting the pattern on garnstudio.com. © 1982-2024 DROPS Design A/S. We reserve all rights. This document, including all its sub-sections, has copyrights. Read more about what you can do with our patterns at the bottom of each pattern on our site. |
|


With over 40 years in knitting and crochet design, DROPS Design offers one of the most extensive collections of free patterns on the internet - translated to 17 languages. As of today we count 304 catalogs and 11422 patterns - 11417 of which are translated into English (US/in).
We work hard to bring you the best knitting and crochet have to offer, inspiration and advice as well as great quality yarns at incredible prices! Would you like to use our patterns for other than personal use? You can read what you are allowed to do in the Copyright text at the bottom of all our patterns. Happy crafting!
Comments / Questions (20)
HI I'm just wondering how many balls of wool I need to purchase for this vest
19.04.2024 - 09:45DROPS Design answered:
Hi Helen, it depends on which yarn you choose and what size you make, for example: in size S you need 400 g DROPS Snow > it means 8 balls. See our lesson HERE. Happy knitting!
19.04.2024 - 11:16Bonjour, je ne comprends pas le rabattement des mailles pour les emmanchures Pour la taille M faut-il rabattre 2 mailles a l'endroit plus 2 mailles a l'envers et ainsi de suite?
21.03.2023 - 08:08DROPS Design answered:
Bonjour Vera, quand vous tricotez le dos et le devant séparément, vous devez rabattre (en taille M), 2 mailles au début des 2 rangs suivants (endroit + envers) et 1 maille au début des 4 rangs suivants (soit 4 mailles de chaque côté: 1 x 2 m et 2 x 1 m). Bon tricot!
21.03.2023 - 11:10Hello, I am knitting a medium and I am confused about this part: Work in stocking stitch back and forth work and cast off for armholes at the beginning of every row in each side as follows: Cast off 3 stitches 0-0-0-0-0-1 time, 2 stitches 0-1-2-2-3-3 times and 1 stitch 2-2-2-3-4-4 times in each side Do I immediately cast off according to the size or knit some rows of stockinette? Or do I knit stockinette after casting off until i reach the correct length to cast off for the neck?
25.01.2023 - 14:40DROPS Design answered:
Dear Shaimaa, after you have divided piece, cast off 2 stitches at the beginning of next 2 rows (from both RS and WS), then 1 stitch at the beginning of next 4 rows (you cast off a total of 3 more stitches on each side). Happy knitting!
25.01.2023 - 16:55LiebesTeam, herzlichen Dank für die überaus schnelle Rückmeldung - zur Info: ich stricke Größe s/xs... Freue mich auf eine weitere Antwort! Liebe Grüße, B.Schreck
03.01.2023 - 13:49DROPS Design answered:
Liebe Frau Schreck, danke für Ihre Antwort, so in Grösse S werden Sie nur 1 Masche am Anfang der 4 nächsten Reihen (Hin- sowie Rückreihen = 2 Maschen beidseitig) abketten = es sind nur noch 36 Maschen übrig. Viel Spaß beim stricken!
03.01.2023 - 16:46Liebes Team, leider verstehe ich diese Anleitung nicht: 3 Maschen je 0-0-0-0-0-1 x beidseitig, 2 Maschen je 0-1-2-2-3-3 x beidseitig und 1 Masche je 2-2-2-3-4-4 x beidseitig Können Sie mir das ausdeutschen und näher erkllären? Vielen Dank! Herzliche Grüße aus Bayern
02.01.2023 - 22:16DROPS Design answered:
Liebe Frau Schreck, können Sie uns bitte sagen, welche Größe Sie stricken? So kann man Ihnen am besten helfen, da die Abketten unterschiedlich je nach Größe sind. Danke für Ihr Verständnis.
03.01.2023 - 09:25Cześć, mam pytanie odnośnie robienia podkroju rękawów, o co chodzi z tym ''razy 2 oczka''? Czy chodzi o dwa rzędy tak robione czy moze wybraną ilość odpowiednią danemu rozmiarowi ( w moim przypadku M) razy te 2 lub jedno oczko zmniejszane na jednej długości? ''0-0-0-0-0-1 razy 3 oczka, 0-1-2-2-3-3 razy 2 oczka i 2-2-2-3-4-4 razy 1 oczko z każdej strony''
10.09.2022 - 19:59DROPS Design answered:
Witaj Martyno, w rozmiarze M zamykasz na podkrój rękawa na początku każdego rzędu z każdej strony: 1 raz 2 oczka i 2 razy 1 oczko. Tzn. w Rz. 1 na prawej stronie robótki: zamykasz 2 oczka (patrz TUTAJ lub przerabiając 3 oczka razem na prawo), przerabiasz do końca rzędu. Rz. 2 (lewa strona robótki): zamykasz 2 oczka na początku rzędu i przerabiasz do końca rzędu. Rz. 3: zamykasz 1 oczko na początku rzędu i przerabiasz do końca rzędu. Rz. 4: jak rz. 3. Rz.5: jak rz. 3. Rz. 6: jak rz. 3. Różne sposoby zamykania oczek znajdziesz w naszych instrukcjach video. Pozdrawiamy!
12.09.2022 - 08:47Dersom jeg skal strikke XS da?
24.11.2021 - 13:52DROPS Design answered:
Hej Nadja. Denna oppskrift finns dessvärre inte i XS. Mvh DROPS Design
25.11.2021 - 08:16Good afternoon! What a lovely slipover! Only I use needle size 10. Yes, I knit a bit tight, and the bottom of the slipover on your model is wavy, but mine is not. Maybe it's only with this yarn, because I knit by your patterns and always use proposed needle sizes. Should I use needle size 15?%)))
02.11.2021 - 11:04DROPS Design answered:
Dear Victoria, you should always make agauge swatch and wash and dry it and change needles if necessary and / or recalculate stitchnumbers accordingly. The bottomm ribbing looks wavy, because it is worn with a slight positive ease. Happy Stitching!
02.11.2021 - 20:56Für mich als Anfänger etwas schwierig nachzuvollziehen.
14.04.2021 - 07:00Verstehe nicht, wie das mit dem Rumpfteil gemeint ist. Auf dem Foto sieht es so aus, als wären Vorder-bzw Rückseite jeweils in einem Stück gestrickt worden. Unabhängig von den Blenden.
14.04.2021 - 06:59DROPS Design answered:
Liebe Sandra, ja genau so wird es gestrickt, von unten nach oben zuerst in Runden bis zum Armlöcher, dann werden Vorderteil und Rückenteil bis zum fertigen Maß einzeln in Hin- und Rück-Reihen gestrickt. Viel Spaß beim stricken!
14.04.2021 - 07:40