
Popular categories
Looking for a yarn?


Comments / Questions (34)
![]() Céline Rousseau wrote:
Céline Rousseau wrote:
Bonjour, Est-ce normal que le 4e rang de la grille A.4 (avec jetés et 2 mailles ensemble) se tricote sur le rang de retour à l'envers ? Si oui, est-ce que je le tricote à l'endroit quand même ? Merci pour toutes vos réponses précédentes
16.02.2022 - 00:02DROPS Design answered:
Bonjour Mme Rousseau, on doit tricoter 2 mailles ensemble à l'endroit sur l'envers mais vous pouvez tricoter 2 mailles ensemble à l'envers si vous le préférez. Bonne continuation!
14.03.2022 - 14:10
![]() Céline Rousseau wrote:
Céline Rousseau wrote:
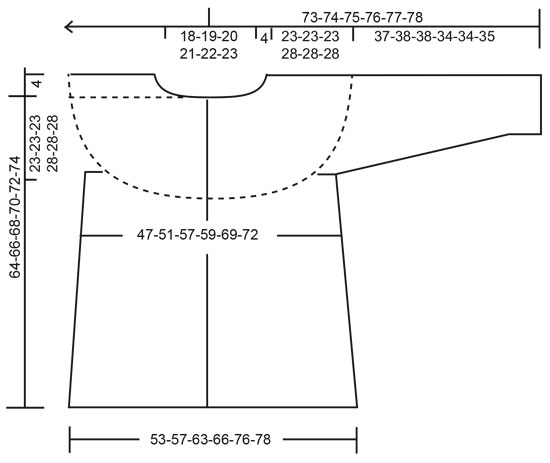
Comment répartir les diminutions équilibrées après le A.1 de l'empiecement ? Pour une taille M? Merci.
04.02.2022 - 05:02DROPS Design answered:
Bonjour Mme Rousseau, consultez cette cette leçon, elle explique comment calculer où diminuer/augmenter à intervalles réguliers. Bon tricot!
04.02.2022 - 09:18
![]() Céline Rousseau wrote:
Céline Rousseau wrote:
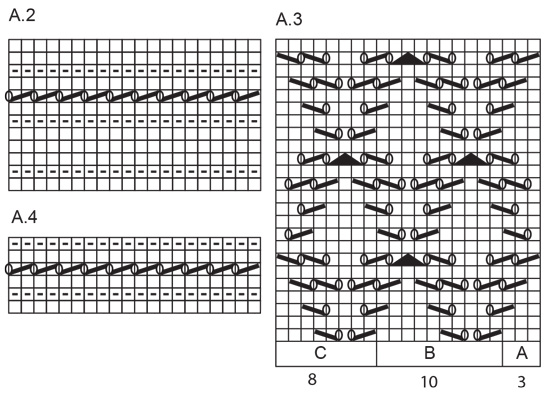
Pour le modèle gilet femme 207-23: 1)Je ne comprends pas le texte comment procéder à la partie Dos & devants avec le diagramme A.3 et pourquoi les subdivision A, B, C.? Pouvez-vous me donner les explications détaillées, maille par maille ? À l'aide svp. Pour la taille M. 2) Si je prend des aiguilles 1 point plus grosse, no 6,5 en suivant le patron taille S, est-ce que cela me donneras une taille M? Merci. Céline
30.01.2022 - 06:23DROPS Design answered:
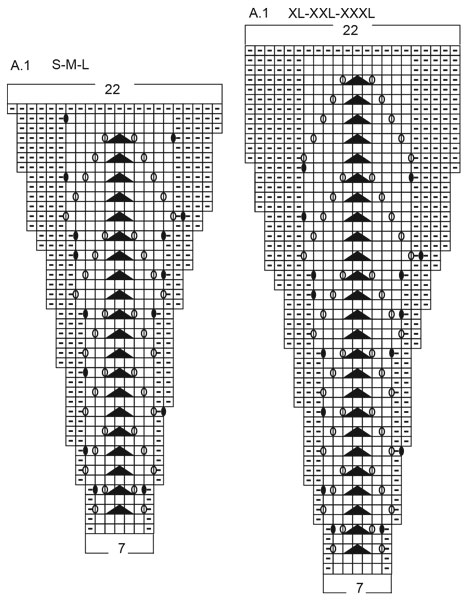
Bonjour Céline, le diagramme A.3 se décompose en 3 parties: A.3A sur les 3 mailles après la bordure devant, on va ensuite répéter A.3B et terminer par A.3C avant la bordure du devant. Pour mieux vous repérer, n'hésitez pas à ajouter un marqueur entre chaque diagramme pour mieux vérifier que vous avez toujours le bon nombre de mailles à chaque fois. Pour avoir les mesures du schéma, il vous faut avoir l'échantillon indiqué, soit 16 m x 20 rangs = 10 x 10 cm avec 2 fils tricotés en même temps - voir aussi ici. Bon tricot!
31.01.2022 - 09:36
![]() Kay Win wrote:
Kay Win wrote:
Is the jacket knitted with one strand each of alpaca and kid silk together?
28.01.2021 - 00:21DROPS Design answered:
Hi Kay, Yes the whole garment is worked with 2 strands. Happy knitting!
28.01.2021 - 07:33
![]() Henriette wrote:
Henriette wrote:
Hoeveel toeren zitten er tussen 2 overhalingen in de bovenpas?
30.12.2020 - 14:38DROPS Design answered:
Dag Henriette,
Wat je met overhalingen bedoelt, begrijp ik niet helemaal, maar op de pas brei je telpatroon A.1 en in de telpatroon zijn alle naalden aangegeven, dus zowel de heengaande als de teruggaande naald staat erin getekend.
02.01.2021 - 14:20
![]() Judith wrote:
Judith wrote:
Warum findet sich in der gedruckten Anleitung kein Diagramm?
03.11.2020 - 21:42DROPS Design answered:
Liebe Judith, schauen Sie mal die Einstellungen von dem Drucker damit alle Seiten (und nicht nur die ersten) gedruckt werden. Viel Spaß beim stricken!
04.11.2020 - 09:29
![]() Lucia wrote:
Lucia wrote:
Buongiorno, nella legenda del diagramma compaiono due simboli diversi con la stessa descrizione [()]= 1 gettato tra 2 maglie, sul ferro successivo lavorarlo a diritto o rovescio (vedere il motivo) per creare un buco [()]= 1 gettato tra 2 maglie, sul ferro successivo lavorarlo a diritto o rovescio ritorto (vedere il motivo) per creare un buco. Nel secondo dovrebbe esserci scritto per evitare che si formi un buco, giusto? Grazie.
26.05.2020 - 14:40DROPS Design answered:
Buongiorno Lucia. Abbiamo corretto il testo. La ringraziamo per la segnalazione. Buon lavoro!
26.05.2020 - 16:01
![]() Cornelia wrote:
Cornelia wrote:
Danke für die schnelle Hilfe
21.04.2020 - 17:44
![]() Cornelia Rack wrote:
Cornelia Rack wrote:
Mir war schon klar, dass ich nur die Umschläge, bei denen kein Loch entstehen soll, verschränkt stricken muss. Ich weiß nur nicht, ob rechts oder links verschränkt. Bei Größe L vielleicht immer rechts verschränkt?
21.04.2020 - 13:30DROPS Design answered:
Liebe Frau Rack, diese Umschläge werden manchmal rechts verschränkt und manchmal links verschränkt gestrickt, schauen Sie mal in den Diagrammen wie sie bei der nächsten Reihe gestrickt werden sollen, z.B. In A.1, Reihe 6 stricken Sie diese Umschläge links (= sie sollen rechte Maschen bei Hinreihen sein) und bei der 10. Reihe wird die Umschläge rechts gestrickt = sie sind bei Hinreichen linke Maschen. Haben Sie diese Lektion gelesen? Hier wird erklärt wie man die Diagramme liest/strickt Viel Spaß beim stricken!
21.04.2020 - 14:31
![]() Cornelia wrote:
Cornelia wrote:
A1. In den Rückreihen soll man Umschläge rechts oder links verschränkt stricken. Woher weiß ich, wann man rechts oder links verschränkt stricken muss. Ich verstehe wahrscheinlich das Diagramm nicht.
20.04.2020 - 21:41DROPS Design answered:
Liebe Cornelia, die Umschläge von 3. Symbol wird normal gestrickt damit ein Loch entsteht (diese Umschläge gehören zum Lochmuster) die Umschläge von 4. Symbol werden verschränkt gestrickt = die gehören zu den Zunahmen und nicht zu den Lochmuster. Hier lesen Sie mehr über Diagramme. Viel Spaß beim stricken!
21.04.2020 - 09:38
|
||||||||||||||||||||||
Story of Snow Jacket#storyofsnowjacket |
||||||||||||||||||||||
 |
 |
|||||||||||||||||||||
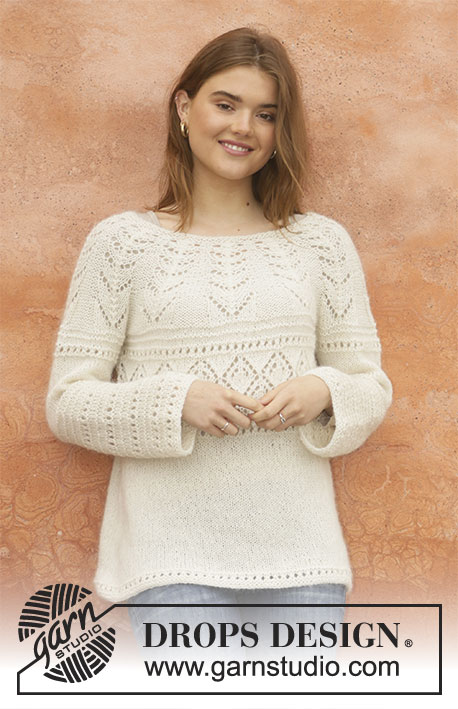
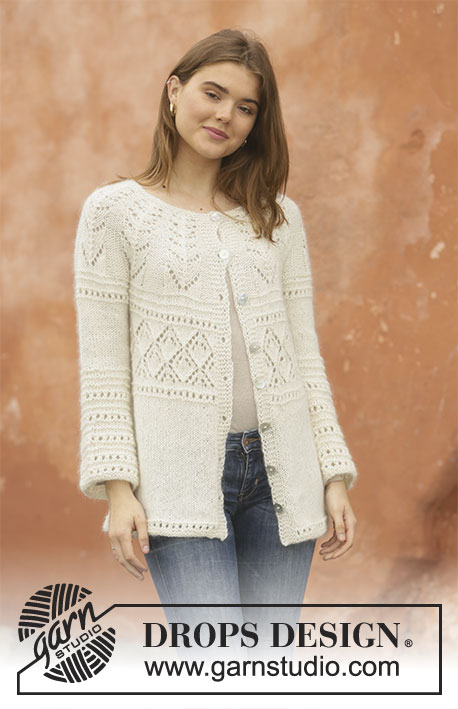
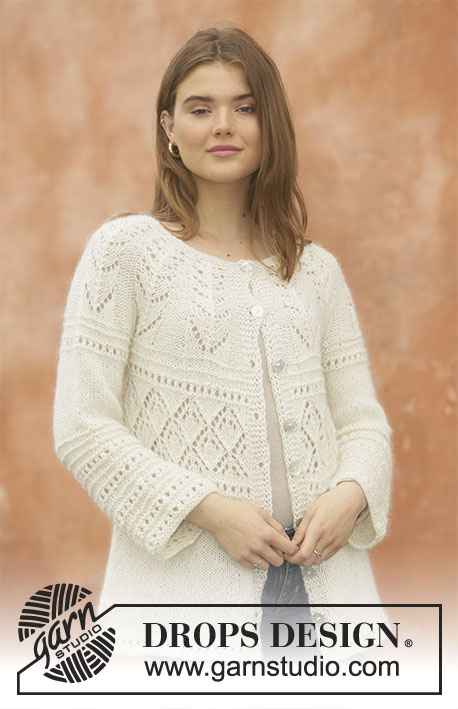
Knitted jacket with round yoke in 1 strand DROPS Alpaca and 1 strand DROPS Kid-Silk. Piece is knitted top down with lace pattern. Size S-XXXL.
DROPS 207-23 |
||||||||||||||||||||||
|
---------------------------------------------------------- EXPLANATION FOR THE PATTERN: ---------------------------------------------------------- GARTER STITCH (back and forth): Knit all rows. 1 ridge vertically = knit 2 rows. PATTERN: See diagrams A.1 to A.4. Choose diagram for your size in A.1. Diagrams show all rows seen from right side. INCREASE/DECREASE TIP (evenly): To calculate how to increase/decrease evenly, use the total number of stitches on row (e.g. 252 stitches) minus bands (e.g. 10 stitches) and divide the remaining 242 stitches by number of increases/decreases to be done (e.g. 10) = 24.2. In this example increase by making 1 yarn over after approx. every 24th stitch. Do not increase over bands. On next row work yarn overs twisted to avoid holes. If decreasing knit approx. every 23rd and 24th stitch together. INCREASE TIP (applies to sides of body): Work until 1 stitch remain before marker thread, make 1 yarn over, knit 2 (marker thread is in the middle of these 2 stitches), make 1 yarn over (= 2 stitches increased at the marker thread and 4 stitches increased in total on round.) On next row purl yarn overs twisted to avoid holes. Then work the new stitches in stockinette stitch. DECREASE TIP-2 (applies to sleeves): Decrease 1 stitch on each side of marker thread as follows: Work until 3 stitches remain before marker thread and knit 2 together, knit 2 (marker thread is between these stitches), slip 1 stitch knitwise, knit 1, pass slipped stitch over stitch worked. BUTTONHOLES: Decrease for buttonholes on right band (when garment is worn). Decrease from right side when 3 stitches remain on row as follows: Make 1 yarn over, knit the next 2 stitches together, knit last stitch. On next row knit yarn over to make holes. Decrease first buttonhole when piece measures approx. 1½-2 cm = ½"-¾". Then decrease the next 7-7-7-7-7-7, approx. 7-7-7-8-8-8 cm = 2¾"-2¾"-2¾"-3⅛"-3⅛"-3⅛" between each. ---------------------------------------------------------- START THE PIECE HERE: ---------------------------------------------------------- JACKET - SHORT OVERVIEW OF THE PIECE: Work yoke back and forth on circular needle from mid front, work top down. Now divide yoke for body and sleeves. Work body back and forth on circular needle from mid front, work top down. Work sleeves in the round on double pointed needles/short circular needle, top down. YOKE: Cast on 87-94-101-108-115-122 stitches on circular needle size 5.5 mm = US 9. Work 2 ridges in GARTER STITCH - see explanation above. Then work as follows from the right side: 5 band stitches in garter stitch, work A.1 (= 11-12-13-14-15-16 repetitions of 7 stitches) and finish with 5 band stitches in garter stitch. When A.1 has been worked vertically, there are 252-274-296-318-340-362 stitches on needle. Knit next row from right side, AT THE SAME TIME decrease 10-4-2-0-6-4 stitches evenly = 242-270-294-318-334-358 stitches – READ DECREASE TIP. Work next row as follows - from wrong side: Knit 5 stitches, purl 35-39-42-46-50-54 stitches (= front piece), slip the next 46-52-58-62-62-66 stitches on 1 stitch holder for sleeve, cast on 6-6-6-6-8-8 new stitches on row (= in the side under sleeve), purl 70-78-84-92-100-108 stitches (= back piece), slip the next 46-52-58-62-62-66 stitches on 1 stitch holder for sleeve, cast on 6-6-6-6-8-8 new stitches on row (= in the side under sleeve and purl the next 35-39-42-46-50-54 stitches, knit the last 5 stitches (= front piece). Now finish body and sleeves separately. NOW MEASURE THE PIECE FROM HERE! BODY: = 162-178-190-206-226-242 stitches. Work as follows - from right side: 5 stitches in garter stitch, A.2 until 5 stitches remain, work 5 stitches in garter stitch. On last row in A.2 adjust number of stitches to 161-171-191-201-231-241. Work next row as follows from right side: Work 5 stitches in garter stitch as before, A.3A (= 3 stitches), work A.3B over the next 140-150-170-180-210-220 stitches (= 14-15-17-18-21-22 repetitions), A.3C (= 8 stitches), finish with 5 stitches in garter stitch as before. When A.3 has been worked 1 time vertically, work as follows from right side: 5 stitches in garter stitch, A.4 over all stitches, 5 stitches in garter stitch. Insert 1 marker thread in each side, 43-45-50-53-60-63 stitches in from each side, back piece = 75-81-91-95-111-115 stitches. Then work in stockinette stitch with 5 stitches in garter stitch in each side. When piece measures 20 cm = 8" from division, increase 1 stitch on each side of every marker thread (= 4 stitches increased) – READ INCREASE TIP! Increase every 3 cm = 1⅛" 5 times in total = 181-191-211-221-251-261 stitches. Continue until piece measures 39-41-43-40-42-44 cm = 15¼"-16⅛"-17"-15¾"-16½"-17¼". Work as follows - from right side: 5 stitches in garter stitch, A.4 until 6 stitches remain, knit 1 and 5 stitches in garter stitch. Work A.4 1 time vertically, work 1 ridge back and forth over all stitches. Bind off. Piece measures approx. 64-66-68-70-72-74 cm = 25¼"-26"-26¾"-27½"-28⅜"-29⅛" from shoulder. SLEEVE: Slip the 46-52-58-62-62-66 stitches from stitch holder in one side of piece on a short circular needle or double pointed needles size 5.5 mm = US 9 and pick in addition up 1 stitch in each of the 6-6-6-6-8-8 stitches cast on under sleeve = 52-58-64-68-70-74 stitches. Insert 1 marker thread in the middle of the 6-6-6-6-8-8 stitches. Marker thread marks mid under sleeve and round begins at the marker thread. Work A.2. When A.2 has been worked 1 time vertically, continue in stockinette stitch. AT THE SAME TIME when piece measures 3 cm = 1⅛", begin decreasing stitches mid under sleeve - READ DECREASE TIP-2. Decrease every 4 cm = 1½" 4 times in total in all sizes = 44-50-56-60-62-66 stitches. Continue in stockinette stitch until piece measures 16 cm = 6¼" from division. Purl 1 round and knit 2 rounds, purl 1 round and knit 2 rounds. Then work A.2 over all stitches. Continue with A.2 until sleeve measures 37-38-38-34-34-35 cm = 14½"-15"-15"-13⅜"-13⅜"-13¾" from division (shorter sleeves in the larger sizes because of longer yoke), work 1 ridge, then bind off. Work the other sleeve the same way. ASSEMBLY: Sew the buttons on to the left band. |
||||||||||||||||||||||
Diagram explanations |
||||||||||||||||||||||
|
||||||||||||||||||||||
 |
||||||||||||||||||||||
 |
||||||||||||||||||||||
 |
||||||||||||||||||||||
Have you finished this pattern?Tag your pictures with #dropspattern #storyofsnowjacket or submit them to the #dropsfan gallery. Do you need help with this pattern?You'll find 26 tutorial videos, a Comments/Questions area and more by visiting the pattern on garnstudio.com. © 1982-2026 DROPS Design A/S. We reserve all rights. This document, including all its sub-sections, has copyrights. Read more about what you can do with our patterns at the bottom of each pattern on our site. |
||||||||||||||||||||||


With over 40 years in knitting and crochet design, DROPS Design offers one of the most extensive collections of free patterns on the internet - translated to 17 languages. As of today we count 324 catalogs and 12291 patterns - 12281 of which are translated into English (US/in).
We work hard to bring you the best knitting and crochet have to offer, inspiration and advice as well as great quality yarns at incredible prices! Would you like to use our patterns for other than personal use? You can read what you are allowed to do in the Copyright text at the bottom of all our patterns. Happy crafting!
Post a comment to pattern DROPS 207-23
We would love to hear what you have to say about this pattern!
If you want to leave a question, please make sure you select the correct category in the form below, to speed up the answering process. Required fields are marked *.