DROPS Super Sale - 5 popular yarns on SALE all April!
Product image DROPS Baby Merino yarn
DROPS Baby Merino
100% Wool
from 4.40 $ /50g
Get the yarn to make this pattern from 4.40$.

The yarn cost is calculated from the pattern’s smallest size and the yarn’s cheapest product type. Looking for an even better price? You might find it on the DROPS Deals!

DROPS Super Sale
DROPS Baby 33-14

#pinkpetalshat

DROPS Design: Pattern no bm-110-by
Yarn group A
-----------------------------------------------------------

SIZES:
0/3 - 6/12 -18/24 months
Equivalent to the baby’s height in inches:
1ft7/1ft10 – 2ft/2ft7 – 2ft9/3ft
Equivalent to the baby’s height in cm:
48/56 – 62/80 – 86/92

Fits head size: Approx. 40/44 – 44/46 – 46/50 cm = 15¾"/17¼" – 17¼"/18" – 18"/19¾"

MATERIALS:
DROPS BABY MERINO from Garnstudio (belongs to yarn group A)
50-50-50 g color 26, light old pink

KNITTING GAUGE:
26 stitches in width and 42 rows in height with leaf pattern; 26 stitches in width and 51 rows in height with garter stitch = 10 x 10 cm = 4" x 4".

NEEDLES:
DROPS DOUBLE POINTED NEEDLES SIZE 2.5 MM = US 1,5.
DROPS CIRCULAR NEEDLE SIZE 2.5 MM = US 1,5: Length 40 cm = 16" or 60 cm = 24".

Needle size is only a guide. If you get too many stitches on 10 cm = 4", change to a larger needle size. If you get too few stitches on 10 cm = 4", change to a smaller needle size.

-------------------------------------------------------

Alternative Yarn – See how to change yarns here
Yarn Groups A to F – Use the same pattern and change the yarn here
Yarn usage using an alternative yarn – Use our yarn converter here

-------------------------------------------------------

You might also like...

Product image DROPS Baby Merino
DROPS Baby Merino
100% Wool
from 4.40 $ /50g
Get the yarn to make this pattern from 4.40$.

The yarn cost is calculated from the pattern’s smallest size and the yarn’s cheapest product type. Looking for an even better price? You might find it on the DROPS Deals!

Pattern instructions

NOTE: This pattern is written in American English. All measurements in charts are in cm. Convert from inches to cm here. There are different terms for crocheting in American and British English. If this pattern includes crochet, convert "crochet terms" here. See this pattern in British English here.
-------------------------------------------------------

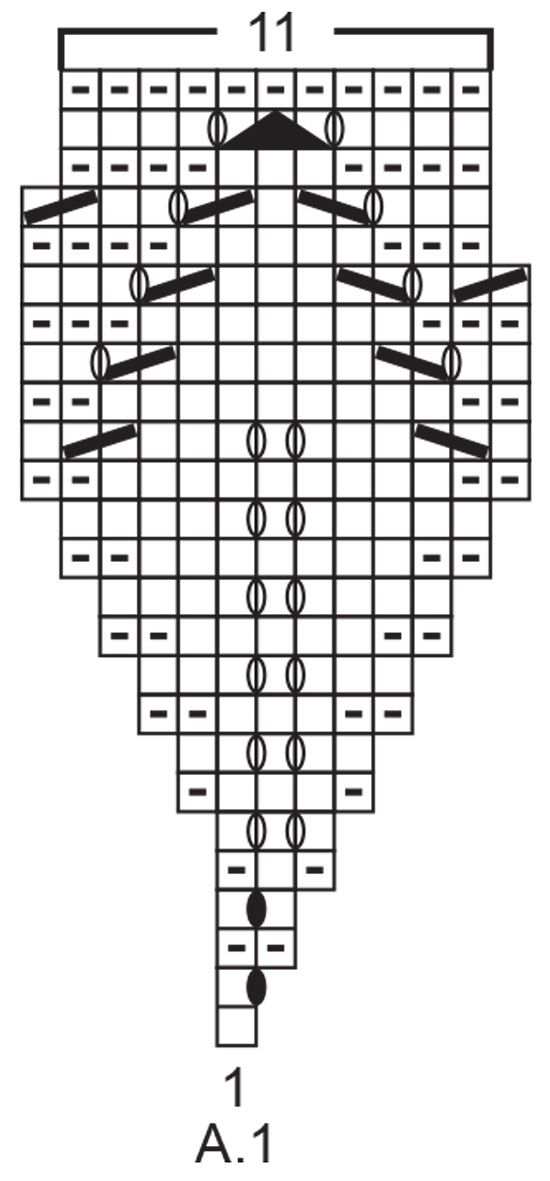
EXPLANATIONS FOR THE PATTERN:

-------------------------------------------------------
RIDGE/GARTER STITCH (worked back and forth):
Knit all rows.
1 ridge in height = Knit 2 rows.

PATTERN:
See diagram A.1. The diagram shows all rows in the pattern seen from the right side.
-------------------------------------------------------

START THE PIECE HERE:

-------------------------------------------------------

BONNET – SHORT OVERVIEW OF THE PIECE:
The piece is worked back and forth with circular needle or double pointed needles, from mid back.

Cast on 7-8-9 stitches with circular needle size 2.5 mm = US 1,5 and Baby Merino. Start from the wrong side and work A.1 back and forth (= 7-8-9 repeats of A.1). When A.1 has been completed there are 77-88-99 stitches on the needle. Insert 1 marker – THE PIECE IS NOW MEASURED FROM HERE!
Work GARTER STITCH back and forth – see description above. When the piece measures 9-10-11 cm = 3½"-4"-4⅜" from the marker, bind off with a picot-edge as described below.

BIND-OFF EDGE WITH PICOT:
Bind off from the right side as follows: Knit 1, (* insert the right needle between the first 2 stitches on the left needle; i.e. between the stitches on the needle not through the stitches, make 1 yarn over the right needle and pull it between the 2 stitches and place it on the left needle *, work from *-* 2 more times, so there are 3 new stitches on the left needle. ** Knit the first stitch on the left needle, pass the first stitch on the right needle over the last stitch worked **), work from **-** a total of 5 times. Repeat from (-) along the whole edge until there is 1 stitch left on the left needle. Cut the strand and pull it through the last stitch.

ASSEMBLY:
Sew the bonnet together mid back, along A.1 – sew in the outermost loop of the outermost stitch so the seam is flat and continue the seam approx. 2 cm = ¾" along the garter stitch section. Cut and fasten the strand.

TIE-CORDS:
Work back and forth with 2 double pointed needles size 2.5 mm = US 1,5. Knit up 4 stitches on the one side of the bind-off edge.
Knit 4, * do not turn the piece, but push the stitches to the other end of the needle, take the strand behind these 4 stitches, tighten and knit the 4 stitches again from the right side *, work from *-* until the cord measures 22-24-26 cm = 8¾"-9½"-10¼", bind off and fasten the strand. Work the other cord in the same way on the other side of the bind-off edge.

Diagram

All measurements in charts are in cm.

knit from right side, purl from wrong side<br />
= knit from right side, purl from wrong side
purl from right side, knit from wrong side<br />
= purl from right side, knit from wrong side
between 2 stitches make 1 yarn over; on the next row (wrong side) knit or purl the yarn over as shown in the diagram to leave a hole<br />
= between 2 stitches make 1 yarn over; on the next row (wrong side) knit or purl the yarn over as shown in the diagram to leave a hole
between 2 stitches make 1 yarn over; on the next row (wrong side) knit-twisted or purl-twisted the yarn over as shown in the diagram to avoid a hole<br />
= between 2 stitches make 1 yarn over; on the next row (wrong side) knit-twisted or purl-twisted the yarn over as shown in the diagram to avoid a hole
knit 2 together<br />
= knit 2 together
slip 1 stitch as if to knit, knit 1 and pass the slipped stitch over the knitted stitch<br />
= slip 1 stitch as if to knit, knit 1 and pass the slipped stitch over the knitted stitch
slip 1 stitch as if to knit, knit 2 together and pass the slipped stitch over the knitted-together stitches<br />
= slip 1 stitch as if to knit, knit 2 together and pass the slipped stitch over the knitted-together stitches
Diagram for DROPS Baby 33-14
Do you have a question? See a list of frequently asked questions (FAQ)

Knitting tension is what determines the final measurements of your work, and is usually measured per 10 x 10 cm. It is provided like so: number of stitches in width x number of rows in height - eg: 19 stitches x 26 rows = 10 x 10 cm.

The knitting tension is very individual; some people knit/crochet loosely while others work tightly. You adjust the knitting tension with the needle size, which is why the suggested needle size only serve as a guide! You need to adjust this (up or down) to ensure that YOUR knitting tension matches the knitting tension provided in the pattern. If you work with a different knitting tension than provided you will have a different yarn consumption, and your work will have different measurements than what the pattern suggests.

The knitting tension also determines which yarns can replace each other. As long as you achieve the same knitting tension you can replace one yarn with another.

See DROPS lesson: How to measure your tension/gauge

See DROPS video: How to make a gauge tension swatch

The required amount of yarn is provided in grams, eg: 450 g. To calculate how many balls you’ll need you first need to know how many grams are in 1 ball (25g, 50g or 100g). This information is available if you click on the individual yarn quality on our pages. Divide the amount required with the amount of each ball. For example, if each ball is 50g (the most common amount), the calculation will be as follows: 450 / 50 = 9 balls.

The important thing when changing from one yarn to another is that the knitting/crochet tension remains the same. This is so that the measurements of the finished piece will be the same as on the sketch provided. It is easier to achieve the same knitting tension using yarns from the same yarn group. It is also possible to work with multiple strands of a thinner yarn to achieve the knitting tension of a thicker one. Please try our yarn converter. We recommend you to always work a test swatch.

Please NOTE: when changing yarn the garment might have a different look and feel to the garment in the photo, due to individual properties and qualities of each yarn.

See DROPS lesson: Can I use a different yarn than the one mentioned in the pattern?

All our yarns are categorised into yarn groups (from A to F) according to thickness and knitting tension – group A contains the thinnest yarns and group F the thickest. This makes it easier for you to find alternative yarns to our patterns, should you wish to switch yarn. All yarns within the same group have a similar knitting tension and can easily replace each other. However, different yarn qualities have different structures and properties which will give the finished work a unique look and feel.

Click here for an overview of the yarns in each yarn group

At the top of all our patterns you’ll find a link to our yarn converter, which is a helpful tool should you wish to use a different yarn than suggested. By filling in the yarn quality you wish to replace, the amount (in your size) and number of strands, the converter will present good alternative yarns with the same knitting tension. Additionally it will tell you how much you’ll require in the new qualities and whether you’ll need to work with multiple strands. Most skeins are 50g (some are 25g or 100g).

If the pattern is worked with multiple colours, every colour will have to be converted separately. Similarly, if the pattern is worked with several strands of different yarns (for example 1 strand Alpaca and 1 strand Kid-Silk) you will have to find alternatives for each, individually.

Click here to see our yarn converter

Since different yarns have different qualities and textures we have chosen to keep the original yarn in our patterns. However, you can easily find options among our available qualities by using our yarn converter, or simply pick a yarn from the same yarn group.

It is possible that some retailers still have discontinued yarns in stock, or that someone has a few skeins at home that they would like to find patterns for.  

The yarn converter will provide both alternative yarn as well as required amount in the new quality.

If you think it's hard to decide what size to make, it can be a good idea to measure a garment you own already and like the size of. Then you can pick the size by comparing those measures with the ones available in the pattern's size chart.

You'll find the size chart at the bottom of the pattern.

See DROPS lesson: How to read size chart

The needle size provided in the pattern serves only as a guide, the important thing is to follow the knitting tension. And since knitting tension is very individual, you will have to adjust the needle size to ensure that YOUR tension is the same as in the pattern – maybe you’ll have to adjust 1, or even 2 needle sizes, up or down to achieve the correct tension. For this, we recommend that you work test swatches.

Should you work with a different knitting tension than the one provided, the measurements of the finished garment might deviate from the measurement sketch.

See DROPS lesson: How to measure your tension/gauge

See DROPS video: How to make a gauge tension swatch

Working a garment top-down provides more flexibility and room for personal adjustment. For example it is easier to try the garment on while working, as well as making adjustments to length of yoke and shoulder caps.

The instructions are carefully explaining every step, in the correct order. Diagrams are adjusted to the knitting direction and are worked as usual.

The diagram depicts all rows/rounds, and every stitch seen from the right side. It is read from bottom to top, from right to left. 1 square = 1 stitch.

When working back and forth, every other row is worked from the right side and every other row is worked from the wrong side. When working from the wrong side, the diagram will have to be worked reversed: from left to right, knit stitches are purled, purl stitches are knit etc.

When working in the round every round is worked from the right side and the diagram are worked from right to left on all rounds.

See DROPS lesson: How to read knitting diagrams

The diagram depicts all rows/rounds, and every stitch seen from the right side. It is worked from bottom to top, from right to left.

When working back and forth every other row is worked from the right side: from right to left and every other row is worked from the wrong side: from left to right.

When working in the round, every row in the diagram are worked from the right side, from right to left.

When working a circular diagram you start in the middle and work your way outwards, counter clockwise, row by row.

The rows usually start with a given number of chain stitches (equivalent to the height of the following stitch), this will either be depicted in the diagram or explained in the pattern.

See DROPS lesson: How to read crochet diagrams

Instructions for working several diagrams after each other on the same row/round, will often be written like so: “work A.1, A.2, A.3 a total of 0-0-2-3-4 times". This means you work A.1 once, then A.2 is worked once, and A.3 is repeated (in width) the number of times provided for your size – in this case like so: S = 0 times, M = 0 times, L=2 times, XL= 3 times and XXL = 4 times.

The diagrams are worked as usual: begin with the first row in A.1, then work the first row in A.2 etc.

See DROPS lesson: How to read knitting diagrams

See DROPS lesson: How to read crochet diagrams

The total width of the garment (from wrist-to-wrist) will be larger in the larger sizes, despite the actual sleeves being shorter. The larger sizes have longer sleeve caps and wider shoulders, so there will be a good fit in all sizes.

The measurement sketch/schematic drawing provides information regarding the full length of the garment. If it’s a jumper or a jacket the length is measured from the highest point on the shoulder (usually closest to the neckline), and straight down to the bottom of the garment. It is NOT measured from the tip of shoulder. Similarly, the length of yoke is measured from the highest point on the shoulder and down to where yoke is split into body and sleeves.

See DROPS lesson: How to read a schematic drawing

Diagrams are often repeated on the round or in height. 1 repeat is the diagram the way it appears in the pattern. If it says to work 5 repeats of A.1 in the round, then you work A.1 a total of 5 times after/next to each other in the round. If it says to work 2 repeats of A.1 vertically/in height you work the entire diagram once, then begin again at the start and work the entire diagram one more time.

Chain stitches are slightly narrower than other stitches and to avoid working the cast-on edge too tight, we simply chain more stitches to begin with. The stitch count will be adjusted on the following row to fit the pattern and measurement sketch.

The rib edge is more elastic and will contract slightly compared to, for example, stocking stitch. By increasing before the rib edge, you avoid a visible difference in width between the rib edge and the rest of the body.

It’s very easy to cast off too tightly, and by making yarn overs while casting off (and simultaneously casting these off) you avoid a too tight cast off edge.

See DROPS video: How to bind off with yarn overs (yo)

To achieve an even increase (or decrease) you can increase on, for example: every 3rd and 4th row alternately, like so: work 2 rows and increase on the 3rd row, work 3 rows and increase on the 4th. Repeat this until the increase is complete.

See DROPS lesson: Increase or decrease 1 st on every 3rd and 4th row alternately

Should you prefer to work in the round instead of back and forth, you may of course adjust the pattern. You’ll need to add steeks mid-front (usually 5 stitches), and follow the instructions. When you would normally turn and work from the wrong side, simply work across the steek and continue in the round. At the end you’ll cut the piece open, pick up stitches to work bands, and cover the cut edges.

See DROPS video: How to knit steeks and cut open

Should you prefer to work back and forth instead of in the round, you may of course adjust the pattern so you work the pieces separately and then assemble them at the end. Divide the stitches for the body in 2, add 1 edge stitch in each side (for sewing) and work the front and back pieces separately.

See DROPS lesson: Can I adapt a pattern for circular needles into straight needles?

Pattern repeats can vary slightly in the different sizes, in order to get the correct proportions. If you’re not working the exact same size as the garment in the photo, yours might deviate slightly. This has been carefully developed and adjusted so that the complete impression of the garment is the same in all sizes.

Make sure to follow instructions and diagrams for your size!

If you have found a pattern you like which is available in women’s size it’s not very difficult to convert it to men’s size. The biggest difference will be the length of sleeves and body. Start working on the women size that you think would fit across the chest. The additional length will be worked right before you cast off for the armhole/sleeve cap. If the pattern is worked top-down you can add the length right after the armhole or before the first decrease on sleeve.

Regarding additional yarn amount, this will depend on how much length you add, but it is better with a skein too many than too few.

All yarns will have excess fibres (from production) that might come off as lint or shedding. Brushed yarns (ie hairier yarns) have more of these loose, excess fibres, causing more shedding.

Shedding also depends on what is worn under or over the garment, and whether this pulls at the yarn fibres. It’s therefore not possible to guarantee that there will be no shedding

Below are some tips on how to get the best result when working with hairier yarns:

1. When the garment is finished (before you wash it) shake it vigorously so the looser hairs come off. NOTE: do NOT use a lint roller, brush or any method that pulls at the yarn.

2. Place the garment in a plastic bag and put it in your freezer - the temperature will cause the fibres to become less attached to each other, and excess fibres will come off easier.

3. Leave in the freezer for a few hours before taking it out and shaking it again.

4. Wash the garment according to the instructions on the yarn label.

Pilling is a natural process that happens to even the most exclusive of fibers. It's a natural sign of wear and tear that is hard to avoid, and that is most visible in high friction areas of your garment like a sweater's arms and cuffs.

You can make your garment look as new by removing the pilling, using a fabric comb or a pill/lint remover.

Still can't find the answer you need? Then scroll down and leave your question so one of our experts can try to help you. This will be done normally within 5 to 10 working days.
In the meantime, you can read the questions and answers that others have left to this pattern or join the DROPS Workshop on Facebook to get help from fellow knitters/crocheters!

Post a comment to pattern DROPS Baby 33-14

We would love to hear what you have to say about this pattern!

If you want to leave a question, please make sure you select the correct category in the form below, to speed up the answering process. Required fields are marked *.

Comments / Questions (55)

country flag Strickliesel wrote:

Hallo, wie kommt man auf die Endzahlen? Die Strickschrift-Skizze ist einfach unmöglich abzuarbeiten. Meine Endzahl ist nun 102 Maschen, obwohl es ja laut Ihrer Beschreibung nur 77 sein dürfen. Für mich ist dieses Ergebnis einfach nur ganz schlimm!! Diese viele verschwendete Zeit. Sehr schade!

02.03.2025 - 08:25

DROPS Design answered:

Liebe Strickliesel, in A.1 wird man Maschen zuerst zunehmen dann abnehmen, so beginnt A.1 mit 1 Masche und endet mit 11 Maschen, A.1 wird in die 1. Größe 7 Mal gestrickt = 7 Maschen angeschlagen, 7 x 11 Maschen nach A.1 = 77 Maschen. Setzen Sie z.B. Markierer zwischen jedem A.1 ein, das kann Ihnen helfen zu schauen, ob Sie jeweils die richtige Maschenanzahl in jedem A.1 bei jeder Reihe haben. Viel Spaß beim Stricken!

03.03.2025 - 09:52

country flag REINE MARIE wrote:

Bonjour ,je viens vous remercier de vos explications qui m'ont été utiles ,j'ai réussi ce merveilleux petit béguin que j'aime beaucoup mais je ne l'ai pas entierement fini puisque j'en suis au point mousse ,.Merci encore de votre aide .Je vous souhaite un bon weekend .

28.02.2025 - 16:37

country flag REINE MARIE wrote:

Bonsoir ,je ne comprend pas j'ai bien réussi le dessin du diagramme mais je n ai que 34 rangs et le dessin est bien fait mais petit ,j ai tricoté avec Baby Mérinos et aiguille numéro 2,5.pouvez vous me dire comment faire ,me conseiller .Je vous remercie à l'avance .Bonne soirée .

27.02.2025 - 23:37

DROPS Design answered:

Bonjour Reine Marie, le diagramme fait ici 25 rangs en hauteur seulement, quand il est terminé, tricotez toutes les mailles au point mousse jusqu'à la hauteur indiquée pour la taille choisie. Pensez à bien vérifier votre échantillon et à garder la même tension: 51 rangs point mousse = 10 cm. Bon tricot!

28.02.2025 - 09:54

country flag REINE MARIE wrote:

C'est dommage que vous n'ayez pas une vidéo juste pour débuter l'ouvrage cela m'aurait bien aidée pour les premiers rangs à placer mes mailles ,bon je ne suis pas jeune mais je vais essayer sinon il me plait tellement ce petit bonnet .Merci encore

27.02.2025 - 18:23

country flag REINE MARIE wrote:

Un grand merci de votre bonne explication car je ne comprenais pas trop le début de plus que le diagramme se lit que sur l 'endroit , je voulais savoir aussi si les jetés font partis des augmentations ? je pense et j'espère que je vais réussir ce magnifique petit bonnet(béguin) pour ma future petite fille qui naîtra dans trois mois .Merci encore de votre réponse (je fais la plus petite taille . Bonne soirée à toute l'équipe de drops

27.02.2025 - 18:09

DROPS Design answered:

Bonjour Reine Marie, le diagramme se tricote en allers et retours, ainsi, sur l'endroit, vous le lisez de droite à gauche et sur l'envers de gauche à droite. Les jetés vont être tricotés soit torse (pour éviter un trou = ovale noir), soit dans le brin avant (ovale blanc, pour le point ajouré). Ils forment au début les augmentations, puis le point ajouré quand on diminue en même temps que l'on fait des jetés, puis on va diminuer plus que l'on va faire de jetés. Suivez juste bien le nombre de mailles dans chaque diagramme, mettez éventuellement un marqueur entre chaque motif pour mieux vous repérer. Bon tricot!

28.02.2025 - 09:21

country flag REINE MARIE wrote:

Bonjour ,ce petit béguin est très joli ,mais voilà je ne comprend pas du tout le début se commence t'il par le haut au dessus de la tête :car je commence par le diagramme mais j'aimerai savoir car en bas il y a 2 pointes sur le dessin .Comment dois commencer? Merci de votre réponse

27.02.2025 - 16:03

DROPS Design answered:

Bonjour Reine Marie, on commence par tricoter la fleur = le dos du bonnet en tricotant 7 à 9 fois A.1 en allers et retours, puis quand A.1 est terminé, on tricote au point mousse (la partie qui va du bas d'un côté jusqu'au bas de l'autre côté en passant par-dessus la tête. Les mailles rabattues avec picot se trouvent au niveau de l'ouverture, elles encadrent le visage. Vous faites ensuite la couture au milieu dos pour "fermer" les mailles de A.1 et terminer l'arrière du bonnet (prolongez la couture sur 2 cm après A.1). Bon tricot!

27.02.2025 - 17:07

country flag Charlotte wrote:

MEGET kringlet formuleret opskrift - især om Picolukning. Huen er yndig, selv med mindre egne fortolkninger...

22.02.2025 - 11:03

country flag Zehetleitner Sylvia wrote:

Die Anleitung funktioniert in meinen Augen tatsächlich nur, wenn man von vorne herein gleich in der Runde arbeitet . Erspart Missverständnisse beim Lesen der Anleitung, gleichzeitig ist die Mütze nahtlos. Die beschriebene Variante mit Hin. und Rückreihen ist schon sehr speziell und nicht sehr praktisch. LG aus Wien

30.01.2025 - 16:21

country flag Rosa wrote:

Non ho capito l'inizio della foglia dove inserire l'aumento sare molto grsts se mi date la spiegazione per realizzare il cappellino chr mi piace molto grazie

28.12.2024 - 18:26

DROPS Design answered:

Buonasera Rosa, a quale parte del modello sta facendo riferimento? Buon lavoro!

30.12.2024 - 00:17

country flag Silvia wrote:

Gibt es von diesem Muster auch eine kostenlose Anleitung für ein Babypulover? Danke

05.09.2024 - 15:29

DROPS Design answered:

Liebe Silvia, es gibt dazu nur eine Anleitung für die Jacke, die finden Sie hier, sonnst finden Sie alle Pullover für Baby hier. Viel Spaß beim Stricken!

06.09.2024 - 08:13