
Popular categories
Looking for a yarn?


Comments / Questions (58)
![]() Alvy wrote:
Alvy wrote:
Bonjour, je tricote la manche, et je viens de faire la 1ere augmentation sur la grille M3, je ne sais pas comment tricoter cette maille sup au rang suivant, je suppose que c'est à l'endroit (et la prochaine aug. sera ensuite tricotée à l'envers je suppose ?) et 2eme question, je fais bien une aug. au 3e rang ensuite ce sera 4 rangs plus loin , et ensuite 3 rangs plus loin, et ensuite 4 rangs plus loin etc.. (ce n'est pas 3e rang, 4e, 3e, 4e....)merci de votre aide
13.11.2017 - 09:49DROPS Design answered:
Bonjour Mme Alvy, tricotez les augmentations comme dans le diagramme pour que le motif puisse continuer sans interruption. Quand vous augmentez alternativement tous les 3 et 4 rangs procédez comme expliqué ici 13.11.2017 - 11:09
![]() Uyan wrote:
Uyan wrote:
Bonjour!Je ne comprend pas l'emplacement des boutonnières,pourriez-vous'éclairer?s'il vous plaît.
12.08.2016 - 12:23DROPS Design answered:
Bonjour Mme Uyan, ouvrez les boutonnières en taille S à 29, 34, 39, 44, 39 et 54 cm (= 6 boutonnières) - en taille M/L à 30, 34.5, 39.5, 44, 49, 53.5 et 58 cm (= 7 boutonnières) et en taille XL à 32, 37, 42, 47, 52, 57 et 62 cm (= 7 boutonnières). Bon tricot!
15.08.2016 - 10:44
![]() Ingrid wrote:
Ingrid wrote:
Mönster 2B är 11 maskor brett, men antalet maskor som ska stickas i detta mönster är inte delbart med 11 :-(
25.05.2016 - 15:45
![]() Kristina Ramberg wrote:
Kristina Ramberg wrote:
Hej mönster 60-16 funkar inte antalet maskor för mönster 2a och 2b . Jag stickar 265 maskor och det går då inte jämnt upp för mönstret är inte delbart med 11 . Vi är fler som försökt och det funkar inte. Hur ska jag tänka istället tacksam för hjälp eftersom jag nu köpt garn till denna tröja och den ska bli en present
14.05.2016 - 16:04DROPS Design answered:
Hej, Du har 265 m stickar: 5 m moss-st, M.1A (=2m), 253 m av M.1B (= 23 ggr), 5 m moss-st = 265 m. Lycka till!
10.06.2016 - 09:26
![]() Ingrid wrote:
Ingrid wrote:
Mönster 2B är 11 maskor brett, men antalet maskor som ska stickas i detta mönster är inte delbart med 11 :-(
13.05.2016 - 19:24
![]() Claudia wrote:
Claudia wrote:
Danke für die schnelle Antwort. Ich habe schon nach ähnlichen Mustern gesucht,aber ohne Erfolg. Ein bisschen habe ich mich auch in das Muster verliebt und ich gebe noch nicht auf 😀
10.05.2016 - 14:03
![]() Claudia wrote:
Claudia wrote:
Die Jacke ist toll...aaaber was ist denn mit dem Muster M2b m2a???? Das passt nicht..sieht merkwürdig aus freue mich über Hilfe
10.05.2016 - 00:08DROPS Design answered:
Liebe Claudia, siehe vorangehende Kommentare. Leider haben wir noch keine Korrektur erhalten, aber Sie können das Muster einfach durch ein ähnliches ersetzen, wenn Sie nicht so lange warten möchten.
10.05.2016 - 08:59
![]() Sigrid wrote:
Sigrid wrote:
Nein, dS meine ich nicht. Das hatte ich schon so verstanden. Aber dieses Muster sieht sehr merkwürdig aus und definitiv nicht so wie auf dem Bild mit der Jacke. Ich habe sogar ein extra Probestück mit 30Maschen gestrickt, weil ich dachte vei den vielen Maschen hätte ich was verkehrt gemach, aber das sieht genauso aus. Das ist überhaupt kein Muster zu erkennen
17.03.2016 - 09:19DROPS Design answered:
Liebe Sigrid, haben Sie gehsen, dass wir auf Ihre Frage geantwortet haben - mehrmals gesendete Posts mit gleichem Text werden von uns gelöscht. Danke für Ihr Verständnis.
17.03.2016 - 12:49
![]() Sigrid wrote:
Sigrid wrote:
Nein, dS meine ich nicht. Das hatte ich schon so verstanden. Aber dieses Muster sieht sehr merkwürdig aus und definitiv nicht so wie auf dem Bild mit der Jacke. Ich habe sogar ein extra Probestück mit 30Maschen gestrickt, weil ich dachte vei den vielen Maschen hätte ich was verkehrt gemach, aber das sieht genauso aus. Das ist überhaupt kein Muster zu erkennen
15.03.2016 - 22:43DROPS Design answered:
Liebe Sigrid, ich habe das Muster nun auch nachgestrickt und tatsächlich wird es bei mir auch etwas unregelmässig. Ich lasse nun Muster M2 bei der Designabteilung überprüfen. Dies wird einen Moment dauern, Danke für Ihre Geduld.
16.03.2016 - 08:22
![]() Sigrid wrote:
Sigrid wrote:
Hallo, Irgendetwas stimmt nicht mit der Anleitung für Muster 2. Könnten Sie das mal überprüfen. Vielen Dank
14.03.2016 - 22:55DROPS Design answered:
Liebe Sigrid, beziehen Sie sich auf Reihe 5? es sieht aus als wenn am Ende vor dem Umschlag das Symbol für "2 re zusstricken" fehlen würde, es ist aber nur ein halbes Symbol für den Umschlag gezeichnet, die andere Hälfte ist beim Anfang des Rapports. So geht das Muster auf.
15.03.2016 - 08:05
|
|||||||||||||||||||
Beach Love |
|||||||||||||||||||
|
|
|||||||||||||||||||
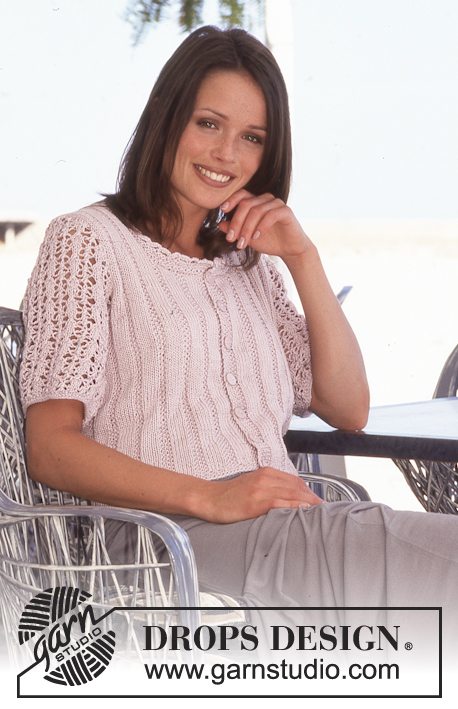
DROPS Cardigan in Muskat.
DROPS 60-16 |
|||||||||||||||||||
|
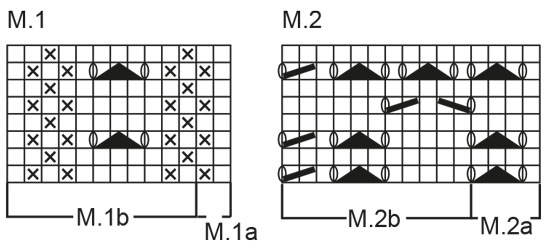
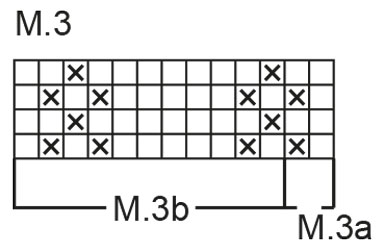
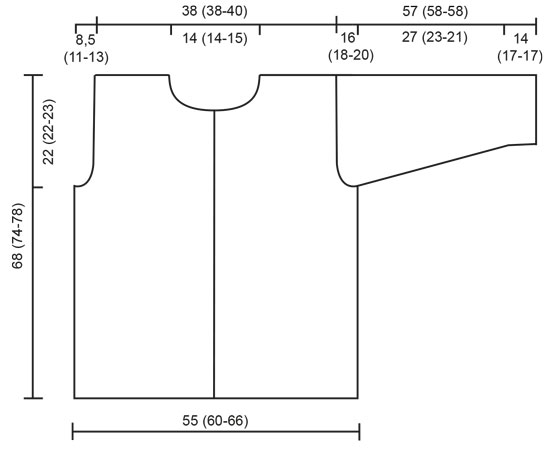
Gauge: 21 sts x 28 rows in stockinette st = 10 x 10 cm [4" x 4"]. Garter st, when knitting flat: Knit all sts, all rows. Pattern: See chart (1 chart = 1 repeat). The pattern is seen from the right side. Buttonholes: Make buttonholes on the right front as follows: bind off the 3rd and 4th sts and cast on 2 new sts over the bound-off sts on the next row when the work measures: 29 (30-32) cm [11⅛" (11.75" - 12⅝")] 34 (34.5-37) cm [13⅜" (13⅝" - 14.5")] 39 (39.5-42) cm [15.25" (15.5" - 16.5")] 44 (44-47) cm [17.25" (17.25" - 18.5")] 49 (49-52) cm [19.25" (19.25" - 20.5")] 54 (53.5-57) cm [21.25" (21" - 22.5")] -- (58-62) cm [-- (22⅞" - 24⅜")] Seed stitch (on an even number of sts): Row 1: * K 1, P 1* Row 2: * P 1, K 1* Seed stitch (on an odd number of sts): All rows: K 1, *P 1, K 1* Seed stitch (worked in the round): Row 1: * knit 1, purl 1 * Row 2: * knit the purl sts from the previous row and purl the knit sts from the previous row * Body: Cast on 243 (265-287) sts (this includes 5 sts at each side for the button band). Knit 2 rows garter st, then 3 rows seed st. On the next row establish the pattern as follows: 5 sts seed st (button band), Pattern 1A, 231 (253-275) sts in Pattern 1B, 5 sts seed st (button band). Continue in pattern as established until the work measures 29 (30-32) cm [11⅜" (11.75" - 12⅝")], then establish the pattern on the next row as follows: 5 sts seed st (button band), Pattern 2A, 229 (251-273) sts in Pattern 2B, 5 sts seed st (button band). Continue in pattern as established -- make buttonholes on the right front (see instructions above) until the work measures 43 (47-49) cm [16⅞" (17.25" - 19.25")] - adjust for complete pattern. On the next row establish the pattern as follows: 5 sts seed st (button band), Pattern 3A, 231 (253-275) sts in Pattern 3B, 5 sts seed st (button band). Continue in pattern as established to finished dimensions. At the same time, when the work measures 46 (52-55) cm [18⅛" (20.5" - 21⅝")] knit the next row as follows: 59 (65-70) sts for the front, bind off 8 sts for armhole, 109 (119-131) sts for the back, bind off 8 sts for armhole, 59 (65-70) sts for the front. Knit the rest of each part separately. Front: = 59 (65-70) sts. Bind off for armholes every other row: 3 sts 3 (4-4) times, 2 sts 2 (3-5) times, dec 1 st 2 times = 44 (45-46) sts. On the row after the last buttonhole - when the work measures 54 (58-62) cm [21.25" (22⅞" - 24⅜")] - bind off for the neck every other row: 10 (11-11) sts 1 time, 3 sts 1 time, 2 sts 2 times, 1 st 2 times. Bind off when the work measures 68 (74-78) cm [26.75" (29⅛" - 30.75")]. Back: = 109 (119-131) sts. Bind off for armholes as on the front = 79 (79-83) sts. When the work measures 66 (72-76) cm [26" (28.25" - 29⅞")] bind off the center 25 (25-27) sts for the neck. Bind off 2 sts at each neck edge on the next row. Bind off when the work measures 68 (74-78) cm [26.75" (29⅛" - 30.75")]. Sleeves: Cast on 59 (59-59) sts and knit 2 rows garter st, then 3 rows seed st. On the next row establish the pattern as follows: K 1 (edge st knit in garter st throughout), Pattern 2A, 53 (53-53) sts in Pattern 2B, K 1 (edge st knit in garter st throughout). Continue in pattern as established until the work measures 14 (17-17) cm [5.5" (6.75" - 6.75")] - adjust for complete pattern. On the next row establish the pattern as follows: K 1 (edge st knit in garter st throughout), Pattern 3A, 55 sts in Pattern 3B, K 1 (edge st knit in garter st throughout). Continue in pattern as established and at the same time inc 1 st at each side (inside the edge st) 15 (15-16) times: Size S: alternately every 4th and 5th row Size M/L: alternately every 3rd and 4th row Size XL: every 3rd row = 89 (89-91) sts. Knit the increased sts into the Pattern as you go along. When the work measures 41 (40-38) cm [16⅛" (15.75" - 14⅞")] bind off for sleeve caps at each side every other row: 3 sts 2 (1-1) times, 2 sts 2 times, 1 st 15 (19-22) times, 2 sts 2 (3-2) times, 3 sts 2 (1-1) times, bind off. The work measures approx. 57 (58-58) cm [22.5" (22⅞" - 22⅞")]. Assembly: Sew shoulder seams. Pick up approx. 115-125 sts around the neck and knit 3 rows seed st, then 2 rows garter st, bind off. Sew sleeve seams. Crochet border: Crochet borders around the body, along the button bands, around the neck and around the sleeves as follows: 1st row: 1 single crochet (sc), * ch 4, skip over approx. 1.5 cm [⅝"], 1 sc *, repeat * - * 2nd row: 4 sc around every ch st loop, 1 sc in the sc from the previous row. Sew on the sleeves and the buttons. |
|||||||||||||||||||
Diagram explanations |
|||||||||||||||||||
|
|||||||||||||||||||
 |
|||||||||||||||||||
 |
|||||||||||||||||||
 |
|||||||||||||||||||
Have you finished this pattern?Tag your pictures with #dropspattern or submit them to the #dropsfan gallery. Do you need help with this pattern?You'll find 26 tutorial videos, a Comments/Questions area and more by visiting the pattern on garnstudio.com. © 1982-2026 DROPS Design A/S. We reserve all rights. This document, including all its sub-sections, has copyrights. Read more about what you can do with our patterns at the bottom of each pattern on our site. |
|||||||||||||||||||


With over 40 years in knitting and crochet design, DROPS Design offers one of the most extensive collections of free patterns on the internet - translated to 17 languages. As of today we count 324 catalogs and 12290 patterns - 12280 of which are translated into English (US/in).
We work hard to bring you the best knitting and crochet have to offer, inspiration and advice as well as great quality yarns at incredible prices! Would you like to use our patterns for other than personal use? You can read what you are allowed to do in the Copyright text at the bottom of all our patterns. Happy crafting!
Post a comment to pattern DROPS 60-16
We would love to hear what you have to say about this pattern!
If you want to leave a question, please make sure you select the correct category in the form below, to speed up the answering process. Required fields are marked *.